
San Francisco is a seriously photogenic city. Jess (my wife, who writes over at Independent Travel Cats) lived in the Bay Area for five years, and I spent three months living there with her in the early days of our relationship. So while I’d never claim to know San Francisco the way someone born and raised in the city does, the spots in this guide are ones we kept going back to, with a camera, in different weather, at different times of day.
This is also why this guide isn’t a generic listicle. For each location, I’ll tell you what lens I shot it with, when I went, what worked, what didn’t (more on this below), and what to do if Karl the Fog has eaten the city for the day. The shots in this guide are mine, taken on my Canon 6D with a wide-angle EF 17-40mm f/4L and a telephoto EF 70-200mm f/2.8L IS II, which is a typical “two-lens” travel kit for this kind of work. A few were taken on my Lumix G6 with the 14-42mm kit lens, which I used as a lighter backup body when hiking the headlands.
Let’s get started.
Table of Contents:
Shooting San Francisco’s fog (or, planning around Karl)
San Francisco has a fog problem, and the fog has a name. Locals call it Karl. If you’re shooting the city between roughly May and August, you should plan for Karl rather than hoping he doesn’t show up, because most days he will.
The thing to understand is that Karl behaves differently in different parts of the city. As a rough mental model:
- Fog-killed spots are anything at low elevation near the bay or the bridge: Baker’s Beach, Vista Point, the Pier 39 waterfront. If Karl is in, the bridge towers vanish and you’ll be shooting grey on grey.
- Fog-resilient spots (often above the marine layer) include Hawk Hill and the higher Marin Headlands viewpoints, plus Corona Heights. On the right kind of fog day you can shoot down onto the cloud, with the bridge towers poking out like a postcard.
- Fog-improved spots are Land’s End cliffs, Sutro Baths, Lombard with low cloud, and Mission District alleyways. Atmospheric weather suits ruins, cypress trees, tight street scenes, and anything where mood beats clarity.
- Fog-doesn’t-care spots are Chinatown, Castro, and the Mission District: indoors-leaning, colour-leaning, people-leaning shots, where fog isn’t really part of the picture.
A typical day in summer: morning fog, afternoon clearing inland (Mission, Castro, Financial District) while the coast stays socked in, then sometimes a clearing window around sunset if you’re lucky. Check the Bay Area fog cam before you head out, look at the marine-layer height in the local forecast, and have a fog plan B for whichever shoot you’re trying to do.
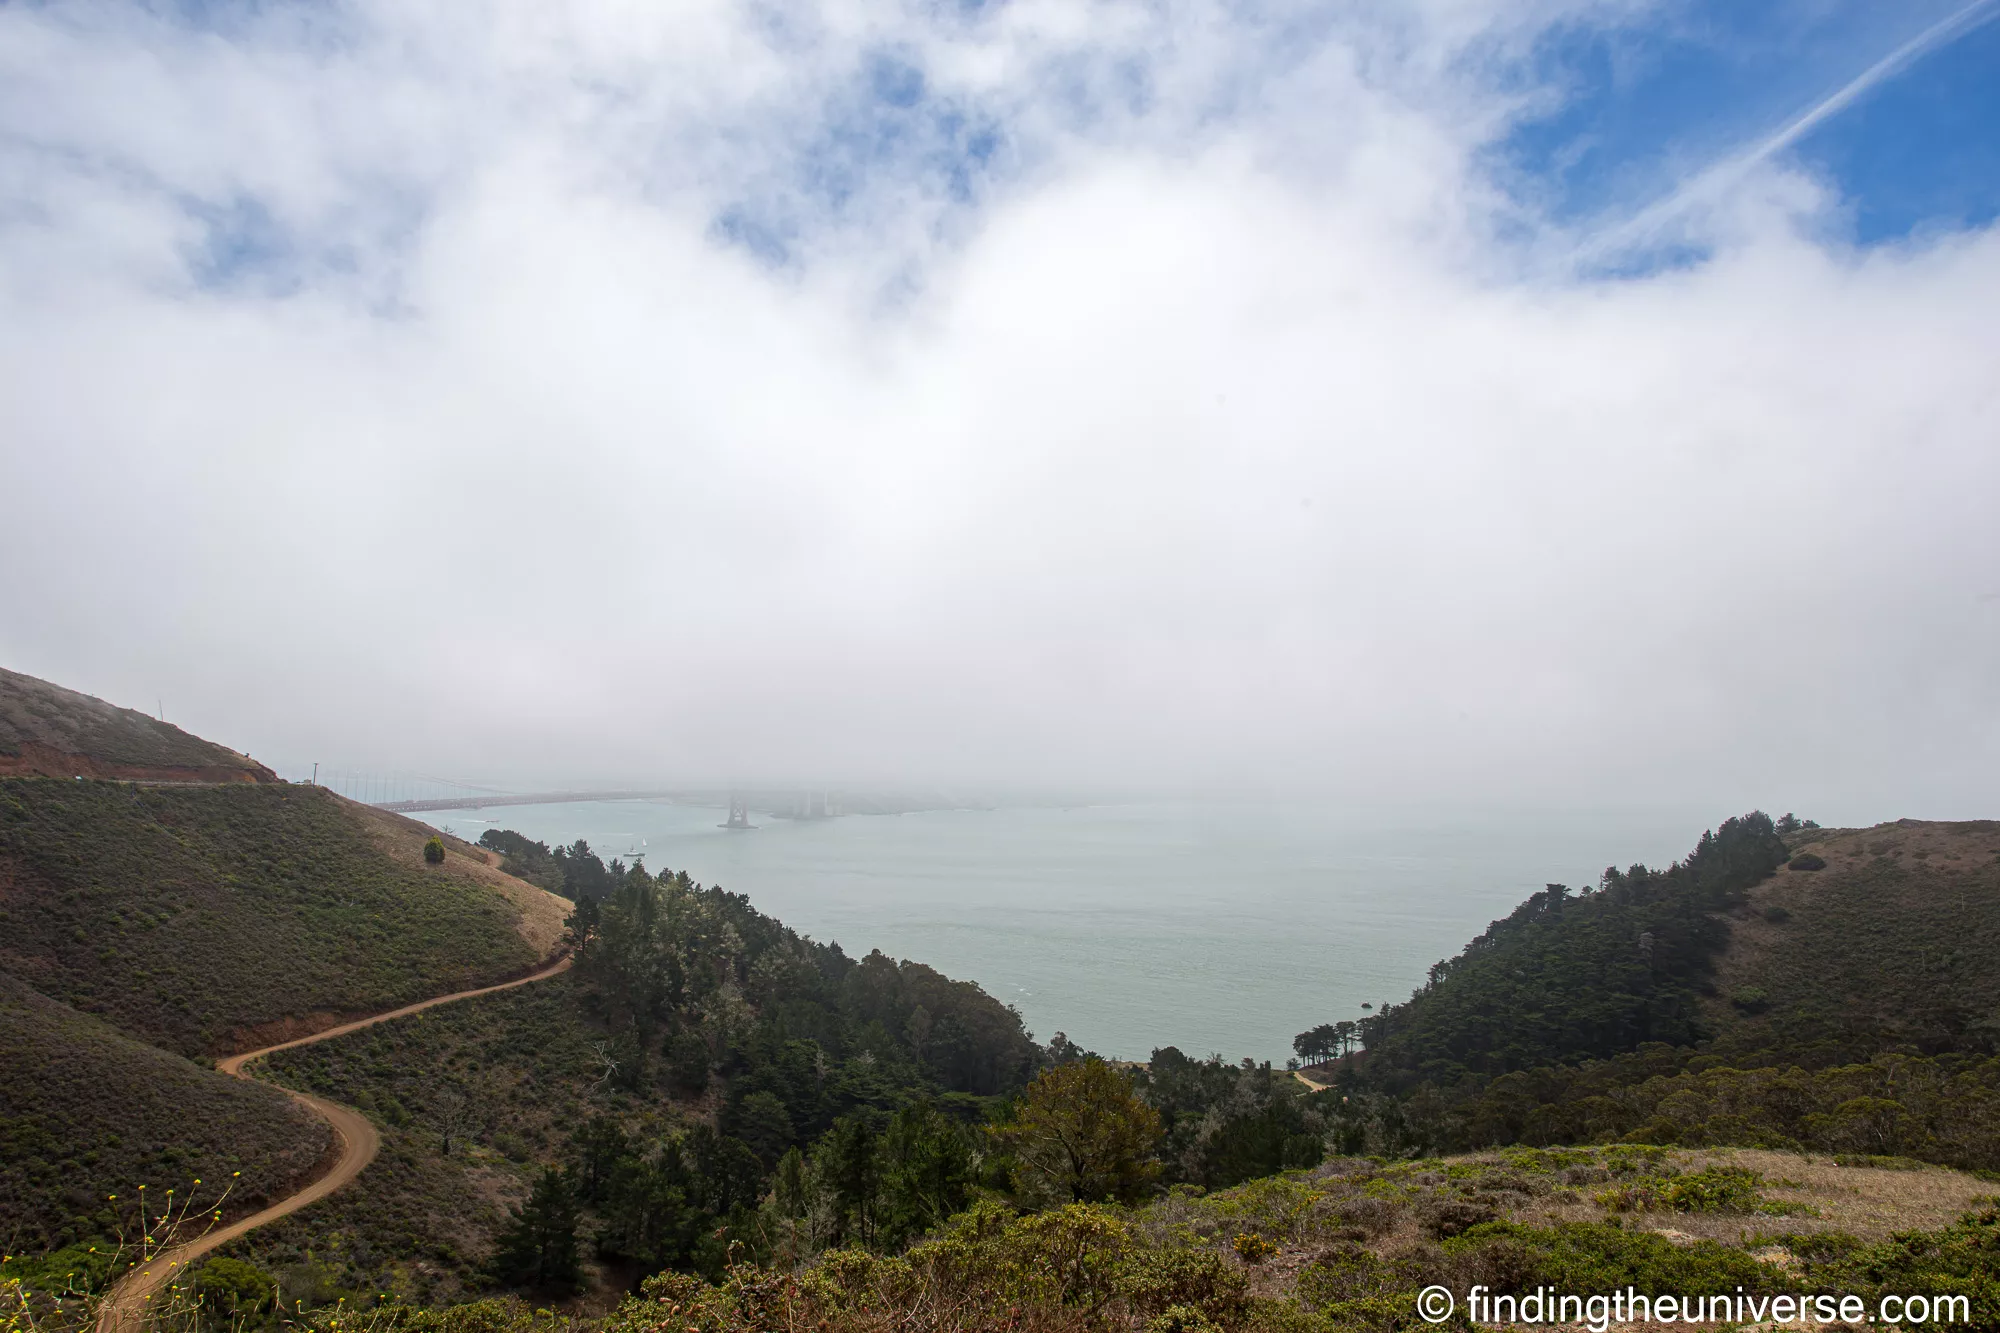
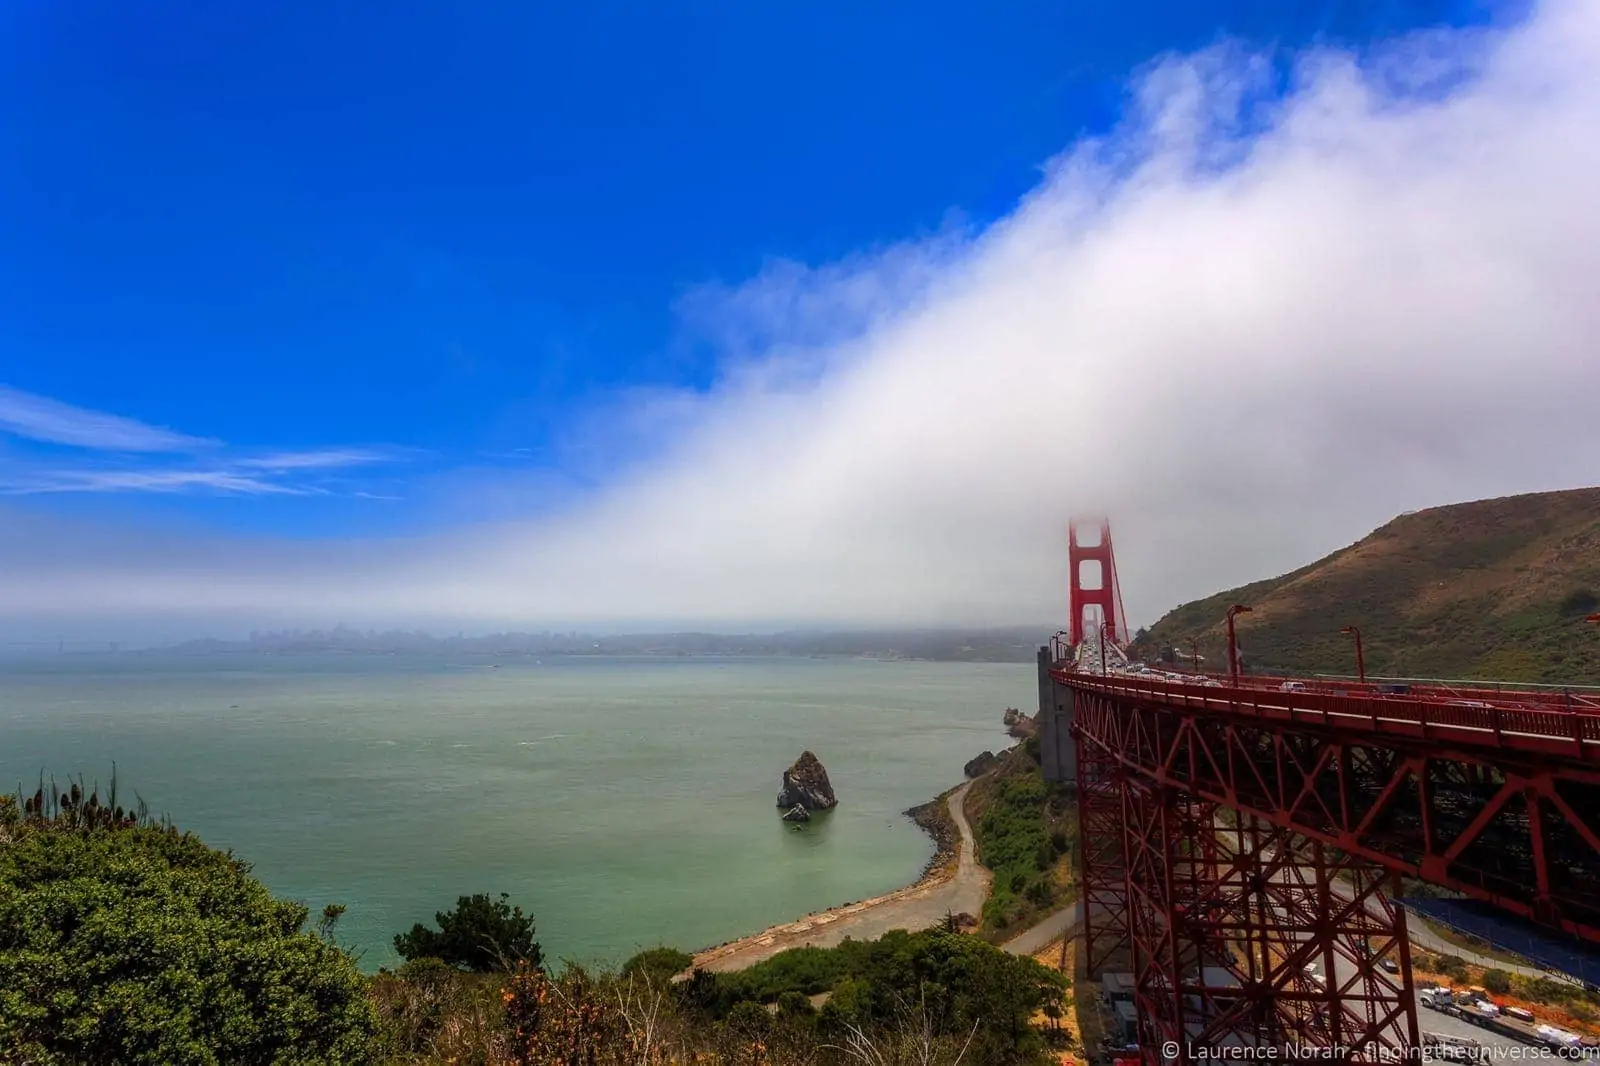
A worked example, from my own attempt at the Marin Headlands. We drove out one morning aiming for Hawk Hill, the postcard high-angle Golden Gate shot. Karl was in. Here’s the view I had, a perfectly nice photo of cloud, with the bay obscured beyond the shoreline:
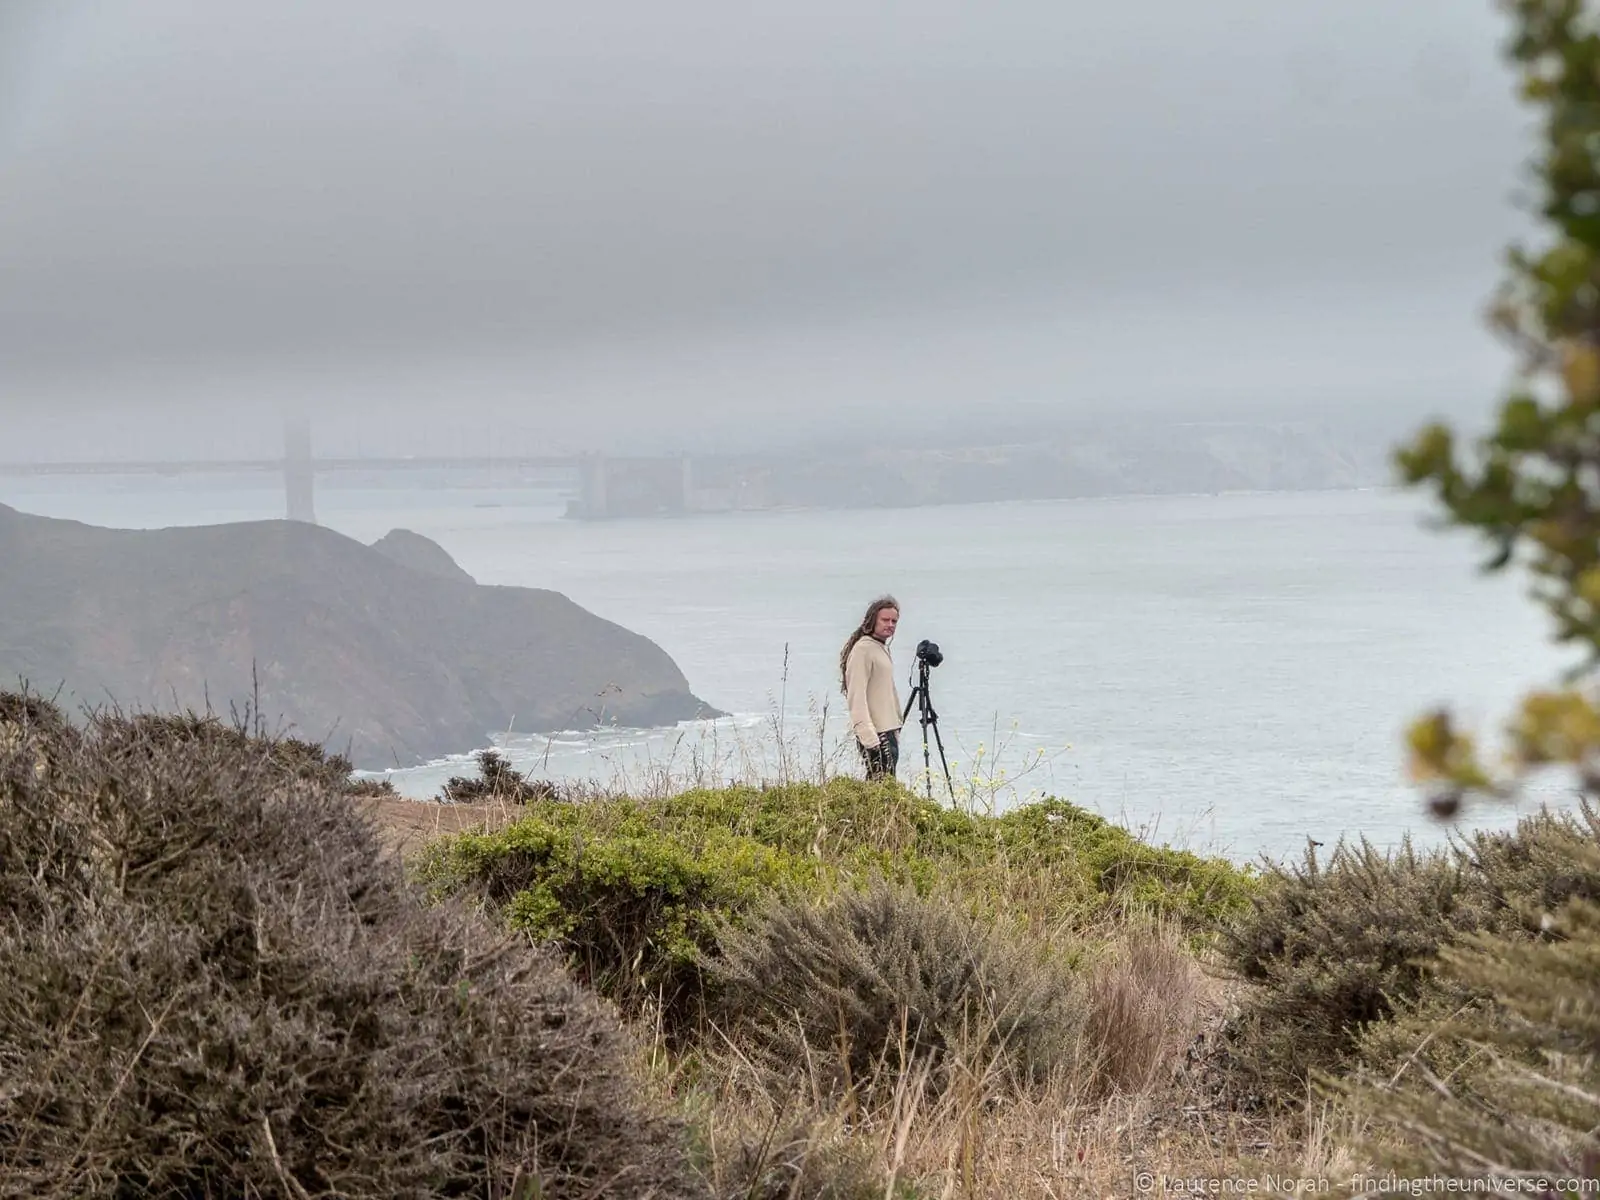
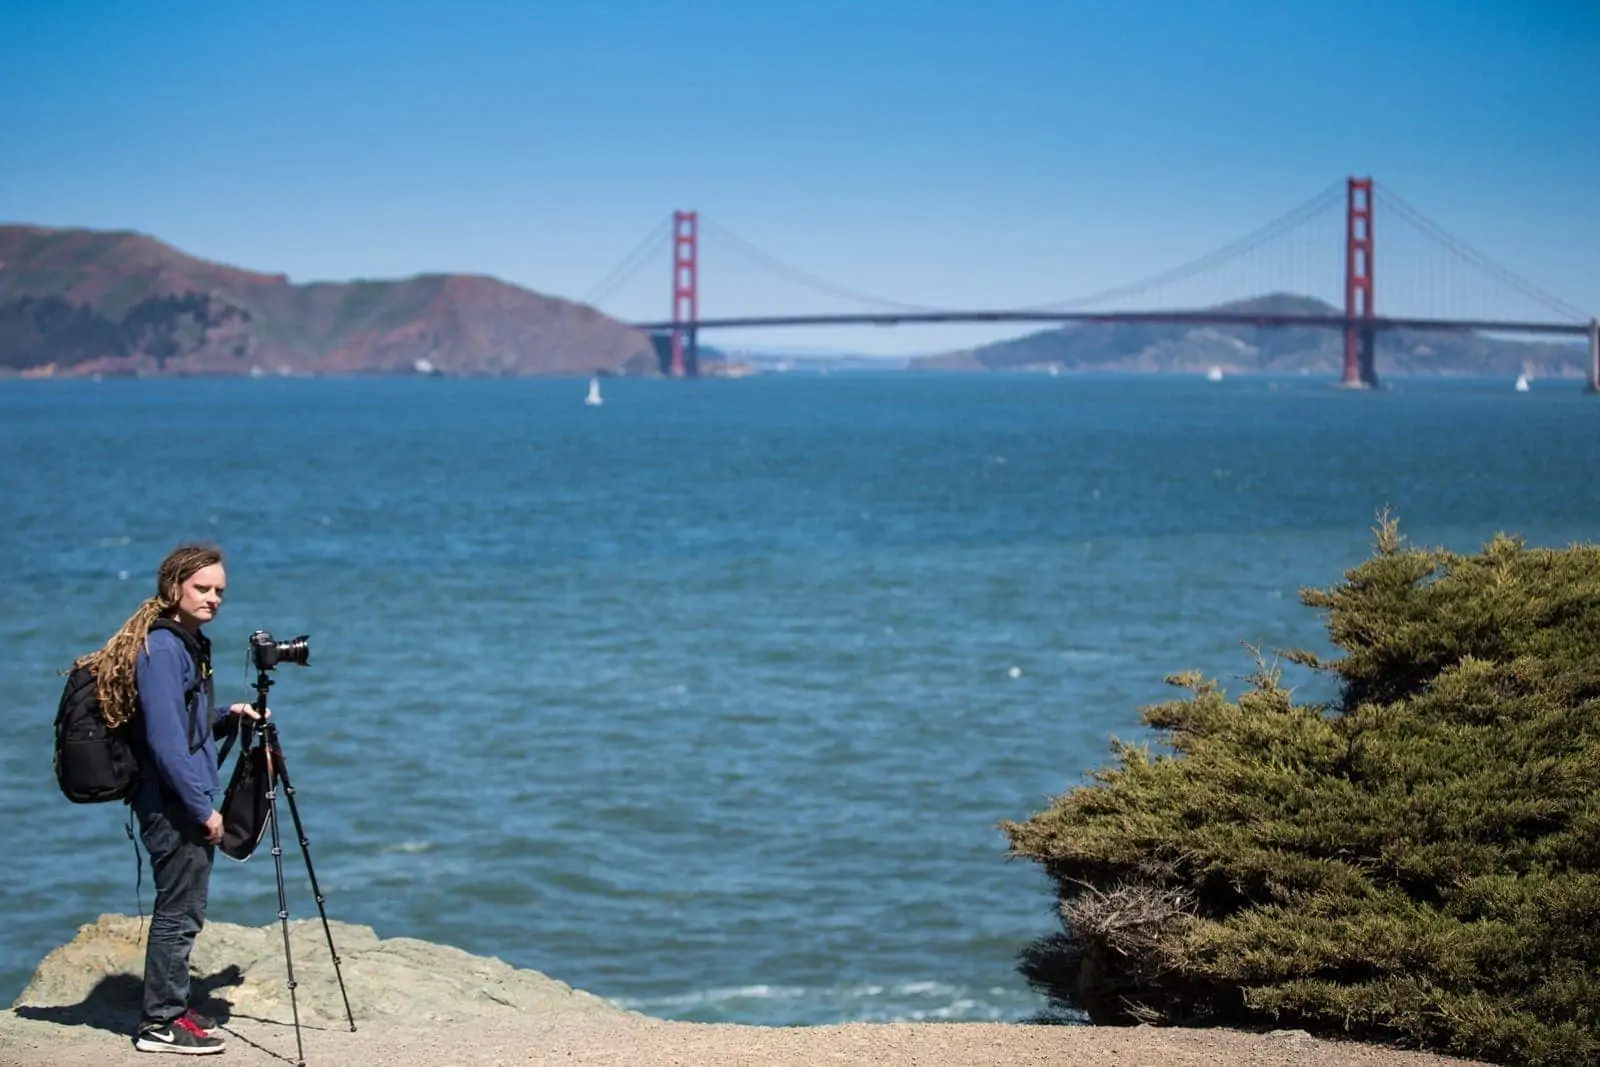
We wandered along the headlands road for a while, cloud rolling in over the bay behind me, looking for any vantage where the bridge was visible. This is what looking-for-the-shot looks like when Karl is winning:
We eventually moved back down the road to Battery Spencer, which is lower and closer to the bridge. From there we could finally see the towers properly, and got a usable shot. The lesson, as much as there is one: have a plan B, and accept that some days you’re not getting the shot you came for. Both photos in spot 2 below are from that same day, salvaged from what looked like a write-off.
The Best Photography Spots in San Francisco
With the fog briefing out of the way, here are my favourite spots for photography in San Francisco. They’re loosely ordered by area, bridge-from-the-south, bridge-from-the-north, west-side cliffs, downtown, then the colourful neighbourhoods. I’ve added shoot-route suggestions at the end so you can chain them by time of day.
If you want photos with you in them at any of these spots, have a look at our guide to taking photos of yourself for the techniques we use.
1. Baker’s Beach
Baker’s Beach is my favourite location in San Francisco for shooting the bridge from the south side. You park above the beach and walk down (a five-minute descent), and the view as the sun sets across the water is what brings me back. Walk left along the sand towards the bridge for closer shots, and watch the tide, the photogenic rocks at the south end make excellent foreground when you can get to them, but they cut you off pretty quickly when the tide comes in.
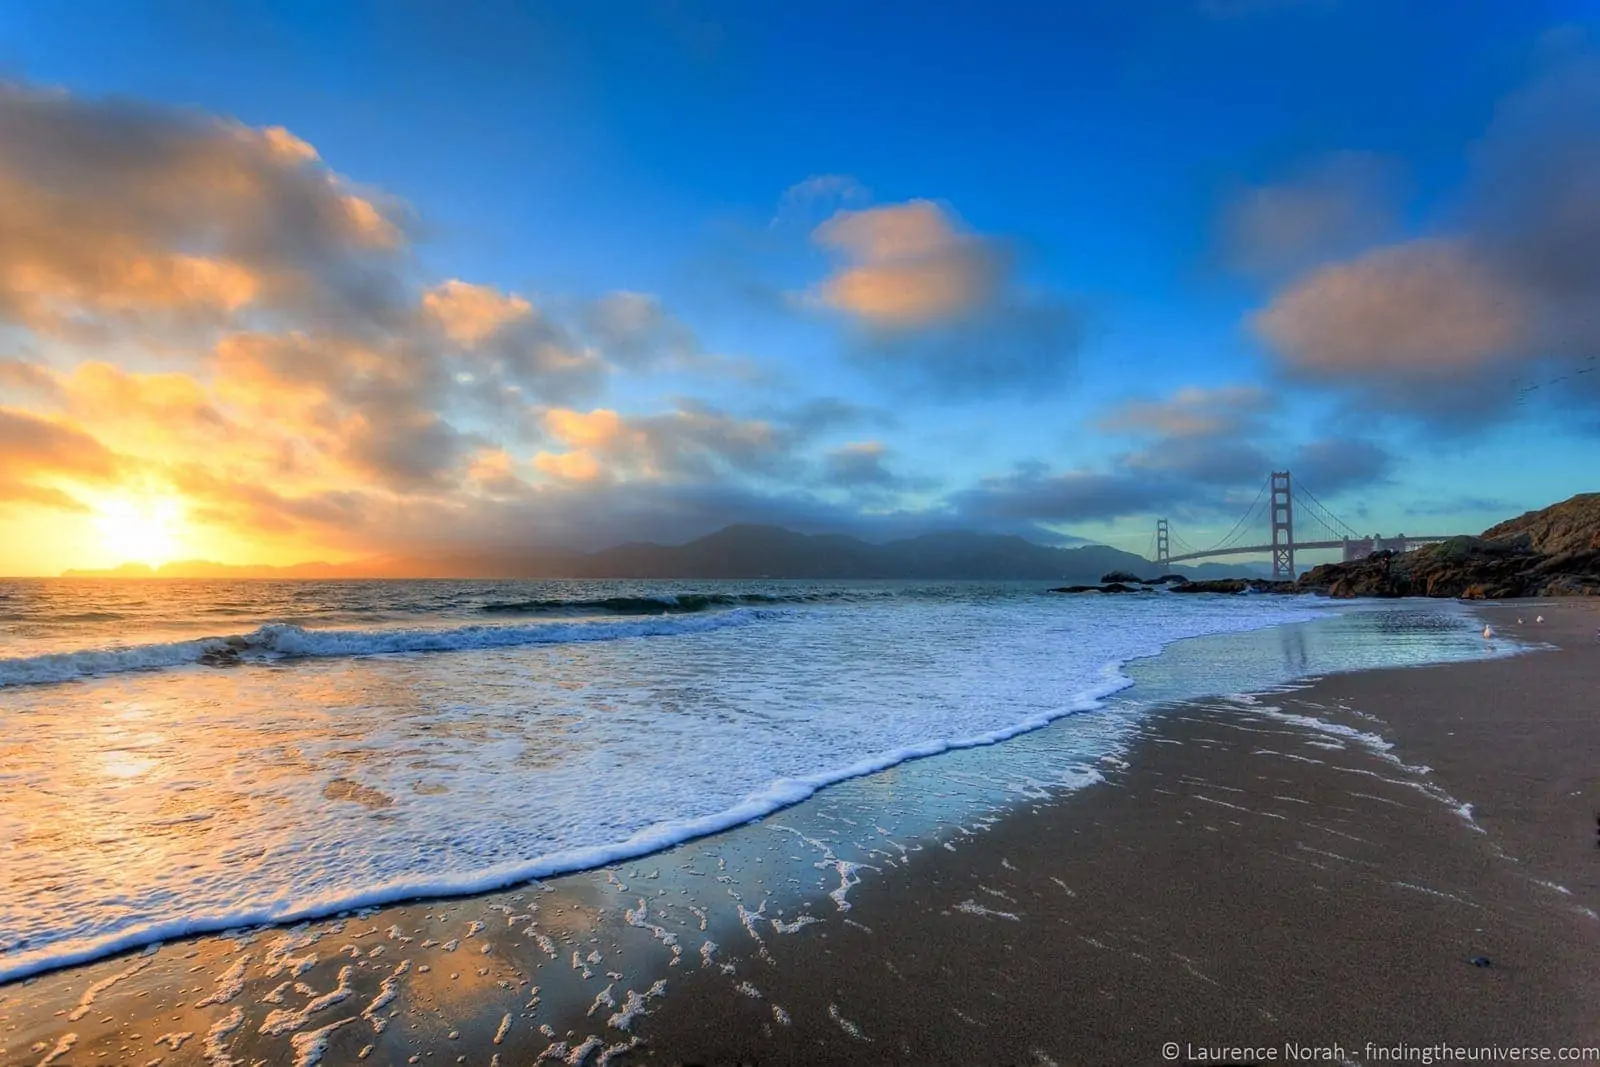
Craft notes: sunset is the time. The bridge faces roughly southeast from here, so the late evening light catches the western face of the towers and the colour of the sky behind. I shot the sunset wide above with the 17-40 at 17mm to take in the whole sweep of beach plus bridge plus sky.
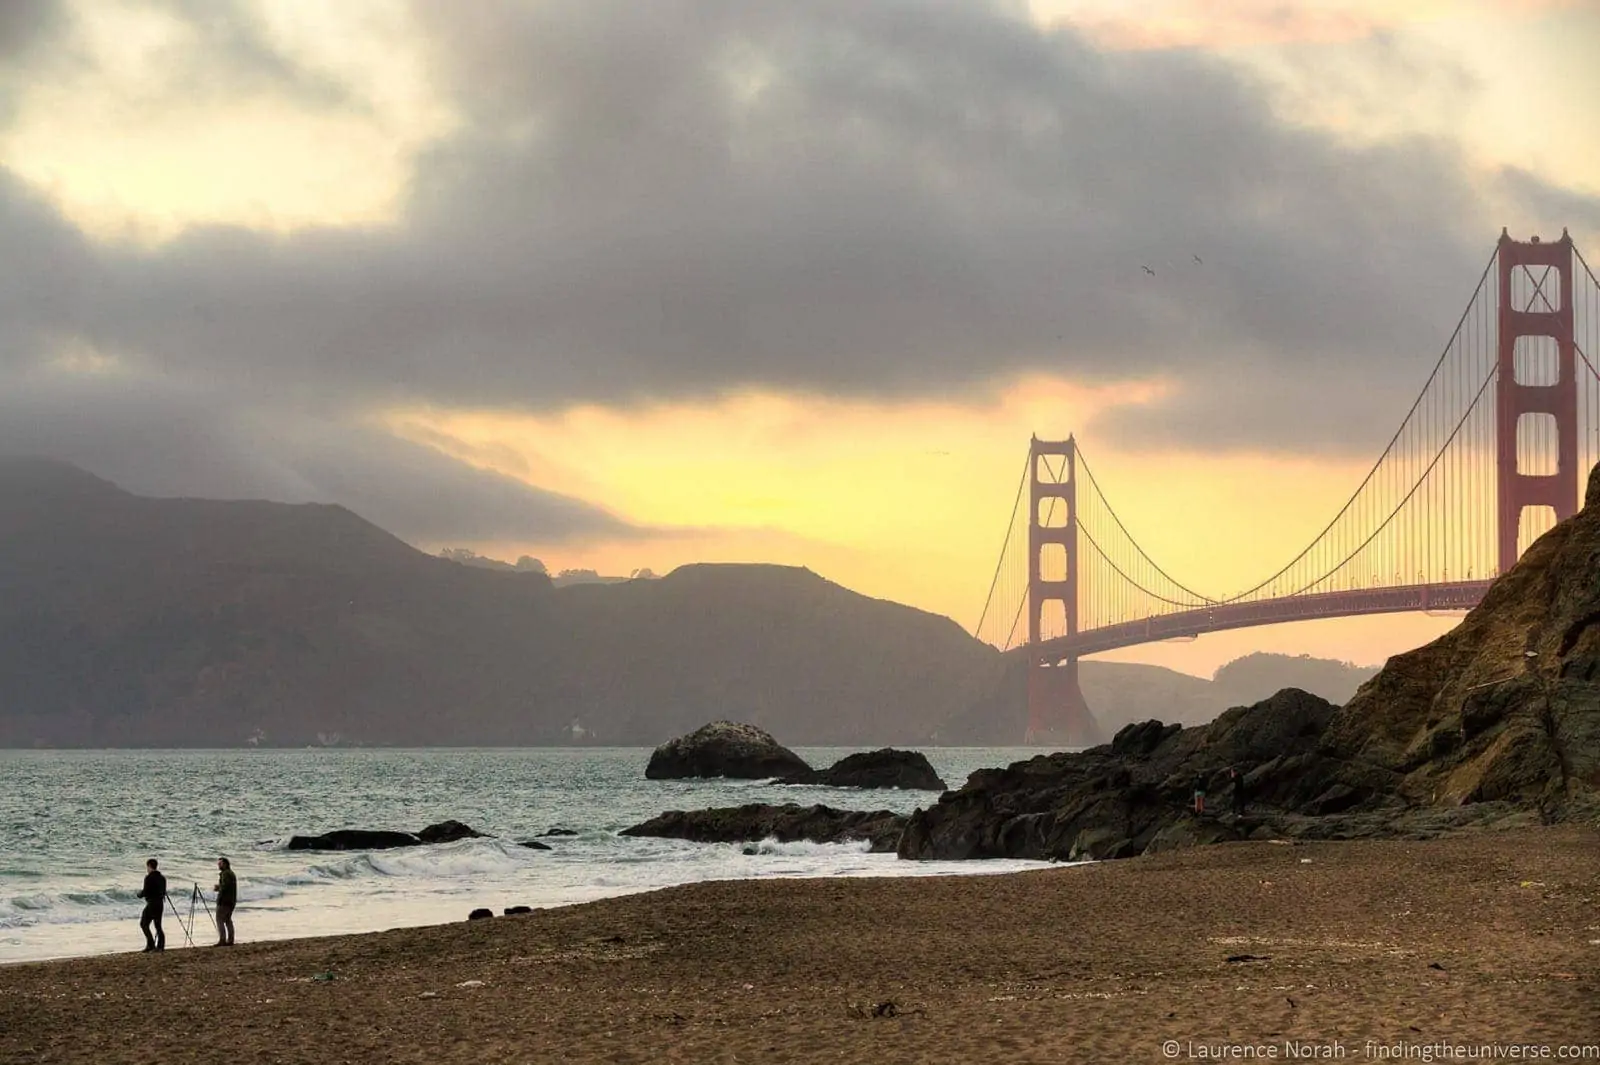
For a tighter, compressed look at the bridge itself I switched to the 70-200, the shot below was at 100mm f/7.1, 1/125s, ISO 800, handheld in the fading light. The other was at 105mm f/2.8 wide open, which gives that softened-background look but means you can’t get the bridge razor-sharp.

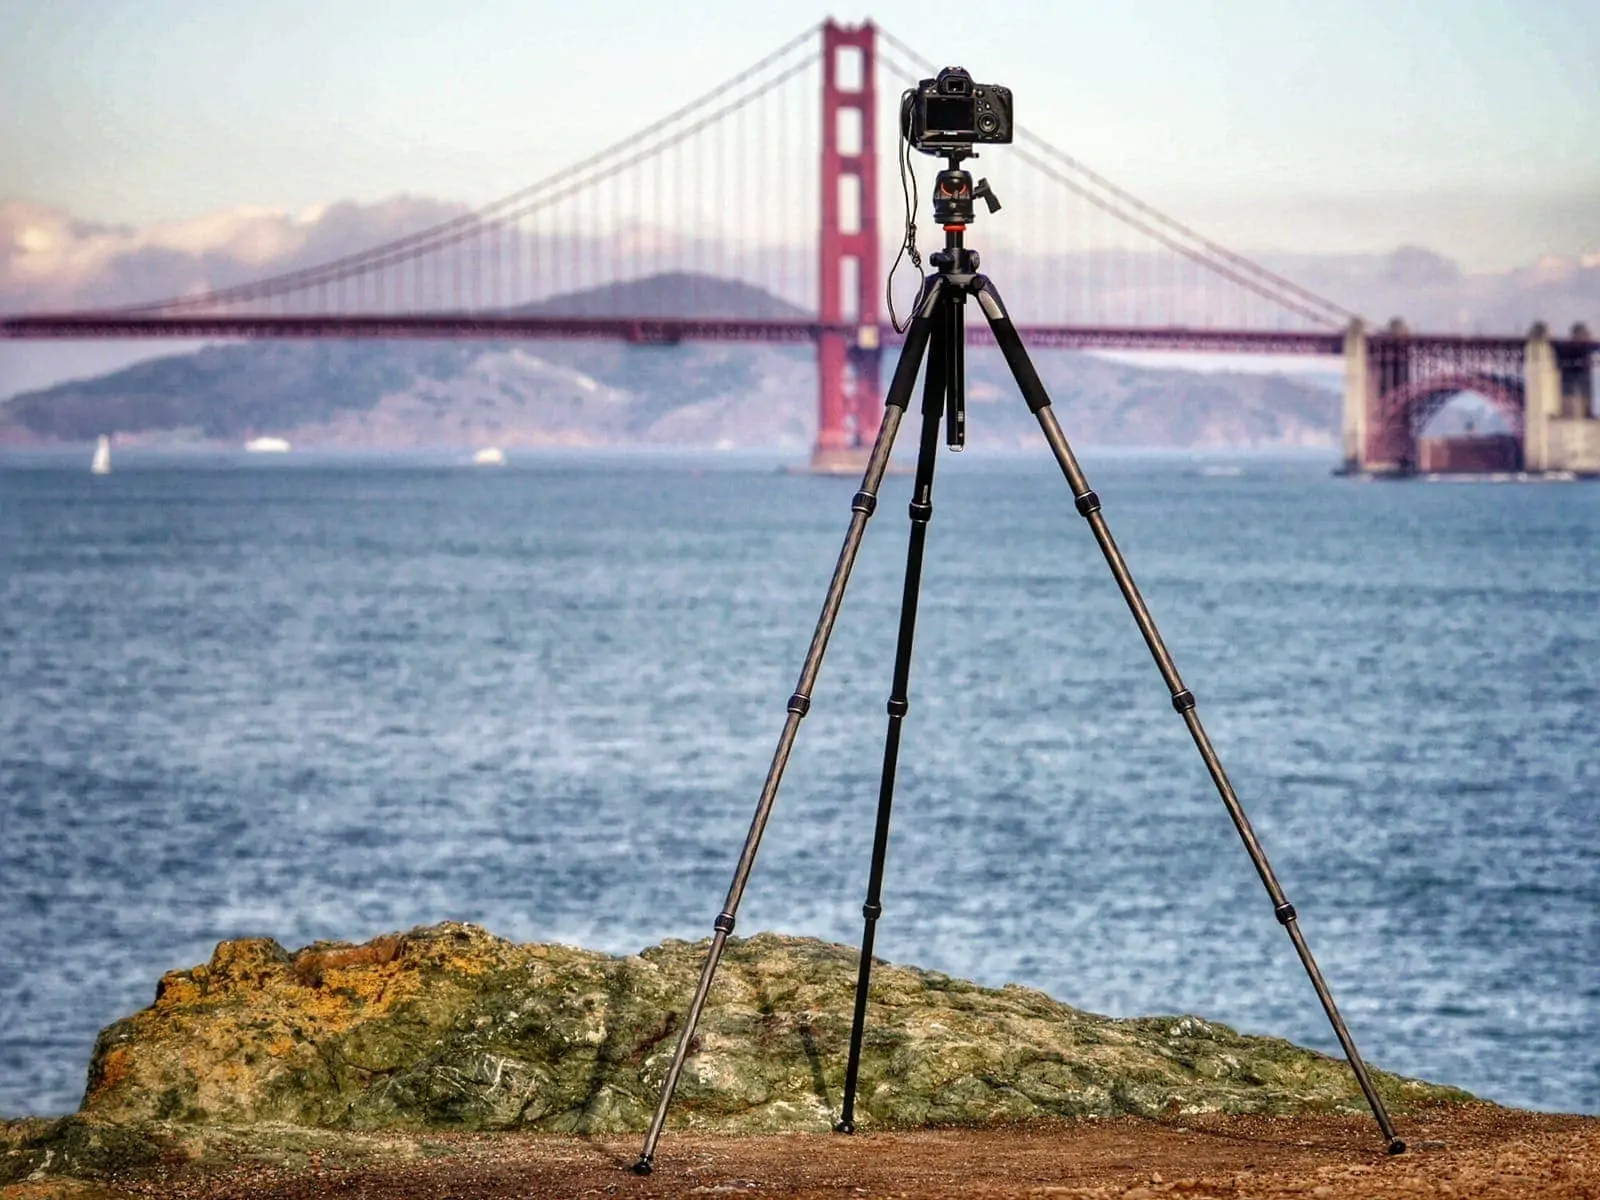
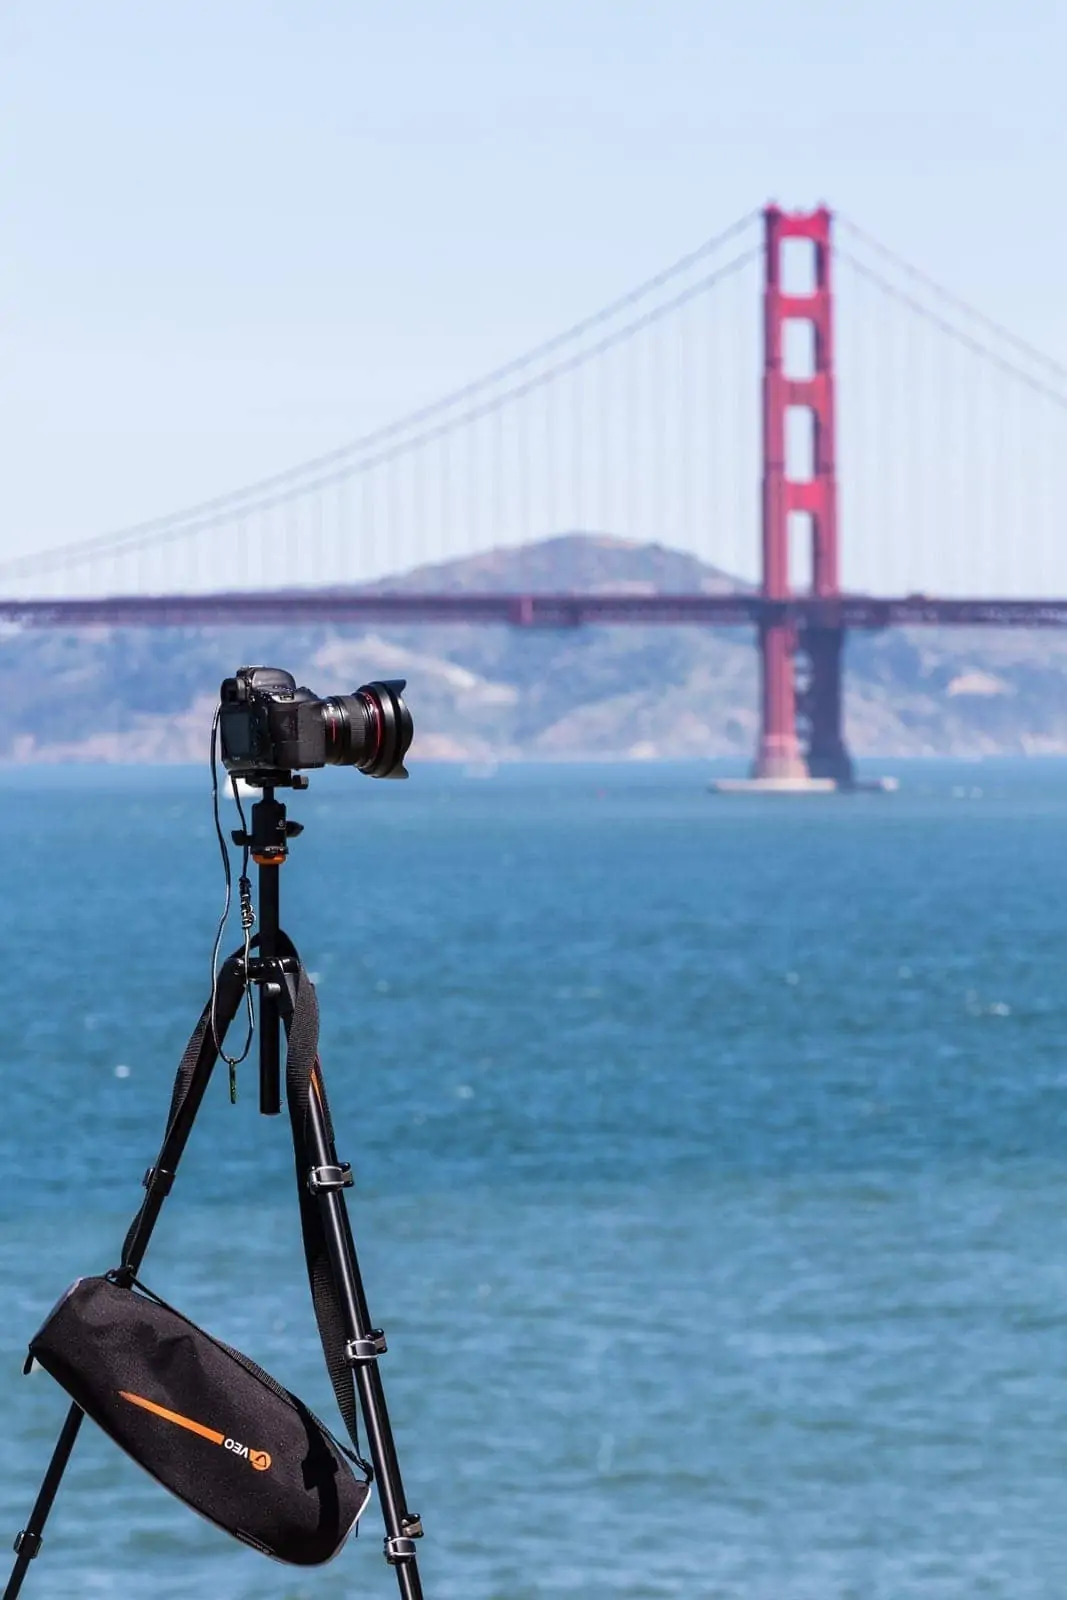
A tripod is worth it here if you’re staying past golden hour into blue hour, because shutter speeds drop fast once the sun is below the horizon. I was using my Vanguard VEO at the time, although these days I’d recommend something like the Peak Design Travel Tripod, it’s the one I take on most trips now.
Fog verdict: Karl-vulnerable. Summer afternoons here can lose the bridge entirely.
2. Battery Spencer and Vista Point
On the north side of the bay there are two easy spots to shoot the bridge from: Battery Spencer and Vista Point. Both are on the Marin side, both are within ten minutes of each other, and they give you very different shots.
Battery Spencer is a little higher and puts the city of San Francisco behind the bridge. On a clear day, anyway. As you can see from my shots, I didn’t have one. This was the salvage spot from the Karl-wins-the-day Marin Headlands wander I mentioned earlier, by the time we got down here, the bridge towers were at least visible, even if downtown SF behind them was just a wash of grey.
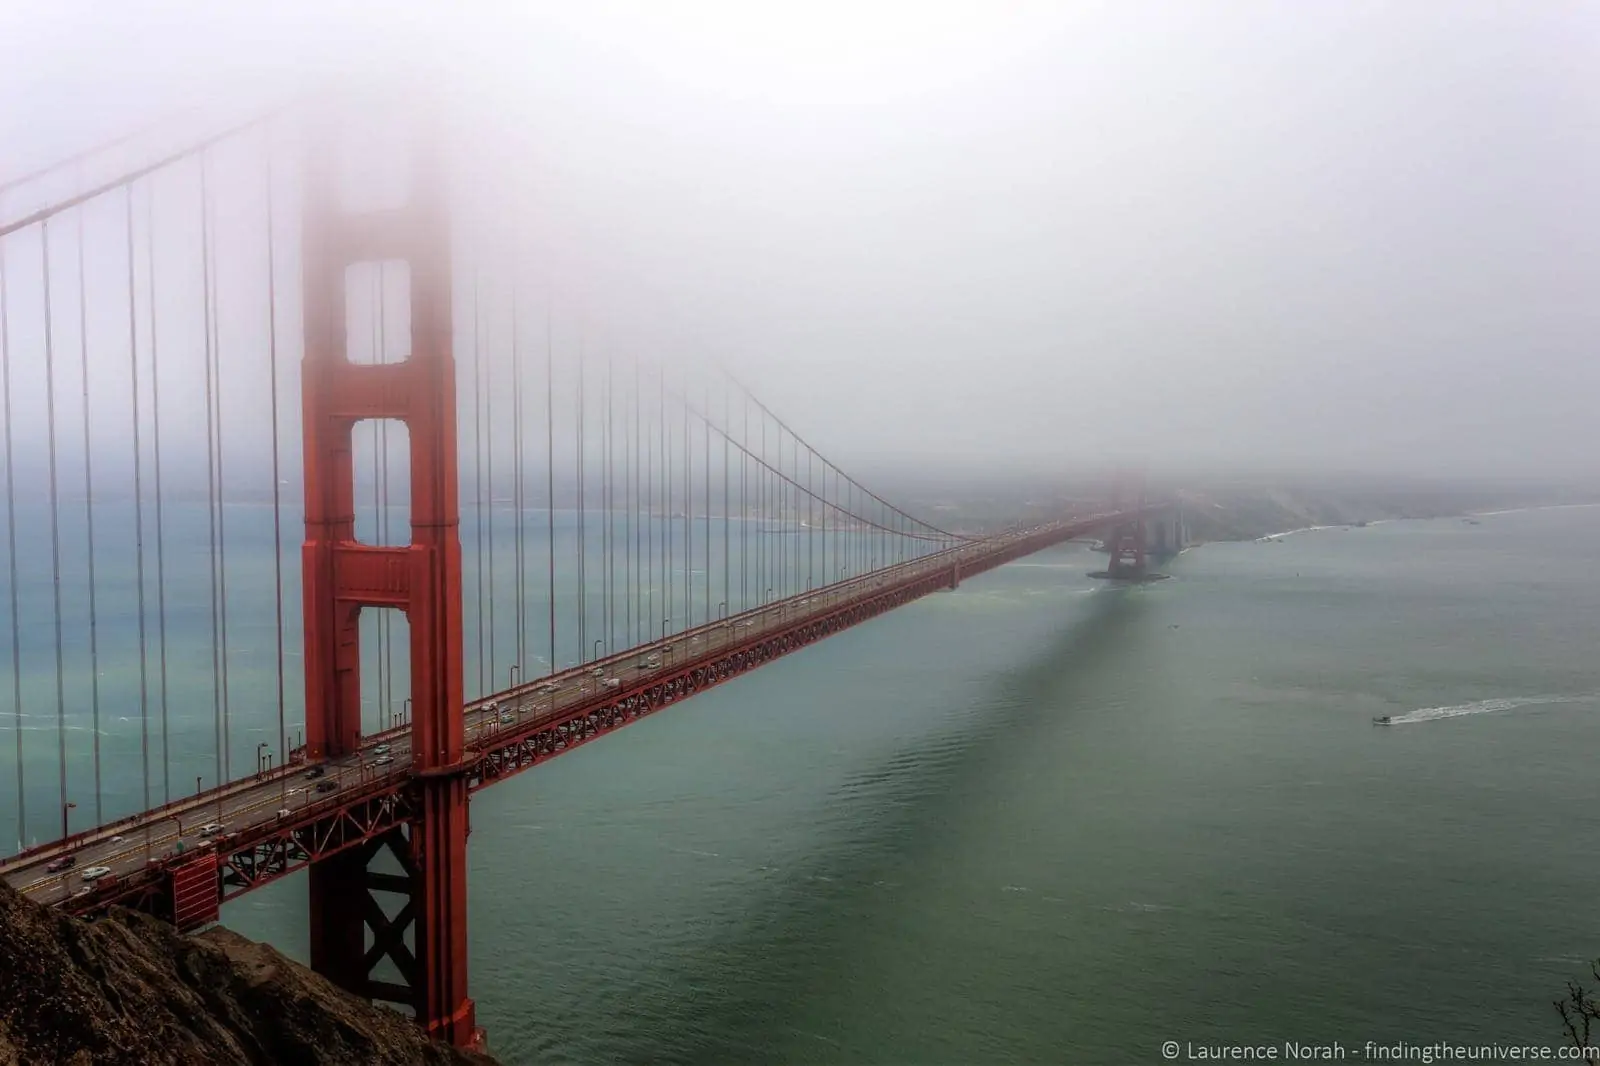

Craft notes: two-lens spot. The wide above (17-40 at 30mm, f/13, 1/100s, ISO 100) is the establishing shot, it captures the geography. The compressed shot (70-200 at 200mm, f/11, 1/320s, ISO 100) flattens the bridge towers against whatever’s behind them, which is the more dramatic single image. If you only bring one lens, bring the telephoto, the wide view is everywhere, the compression isn’t. Stop down to f/11 or f/13 for landscape sharpness.
A pedestrian tunnel runs under the freeway across to Vista Point, where you can shoot the bridge with the city skyline visible (when Karl isn’t in) and look directly down the length of the bridge. Same two-lens game, wide for the establishing geometry, telephoto for the towers.
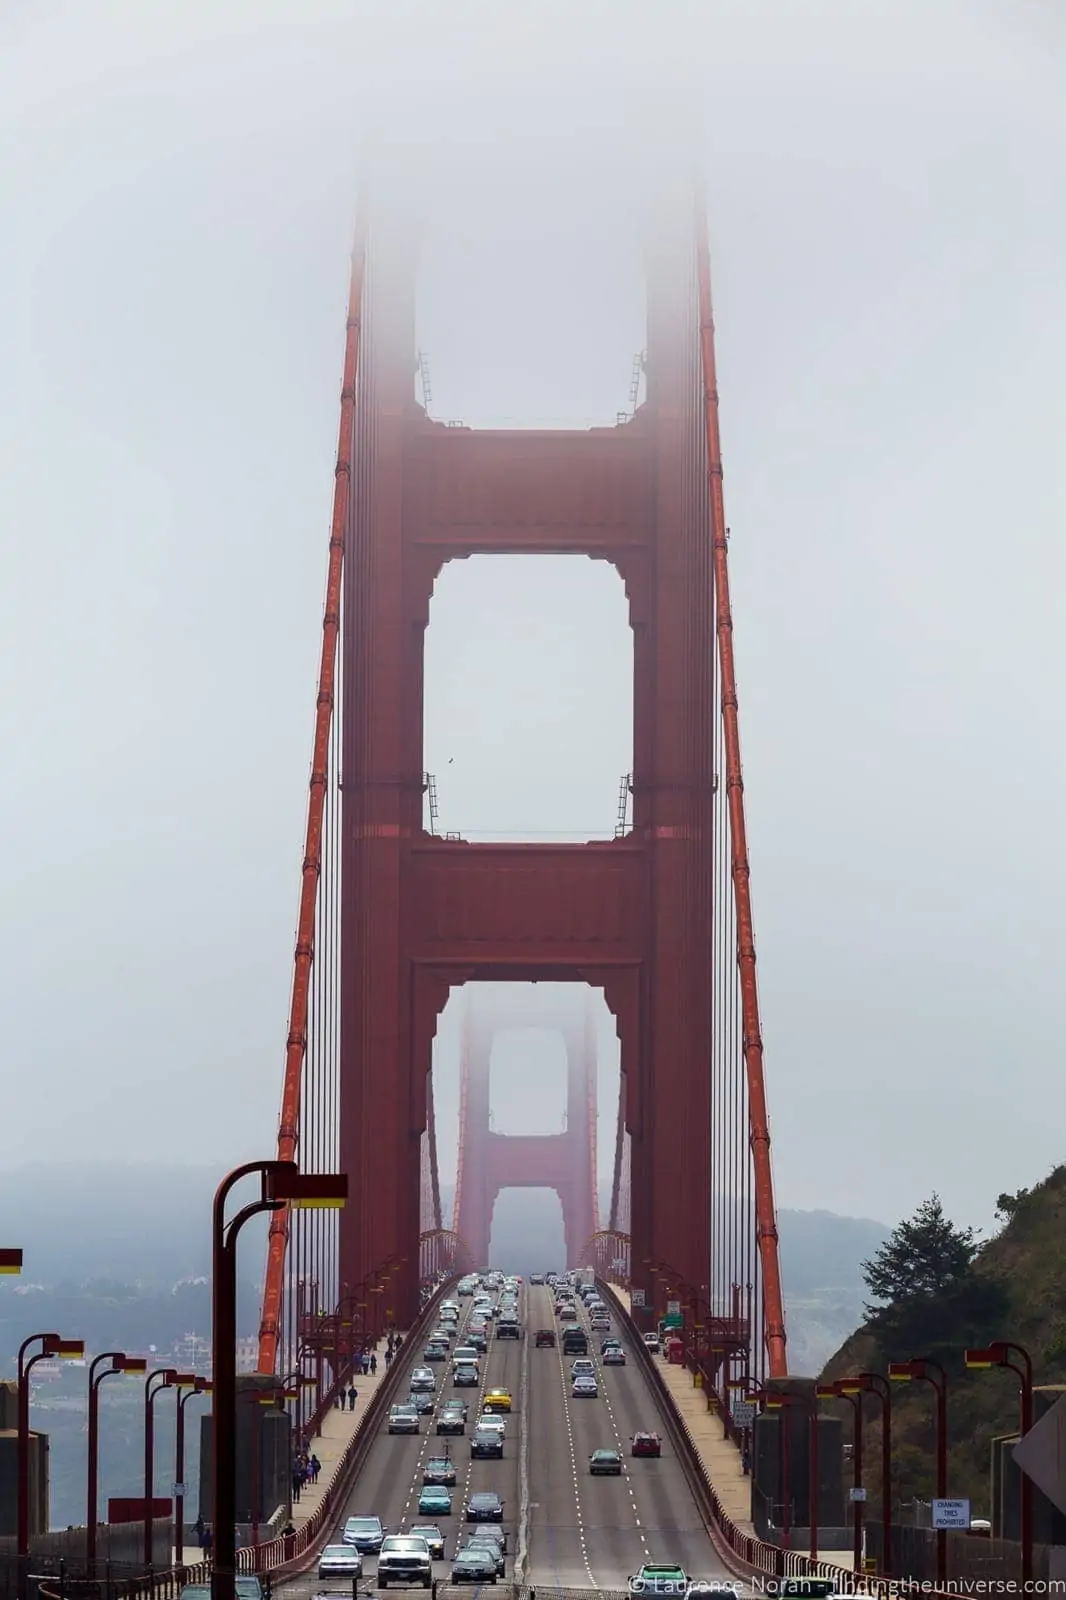
Time of day: the bridge’s north face catches morning light from these angles, so sunrise to mid-morning works well. Sunset puts the sun behind the bridge from this side, which is a different look (silhouettes, sky colour) but you lose the tower detail.
Fog verdict: partly Karl-vulnerable, Battery Spencer can still be usable when the higher headlands are socked in, because it’s lower down.
3. Hawk Hill and Conzelman Road
Drive past Battery Spencer up Conzelman Road and you climb into the Marin Headlands proper. Hawk Hill is the high point of the road, the postcard angle of the Golden Gate Bridge, looking down on the towers with the city behind. When conditions are right, this is the best Golden Gate Bridge shot in San Francisco. When conditions aren’t right (see above), it’s a study in cloud.
The road is one-way going west once you’re past Battery Spencer, so you commit to the loop, you can’t easily double back. There are several pullouts along Conzelman before Hawk Hill itself, and any of them can give you a slightly different elevation and angle. If you have time, walk between them rather than driving spot-to-spot, the changing perspective as you climb is useful for finding your composition.
Craft notes: telephoto territory. A 70-200 (or longer) lens at 100-200mm compresses the bridge against the city behind it, which is what makes this shot iconic. A wide-angle here puts too much foreground rock into the frame and the bridge ends up small. Stop down for sharpness front-to-back. The light is best at sunrise (early light hits the towers from the east) and at the end of “magic hour” before sunset, when the city behind the bridge starts catching warm light.
Fog verdict: the most Karl-resilient bridge spot when the marine layer is low, you can shoot down onto the fog with the towers above it. When the layer is high (above the headland), this is the worst spot in the city.
4. Bonita Point Lighthouse and the Marin Headlands
Keep going past Hawk Hill and Conzelman Road takes you all the way out to Point Bonita Lighthouse, on the western tip of the headlands. Park at the visitor centre and there’s a short walk down to the lighthouse itself. The walking is the point as much as the destination, the road and trail give you several abandoned old fortresses (Battery Mendell, Battery Wallace, Battery Alexander), all of which are excellent if you’re into grungy decay and concrete.
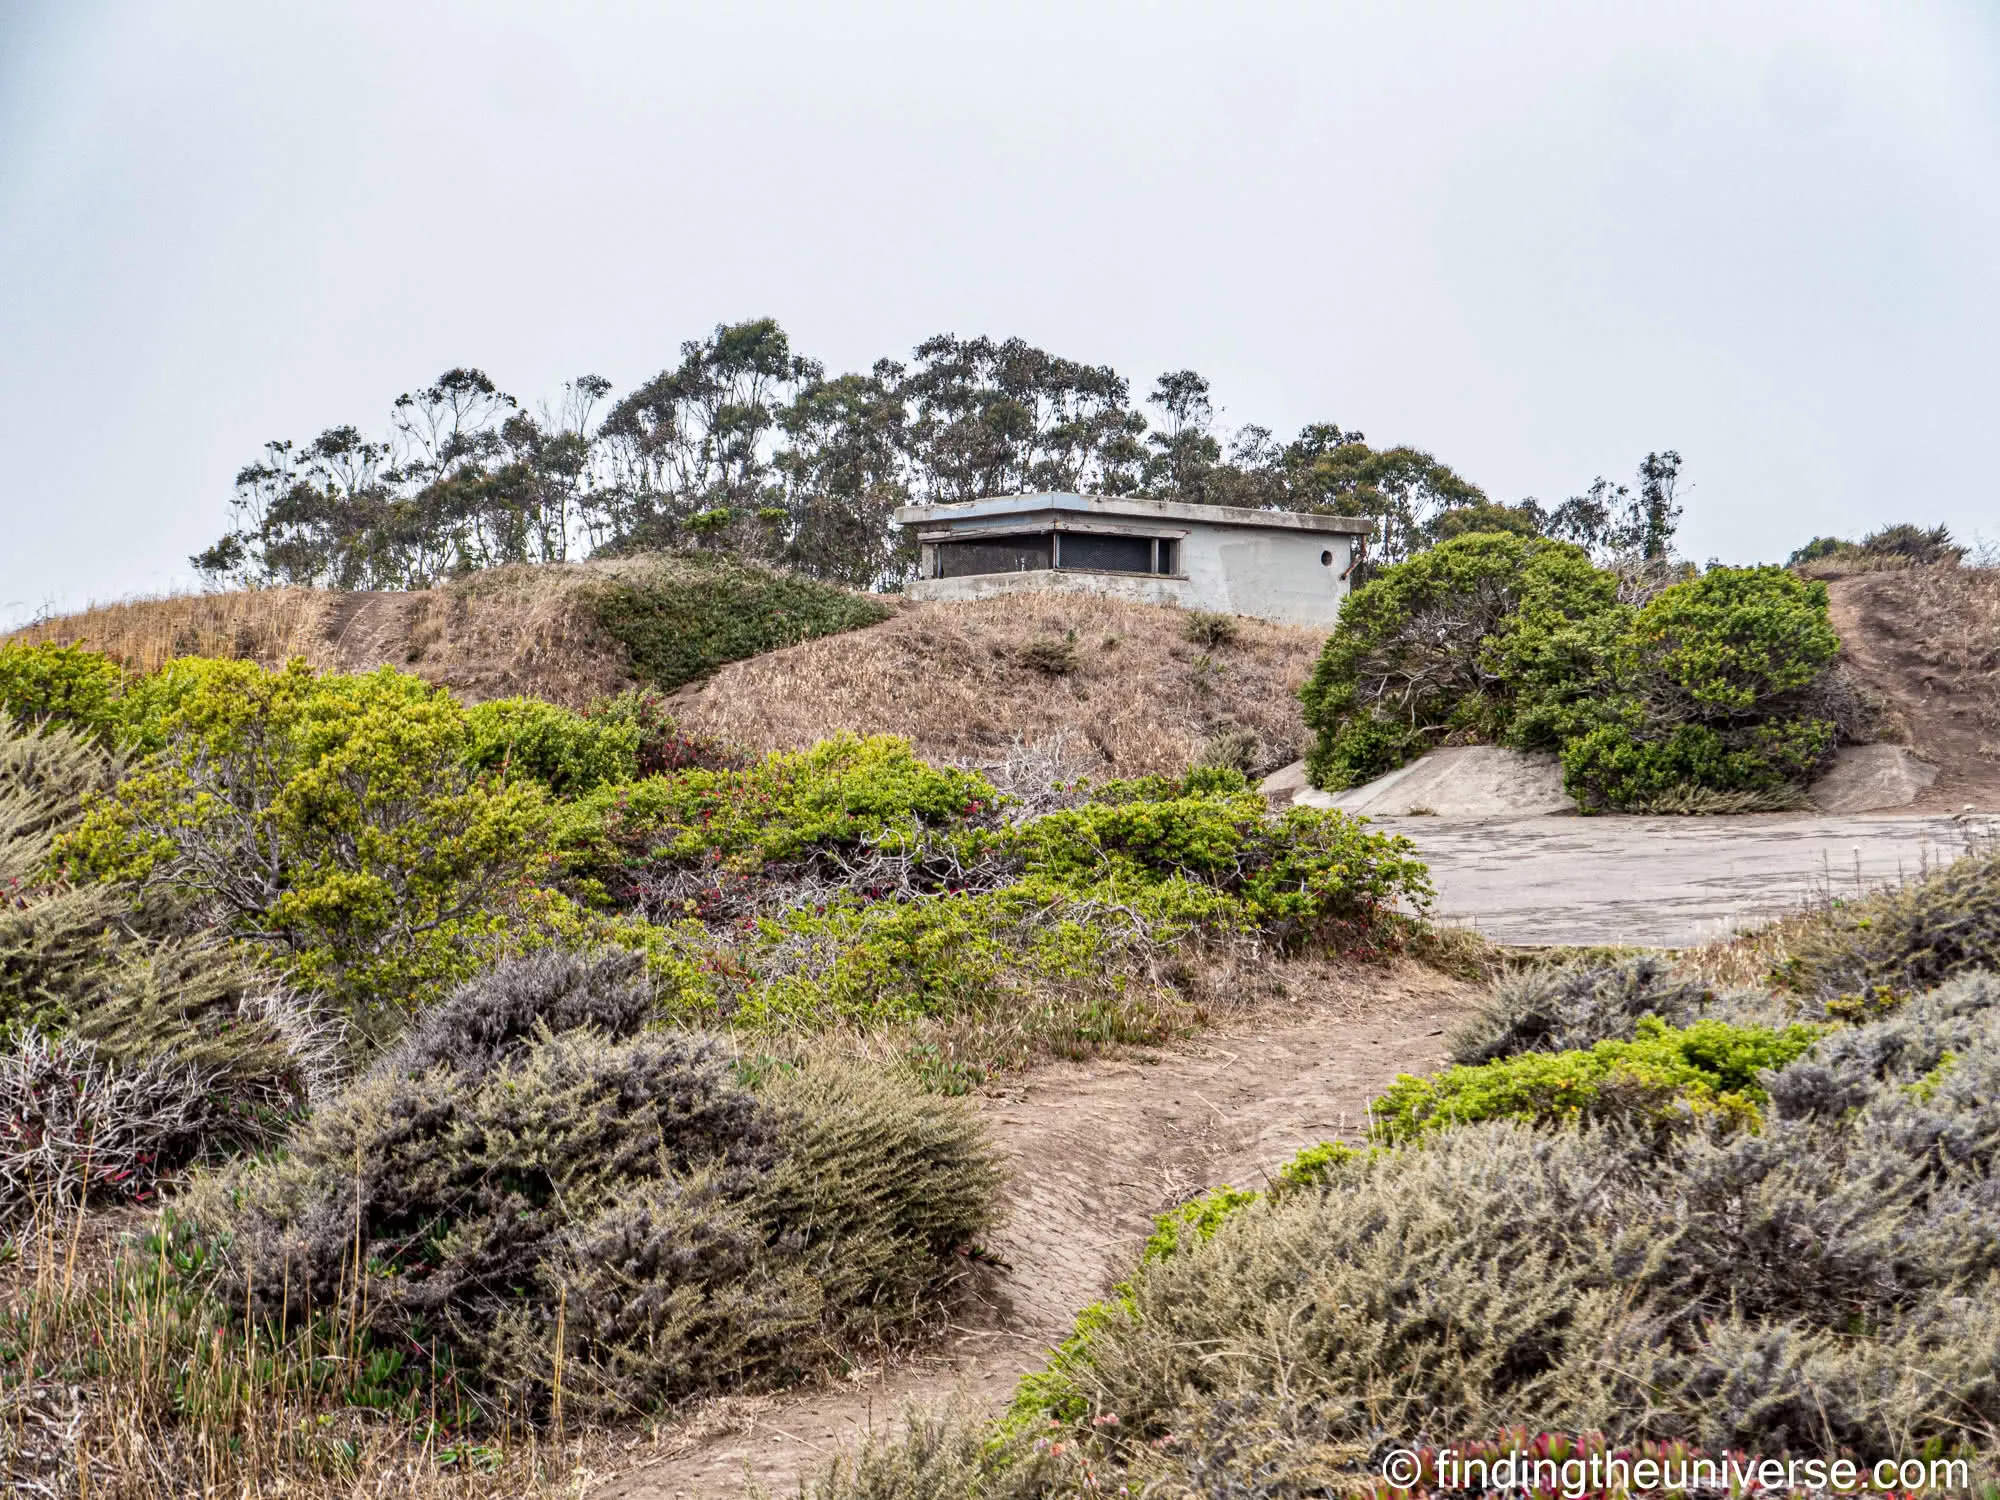

Craft notes: wide-angle for the landscape sweep (17-40 at 17mm, f/11) gave me the road, the cliffs, and the bay. You can also shoot the other way for a shot that includes (in my case) a Karl obscured view of the Golden Gate bridge.

For the lighthouse itself, a slightly longer lens helps you isolate it against the rocks. Time of day: the lighthouse faces roughly west, so afternoon and sunset suit it.
Fog verdict: this far out on the headlands you can be above, in, or below the marine layer depending on the day. Worth checking before you commit.
5. Land’s End
Side note before the photography: Land’s End is my favourite place in San Francisco for a walk, and Jess has written a full guide to the hike if you want it. From the car park you can walk along the headland with views of the Marin Headlands and the Golden Gate Bridge from the west, a different angle to anywhere else in this guide. The beaches here are great for longer-exposure work, with rocks and rushing water for foreground and movement.

Craft notes: with a longer lens (the 70-200 here) you can get the bridge from a perspective most photographers don’t bother with, looking at it from the west. The black-and-white long-exposure shot above is a 10-stop ND filter on the wide lens, if you’re carrying ND filters, the Land’s End beaches are where to use them. The cypress trees along the trail are also a strong subject in their own right, especially in low light or fog. Fog verdict: fog-improved. Atmospheric mist suits the cypress and the cliffs. If you’re picking one spot for a foggy day, this is it.
6. Sutro Baths
Just down the hill from Land’s End is one of San Francisco’s stranger landmarks, the ruins of the Sutro Baths. Built in 1894 as the largest indoor swimming complex in the world, abandoned in 1966, partially demolished, then left as concrete pools full of seawater on the cliffs above the Pacific. There are all sorts of photography opportunities here, from the sea wall against the ocean, through to high contrast cave silhouettes.

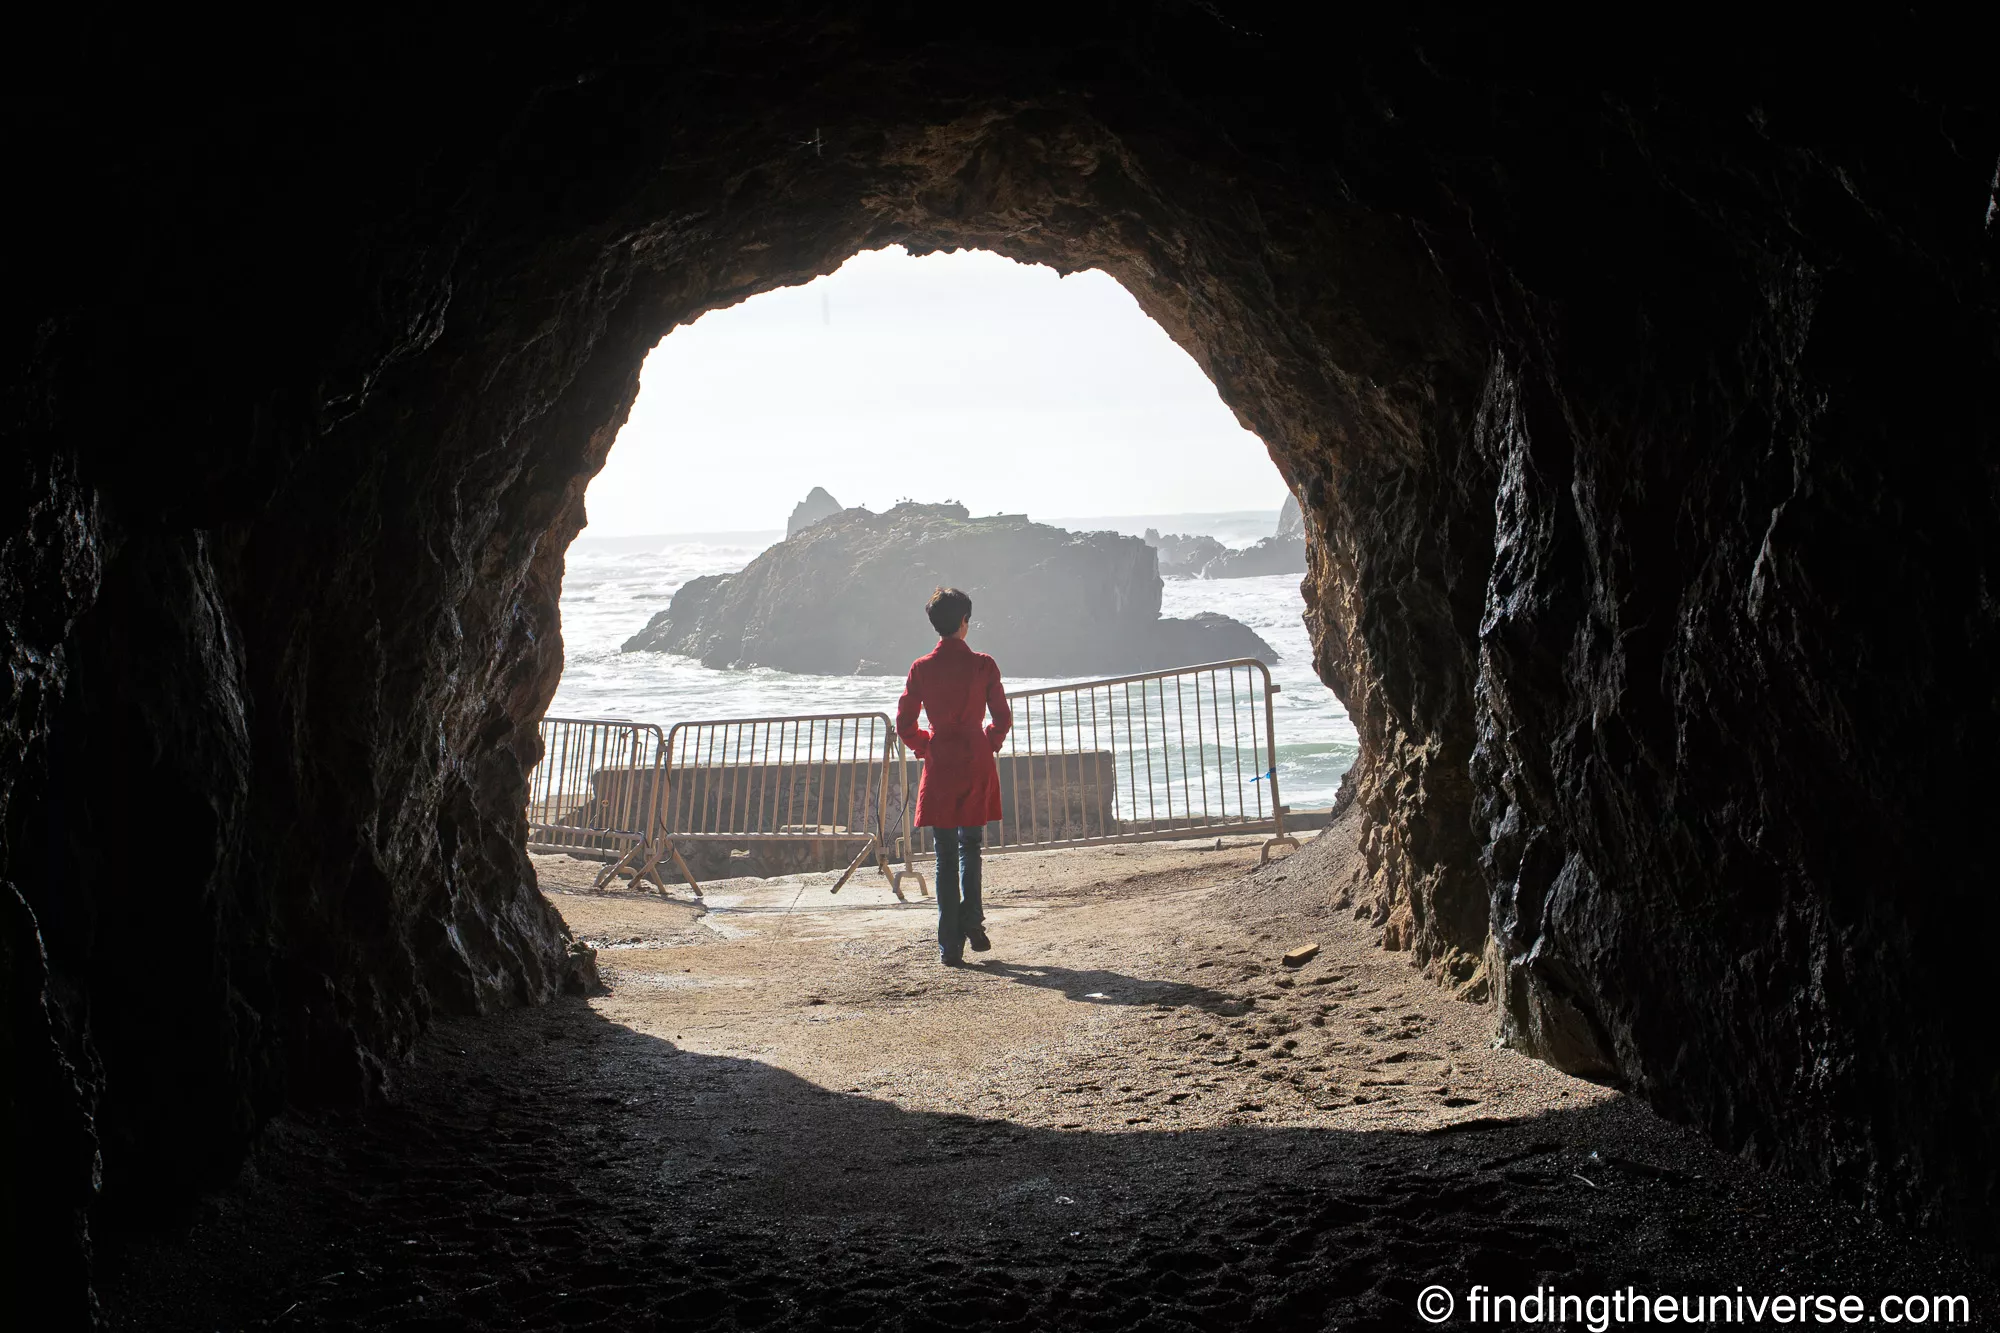
Craft notes: wide-angle suits the geometry, both shots above are with the 17-40, one at 17mm (f/9, 1/250s, ISO 100) for the full sweep of the ocean, one at 40mm (f/9, 1/125s, ISO 160) for a tighter composition of Jess emerging into the light.
Stand at the trail above the ruins for the establishing shot, then walk down into the ruins themselves for closer details on the concrete and waterlogged pools. Time of day: sunset is excellent here, the cliffs face roughly west and you get the Pacific and the sky working together. Fog is also fine, often better.
Fog verdict: fog-improved. The atmosphere helps. Bring a tripod if you’re going to be there past sunset.
7. The Financial District
Like a lot of US cities, San Francisco has decent skyscrapers if you know where to point a camera. My favourite is the Transamerica building, a pyramid-shaped tower that’s a lot of fun to shoot from below. With an ultra-wide lens, the right cloud cover, and an ND filter, the buildings in the Financial District give you symmetrical architecture, leading lines, and dramatic skies.
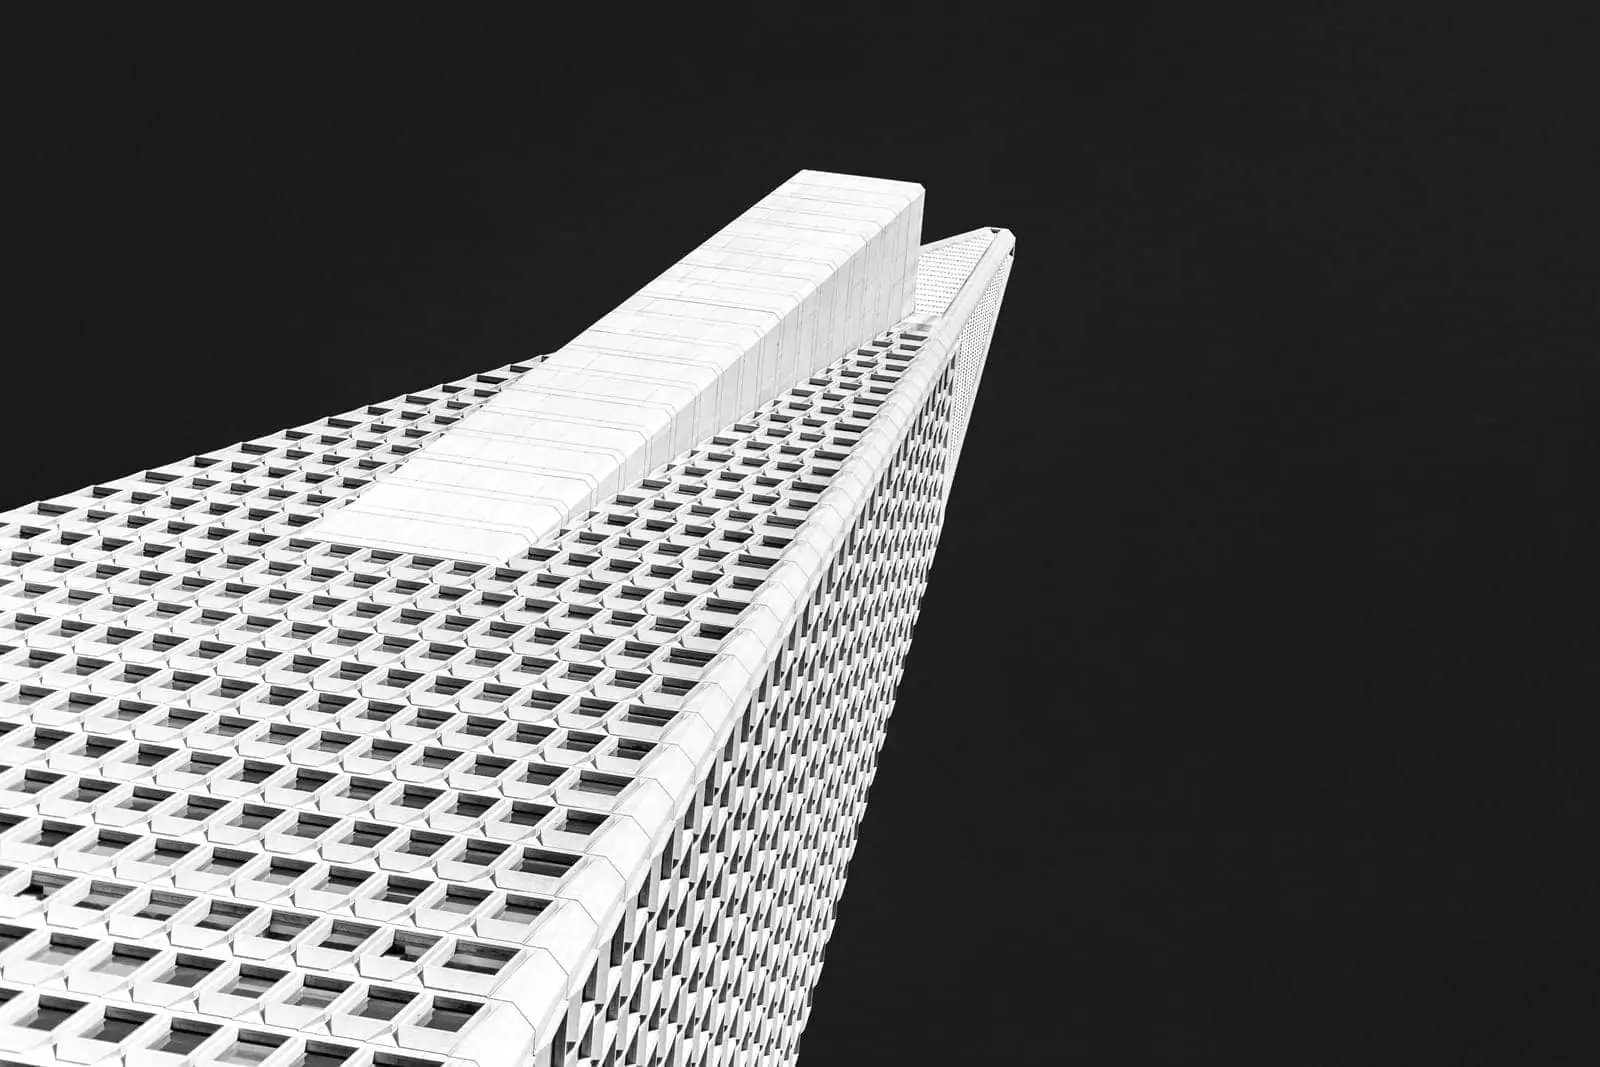
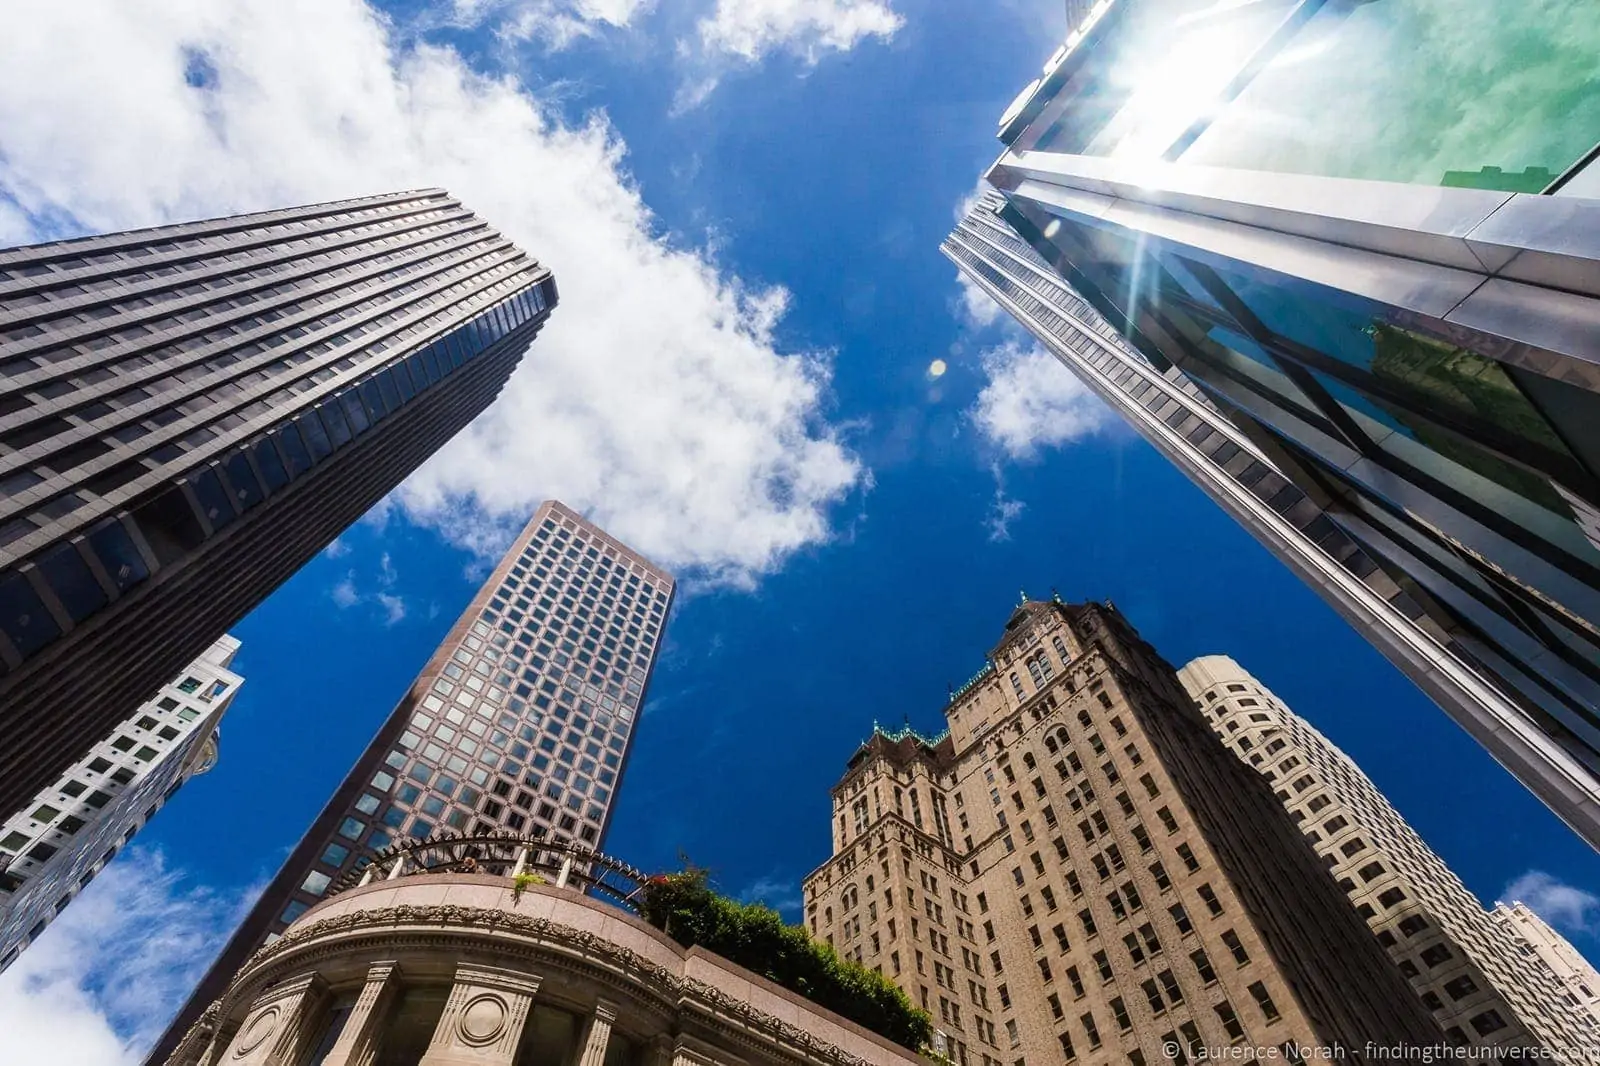
Craft notes: 17mm-wide is your friend here. The Wells Fargo shot above was 17mm at f/16, 1/320s, ISO 640, small aperture for sharpness across the whole building, higher ISO because you’re often shooting in the shadow of taller towers. Watch the parallax: shooting up at a tall building with a wide lens converges the verticals, which can either be the look you want (dramatic, leaning-in) or a problem (correct in post if you don’t want it). Time of day: mid-morning when the sun has cleared the towers but the light is still angled. Avoid midday, the shadows are flat and ugly.
Fog verdict: Karl-doesn’t-care. You can shoot the Financial District in any weather; cloud cover often helps with even lighting.
For more on the gear and filters that suit this kind of architectural work, my photography gear post has the full kit list.
8. Chinatown
If you’re into colourful street photography, head to Chinatown. I was lucky and caught the Chinese New Year’s Parade, which was spectacular, but you don’t need an event to get good street shots here. The signage, the lanterns, the architectural details, and the people-watching are all year-round.
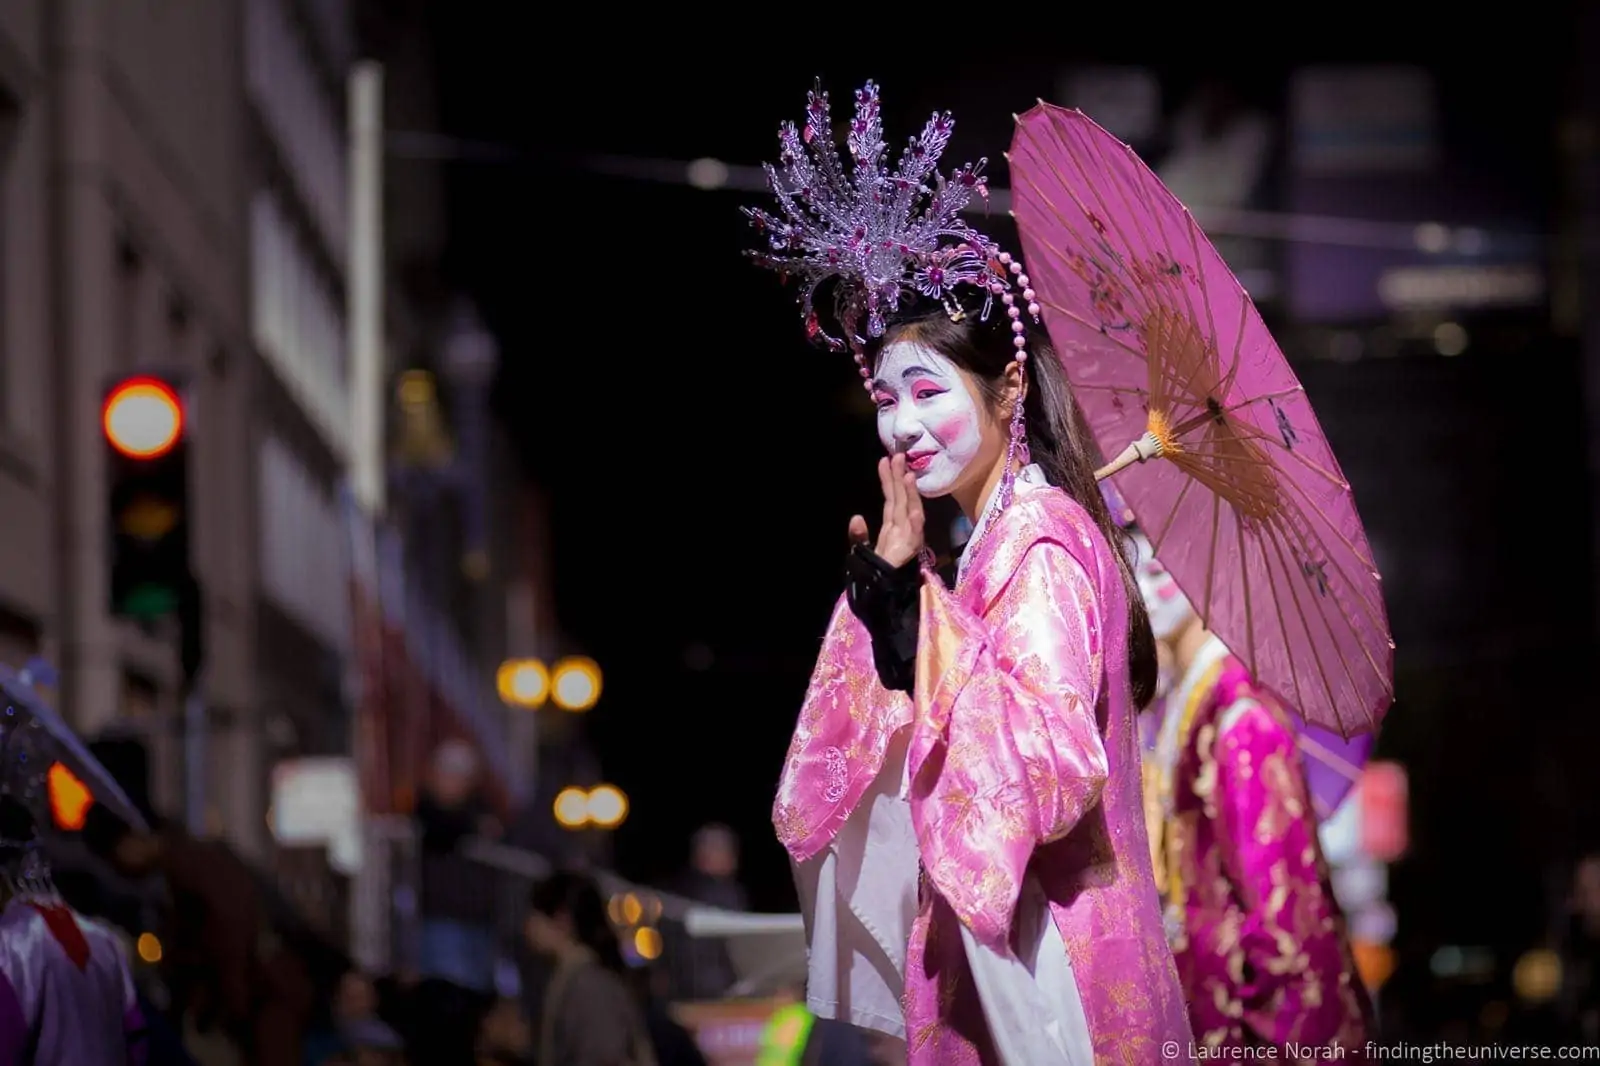
Craft notes: street photography is mostly about being unobtrusive, so a tripod isn’t useful here, leave it in the bag (the modern Peak Design Travel Tripod folds small enough to do exactly that, which is partly why I switched to it). Shoot handheld at higher ISO if you need to. A 35mm or 50mm prime, or a fast standard zoom in the 24-70 range, gives you the right framing for street work, wide enough for context, tight enough to isolate. Time of day: late afternoon when the light angles in between buildings, or evening when the lanterns and signs come on.
Fog verdict: Karl-doesn’t-care.
9. The Castro District
A bit different to Chinatown, the Castro is the centre of gay San Francisco. The colours, the characters, the street energy, all good for a wandering shoot. I was particularly taken with the rainbow crosswalks. Plenty of rainbow flags here too, of course.
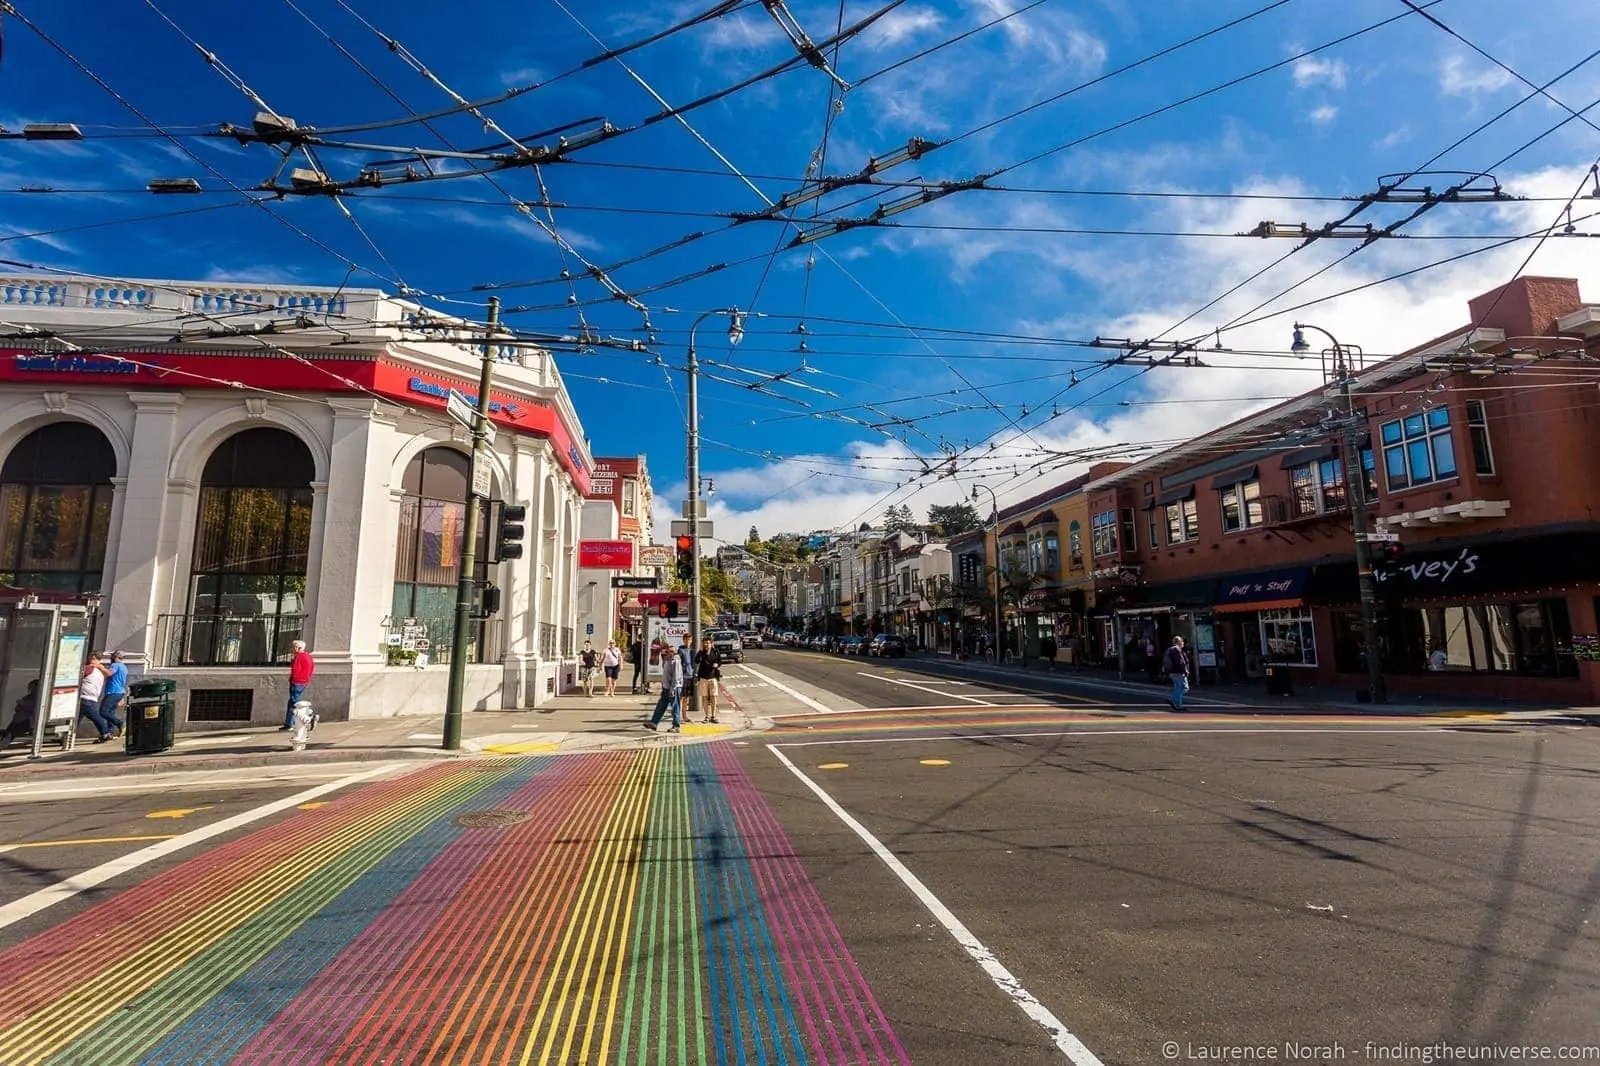
Craft notes: top-down shots of the rainbow crosswalk work well because the geometry of the painted bands is the picture, get up high (a slight elevation, even just standing on a step) and shoot down. A wide lens lets you take in the full crosswalk plus the surrounding street. Time of day: bright daylight is fine, the colours need light to pop.
Fog verdict: Karl-doesn’t-care.
10. Corona Heights
For a panorama of the San Francisco skyline, head up Corona Heights. The climb is brief but steep, and the view across the city, Twin Peaks behind you, downtown in front, the bay beyond, is one of the best you’ll get without a permit and a helicopter. We came up here as part of a San Francisco walking tour, and I’ve been back since because the view is worth it on its own.

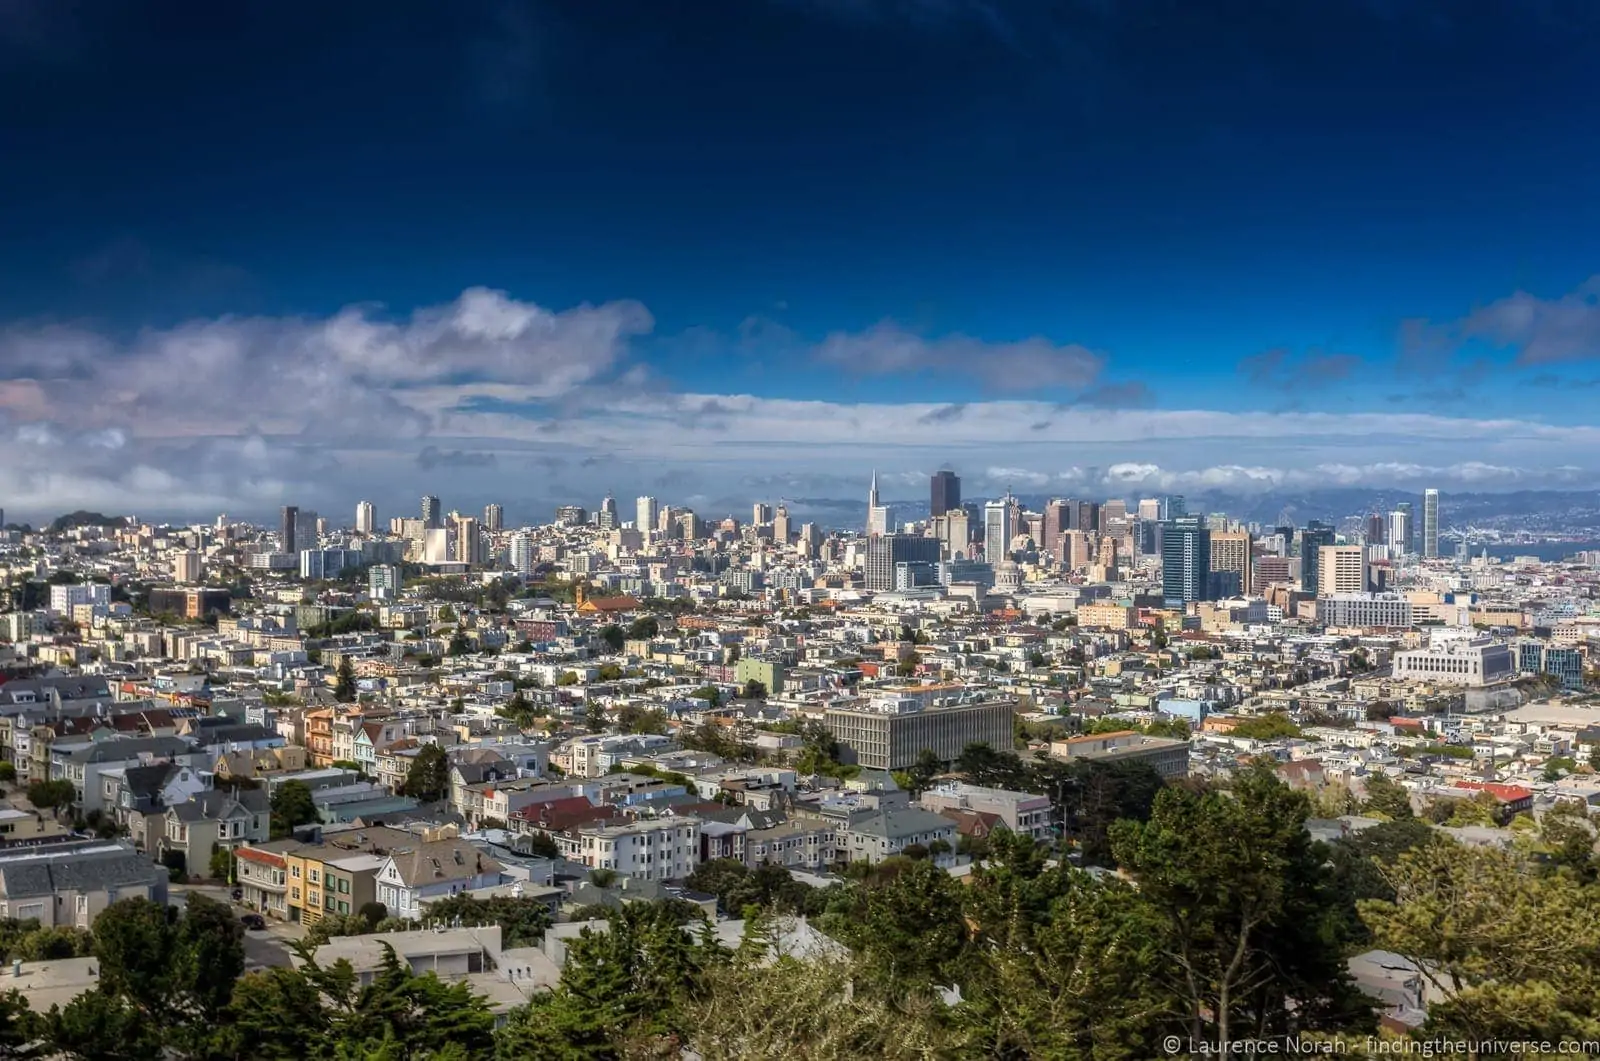
Craft notes: two looks here. The wide skyline shot is the obvious one (17-40 at 40mm, f/6.3, 1/250s, ISO 100). The other shot is the more interesting one for me, a 70mm f/2.8 1/2000s shot wide-open with a couple in the foreground looking out. Shallow depth of field on the foreground, soft city behind. If you have a fast standard-zoom or a 70-200, this kind of layered foreground-plus-skyline composition is almost always more interesting than the bare panorama.
Time of day: sunset is the move, the city catches warm light and the sky behind goes pink. Get there fifteen minutes before sunset to set up.
Fog verdict: often Karl-resilient. Corona Heights is high enough to clear the marine layer on most fog days.
11. Pier 7
San Francisco has a long maritime heritage and a lot of piers, the most famous being Pier 39. I’d recommend starting your pier exploration at the Ferry Building and walking from there to Pier 39, with a stop at Pier 7 along the way. Old streetcars run on the Embarcadero, and Pier 7 itself is a quiet wooden pier with beautifully symmetrical Victorian-style street lamps and a clear view of the Transamerica building.
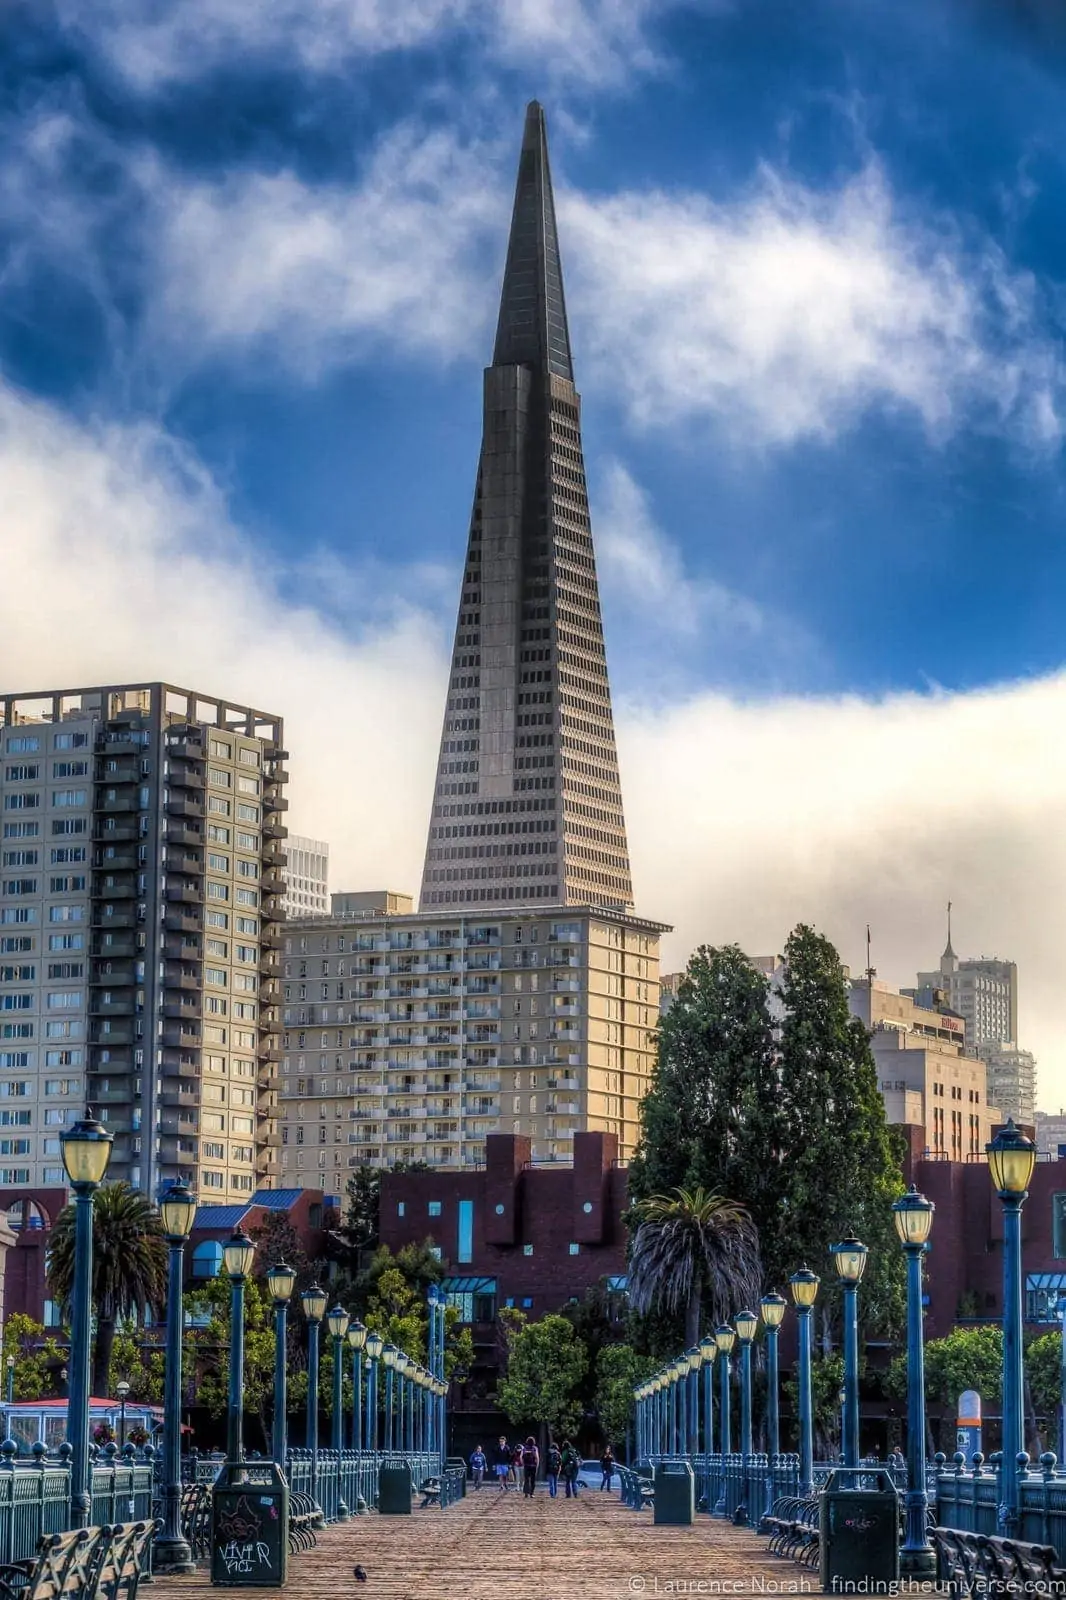
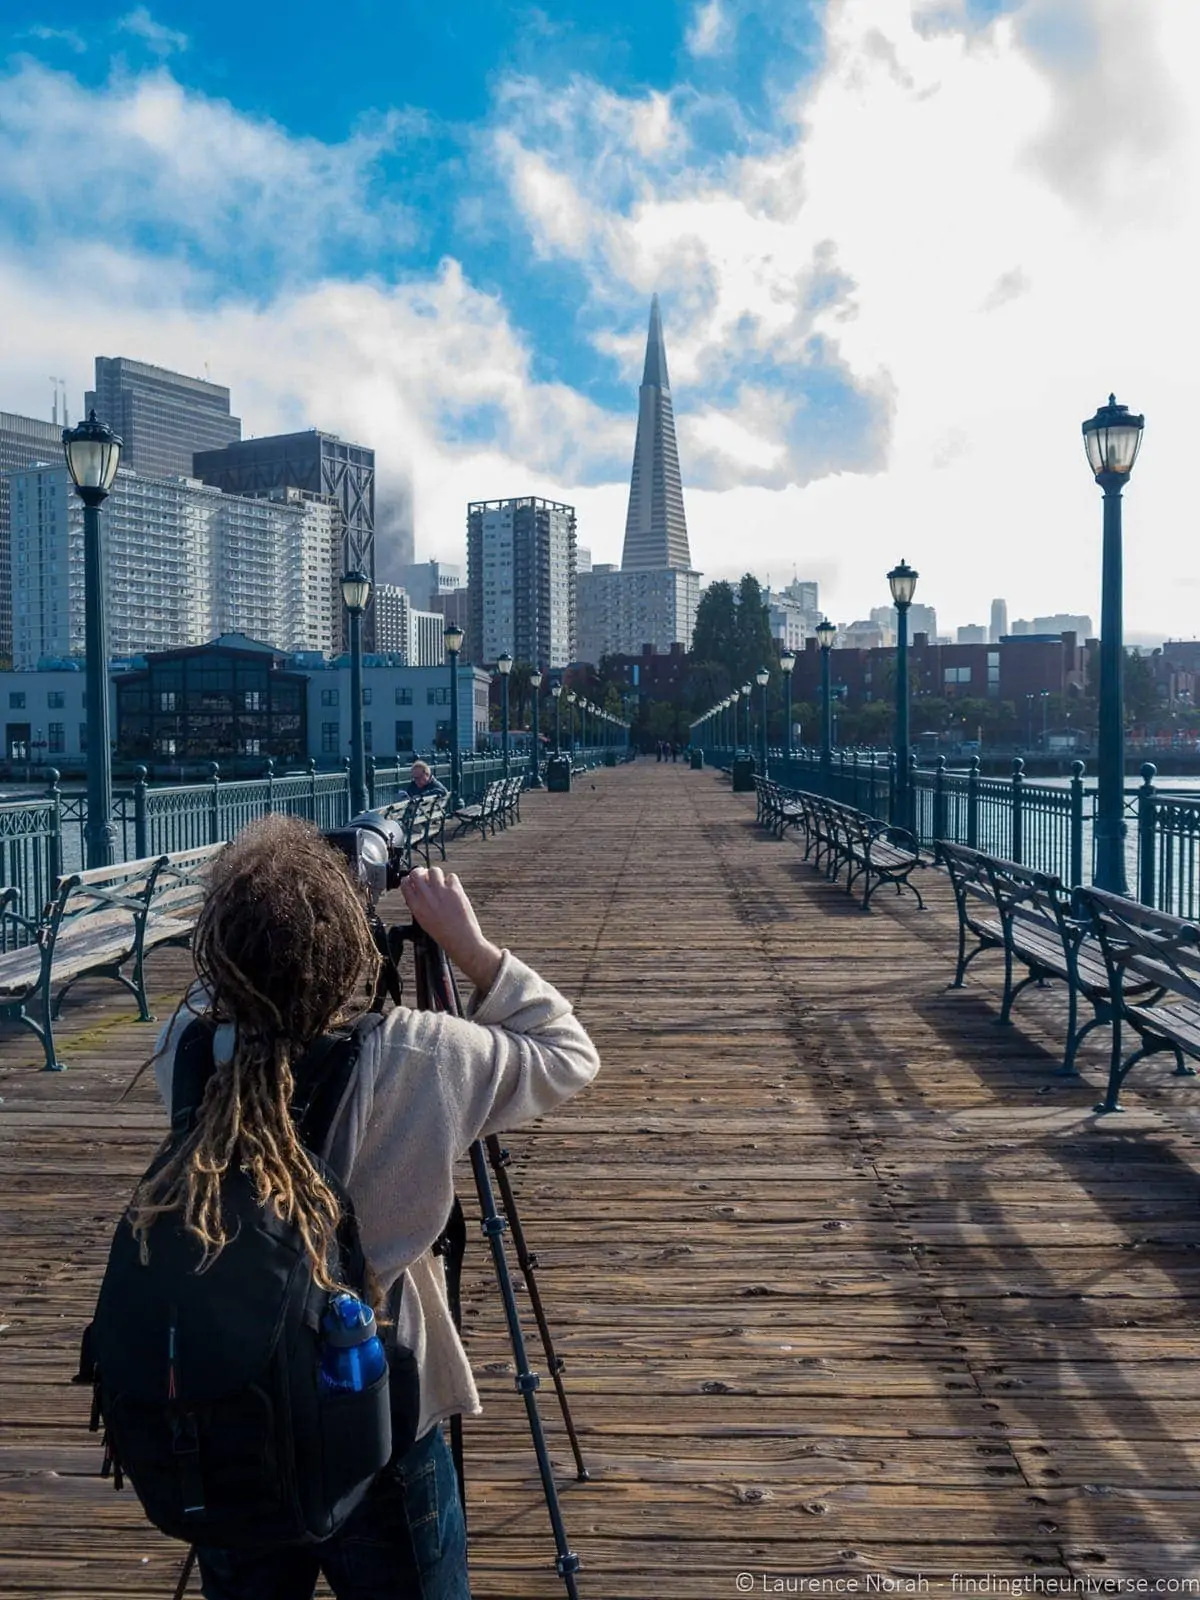
Craft notes: Pier 7 is a leading-lines spot. Stand at the start of the pier and shoot straight down, the lamp posts and the wooden boards run away in symmetrical perspective. A mid-telephoto compresses the lamps tighter together for a more graphic look (the shot above was 70-200 at 95mm, f/7.1), wider lenses give you more sweep but the lamps end up small and the symmetry weakens. Shoot stopped down (f/7.1 to f/11) for sharpness through the depth.
Time of day: early morning before the joggers and tour groups arrive, or late evening when the lamps come on for blue-hour.
Fog verdict: partly Karl-vulnerable but often atmospheric, a bit of mist down the pier suits the geometry.
12. Pier 39 (Fisherman’s Wharf)
You can’t come to San Francisco without going to Fisherman’s Wharf, the most committed tourist trap in town. Which, as you’d imagine, makes for excellent photo opportunities. Get the clam chowder from Boudin in a sourdough bowl while you’re there, it’s worth the queue.
Anyway. Pier 39 is good for photographing people, sea lions, and people taking pictures of sea lions. Sea lion numbers fluctuate seasonally, peak haul-out is generally autumn through early spring, summer’s quieter, so check before you go if they’re a must. Plenty of stores and street performers as fallback.
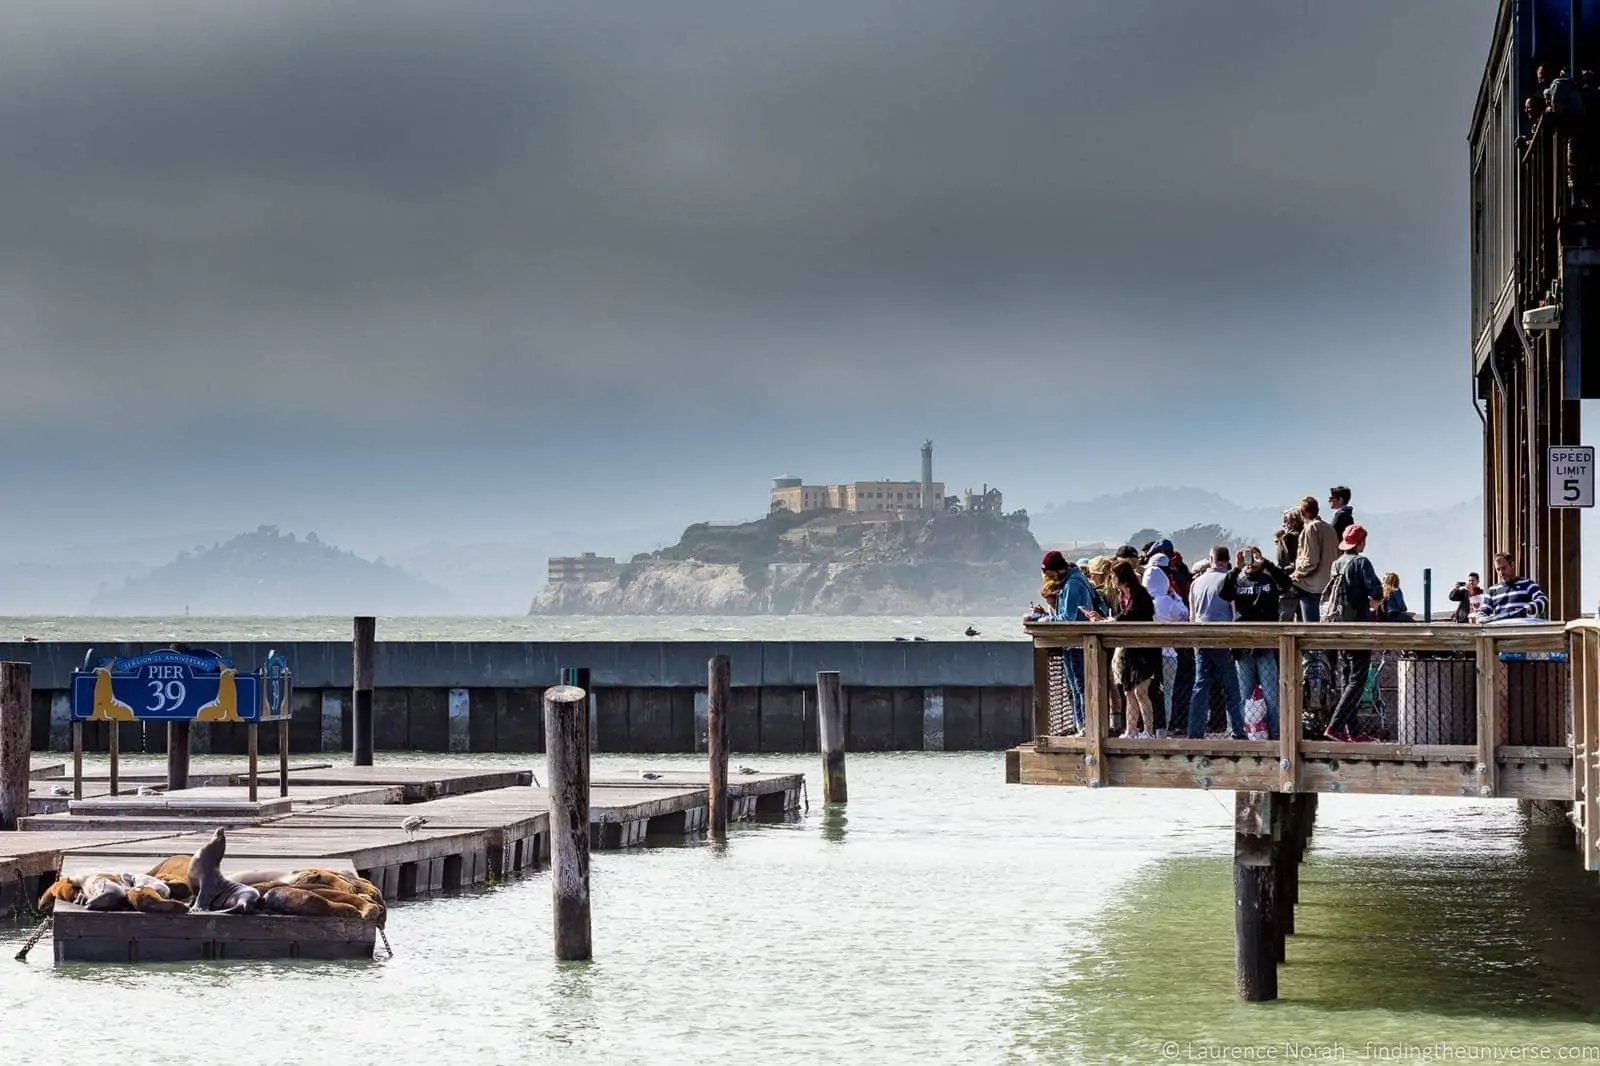

Pier 39 is also the easiest place to get a clean shot of Alcatraz, the views into the bay are wide open, and a long lens lets you compress the island against the water.


Craft notes: the Alcatraz shot above was 110mm at f/10, 1/160s, ISO 160. You want a long lens (100-200mm minimum on a full-frame, or equivalent on crop) to make the island read as more than a small grey dot in a wide ocean. Stop down for sharpness. People shots benefit from a wider lens (a 24-70 or 35mm prime) to get context plus subject.
Time of day: golden hour for the Alcatraz long lens shots, the island catches warm light from the west. Midday is brutal here in summer; mornings and evenings are friendlier.
Fog verdict: Karl-vulnerable for the Alcatraz shot (the island disappears in fog, but can be atmospheric if it’s not too foggy), but the dock and street scenes work in any weather.
13. Nob Hill and Powell Street
You can’t leave San Francisco without an iconic photo of a cable car, ideally on one of the hills. I have two approaches.
First, Powell Street at the Market Street end, where the cars are turned around. It’s crowded, but if you head up Powell a little you can sometimes find a row of cars waiting their turn. That gives you people-less compositions, if that’s what you want.
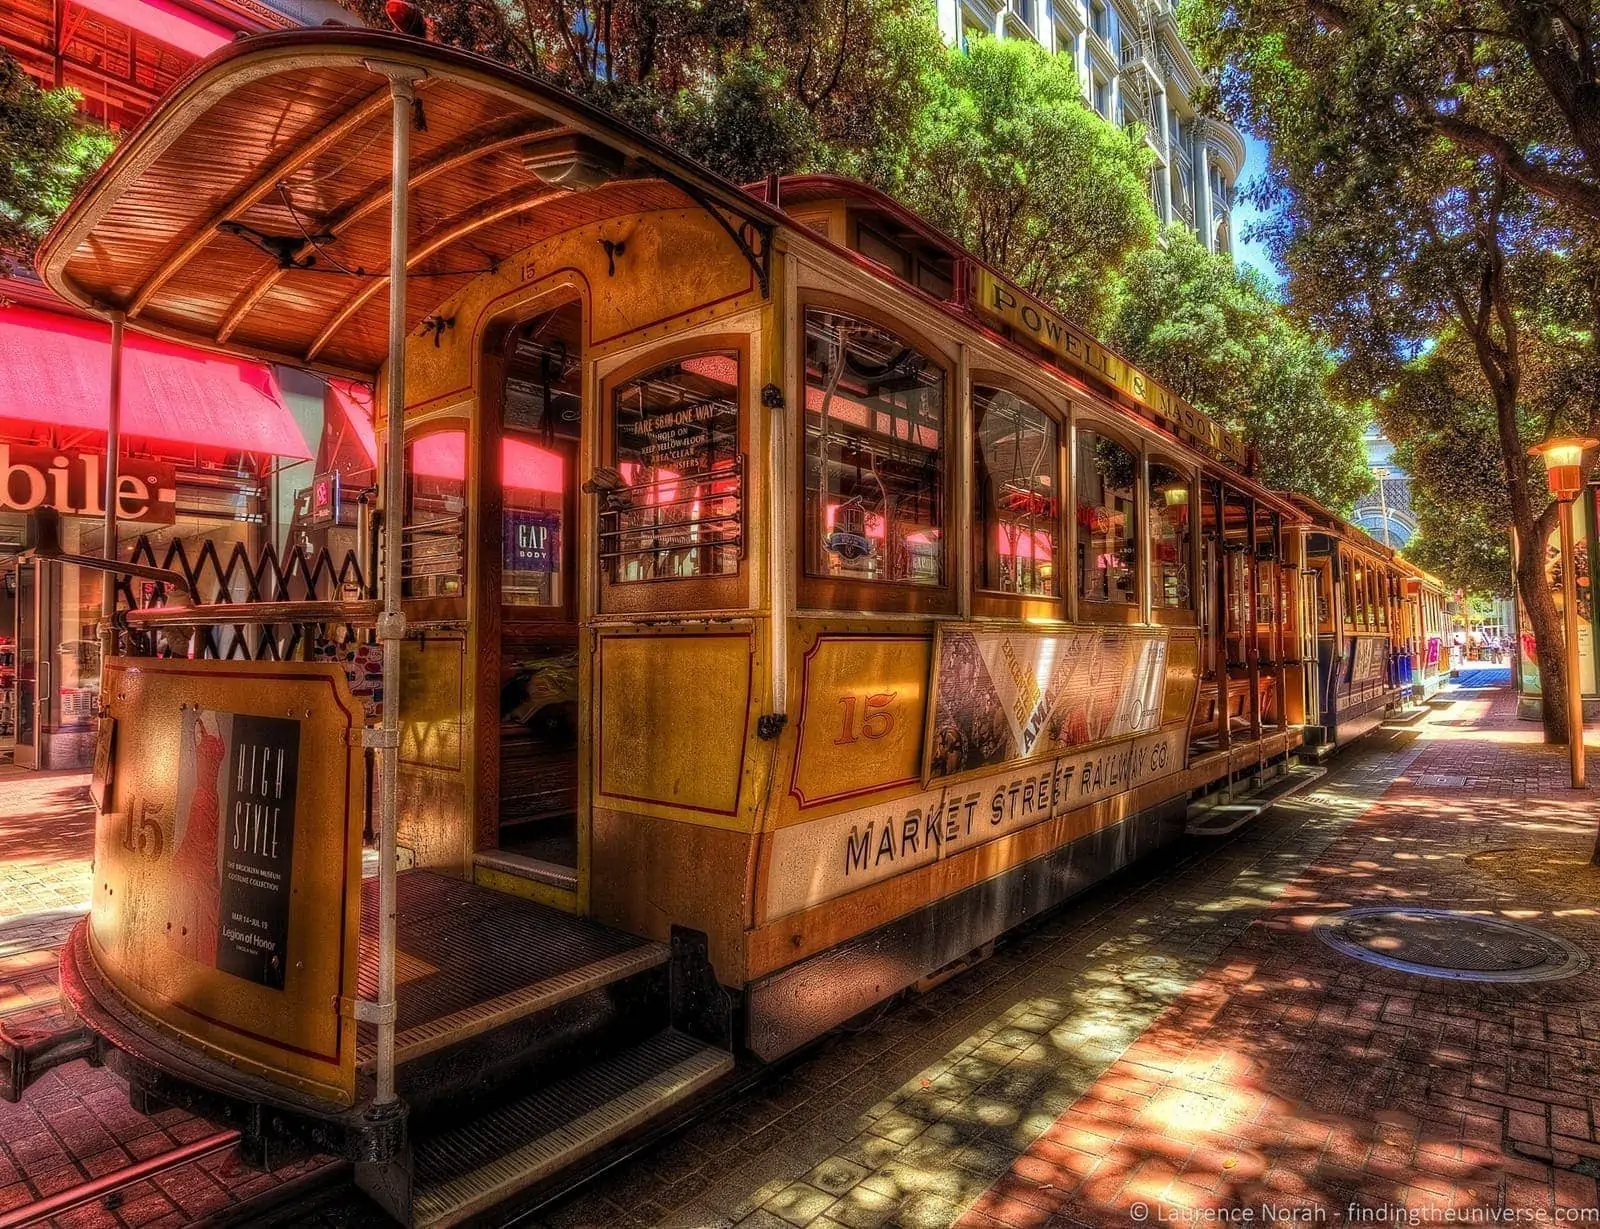

Craft notes: the wide shot above was 17mm, f/13, 1/5s, ISO 100, on a tripod. A 100 ISO for a clean image, f/13 to get everything in focus, 1/5th of a second because I was on a tripod and shutter speed matters less. The car wasn’t moving, so no motion blur here, although that’s also a nice effect.
If you want shots of the cable cars in motion, head up Powell Street to the intersection with California for some good steep-street angles. A long lens compresses the steep gradient (see my lens compression guide for why this matters), making the cars look like they’re climbing vertically.
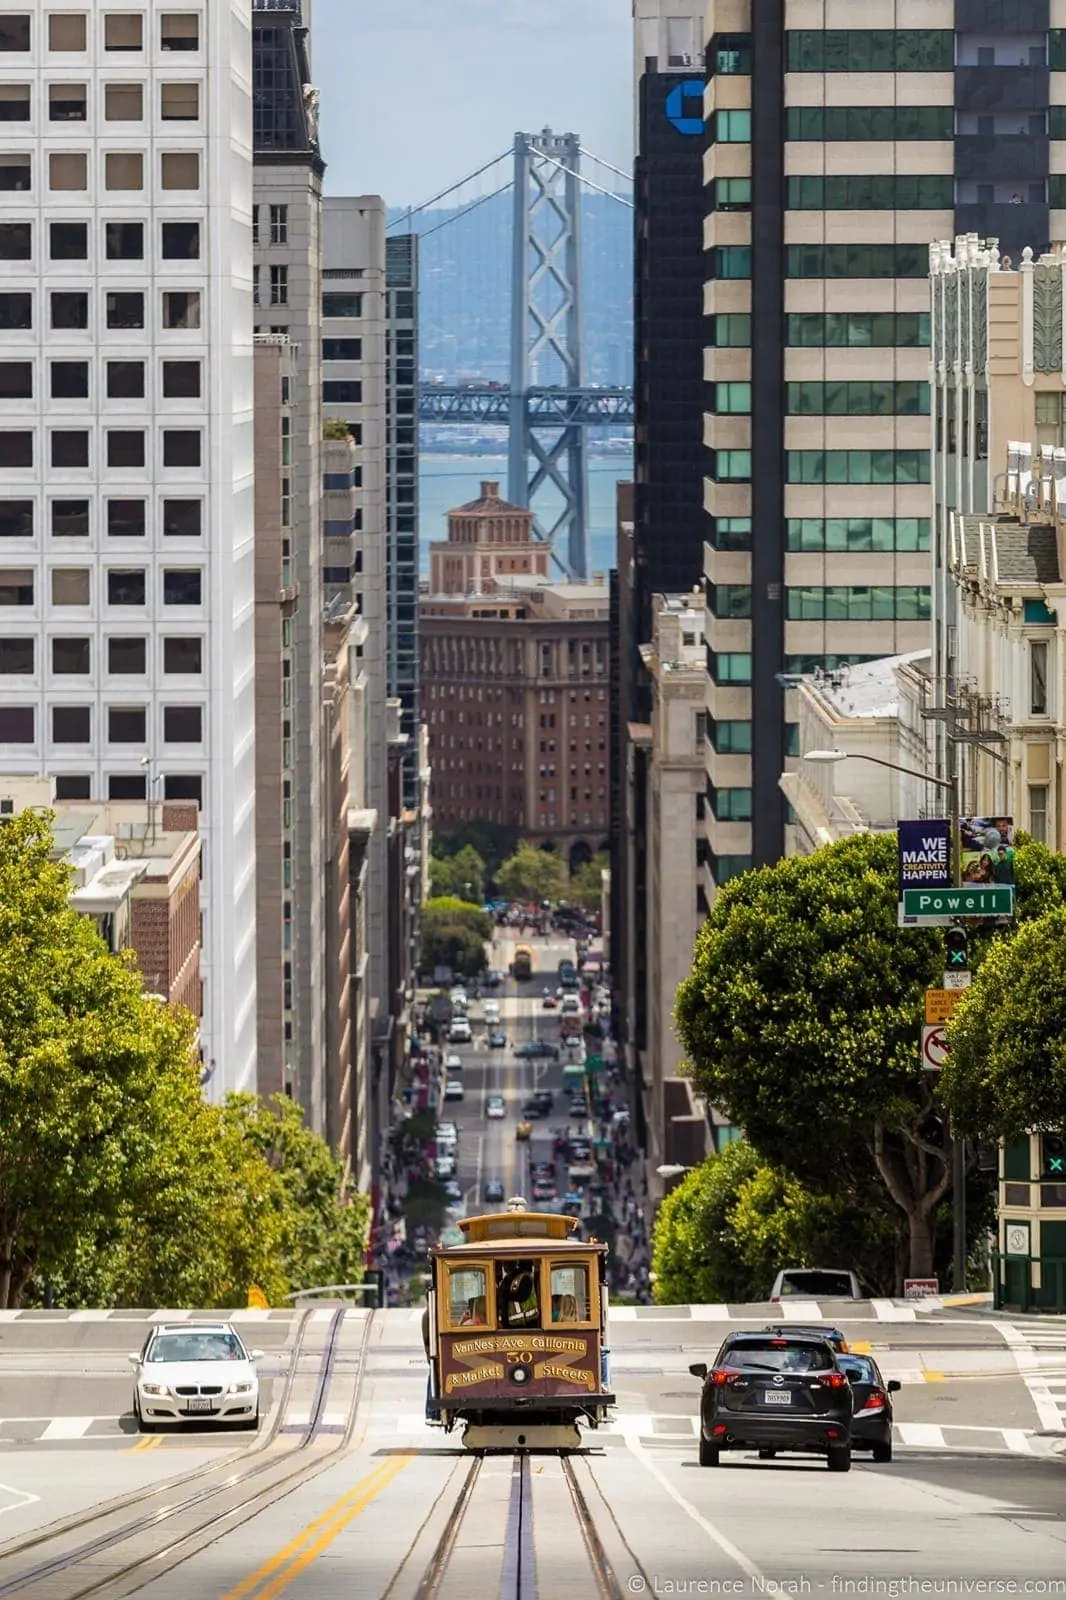
Craft notes for the action freeze: the shot above was 200mm, f/3.2, 1/1250s, ISO 100. Fast shutter to freeze the cable car cleanly, wide aperture (f/3.2) to throw the background slightly out of focus, all hand-held. The pairing of these two cable car shots, the long-exposure motion blur and the telephoto action freeze, is a useful contrast. Same subject, opposite shooting strategies, different stories.
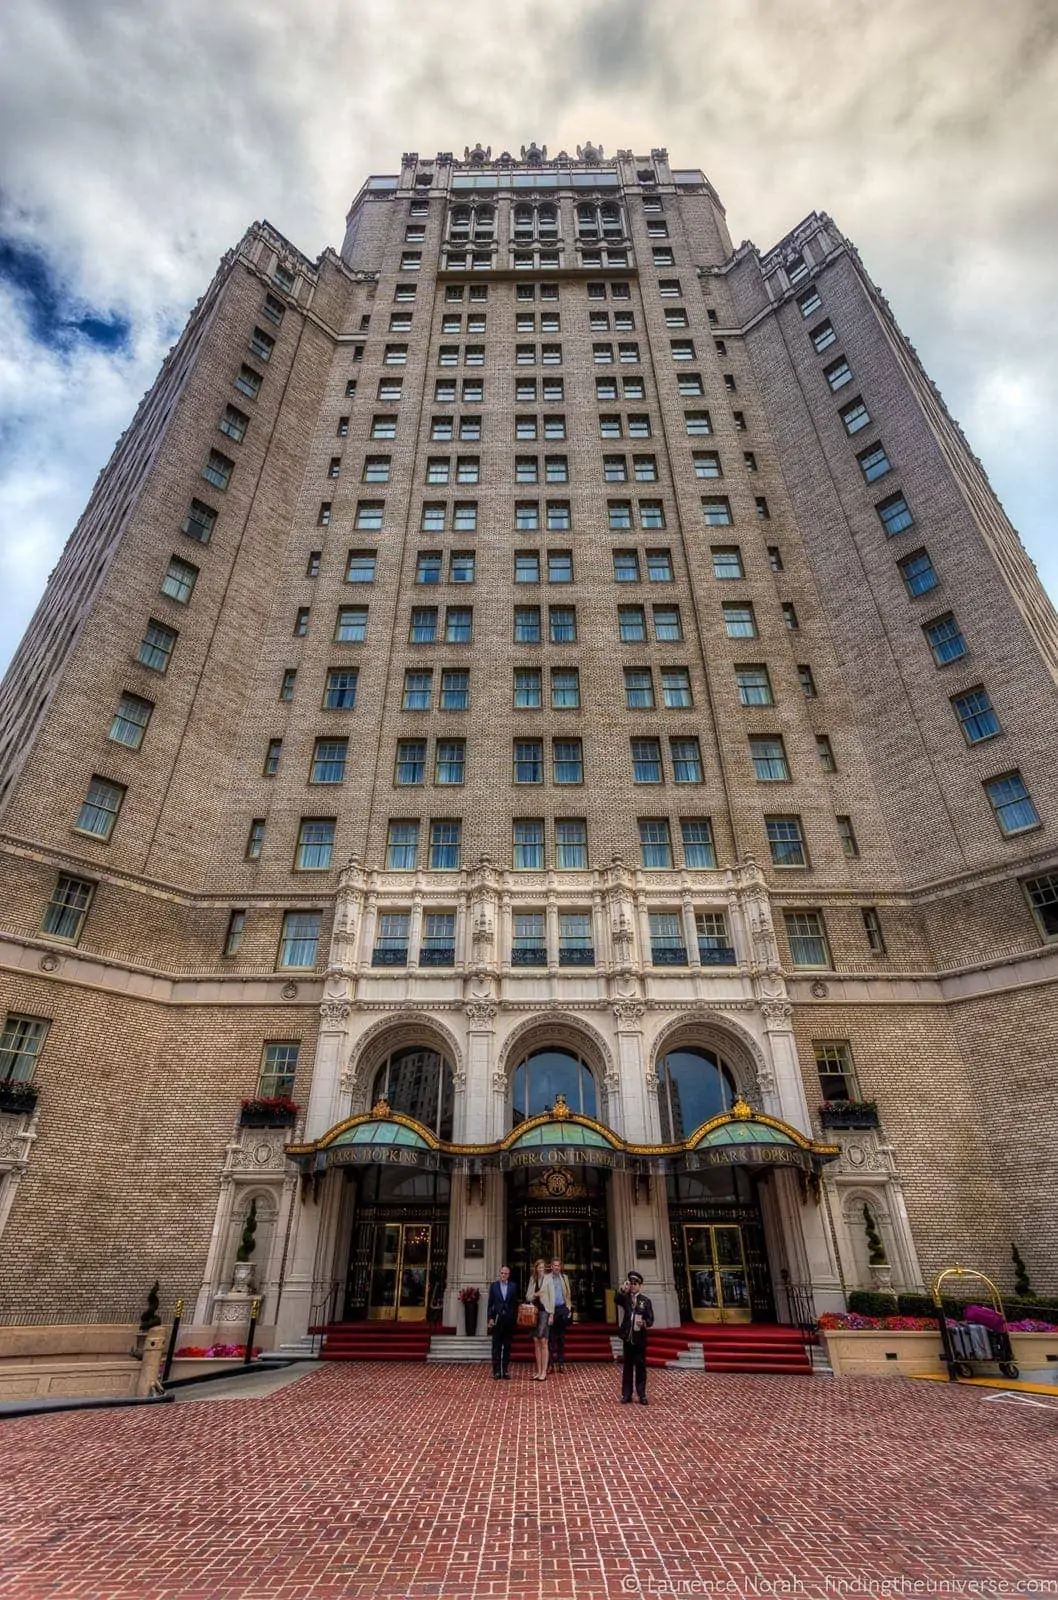
While you’re up here, the Nob Hill area has some of the grandest hotels in the city. The Top of the Mark at the Mark Hopkins is a small icon worth a frame.
Fog verdict: Karl-doesn’t-care for the cable cars. Powell is sheltered enough that fog doesn’t really kill the shot.
14. Mission District
For street art, or just something a bit more gritty, head to the Mission. Clarion Alley and Balmy Alley are the densest concentrations of murals in the city, Clarion off Valencia between 17th and 18th, Balmy off 24th. The art rotates regularly; what’s there now won’t be there in a year. The wider Mission has a colourful streetscape, taquerias, bookshops, the dolores park crowd, and is a great wandering shoot.
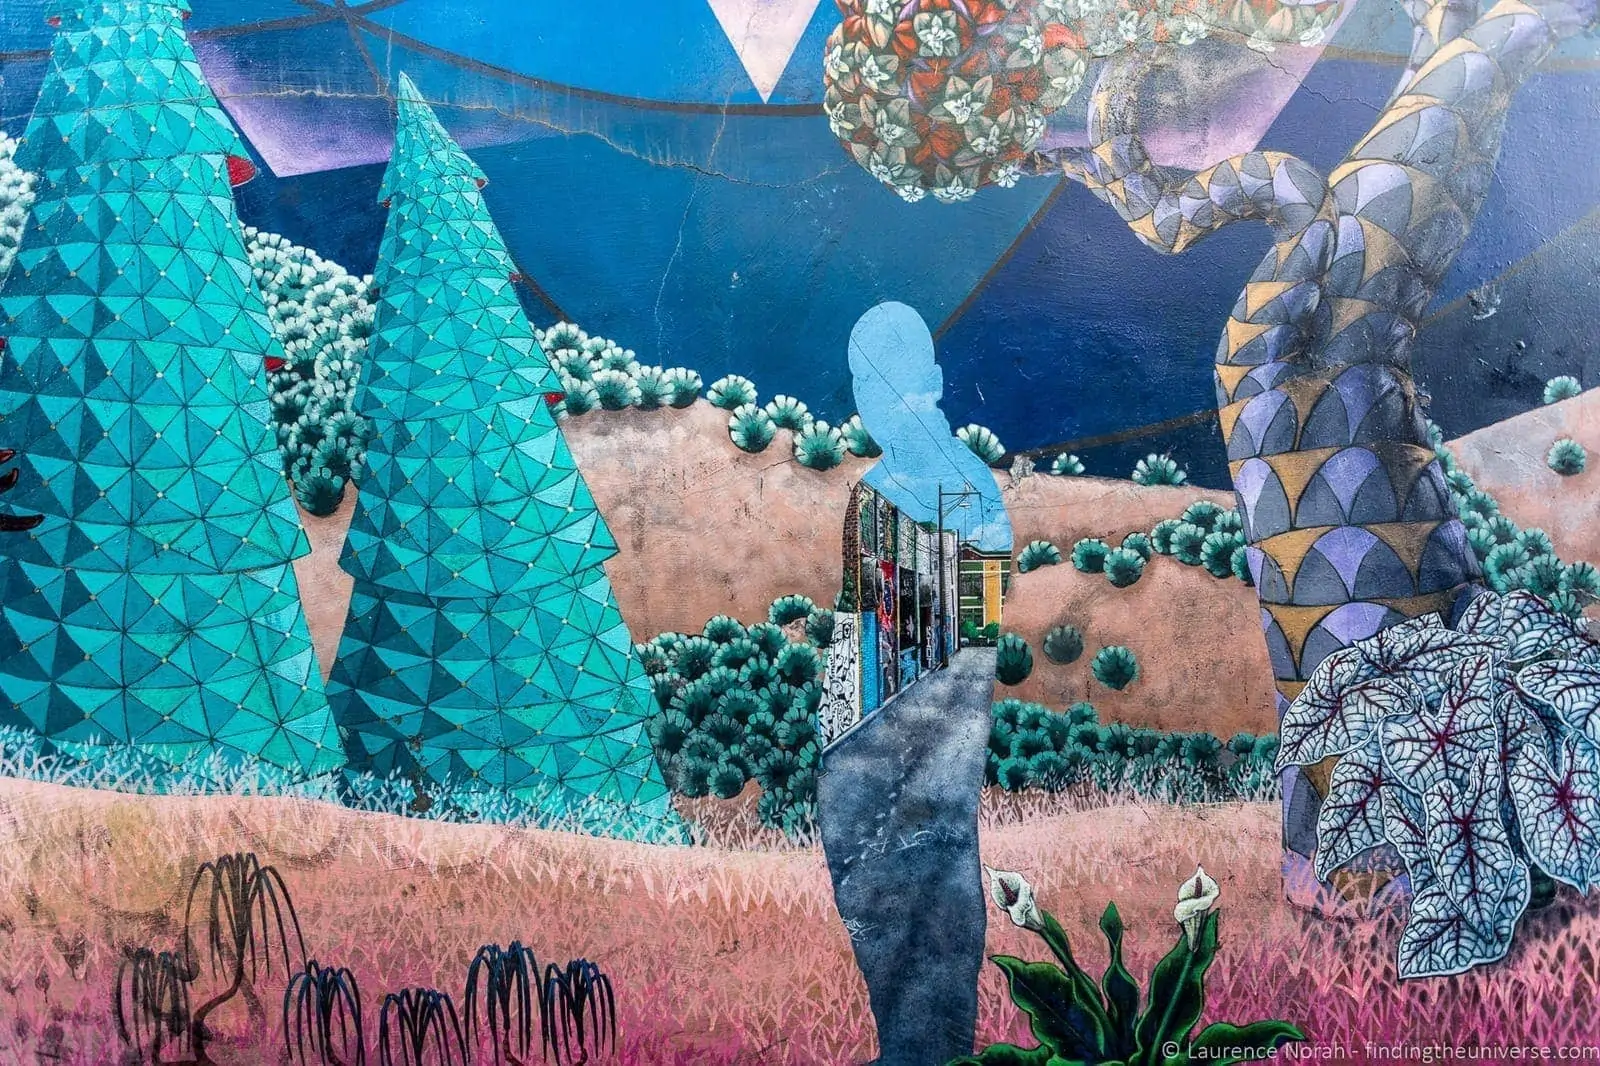
Craft notes: wide angles work for the murals because the alleys are narrow, you’ll struggle to step back far enough for a long lens. The shot above was 17mm at f/6.3, 1/60s, ISO 640, wide aperture, higher ISO for the dim alley light. Watch the verticals if you’re shooting straight at a wall and want it square. Time of day: overcast or shaded light is actually good for mural photography because direct sun causes contrast and colour issues, paint reflects unpredictably. Fog verdict: Karl-doesn’t-care, possibly Karl-helps.
15. Haight-Ashbury
I’d be remiss not to mention Haight-Ashbury, even briefly, the colourful Victorian houses along the Haight are a small but recognisable San Francisco shot, especially the painted facades around the corner of Haight and Ashbury itself.

Craft notes: the shot above is at 29mm, f/6.3, 1/160s, ISO 100, a slightly wider standard focal length to take in two or three houses at once without losing the architectural details. The Painted Ladies at Alamo Square (just north-east of here) are the more famous Victorian-house shot, and worth a stop in the same trip, although they’re often so busy with people doing their own version of the shot that I prefer the quieter Haight blocks.
Time of day: mid-morning when the painted facades are lit but the streets aren’t blasted by midday sun.
Fog verdict: Karl-doesn’t-care.
Suggested shoot routes
A photographer with two mornings and two evenings in San Francisco doesn’t need fifteen separate places to think about. Here’s how I’d chain them.
Sunrise route, bridge from the south: Baker’s Beach for first light on the bridge towers from the south. If light is thin, walk back up to the cliff trails above Baker’s for a higher angle. Drive across the bridge to Battery Spencer for the close-up, and on up Conzelman Road to Hawk Hill for the postcard shot if conditions allow. This is a 3-4 hour morning if you take it slowly.
Sunset route, west-side cliffs and city panorama: Sutro Baths for late afternoon light into the ruins. Walk up to Land’s End for the cypress trail and the Pacific views. Drive across town and finish at Corona Heights for the city panorama as the sun drops, then stay for blue hour on the skyline. About 4 hours.
Bad-weather day (Karl wins): head inland and indoors-leaning. Chinatown for the colour and people, Castro for the rainbow crosswalk and the streetscape, Mission District for the murals at Clarion and Balmy alleys. Then if the fog burns off in the afternoon, finish at Pier 7 for the geometric leading lines (works in any weather) and Powell Street for the cable-car motion-blur shot at dusk. Half a day to a full day depending on pace.
The “I have one full day” plan: Baker’s at sunrise, Battery Spencer + Hawk Hill mid-morning, Land’s End and Sutro Baths around lunch, Corona Heights and Mission late afternoon, Powell Street at dusk for the cable cars. Brutal but doable.
Where to Stay in San Francisco
There are plenty of options for accommodation in San Francisco. We’ve stayed at and are happy to recommend the Hotel Emblem (previously the Hotel Rex), which is well located in the city centre and within walking distance of several of the locations in this guide.
You can see more options for hotels in San Francisco across the full range of budgets.
Frequently Asked Questions
What’s the best time of day to photograph San Francisco?
For the bridge and the headland views, sunrise and sunset both work, sunrise from the north (Battery Spencer, Hawk Hill, Vista Point) catches the towers from the east, and sunset from the south (Baker’s Beach) catches the western face. For the colourful neighbourhoods (Chinatown, Castro, Mission, Haight), late afternoon gives you angled light without the harsh contrast of midday. For the cable cars on Powell Street, dusk into blue hour is the most atmospheric.
How do I plan a photo shoot around San Francisco’s fog?
Check the Bay Area fog cam and the marine-layer forecast before you commit to a spot. As a rough guide: the bridge from low-elevation spots (Baker’s, Vista Point, Battery Spencer) is the first thing fog kills; the Marin Headlands above the marine layer (Hawk Hill especially) can be the best fog-day shot in the city if the layer is low; Land’s End, Sutro Baths, the cypress on the cliff trails, and most of the colour-and-street neighbourhoods (Chinatown, Castro, Mission, Haight) all work in fog or actively benefit from the atmosphere. Have a plan B for the day, never plan a single bridge shot and nothing else if it’s foggy season.
What lens should I bring for San Francisco photography?
A wide-angle (16-35mm equivalent) and a telephoto (70-200mm equivalent) is the two-lens kit that covers almost everything in this guide. The wide handles the architecture, the alleys, the establishing landscape shots, and the symmetrical pier compositions. The telephoto handles the bridge compression from the headlands, the Alcatraz shot from Pier 39, and the cable cars on the steep streets. If you can only bring one lens, bring the telephoto, the wide view is everywhere, the compression isn’t.
Where can I park near the Golden Gate Bridge photo spots?
For Baker’s Beach there are two free parking lots off Bowley Street; they close one hour after sundown and fill on weekends, especially at sunset. For Battery Spencer there’s a small free lot off Conzelman Road just past the bridge, arrive early on weekends because it fills. Hawk Hill has pullouts along Conzelman; the road is one-way past Battery Spencer so commit to the loop. Vista Point has free parking right at the viewing area. Land’s End has a free lot at the visitor centre.
Is it safe to photograph in San Francisco with expensive camera gear?
Use the same common sense you’d use in any large city. The areas in this guide are mostly safe in daylight; the Mission District has improved over the past decade and the busy streets and alley murals are fine, although I wouldn’t wander the quieter blocks late at night with a visible kit bag. Pier 39 and the bridge spots are tourist-heavy and well-patrolled. Don’t leave gear visible in a parked car anywhere, that’s the most common loss point in the city.
What’s the best spot to photograph the Golden Gate Bridge?
Pick the spot that matches the look you want. Baker’s Beach for the south-side sunset; Battery Spencer for the tight close-up from the Marin side; Hawk Hill for the postcard high-angle if conditions allow; Land’s End for the lesser-shot west-side angle. If I had to pick one, Hawk Hill on a clear morning, but I rarely got that morning.
Sunrise or sunset for the Golden Gate Bridge?
From the south side (Baker’s Beach), sunset, the western face of the towers catches the light. From the north side (Battery Spencer, Vista Point, Hawk Hill, Marin Headlands), sunrise, the morning light comes in from the east and lights the towers without putting the sun behind them. From the west (Land’s End), either works depending on what you want to do with the sky.
Do I need a tripod for San Francisco photography?
For the bridge spots at sunrise/sunset and into blue hour, yes, shutter speeds drop fast and you’ll want long exposures for the smoothest water. For the cable car motion-blur shot on Powell, yes, a 1/5s exposure is impossible hand-held. For street photography in Chinatown, Castro, Mission, and Haight, no, a tripod is more trouble than it’s worth and you’ll be more obtrusive than you want to be. The Peak Design Travel Tripod is the one I take on most trips now, small enough to ignore when not in use, sturdy enough when you need it.
Additional reading and resources
San Francisco has more photography spots than one post can do justice to. I haven’t even mentioned the Bay Bridge, the Painted Ladies at Alamo Square, Twin Peaks, or any of the museums. A few more resources to help:
- Jess’s guide to Top 10 Things to Do in Golden Gate Park, another excellent photography area I haven’t covered above.
- If you’re in the market for a new camera, my full guide to the best travel camera covers something for every budget.
- For the gear and filter setup I use across this kind of work, my photography gear post has the full kit list.
- My other photography location guides for getting the shot in destinations around the world, plus the wider photography locations tag.
- If you want to go deeper on travel photography, I run an online travel photography course covering everything I know, with one-on-one feedback as you go.
And that’s it for San Francisco. If you’ve shot the city and have a spot I haven’t covered (especially anything sunrise or sunset that I’ve missed), drop it in the comments, I’d love to know. And don’t forget to look at some of my other photography location guides for more travel photography ideas.

Steven says
Hello! I’m going to San Francisco at the end of May and was hoping to get that cable car shot going up the hill with the Golden Gate Bridge in the background, just as you have pictured. Any chance you could tell me where exactly you took that photo? Perhaps by providing the GPS coordinates? Many thanks for your fantastic and informative article!
Laurence Norah says
Hey Steven!
So the shot of the tram was taken from the intersection of California Street and Mason Street looking down California Street towards Powell Street. It was shot at 200mm, the tram is a couple of blocks away in the image. It’s actually not the Golden Gate bridge in the background though, it’s the San Francisco-Oakland Bay Bridge 🙂
Have a great time in San Francisco, I hope you get lots of great photos 🙂
Laurence
Sam says
Great blog!
Btw:
6. “Chinatown” is one word. And the photo you used may have been from the parade but it’s of a woman in Japanese clothing and make-up 😉
Laurence Norah says
Hi Sam!
Thanks very much 🙂 I’ve fixed that error! I know the lady is in Japanese dress, but as it was a Chinatown parade I figured it was ok 😉
Laurence
Marc Yoder says
The beautiful cable car shot with the bridge in the background. Is that near the Fairmont? Could I get it with a 50mm lens, or will i need more pull? Great article!!! Thanks!!!
Laurence Norah says
Hi Marc
This was taken at 200mm, so you would either need to crop, or take a longer lens 🙂 And yes, you have the location correct!
Eve says
Hi Laurence,
Great guide and pictures, thanks a lot for sharing!
Can you tell me where you were exactly to get the shot down the length of the Golden Gate? Is there a place high enough at Vista Point to get it directly from there or do you have to go on the hills?
Thanks again!
Best,
Eve
Laurence Norah says
Hi Eve!
My pleasure 🙂 And yes, I can! My camera has built in GPS, so I can give you the exact co-ordinates of that image in fact 😉
It was taken from here:
37°49’56.063″ N 122°28’48.353″ W
If you look at that on Google Maps, you’ll see it’s from Vista Point itself, no need to climb a hill 🙂 You will need a zoom lens though, this was shot at 175mm to get that effect.
Enjoy, and do swing by and let us know how your trip went and share some photos! We even have a facebook group for just that sort of thing, if you use facebook!
https://www.facebook.com/groups/travelloversandphotography/
Best
Laurence
Eve says
Thanks so much for your fast and detailed answer Laurence! I’ll check your Facebook group!
Best,
Eve
Laurence Norah says
My pleasure!
Dolf says
Laurence, thank you for the detailed info. I had 3 days to burn and your guide was the best to hit the major points. I encountered some very aggressive homeless folks at pier 7 early one morning, but was able to get my shot and move on. Thxs again.
D.
Laurence Norah says
Hey Dolf – my pleasure! It’s such a photogenic city, I’m delighted you were able to get some shots without too much trouble 🙂
Cathy Ivie says
How did you manage to get a photo in the middle of Caifornia Ave?
Laurence Norah says
I took it from a pedestrian crossing in the middle of the street with a long lens 🙂
Jaki Levy says
Thanks for this great resource. I’ve lived in San Francisco for over 6 years and still got some good info and inspiration from you. It’s nice to see these places from a different set of eyes 🙂
Laurence Norah says
Thanks Jake, our pleasure. A beautiful city to call home 😀
Charlie says
Save all locations in google maps. maybe someday.
Laurence Norah says
I hope so!
Stop Motion and Beyond says
Thanks Lawrence for your photographic insights. I just started getting serious about my photography and your photos and info are very helpful. Thank you very much..
Laurence Norah says
My pleasure – delighted you found it useful. Enjoy San Francisco!
Abhishek Prabhu says
Love the telephoto shot of the cable car !
Jake says
I love the picture at Pier 39! How did you get Alcatraz to look so close?
Laurence says
Thanks very much! A zoom lens is the answer, it makes things seem closer together 🙂
Austin Dixon says
Gotta love SF! Great photos and thanks for sharing. If you’re ever in LA, let’s connect 🙂
/ Austin
Laurence says
Thanks Austin, will do!
Tripplanners says
Very good website and photographs. Thank You.