
In today’s photography tips post I’m going to be talking about a popular photography technique that many professional photographers, myself included, use on a daily basis—back button focus. This is one of those techniques that has a short learning curve, but once you’ve got the hang of it, you’ll wonder why you ever took photos any other way. Of course not everyone is going to want to use back button focus as it’s a matter of preference, but this post should give you all the information you need to try it out and decide if it is for you.
In this post I’m going to go through everything you need to know, from what back button focus is through to why you would use it, how to activate it on your camera and finally, how to actually use back button focus. Let’s get started.
Table of Contents:
What is Back Button Focus?
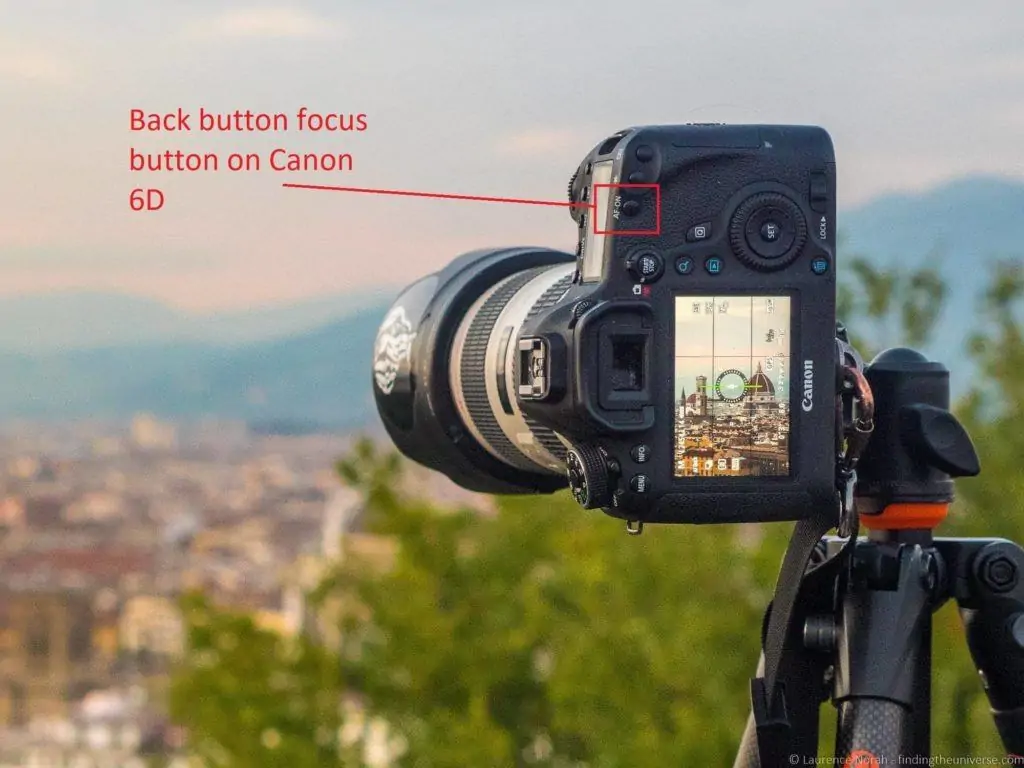
As the name suggests, back button focus involves using a button on the back of your camera to control focus. As a result, it won’t be available on every camera, although many mirrorless and SLR cameras do offer this as a feature. Canon cameras in particular have this feature across their SLR range, even on their more basic DSLR camera models.
Normally when you are taking a picture, you depress the shutter button a little way which does two things: 1.) it focuses the image and 2.) it calculates how much light there is in the scene so the exposure can be correctly set.
Then you press the shutter the rest of the way to take the picture.
With back button focus, the shutter button no longer controls focus, instead, it just handles light metering and actually taking the picture.
Why Would You Use Back Button Focus?
The main reason is to have more control. By separating the focus from the exposure metering, you are able to perform these two functions separately. You can also focus on a subject, then recompose your shot more easily to match the composition you are looking for.
This has multiple benefits. The first is that you have total control over focus and exposure metering, and can control them independently. So you can focus on one part of the scene with back button focus, recompose your shot, expose by using the shutter button, and then take the shot.
The next advantage is that you don’t have to keep refocusing between shots if you are taking pictures of the same subject but with slightly different compositions. With back button focus, you only need to focus the first time – after that however many times you press the shutter button it won’t refocus unless you choose to.
This is invaluable if you are doing portrait work, as a wedding photographer for example, and want a number of compositions of the same scene – you get your focus right for the first shot, and then don’t have to worry about the camera erroneously focusing on a bit of background in the fourth or fifth shot.

Back button focus can also save you from the dreaded situation where the camera loses focus just because you forgot to keep the shutter button partially depressed whilst waiting for the moment to take the shot. If you do this normally, when you depress the shutter again, the camera will hunt for focus again – meaning you might lose that shot. With back button focus, once you’ve got focus, you can just worry about hitting the shutter button at the right moment.
Finally, in my experience, back button focus makes action and wildlife photography much easier. Most cameras these days come with a variety of continuous focus modes, where the camera will lock focus on a moving target and adjust focus to keep the target sharp. On Canon this is called AI Servo mode.
Back button focus makes photos of moving subjects easier, as you can use one button to keep the focus, and then hit the shutter button to get the shots you want without worrying about your use of the shutter button changing the focus.
How to Activate Back Button Focus
Now that I’ve shown some of the benefits of using back button focus, you might be wondering how to activate it for your camera. Well, the simple answer is that you should check your camera manual, because activating back button focus varies from brand to brand, and from camera model to camera model.
For example, on my Canon 6D, I have to go to my Custom functions 3 menu, then scroll to screen 5, then change the shutter button to metering start, and change the AF-ON button (this is the back-button) to AF-Start. This sounds complicated but only takes a few seconds now I know what I’m doing.
For your camera, you can check your camera’s instructions handbook or visit your camera manufacturers website where you can find out how to activate back button focus for your camera. For Canon models, you can see this Canon learning article on activating it for popular Canon models.
How to Use Back Button Focus
Once activated, back button focus is easy to use. First, you’ll want to make sure your camera is set up so you have a specific focus point selected. You definitely don’t want to be letting the camera pick the focus point (the whole point of this exercise is to take back control!).
Again, how you do this varies by camera. On my Canon 6D for example, there’s a button on the back of the camera that lets me select the autofocus point— I can choose one of the focus points myself, or I can let the camera pick the focus point depending on the scene. I usually have the centre focus point selected as on my camera model it’s the most accurate, particularly in low light situations.
Once you have the focus point selected, you point your camera at the scene and place the focus point over the subject you wish to focus on. Press the back button focus button until the camera indicates it has focus. For static subjects where you are not using continuous focus, you can now let go of the back button focus button, and the camera will keep it’s focus point. For moving subjects, you will likely want to keep the back button focus depressed as you track the subject so it keeps focus.

Now, you can either take the shot, or you can recompose to achieve the composition you want. I usually recompose as I generally don’t want my subject right in the middle of the shot (read more on composing great photos here).
Once you have the shot composed, just press the shutter button to take it. You can even take a few shots of different compositions. You only need to refocus if you change your focal length, or your subject moves closer or further away from the camera (or you move).
This does take a bit of practice, not least because you are now using your thumb for one function (the focus) and your finger for the other function (taking the picture and exposing). In particular, when shooting moving subjects with a continuous auto-focus mode can be a little tricky to master.
Reasons not to use Back Button Focus
Whilst back button focus, once mastered, can improve your photography, in our experience it has one major drawback. This is when you happen to be out and about, and ask a stranger to take your picture (one of our techniques for getting photos of yourselves as a couple). Trying to explain back button focus on the fly to a photography novice is generally not something you want to be doing!
My solution is that I know how to quickly disable back button focus on my camera, and just do that quickly before handing my camera over.
Another option that we have used is just to set up the shot beforehand, and then hand over the camera, and just asking them to press the button. If you set a fairly high aperture (around f/8 to f/11), most lenses will be fairly forgiving of focus thanks to depth of field, so even if the person moves forward or backward a bit the shot will come out fine.
Otherwise, just get used to carrying a tripod and getting photos of yourself that way, it will likely turn out better anyway!
I’d also add that back button focus is a bit of a learning curve, as you will be so used to your shutter button performing the focus for you. If you have a new camera and are just starting out with photography, I would perhaps suggest not enabling back button focus until you are comfortable with your camera and how to operate it. Back button focus is a fantastic photography technique, but it’s not for everyone, so only use it if you feel the benefits will make it worth it for you.
Further Reading on Photography
Hopefully this article on back button focus has been helpful. This is a relatively advanced technique usually used by professional photographers, but once you get used to it you’ll likely wonder why you ever focused in any other way! Now that you’ve conquered back button focus, you might want to improve your other photography skills, so take a look at some of our other photography related content:
- If you’re inspired to buy a camera that supports back button focus, check out my guide to picking the best travel camera, which features a range of cameras at various price points, many of which have back button focus
- If you need a new lens, I have a guide to the best travel camera lenses which covers the majority of camera types available today
- Looking for inspiration for what to buy for a photographer in your life? Check out our detailed photography gift guide!
- For more information on improving your photography, take a look at my series of Photography Tips, which I am always expanding and updating with posts like this one
- Ever wondered how to easily replace the sky in an image? Check out our guide to sky replacement in photography for an easy process anyone can do.
- I also have an always expanding series of Photography Location Guides, to help you get the best shot in locations around the world.
- An overview of my Travel Photography Gear, in case you wondered what a professional photographer has in his bag
- A Beginners’ Guide to Improving your Travel Photos for those starting out in travel photography
- Our reasons why you need a travel tripod
Looking to Improve Your Photography?
If you found this post helpful, and you want to improve your photography overall, you might want to check out my online travel photography course.
Since launching the course in 2016, I’ve already helped over 2,000+ students learn how to take better photos. The course covers pretty much everything you need to know, from the basics of how a camera works, through to composition, light, and photo editing.
It also covers more advanced topics, including astrophotography, long exposure photography, flash photography and HDR photography.
You get feedback from me as you progress, access to webinars, interviews and videos, as well as exclusive membership of a facebook group where you can get feedback on your work and take part in regular challenges.
It’s available for an amazing one-off price for lifetime access, and I think you should check it out. Which you can do by clicking here.
And that’s it! As always, if you’ve got any questions about this post, or any photography questions in general, do feel free to leave them in the comments below, and I’ll get back to you as soon as I can.
Sal Approvato says
thanks for the article, I will be checking out RAW shooting with my new Pixel 7 Pro (my only camera). I also just subscribed to your newsletter.
Is it possible to take a JPG photo and convert it to a RAW photo to better edit it ? I’m thinking probably not but I’m not sure.
Laurence Norah says
Hey Sal,
It’s my pleasure! So no, you can’t go from JPG to RAW unfortunately. JPG is what’s known as lossy compression, which means when the image is compressed the data is lost.
Hope this helps, let me know if you have any more questions! The Pixel 7 Pro is a lovely bit of kit, enjoy it!
Laurence
Sal Approvato says
thanks Laurence. I look forward to learning a lot more about photography through your content.
Laurence Norah says
My pleasure Sal!
Fiona Haughton says
Are you saying that you still need to half-depress the shutter button after pressing bbf button to meter for the exposure? This seems to defeat the object for fast moving subjects??
Laurence Norah says
Hi Fiona,
This will depend on your camera and how you have it set up. Most cameras continuously meter the light, and half depressing the shutter button locks the exposure. You can see what your camera does when it’s on by moving it around and pointing it at different areas of brightness in aperture or shutter priority mode. If the settings change, it’s metering. When you half depress the shutter button, it will likely lock the metering (although this depends on your setup).
I hope this answers your question but let me know if not!
Best
Laurence
Dorian Mases says
Such an really well written and informative article. I can’t believe how good using the back button focusing and it’s sad that I had not found it sooner, thanks for your help.
Dorian
Laurence Norah says
My pleasure, thanks for your comment Dorian 🙂
robert says
Informative article! Mntioned above are some useful and effective photography tips. Thanks for sharing such an amazing article.
Laurence Norah says
Thanks Robert 🙂
Rose says
Thanks for sharing your Photography tips. I’m happy to share this.
Laurence Norah says
Thanks Rose!