A common photography problem that you have likely encountered when taking photos is that sometimes the sky doesn’t compliment the scene you are photographing. The end result is that we get a lovely shot of some scenery or people, with a flat grey sky that really doesn’t do justice to the scene we are trying to shoot.
You might encounter the dreaded sky problem in a range of different scenarios, from travel photos through to wedding photos or graduation photos. What these moments have in common is that they tend to be time sensitive. You only have the one opportunity to get the photo, so you have to get the shot regardless of the sky.
It can come down to a choice between a shot with poor skies, or no shot at all. Obviously the shot with poor skies is really the only option. After all, these are the kinds of photos you are going to treasure, and likely even print, display, and share with people. They’re also unlikely to be shots you can ever take again!
Even if the sky isn’t grey and featureless, if your subject isn’t well lit you might find that your only options are a correctly exposed subject and over-exposed sky (the sky just looks white), or a dark subject and a correctly exposed sky. Neither of these are good options.
One solution to this problem is to shoot multiple exposures and blend them together afterwards, a technique known as exposure blending. However, not everyone is travelling with a tripod and the other necessary equipment to shoot these types of shots. So replacing the sky might be the only option.
In this guide, I’m going to walk you through replacing the sky with an easy to use photo editing application.
Before the tutorial, let’s answer some common questions about replacing the sky in a photo.
Table of Contents:
Why Would You Want to Replace the Sky in a Photo?
There are a number of reasons you might want to replace the sky in an image.
The first is that when you took the photo, it was not necessarily a nice day, and a flat grey sky doesn’t do your subject justice.
The second is that perhaps the light was challenging when you took your photo, and so the sky came out so bright as to be unnatural.
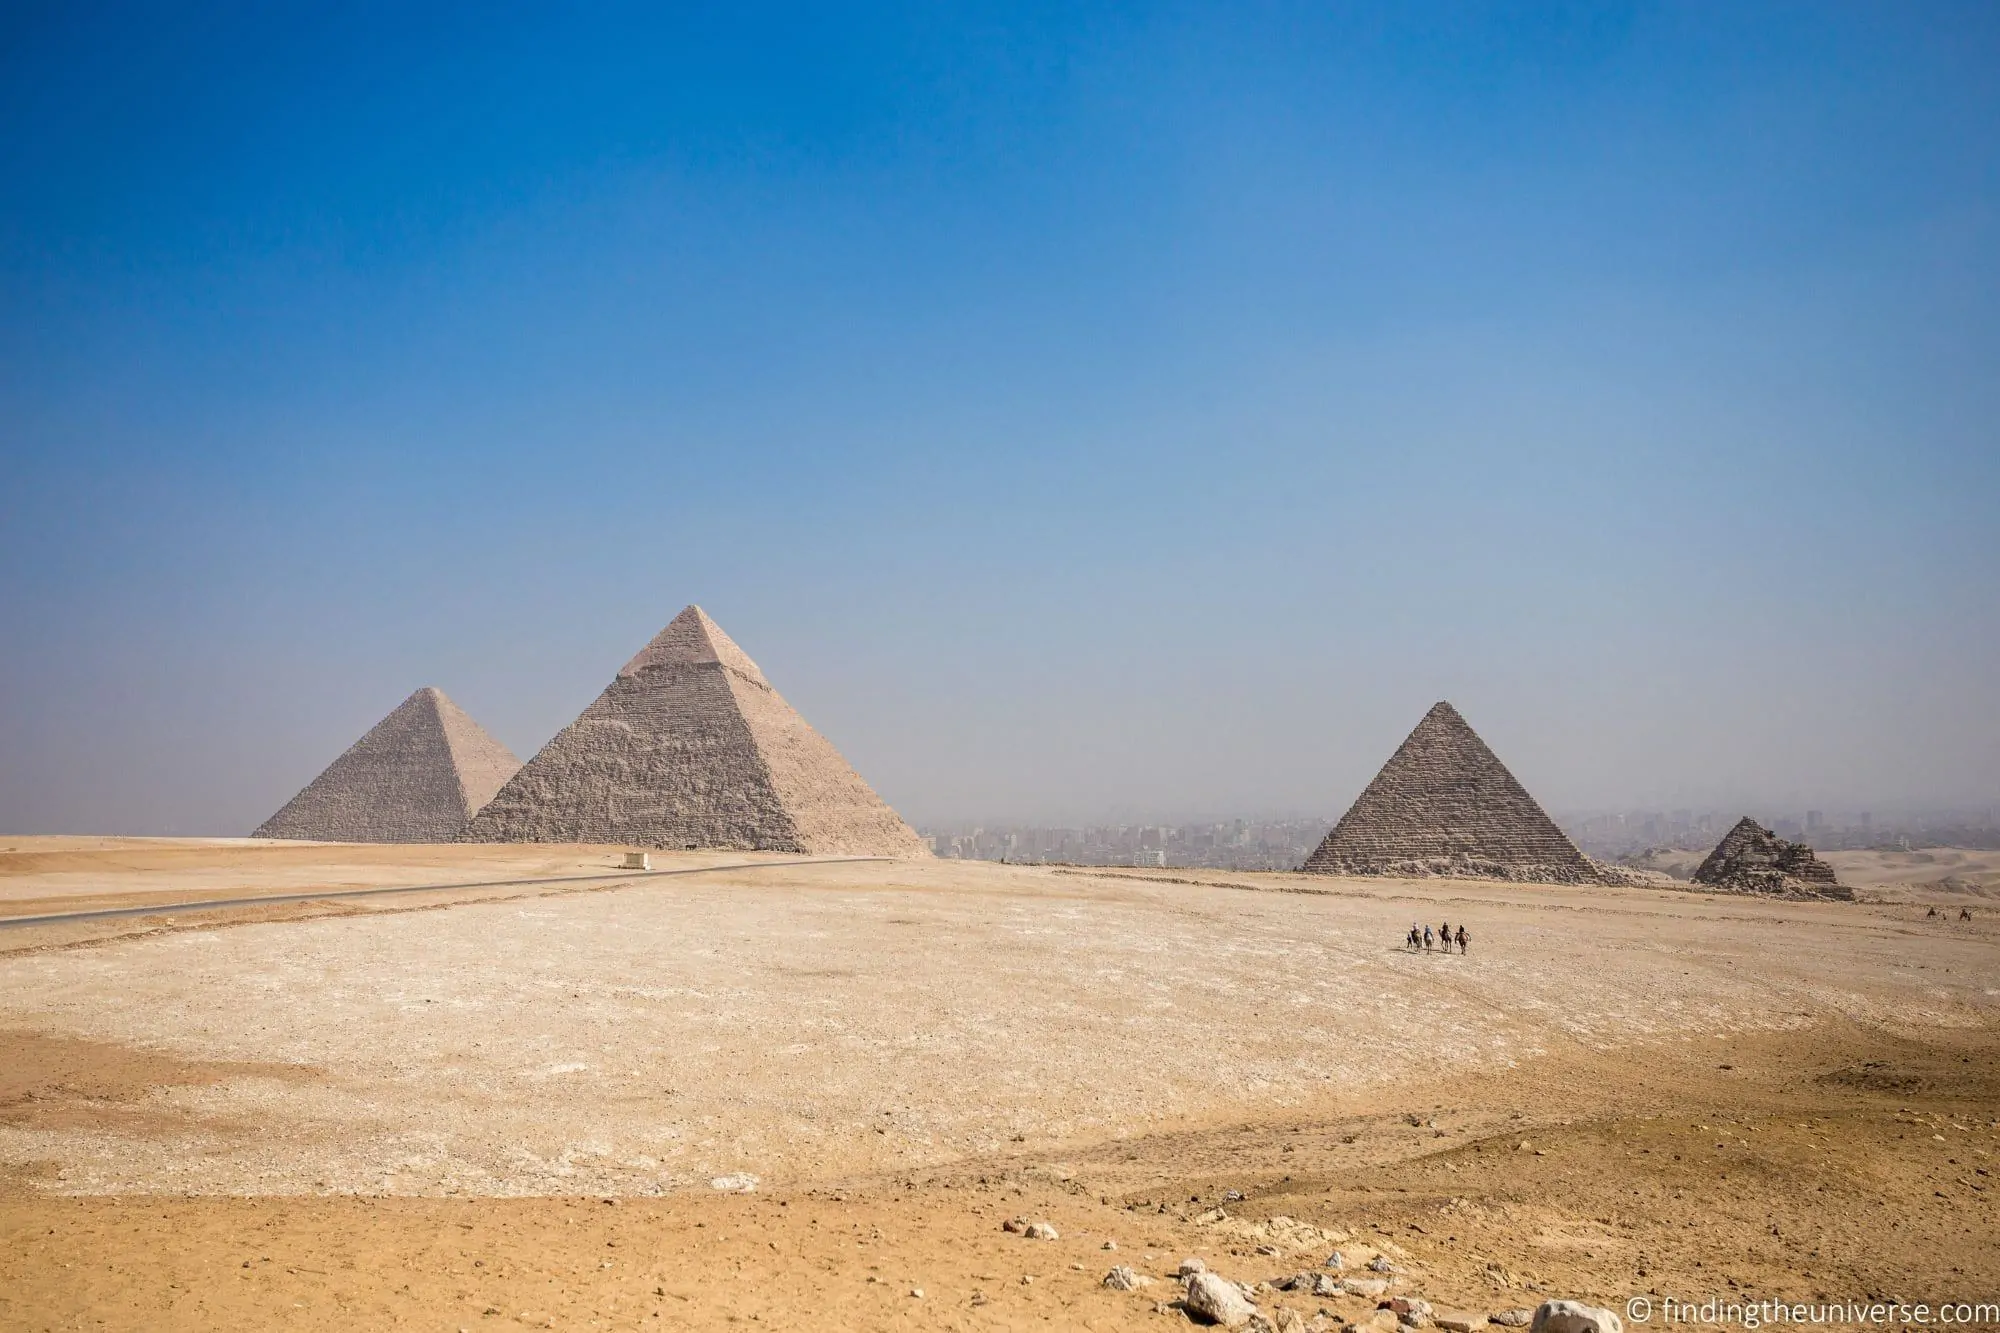
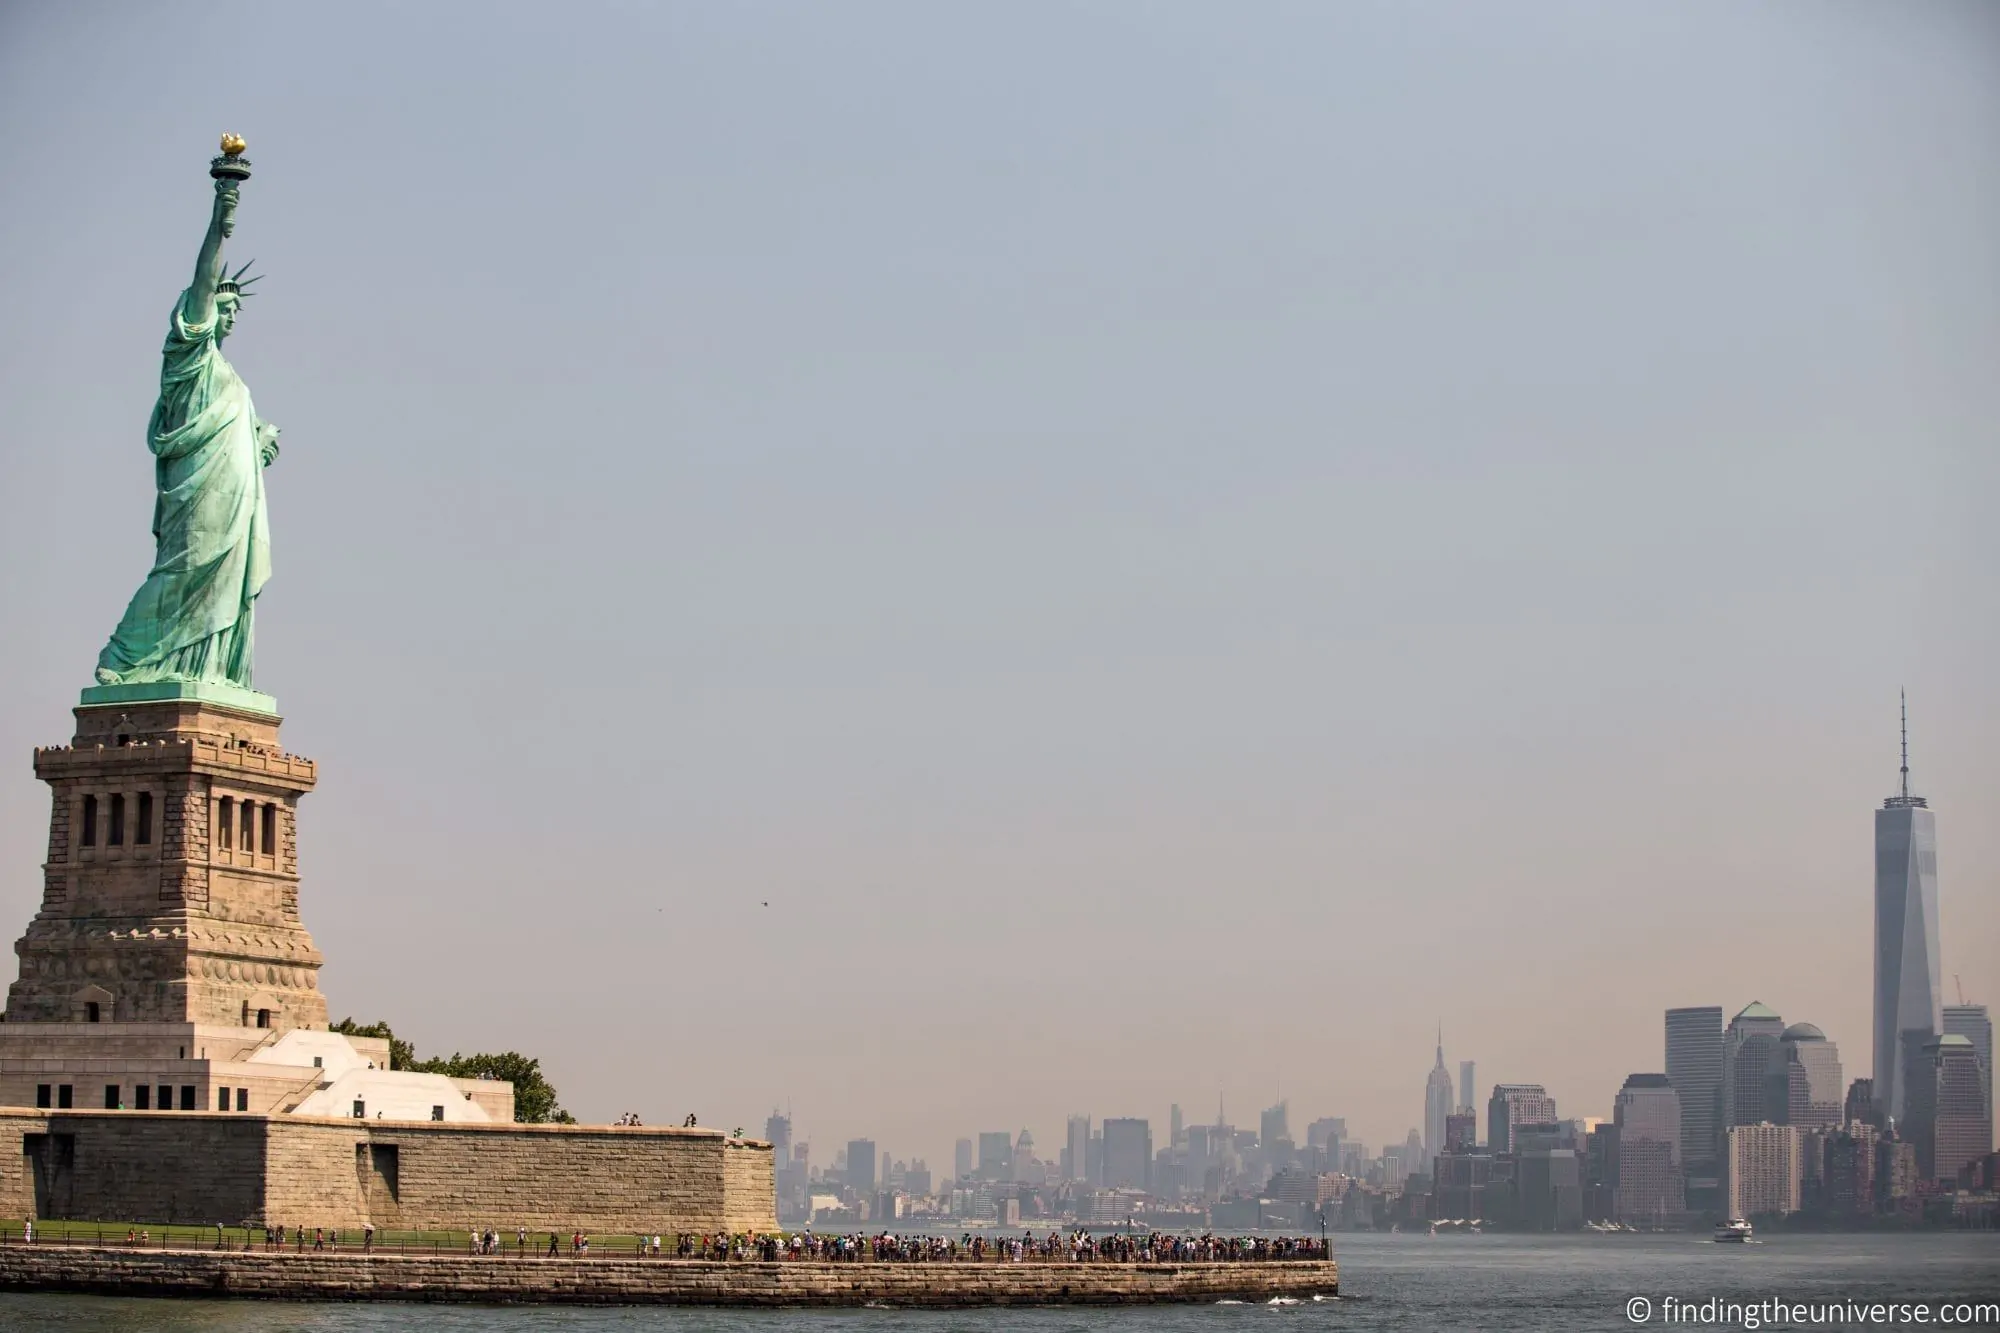
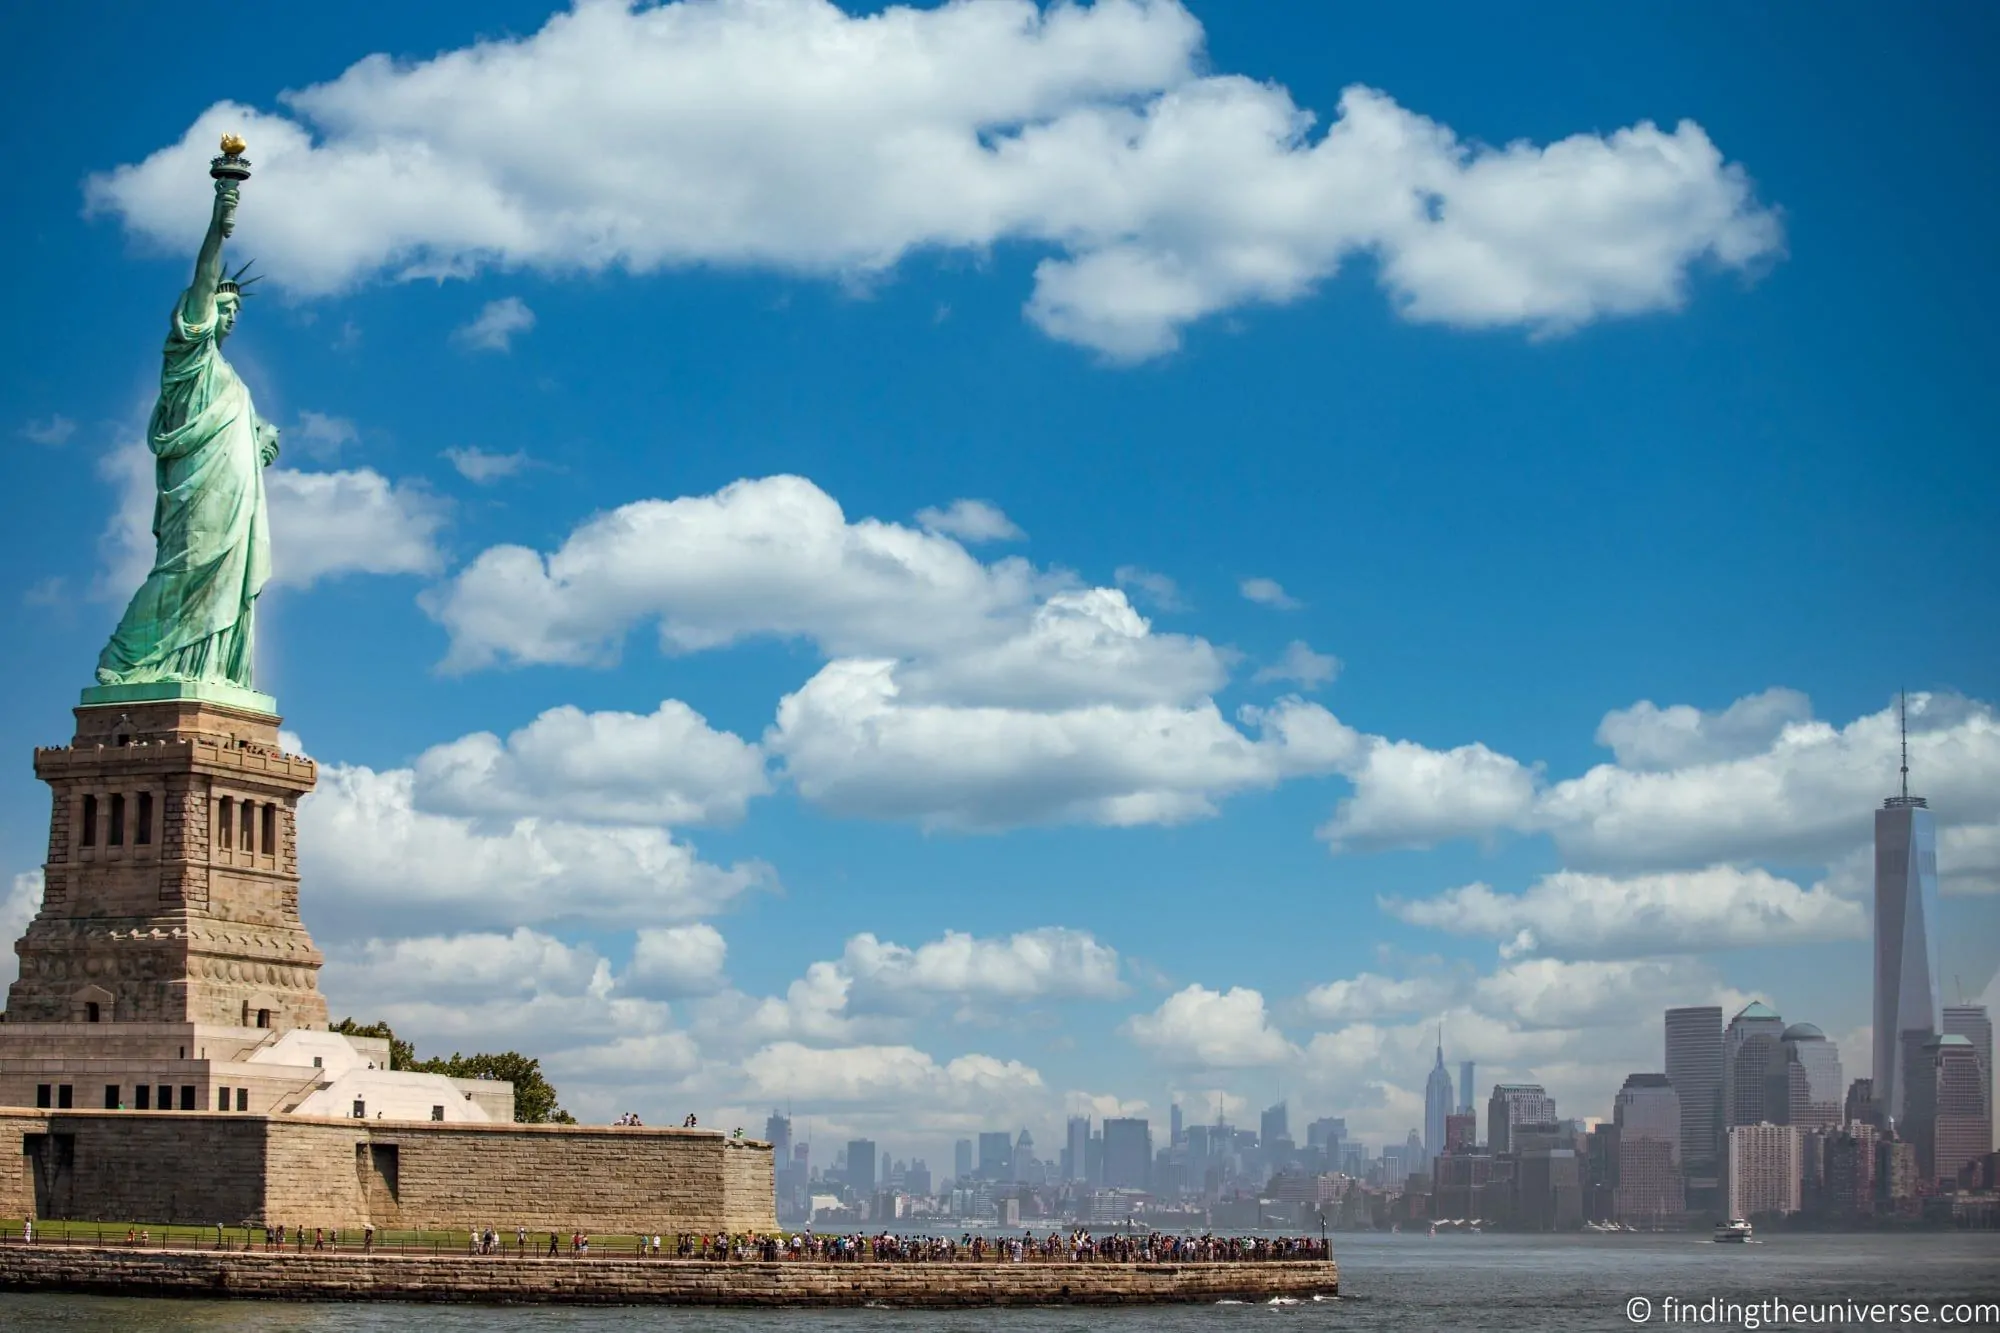
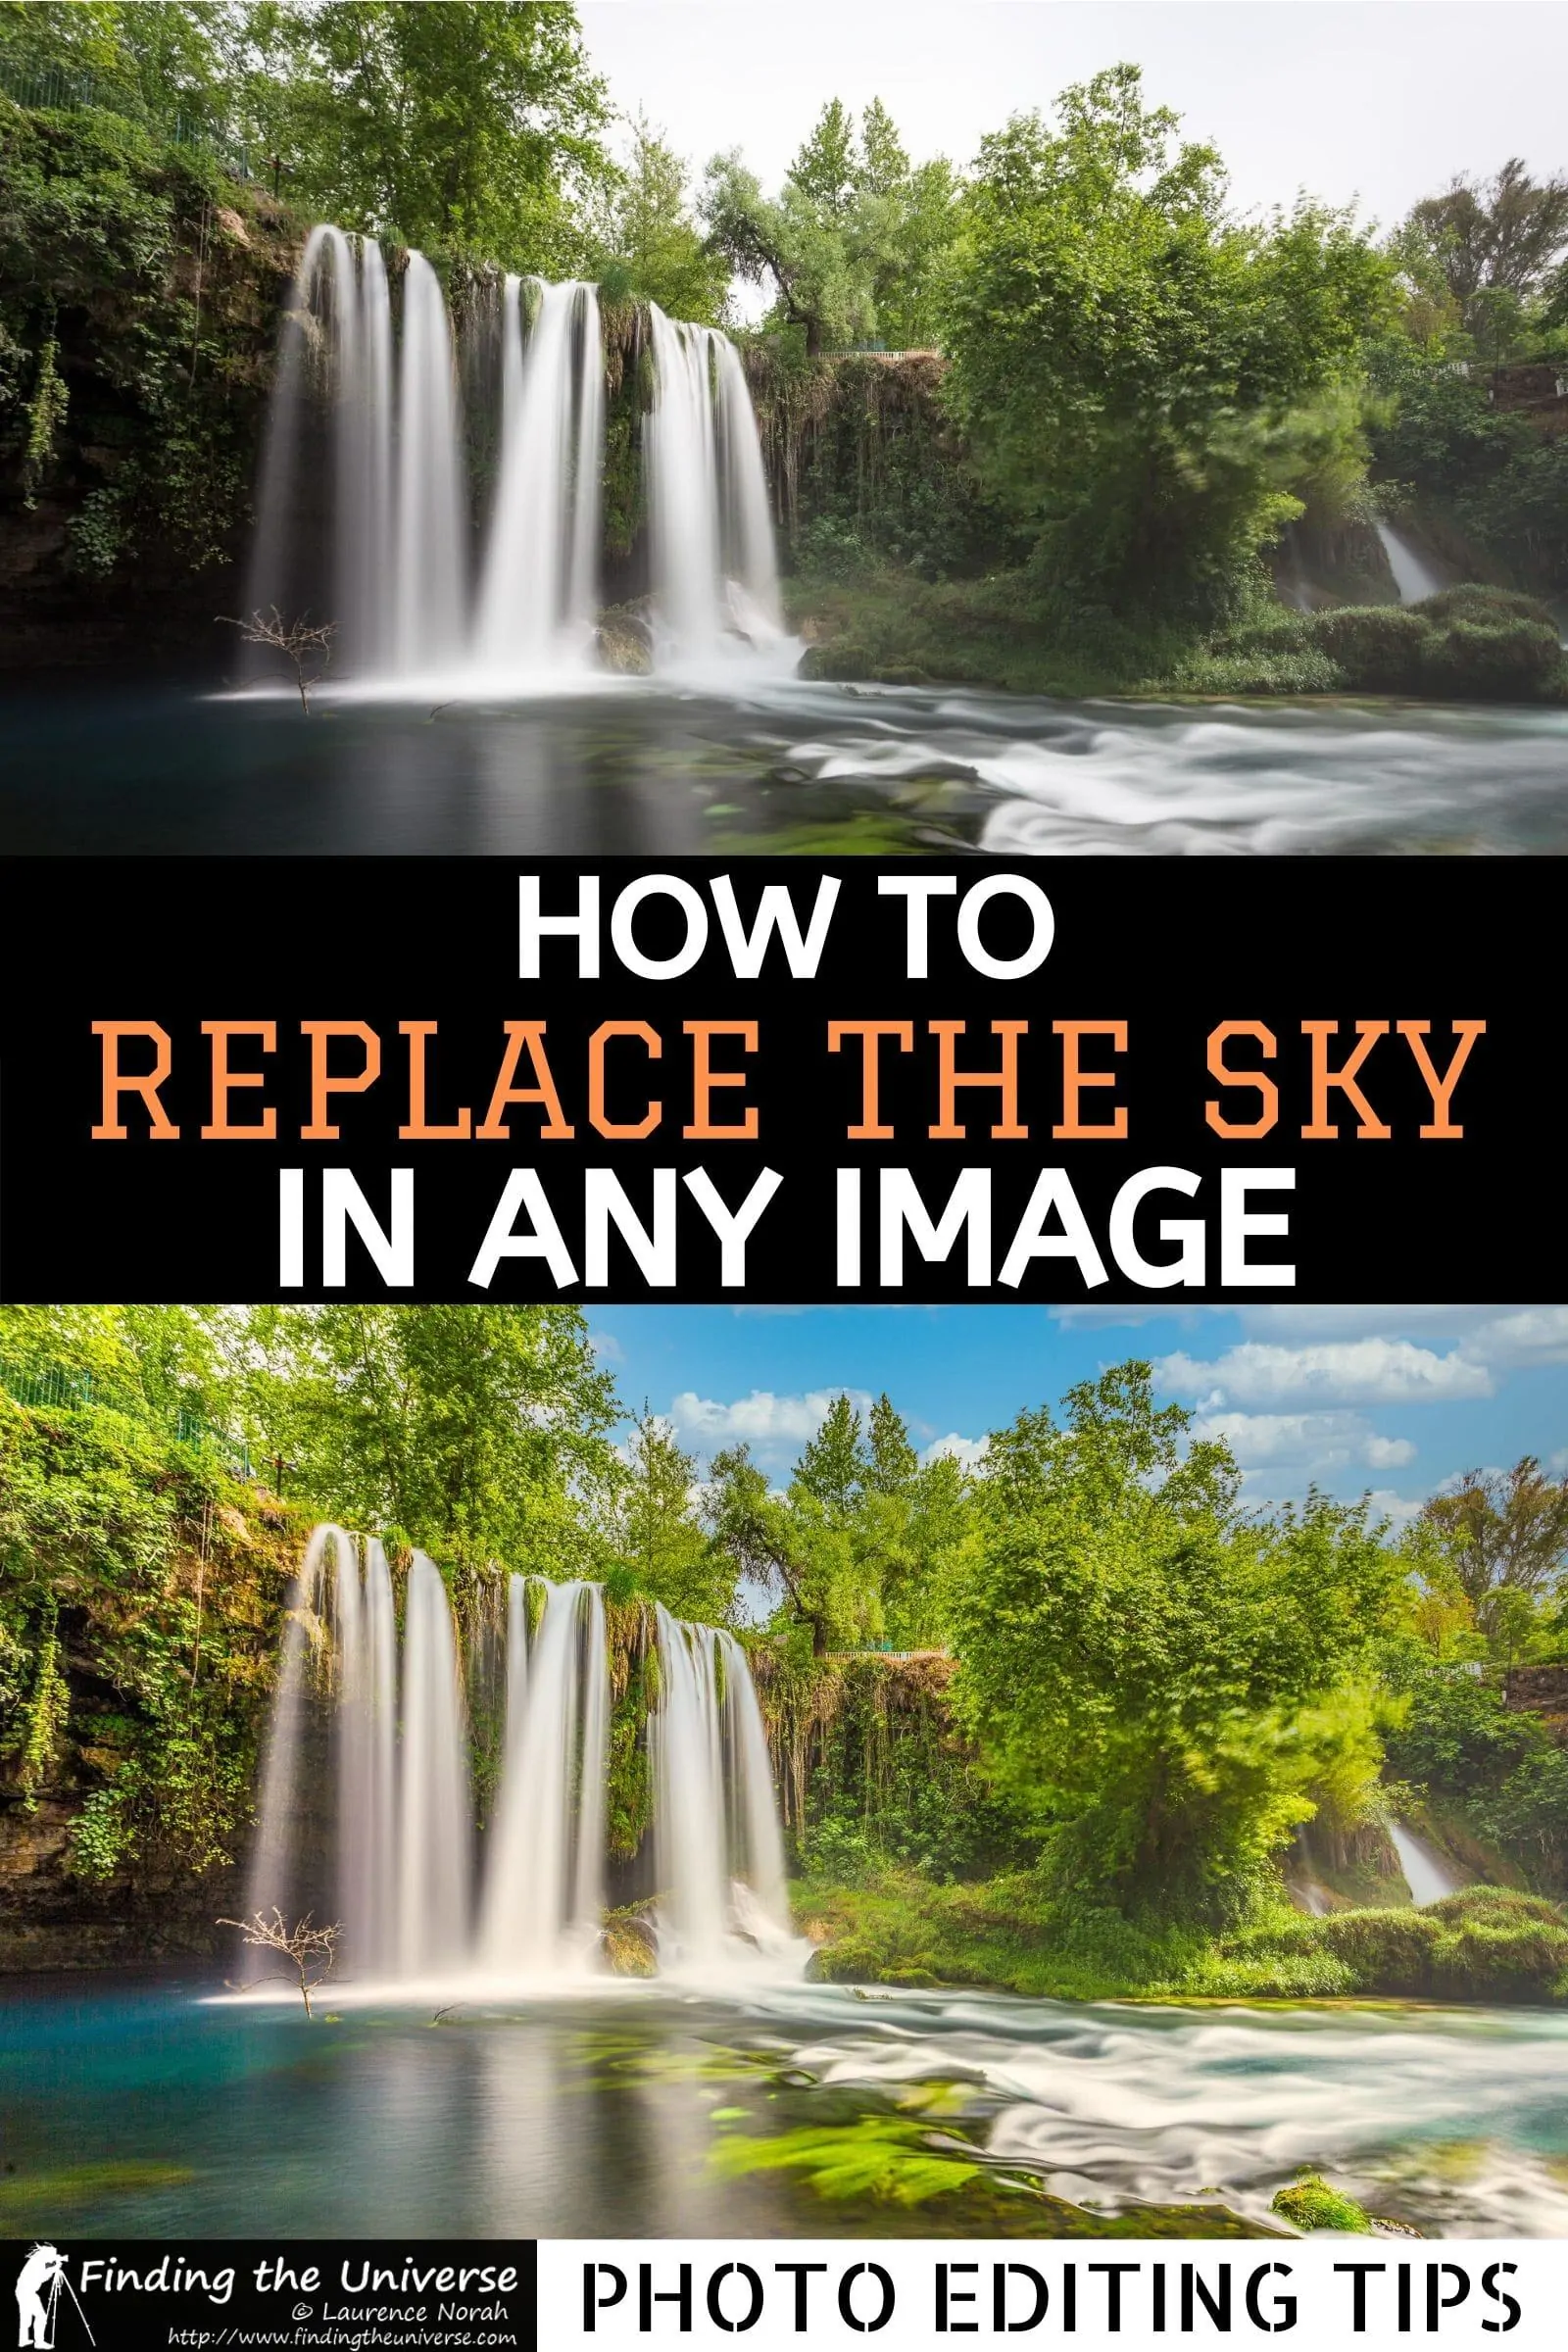
I would say as travel photographers the above two reasons are the main reasons to replace a sky. Here’s a before an after of two images to give you an example. I’ll use this same image in the sky replacement tutorial further on in this post.


Of course, it’s not just travel photographers who run into this issue. Anyone trying to photograph a time sensitive moment like a wedding, graduation, or special event is going to be familiar with the issue of not having limitless opportunities to capture the moment. Regardless of the sky, you need to get the shot!
There are other reasons to replace a sky too. Astrophotographers for example, sometimes use star tracking setups for really long exposures. These track the movement of the stars across the sky, creating wonderful images of the night sky. However, it also makes the land blurry because the camera is moving.
In these situations, the solution is to take two images – the long exposure tracked star shot of the sky, and a shorter exposure of the foreground. The final image would then be a composite of the two images. In this case, you technically need to replace the sky in one image with the other, although you are still using the two images you captured.
Finally, you might want to replace the sky for artistic reasons rather than anything else. Maybe you want to pop a nice milky way shot over a city skyline, or change a daytime shot into a sunset image.
Changing the sky in an image can really change the overall look of the shot, and it can be a great way to make an average image great.
Is Replacing the Sky Cheating?
Before answering this question, let’s talk a bit about photo editing.
Every photo you see is edited in some way. It has to be – a photo is a representation of a scene, and to turn the scene into a photo requires it to be processed in some way.
This will either be done by your camera when you take the photo, or by you when you load it into a photo editor.
However, there is a difference between editing a photo to adjust things like brightness and sharpness, and manipulating a photo to fundamentally change parts of it, by removing or replacing parts of it.
The former is generally known as photo editing, the latter is known as digital manipulation. This technique is commonly referred to as “Photoshopping” in reference to the most popular software used for digital manipulation, Adobe Photoshop.
To answer the question of whether or not replacing the sky is cheating, we should consider whether or not digital manipulation in general is cheating.
This is a complicated question to answer. Photography is a form of art, and ultimately as the artist you can create whatever art you like. In addition, changing the sky isn’t necessarily a misrepresentation of a scene. If you had visited on a sunny day when you took your photo, you likely would have gotten an image like the one you created when you replace the sky.
That said, if you wilfully misrepresent the image as being a true representation of the scene you actually saw, perhaps to enter it into a photo competition, then that would be considered cheating. For this reason, most contests are very clear that digital manipulation is not allowed.
Personally, I don’t replace the sky in my images very often, if at all. I like to keep the images on the blogs as true to life as possible, to represent the experience we had. Sometimes it rains when we travel, that’s just life. But that’s my personal decision, not necessarily the right one for you.
I don’t think though that most people will really care one way or the other if you edit your holiday photos to make the sky look a bit nicer than perhaps it was, or to fix up an overexposed image. They’re your images, so I say do what you want with them.
If you are a wedding or event photographer, and have been commissioned to produce photos for a client, then this is a bit different. My suggestion is to talk with the client about the images, and consider giving them versions of the image with or without the skies edited if they prefer. Obviously this is additional work on your part, so this is something to discuss with the client.

What Photo Software Can You Use To Replace a Sky?
When people think about digital photo manipulation, the first software that comes to mind is likely going to be Adobe Photoshop. This is definitely one of the most popular tools among photographers and digital artists for all sorts of image manipulation tasks, including sky replacement.
The latest version of Photoshop allows for easy sky replacement. However, Photoshop is a relatively expensive product, and many photographers don’t want to pay the monthly fee to use it. In addition, in my testing, I’ve found that other tools actually do a better job.
Instead of Photoshop, I’m going to suggest you use Skylum Luminar for sky replacement. This is a standalone product, available both as a subscription and for a one-off price, which has a number of very useful tools for photo editing.
One of these tools is the AI Sky Replacement tool. This is an amazingly powerful tool which makes replacing skies really easy. It comes with a range of pre-defined skies, and you can also add your own skies, or download more skies from their online library (for a fee).
It has a range of easy settings you can use to adjust the sky replacement, and it also adjusts the lighting in your image to make the sky look more natural. It even works really well with really complicated skylines, such as trees – which can be a real challenge to work with in Photoshop. The most recent update even supports reflections.
Finally, Luminar and Photoshop are not the only tools you can use for sky replacement. ON1 Photo RAW also have a built-in sky replacement tool, and that’s our favorite direct Lightroom alternative.
You can also use any photo editing software which includes the ability to load multiple images in layers , although this can be a more time-consuming process.
You can see our list of our favourite photo editing software here for a range of options at various prices.
Can You Replace the Sky in Lightroom?
You cannot replace the sky in Adobe Lightroom. Whilst Lightroom is our go to photo editor for most of our photo editing tools, it’s more of a pure photo editing tool rather than a digital manipulation tool.
So while you can make small adjustments to images and even remove small objects, it has no layer support and you can’t entirely replace the sky with another sky.
However, Lightroom integrates with both Luminar and Photoshop, so you can easily send your image from Lightroom to one of these other editing apps, do your sky replacement, and then send the edited image back to Lightroom for final tweaking.
If you have the Adobe photography plan, it includes both Lightroom and Photoshop, so we would suggest using Photoshop for sky replacement in this scenario.
How to Replace the Sky in a Photo: A Step By Step Guide
I’m now going to walk you through how to easily replace the sky in an image.
To make this tutorial easier, I’d suggest that before reading this guide, you do two things.
First, download and install the trial version of the software I’m using from here. I’m using Skylum Luminar for sky replacement. If you have the software, you can easily follow my step by step guide to replace the sky in your images as I go.
Second, grab the high-resolution version of the image I’m using. You can do that by clicking this link and downloading the image. Normally you’d want to edit a RAW file, but to save bandwidth I think a JPG version will work fine for this tutorial.
Of course, you can follow the tutorial with your own image too, but you might find it easier to start with my tutorial image. That way you can follow along and check to make sure the image looks fairly similar to mine at the end. Then you should be able to replicate the process with your own photos.
Now you’re ready, let’s replace the sky in your photo!
Step 1: Load the Image into Luminar
If this is your first time using Luminar, once it opens you have a few options. The easiest option for editing a single image as we’ll be doing in this tutorial is just to go to the menu and choose “file”, and then from the dropdown, select “edit single image”. You can also use the keyboard shortcut ctrl+o (cmd-o on Mac) to achieve the same thing.
When the file selection dialog opens, navigate to where you downloaded the image, or just pick one of your own images you’d like to play with.
When you have the file opened, you’ll be presented with a large view of the image in the centre of the screen. Some presets will likely appear at the bottom of the screen (known as “looks” in Luminar), and the editing tools will all appear to the right. It should look as follows.
Note that the interface might change slightly as Skylum make updates to their software, but the general workflow should remain the same.
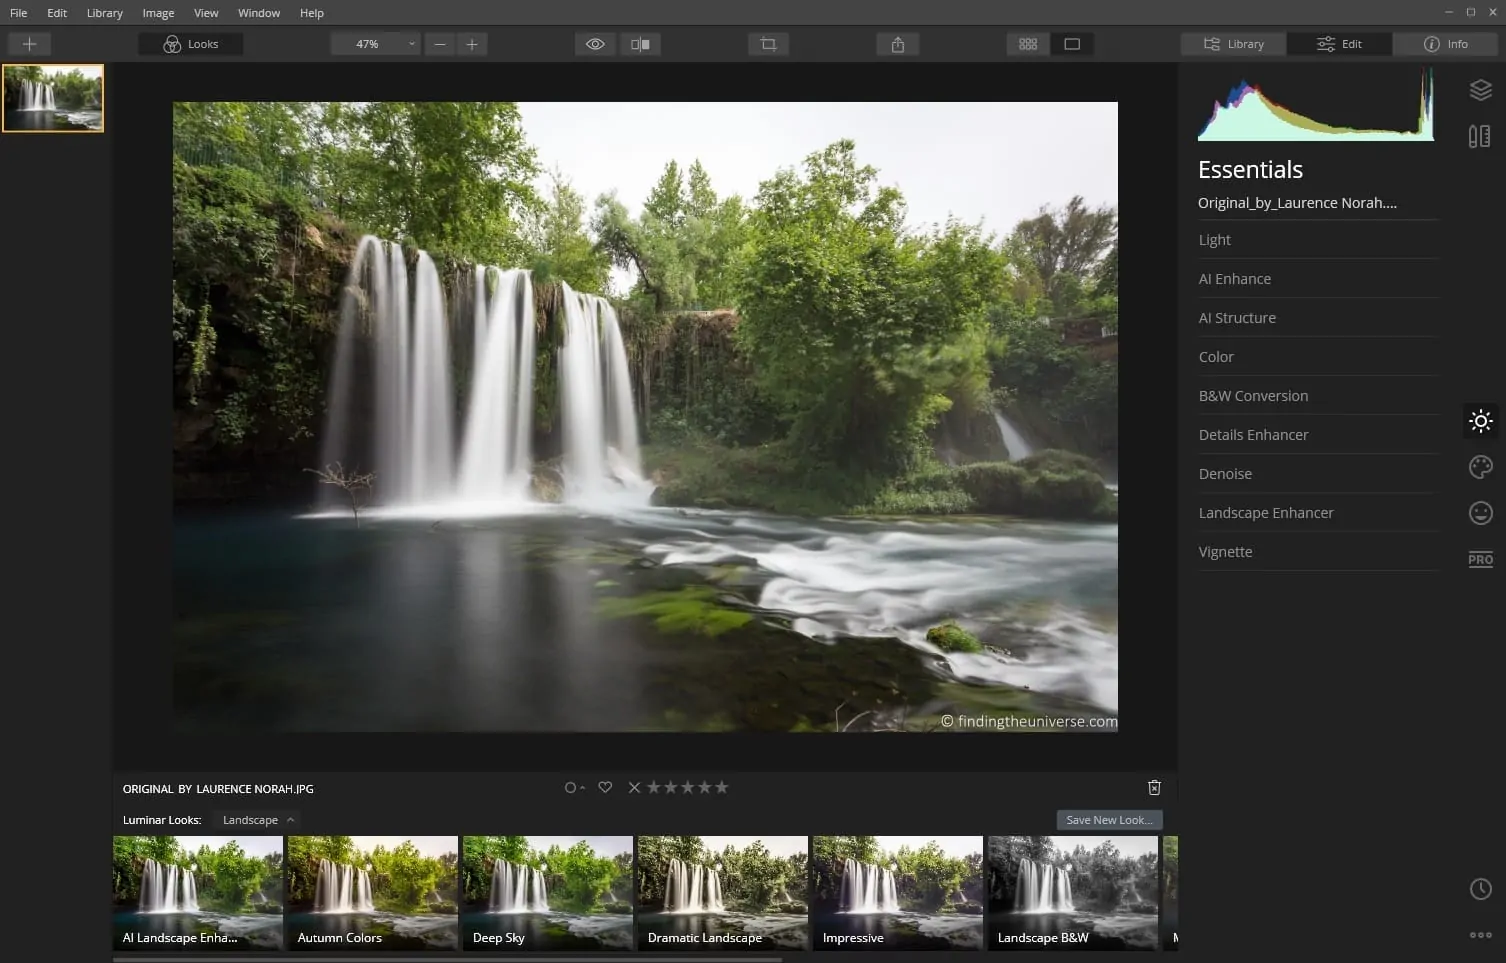
To make this view a bit cleaner, if the Looks appear at the bottom (small thumbnails with different version of the image), just hit the looks button from the top menu to remove the looks and make the image editing window larger.
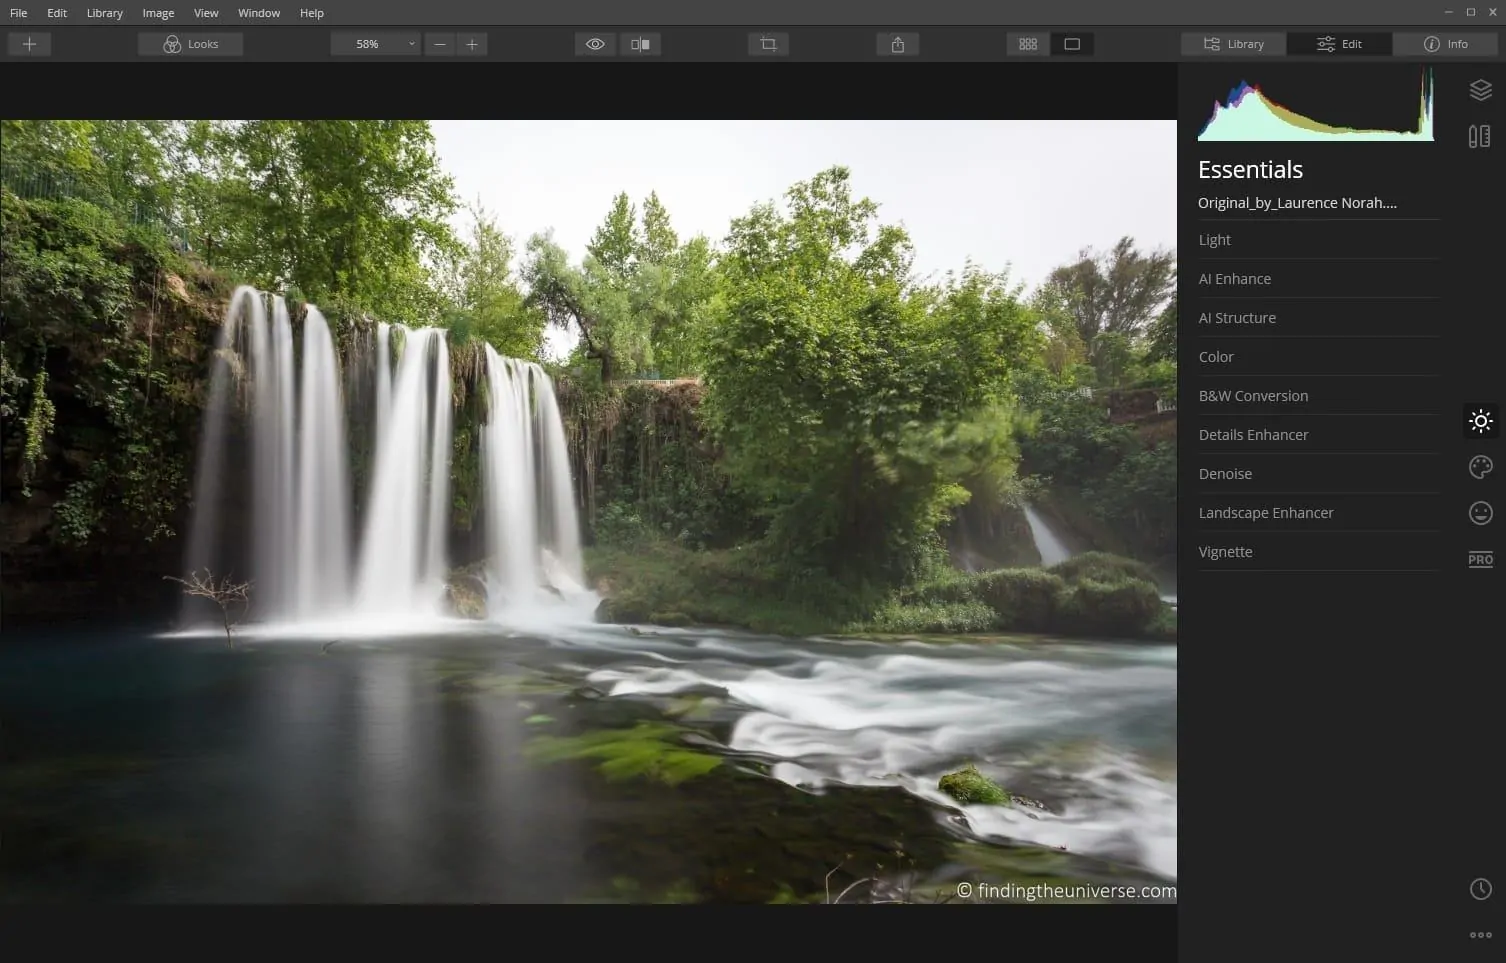
I’d also recommend toggling the left hand side film strip off as well, as you’re only editing the one image. You can do this by pressing “View -> Hide filmstrip”.
Finally, toggle the bottom photo actions panel at the bottom of the screen by pressing “View -> Hide Photo Actions Panel”.
You should now just have the editing tools down the right and the image in the middle, as follows.
Step 2: Select the Sky Replacement AI Tool
Now you have the image loaded, it’s time to select the Sky Replacement tool.
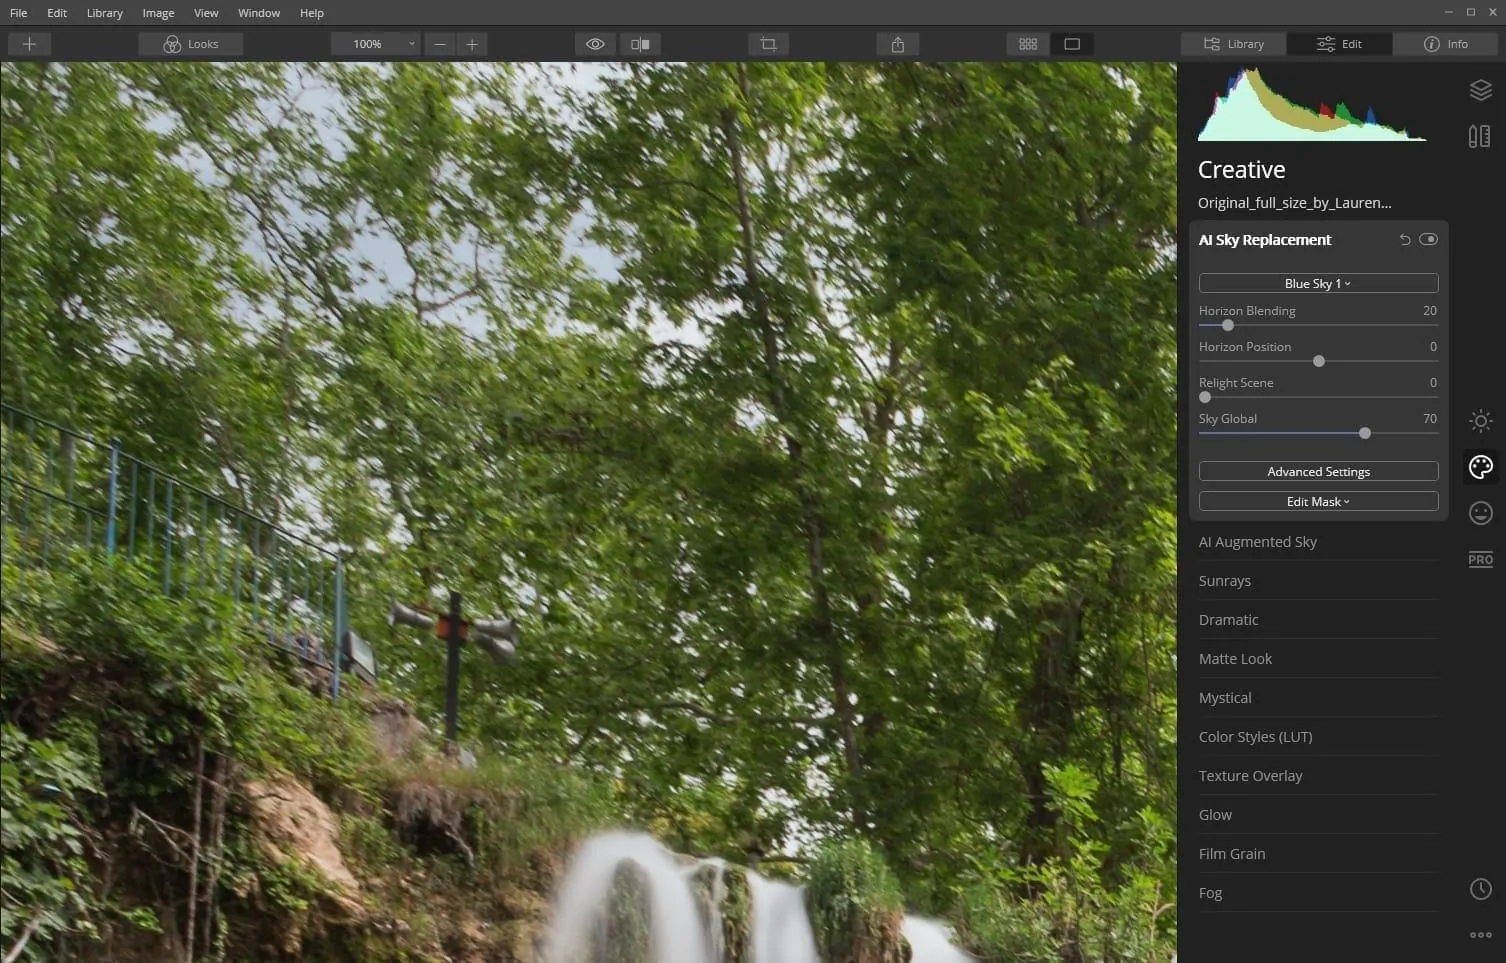
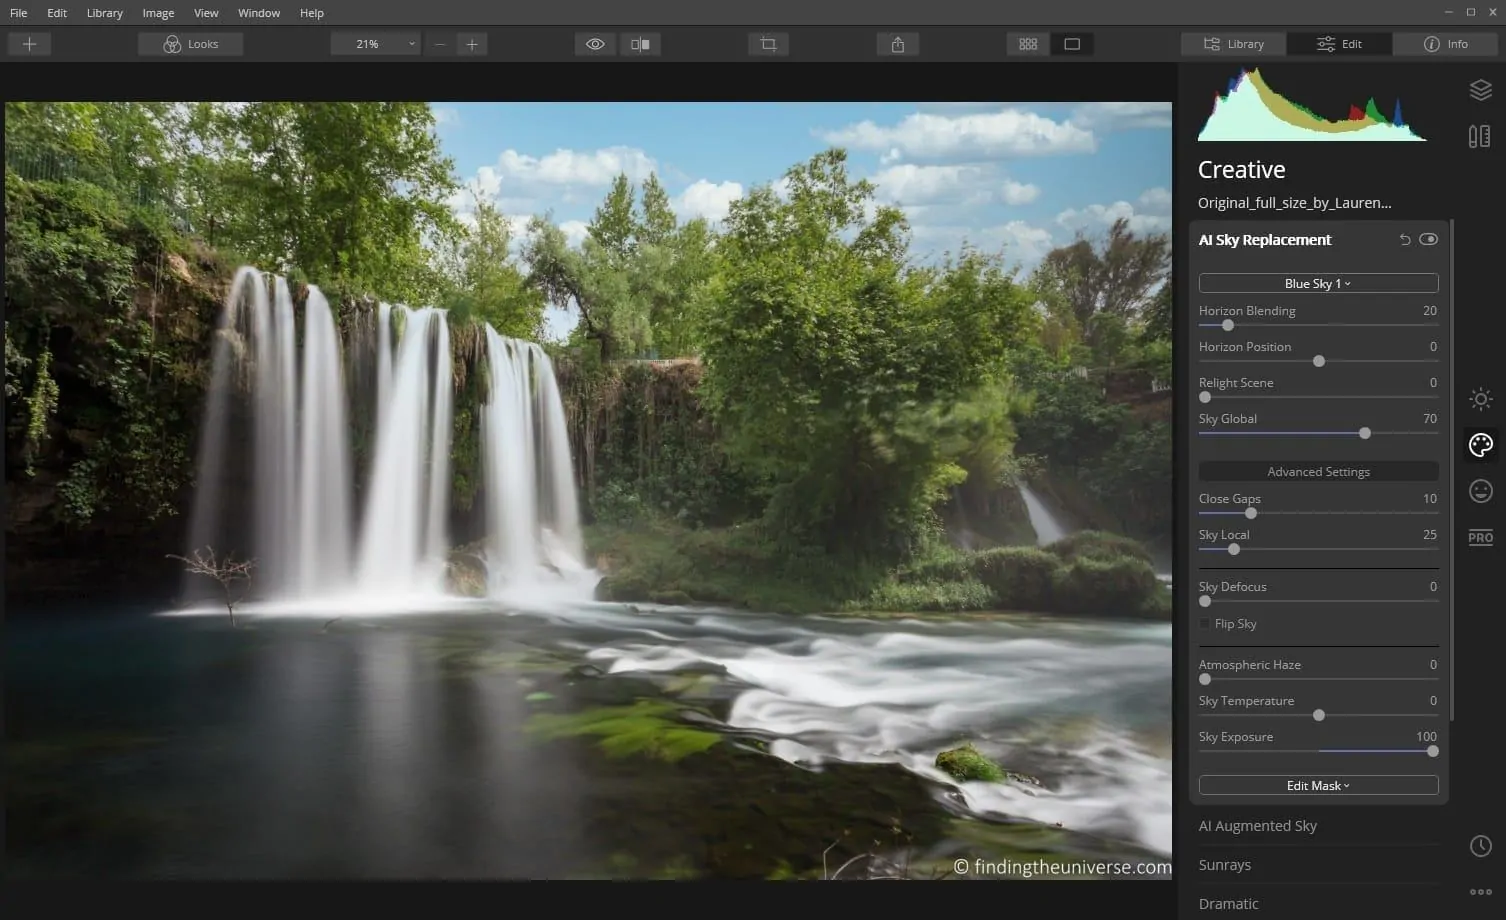
In the right hand part of the Luminar window are all the tools you can use to edit an image. To get to the sky replacement tool, you need to select the “creative” tools, which looks like a painters palette. I’ve marked this in red in the below image.
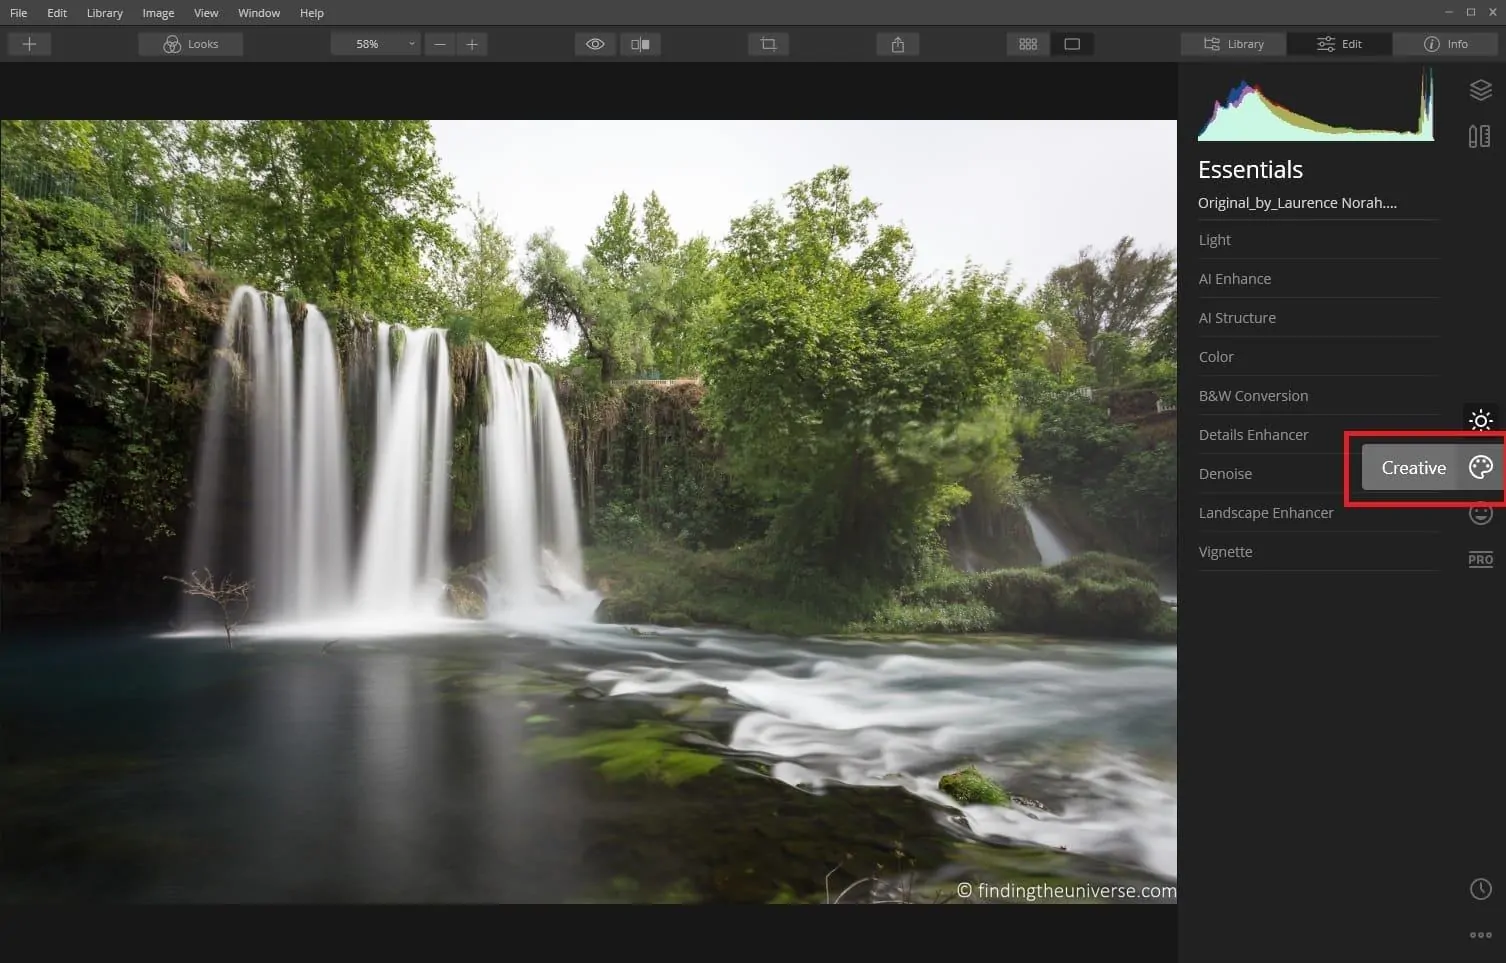
When you click on this, new options will load. The first option at the top of the list will be “AI Sky Replacement”. Click this, and it will expand with a number of options.

Step 3: Choose a Sky
Now for the fun part. The first thing you need to do is select the sky you want to add to the image. Press the “Sky Selection” button, and a drop down will appear.
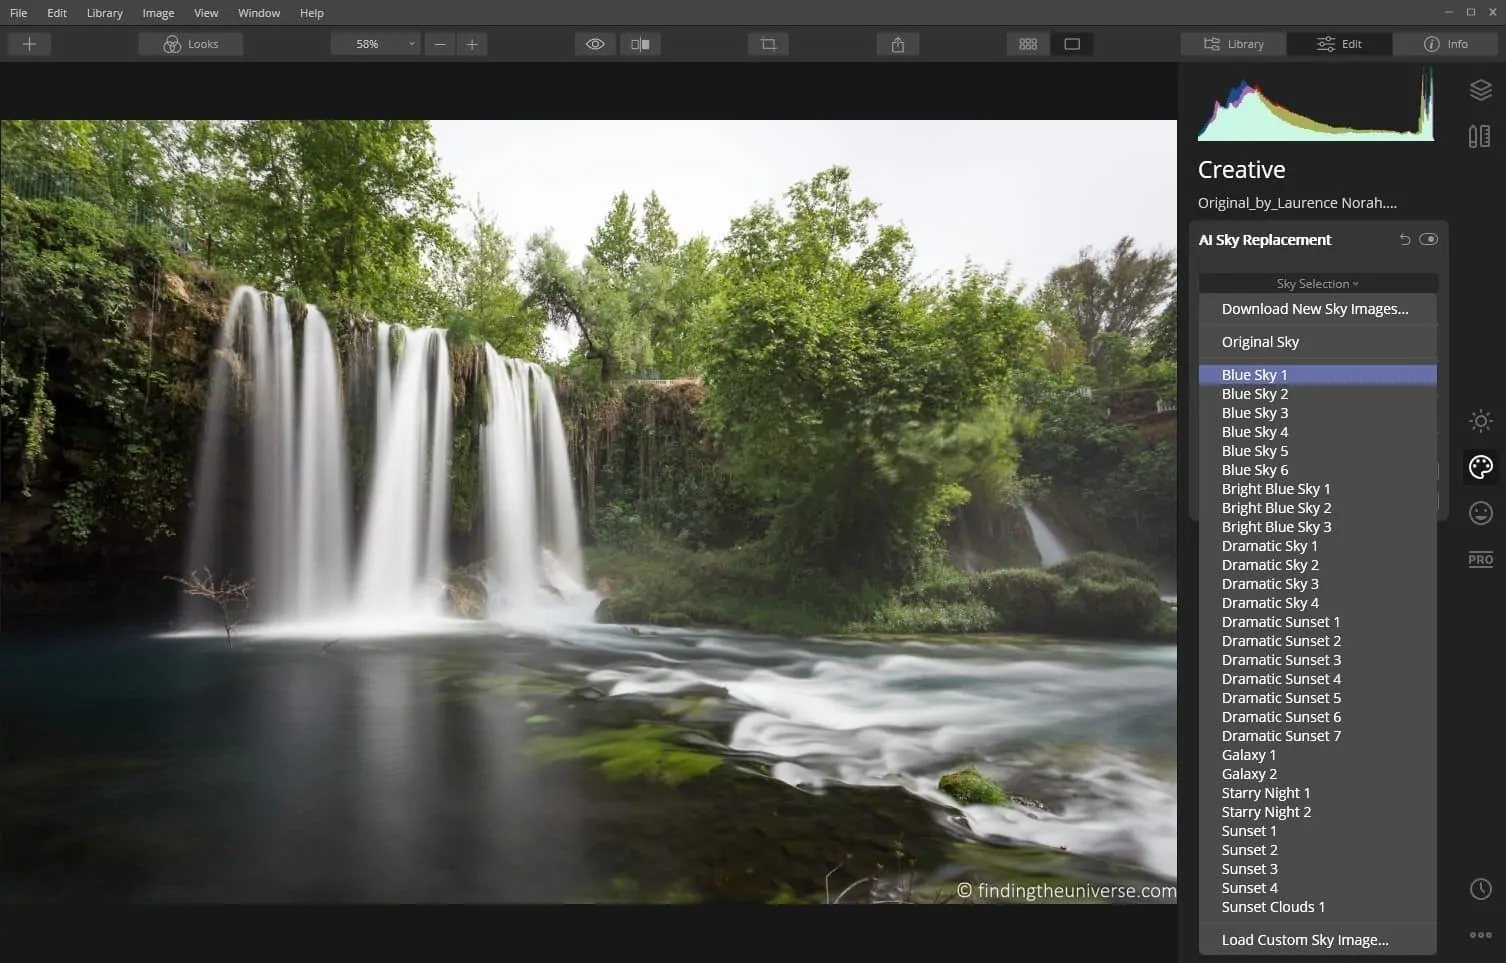
You’ll see a number of options, including a link to download skies, a list of existing skies, and the option to add your own sky image. For now, just select the first sky on the list, titled Blue Sky 1. The magic will happen.
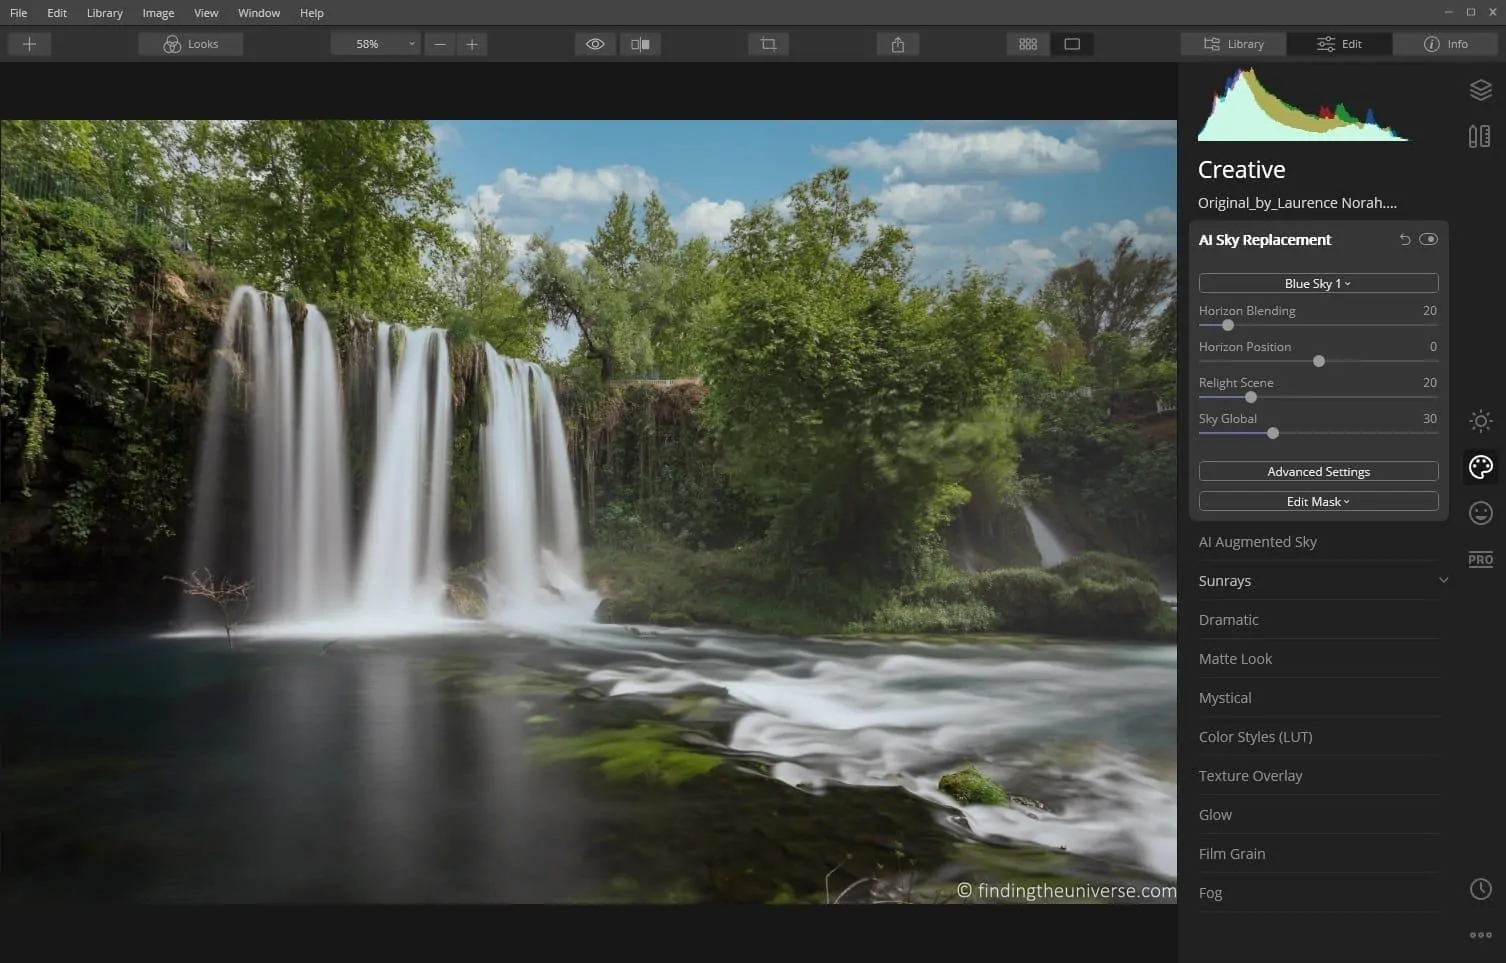
I think you will agree, this is a pretty dramatic change! However, it’s not perfect. The image has gone a bit cool (blue) in overall color tone, and in my opinion the water looks a bit odd. Still, as a default option it’s pretty amazing, especially if you zoom to the trees.

The good news is that Luminar gives you options for quickly adjusting the sky tool in case it doesn’t look exactly how you want. We’ll look at these next.
Step 4: Make Adjustments
Underneath the sky selection dropdown are a number of sliders. You can move any of these sliders with your mouse, and you can reset them by double clicking them.
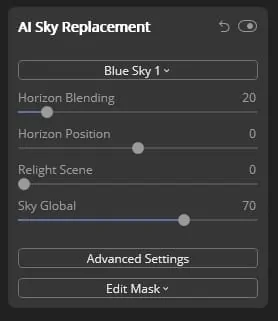
Here’s what they do:
- Horizon Blending. This is used to help smooth the transition between the horizon on your image and the new sky. This can make the image look more natural. Moving the slider to the right increases the blend, and moving it to the left reduces it.
- Horizon Position. Luminar will try to position the new sky so it lines up with the horizon in your existing image. Sometimes it might not get this quite right, so you can move the new sky up by shifting the slider to the right, and down by shifting it to the left.
- Relight Scene. One of the main challenges with replacing the sky in an image is ensuring that the light is realistic. For example, if you add a sunset to a photo taken in the middle of the day, the color tone is going to be all wrong, as the light at sunset is a much warmer, yellow color. The Sky replacement tool automatically adjusts the light in the scene to match the new sky. If it gets it wrong, you can reduce the effect by moving the slider to the left, and increase it by moving it to the right.
- Sky Global. This slider controls how much sky is added to the image. Moving it to the right will increase the amount of sky. This will be particularly noticeable with things like trees, where the sky might or might not appear properly behind them.
In our scene, the horizon is hidden behind the trees, so the horizon blending and horizon position tool don’t need to be changed.
However, I would suggest that the tool hasn’t quite gotten the lighting right, as the whole scene is a bit blue. We can fix this by reducing the Relight Scene slider. Personally I think it looks fine at zero.
I also think the Sky Global slider can be adjusted to the right. You might not notice the difference when you do this, but if you zoom in on the trees to the top left of the image, you’ll notice that the area behind them is still quite grey at the default settings. If you move the slider to the right, this grey is replaced by nice blue sky.
I think we’re at the point with the sky replacement where it looks pretty good, and you would probably just want to do a few global image edits to get the shot where you want it to be at this point.
However, Luminar does have more options for Sky Replacement, which we’ve not even touched yet. So let’s look at these.
Step 5: Advanced Sky Replacement Settings (Optional)
Luminar’s Sky Replacement tool is really clever. So clever in fact, that most of the time, you can just put a new sky in your image and it will just look great straight away. You might want to twiddle with one of the four main sliders, but that will be about it.
But don’t think that just because it’s simple, it’s not also powerful and adjustable. Let’s take a look at the advanced settings to see what else you can do. You can see these by pressing the “Advanced Settings” button under the four main sliders.
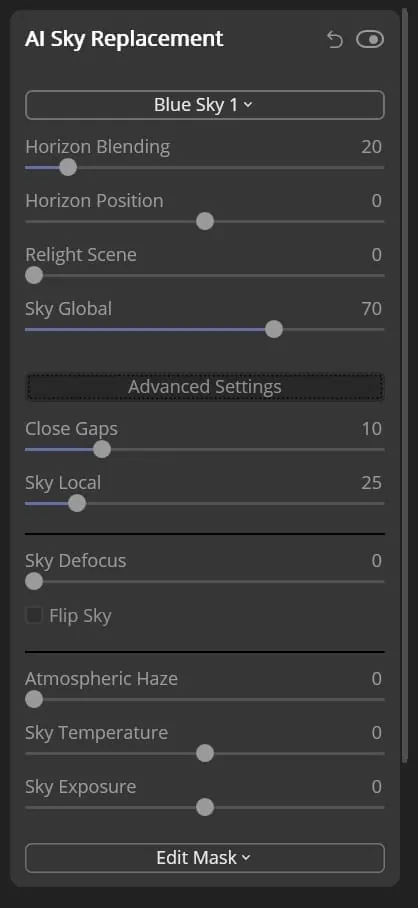
This will reveal a host of new sliders! Let’s look at what these do. I’ll also provide an example for each where it makes a difference in the shot.
Close Gaps
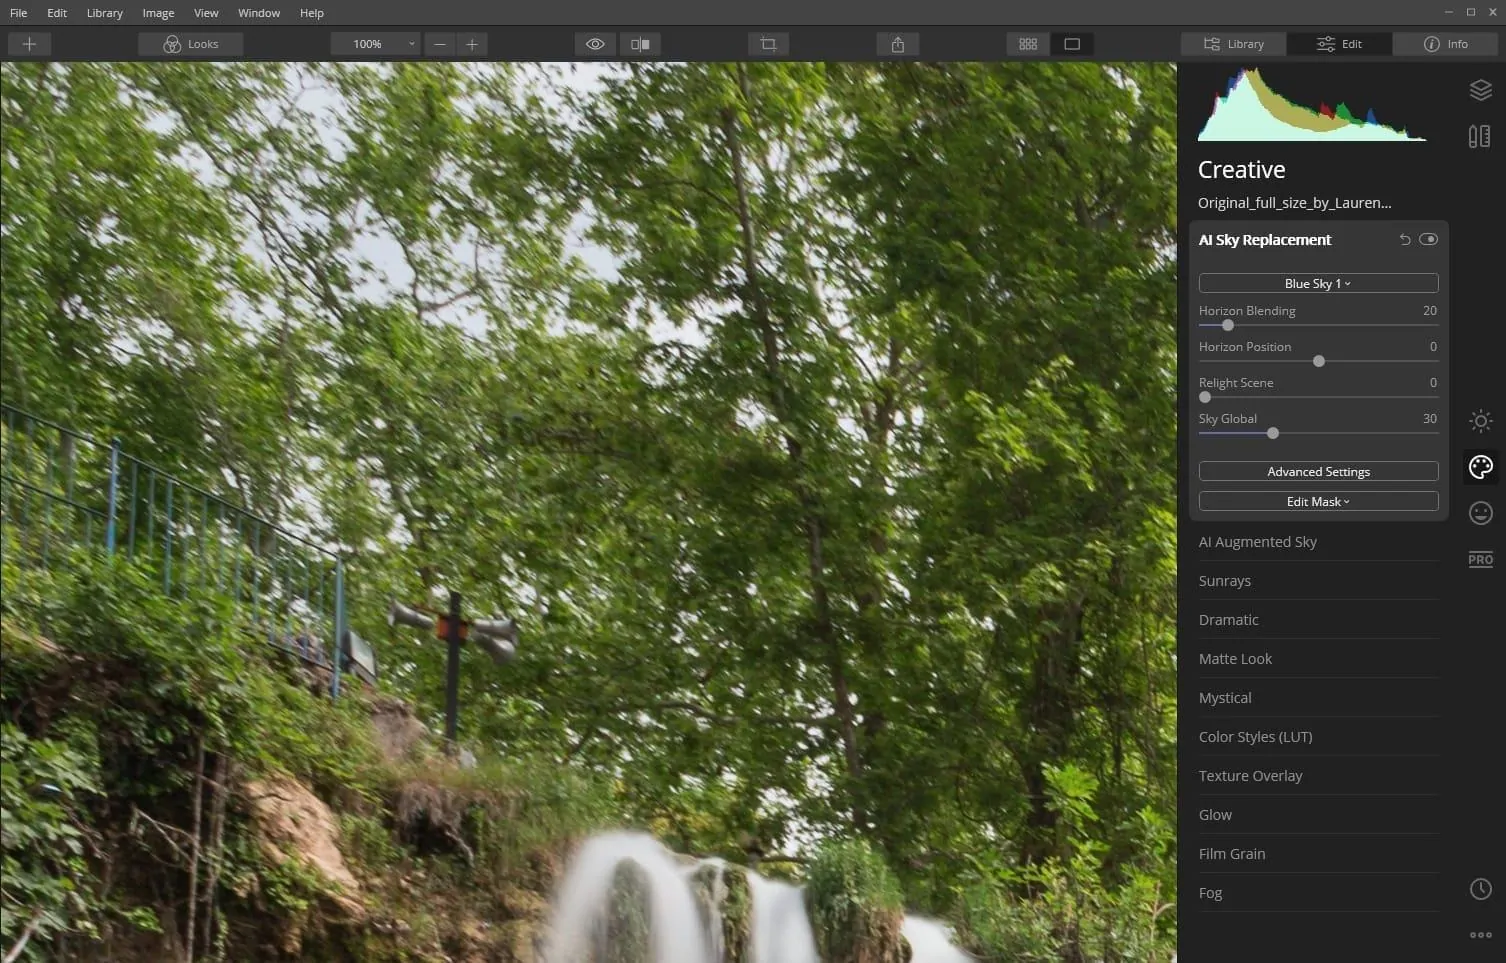
This slider is particularly useful for when you have parts of the image where the tool failed to replace the old sky with the new sky. This can happen especially when you have trees or wires – basically any part of the shot above the horizon which you should be able to see the sky through.
If you move the slider to the right, it should fill in more of the gaps. Just be careful when doing so, as moving it too far can start to replace parts of the scene that are not sky.
In my example shot, I have to say that the default setting has worked really well, and moving the slider to the right doesn’t do much. So to demonstrate the effect it has, I moved the slider to zero. If you zoom in on the trees to the top right of the shot, you can see that sections of the trees no longer have the new sky behind them, and they look incomplete.

Sky Local
The Sky Local tool is used to merge the old sky with the new sky. Specifically, if there are clouds in the old sky, the sky local tool can be used to define how much the old clouds merge with the new clouds.
As my original sky was just totally grey, this slider has no effect in this example.
Sky Defocus
Those folks at Luminar really have thought of everything. If you take a shot with a shallow depth of field, say a portrait, then you would expect the sky to be out of focus along with the rest of the background in the shot. So adding in a perfectly sharp sky is going to look a bit weird!
The Sky Defocus slider lets you control how in or out of focus the new sky is. Move it to the right for less focus, and to the left for sharper focus. Here’s an example with it totally defocused.

Flip Sky
The flip sky checkbox is pretty simple – it just flips the sky 180. So all the clouds that were on the right are now on the left, and vice versa.
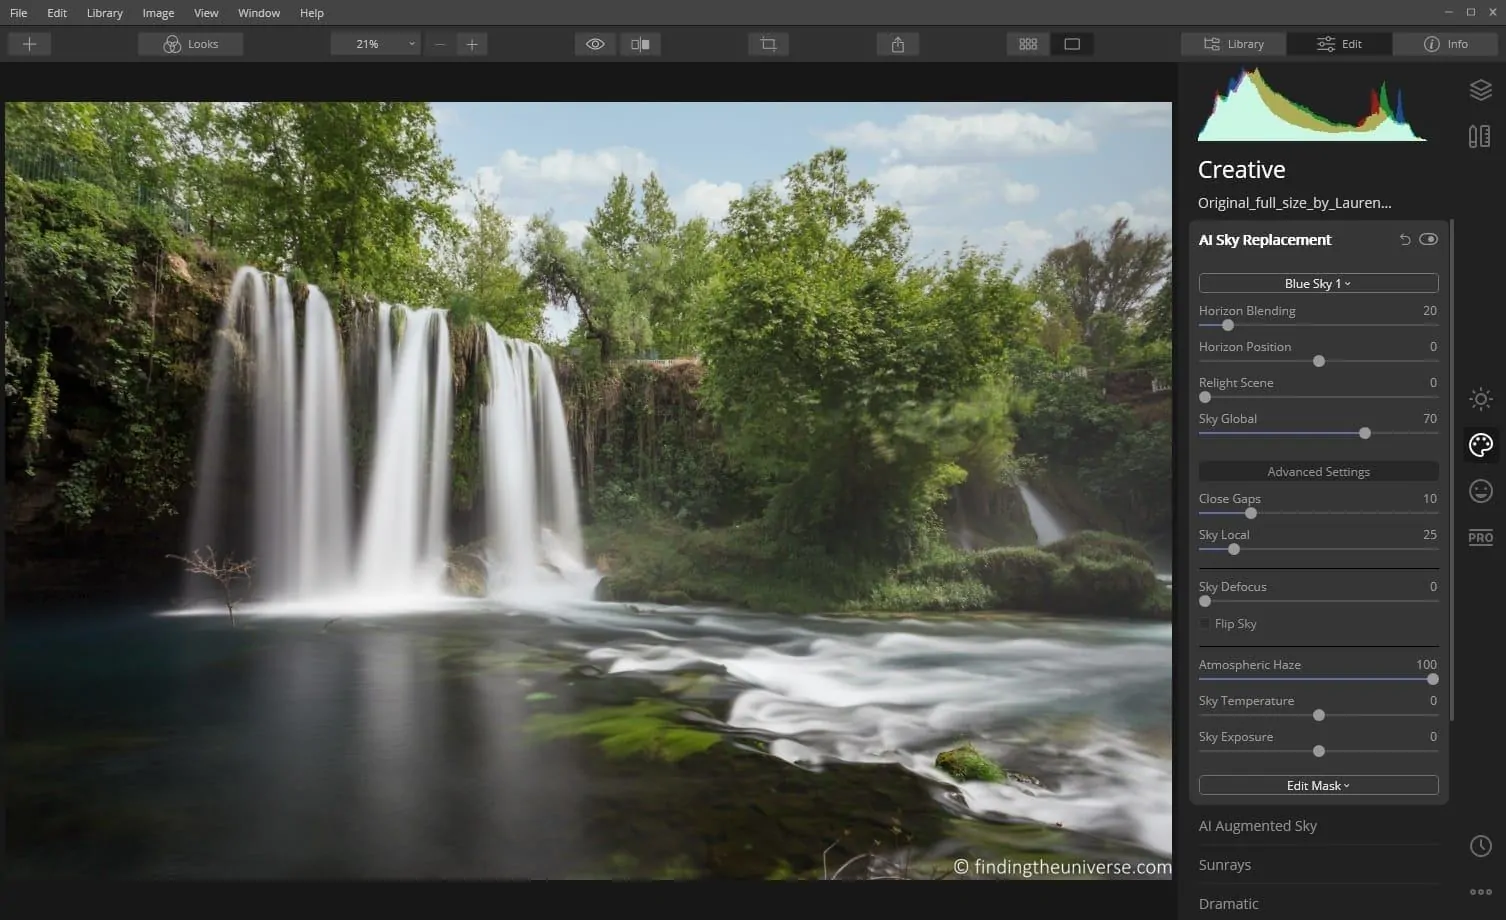
Atmospheric Haze
When we’re out shooting, depending on conditions, the air might not always be perfectly clear. So if your foreground is a little hazy due to moisture or other environmental factors, having a perfectly clean and clear sky also won’t look natural.
The atmospheric haze slider can be used to adjust for this effect, allowing you to add haze to your sky to match the foreground. Here it is at maximum effect.

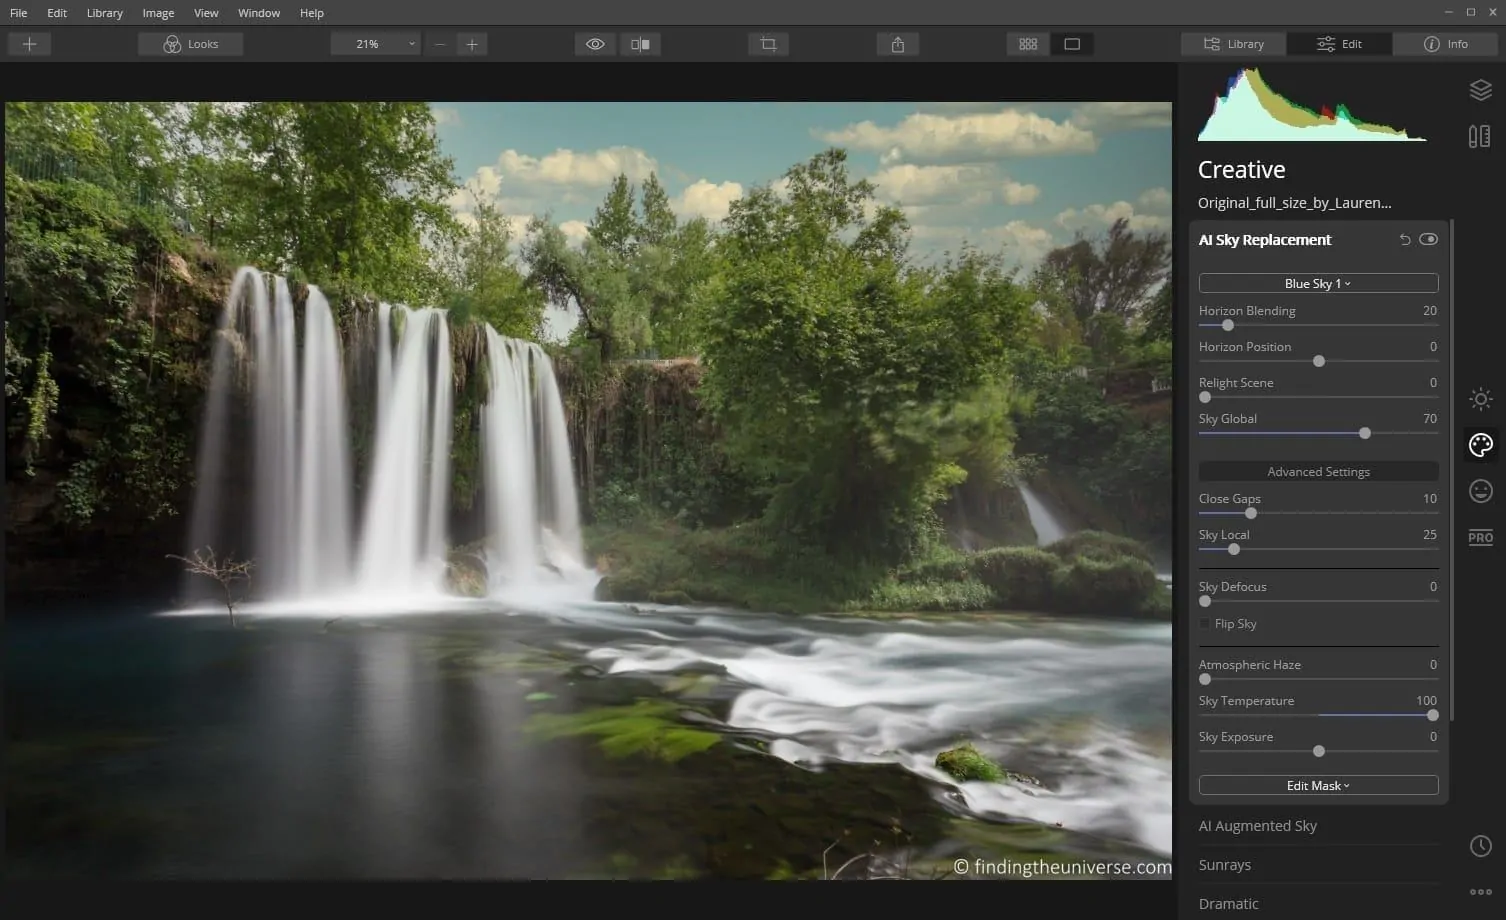
Sky Temperature
The temperature of a shot refers to how warm or cool the light is. Warm light is what you might find at sunset or sunrise, when everything seems more yellow, while cool light is what you would find closer to midday, when things seem more blue.
The Sky temperature slider lets you make the sky warmer (move slider right) or cooler (move slider left) in order to match the rest of the shot. Here’s an example with the temperature set to the maximum warmth, or all the way to the right.
Sky Exposure
Finally, you can adjust the exposure of the replacement sky. Exposure refers to how bright the image is, and by moving the sky exposure slider to the left you can make the sky darker, and by moving it to the right you can make it brighter.
This is useful for ensuring the replacement sky balances nicely against the rest of the image. Here’s an example with the sky exposure moved up to +100.
Masking
The final editing option you have is for those of you who really want to dive down into the details. Again, this just shows that whilst this tool looks simple on first glance, it does have a lot of power when you dive down into it. If you press the “Edit Mask” button, you will be presented with the following options.

If you’ve ever done any photo editing, you will probably be familiar with the idea of a mask. If not, a mask is what we call the area of the image that the edits we have made apply to. In our sky replacement example, everywhere that has the new sky is under the mask. Everywhere else is the original image.
The mask editing tools give you more fine-grained control over exactly where the replacement sky is. This can be useful for the occasional times when the AI doesn’t get it quite right.
There are three mask tools, a brush, a radial filter and a gradient filter. Again, these are fairly standard mask concepts. I’ll just demonstrate with the brush to show you what I mean. If you select the brush from the menu, a toolbar will appear at the top of the image, and a circular tool will appear where your mouse is. This is the brush.
The toolbars along the top give you options to control the size of the brush. You can also turn the “mask” on or off, which will show you where the mask is. Select the erase tool, and start painting the sky.
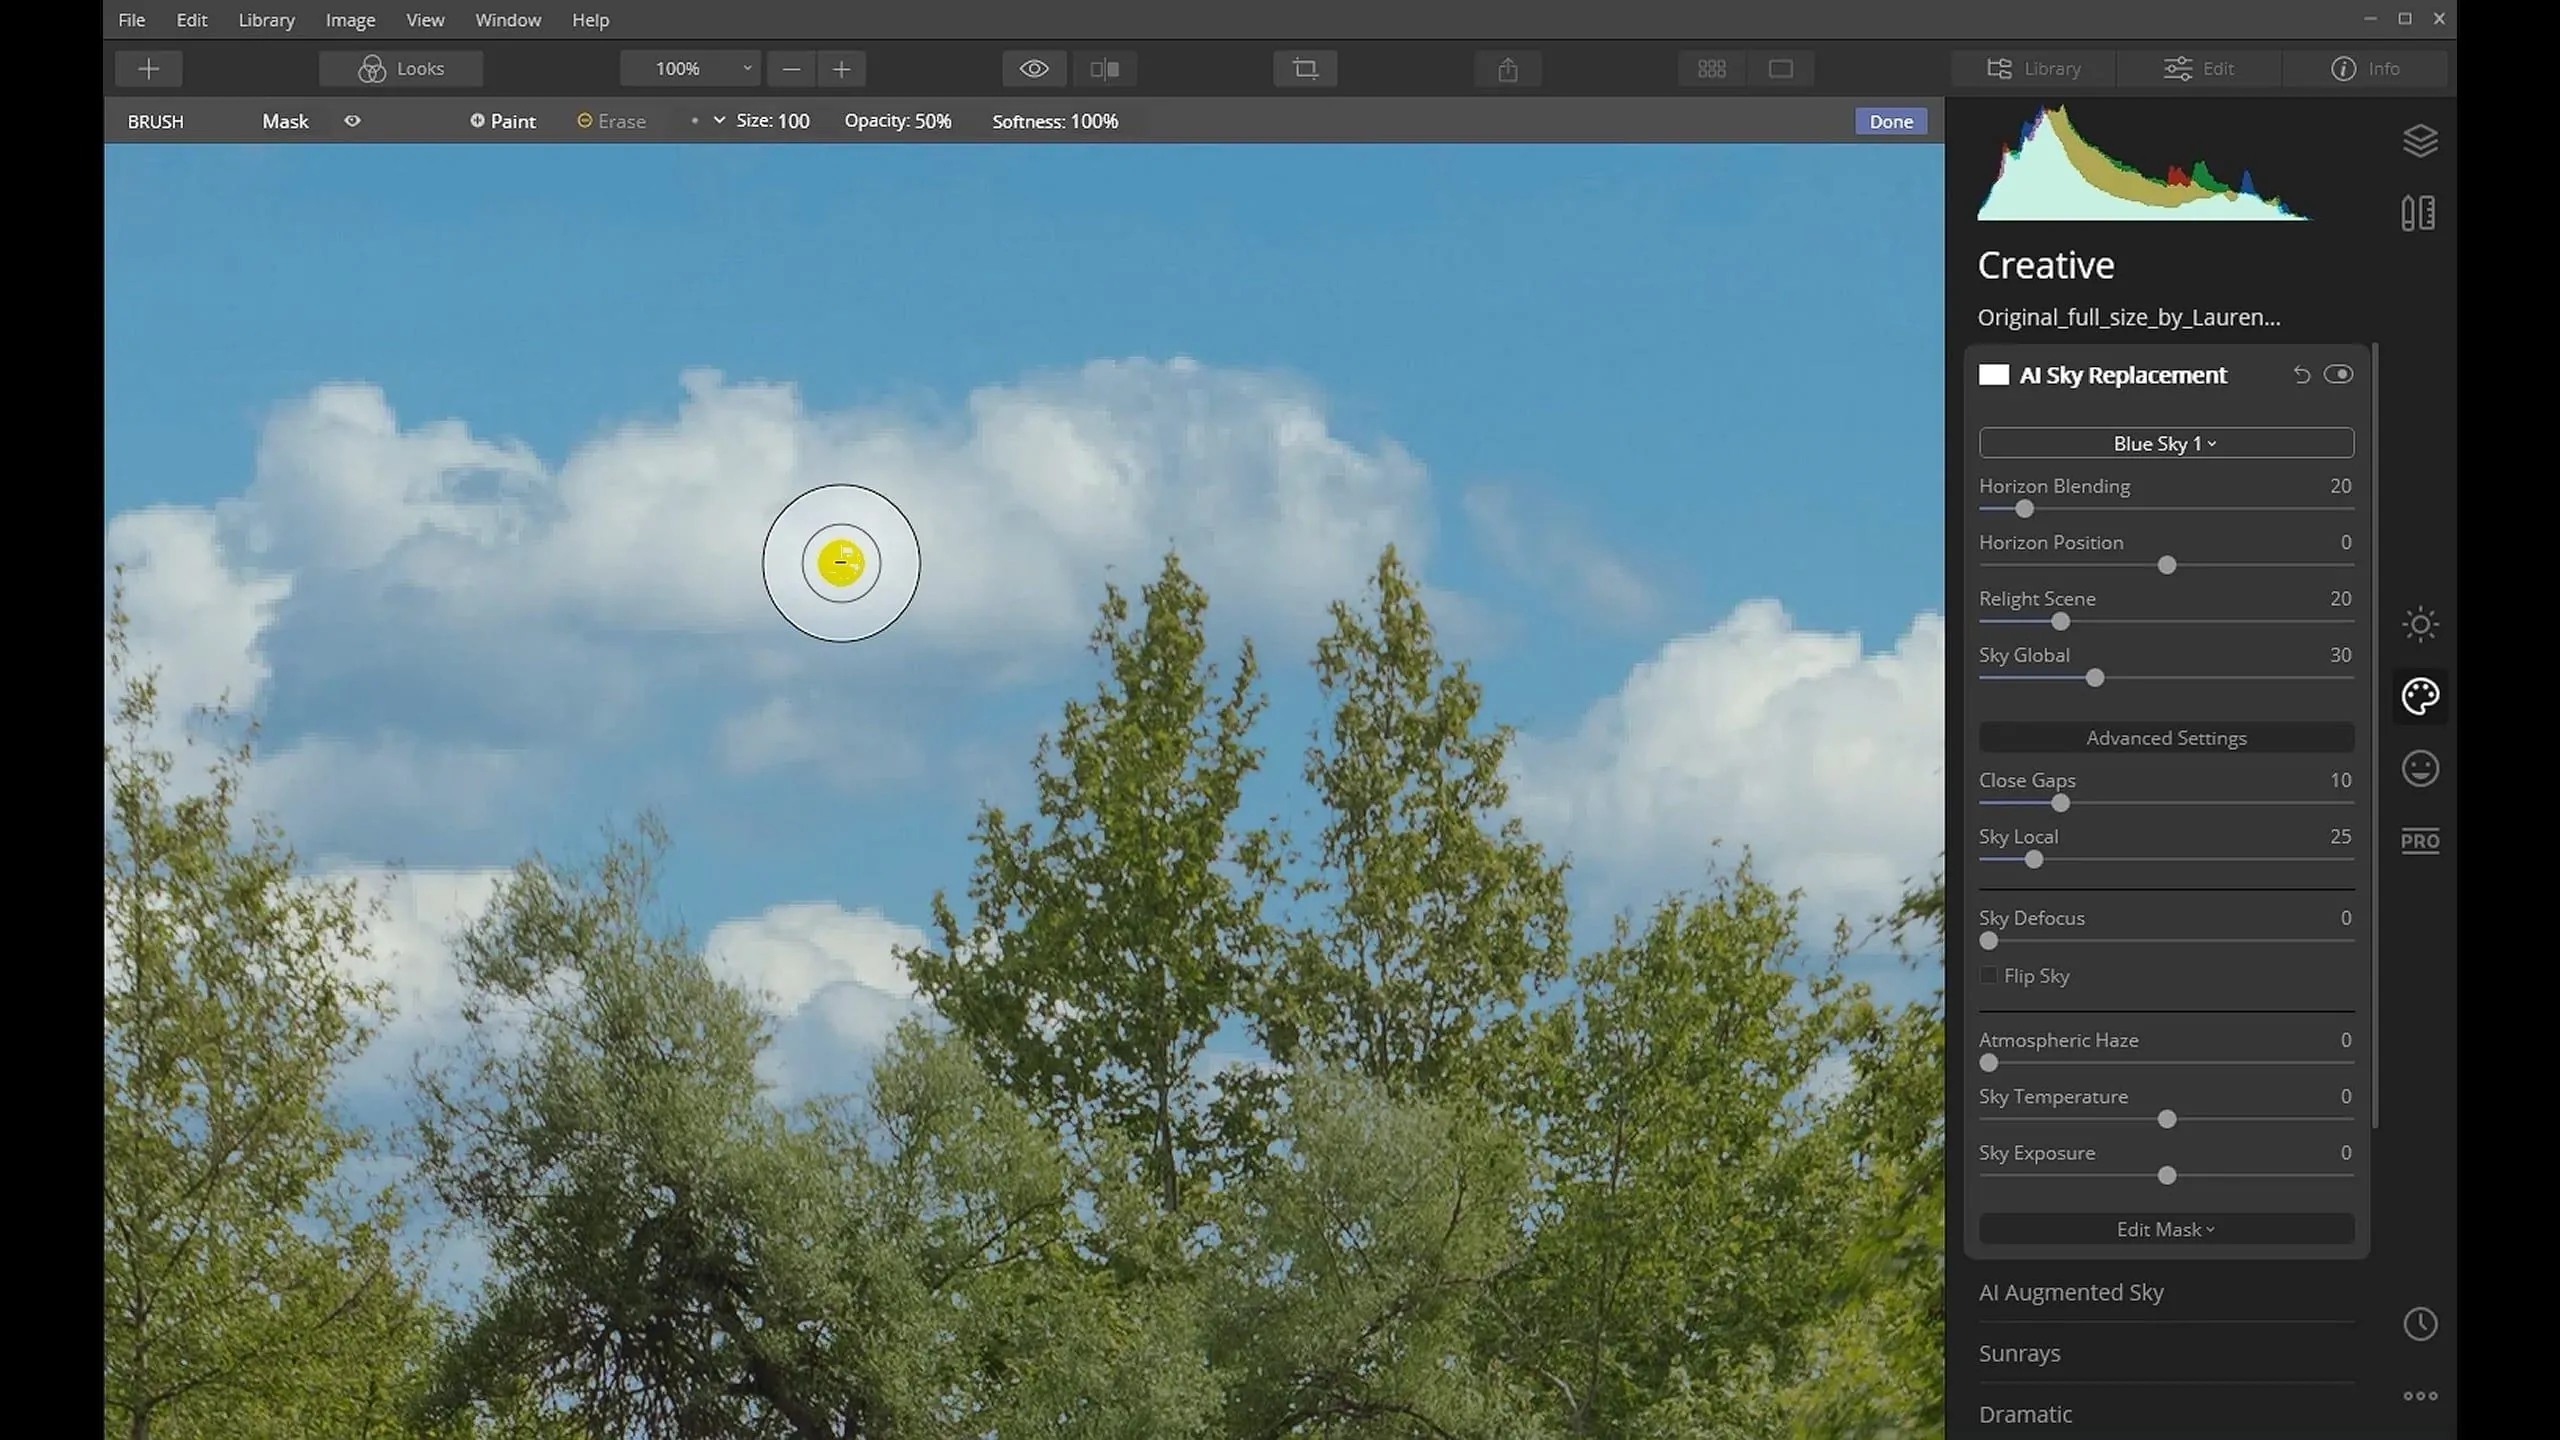
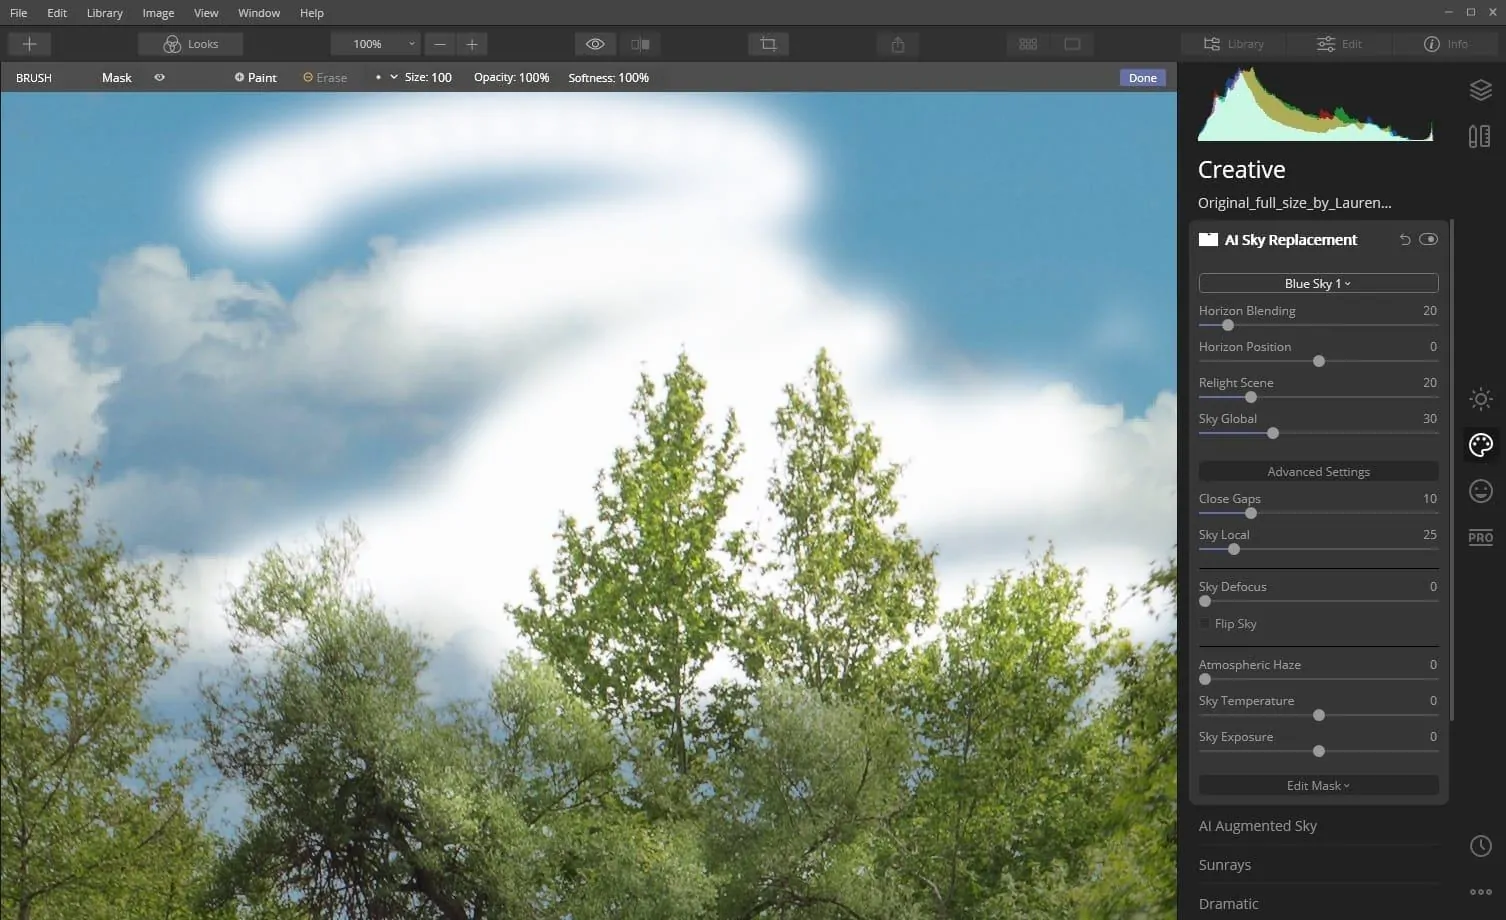
You’ll see that the new sky disappears as you remove the mask, replaced by the old sky. If you switch to the “Paint” option on the toolbar, you can paint the new sky back in! Once you are done, press “Done”.
Masking just gives us more fine grained control over the end result, and can be very useful for particularly complex images.
Step 6: Save! And you’re done
You’re done with the sky replacement! Of course, you might still want to tweak the overall look of the image, and Luminar has a number of other tools to do this. I suggest starting with the AI Enhance tool in the Essentials tab and going from there.
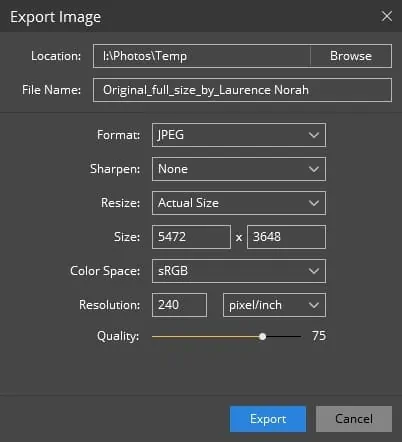
The main thing now is to save your image. From the File menu, press “export”. From the popup, choose the file format (JPG is the most useful), and the save location. Then hit export.
And you’re done!
More Sky Replacement Examples
To give you an idea of what else you can do with Luminar, here are a few more before and after sky replacement shots I put together using my photos and Luminar’s Sky Replacement tool.

Further Reading
That’s it for my guide to replacing the sky in your images using Luminar. If you found this useful, you might enjoy some of my other photography content. Here are some articles to get you started.
- We have a guide to how to use a compact camera, how to use a DSLR camera, and how to use a mirrorless camera, which you might find interesting. We also have a guide to how a DSLR works
- Knowing how to compose a great photo is a key photography skill. See our guide to composition in photography for lots of tips on this subject
- We have a guide to what depth of field is and when you would want to use it.
- We are big fans of getting the most out of your digital photo files, and do to that you will need to shoot in RAW. See our guide to RAW in photography to understand what RAW is, and why you should switch to RAW as soon as you can if your camera supports it.
- You’re going to need some way of editing your photos. We used Luminar in this guide, but there are a number of other options on the market. See our guide to the best photo editing software, as well as our guide to the best laptops for photo editing. We also have a guide to getting the best performance out of Adobe Lightroom.
- If you’re looking for advice on specific tips for different scenarios, we also have you covered. See our guide to Northern Lights photography, long exposure photography, fireworks photography, tips for taking photos of stars, and cold weather photography.
- If you’re looking for a great gift for a photography loving friend or family member (or yourself!), take a look at our photography gift guide,
- If you’re in the market for a new camera, we have a detailed guide to the best travel cameras, as well as specific guides for the best cameras for hiking and backpacking, the best compact camera, best mirrorless camera and best DSLR camera. We also have a guide to the best camera lenses.
- If you want a camera or lens, but the prices are a bit high, see our guide to where to buy used cameras and camera gear for some budget savings options.
- We have a guide to why you need a tripod, and a guide to choosing a travel tripod
Looking to Improve Your Photography?
If you found this post helpful, and you want to improve your photography overall, you might want to check out my online travel photography course.
Since launching the course in 2016, I’ve already helped over 2,000 students learn how to take better photos. The course covers pretty much everything you need to know, from the basics of how a camera works, through to composition, light, and photo editing.
It also covers more advanced topics, including astrophotography, long exposure photography, flash photography, and HDR photography.
You get feedback from me as you progress, access to webinars, interviews and videos, as well as exclusive membership of a Facebook group where you can get feedback on your work and take part in regular challenges.
It’s available for an amazing one-off price for lifetime access, and I think you should check it out. Which you can do by clicking here.
And that’s it! I’d love to hear your experiences trying sky replacement yourself. Have a go, and let me know how you find it in the comments below!

Doug Heimstead says
Excellent article!
Laurence Norah says
Thanks Doug!