
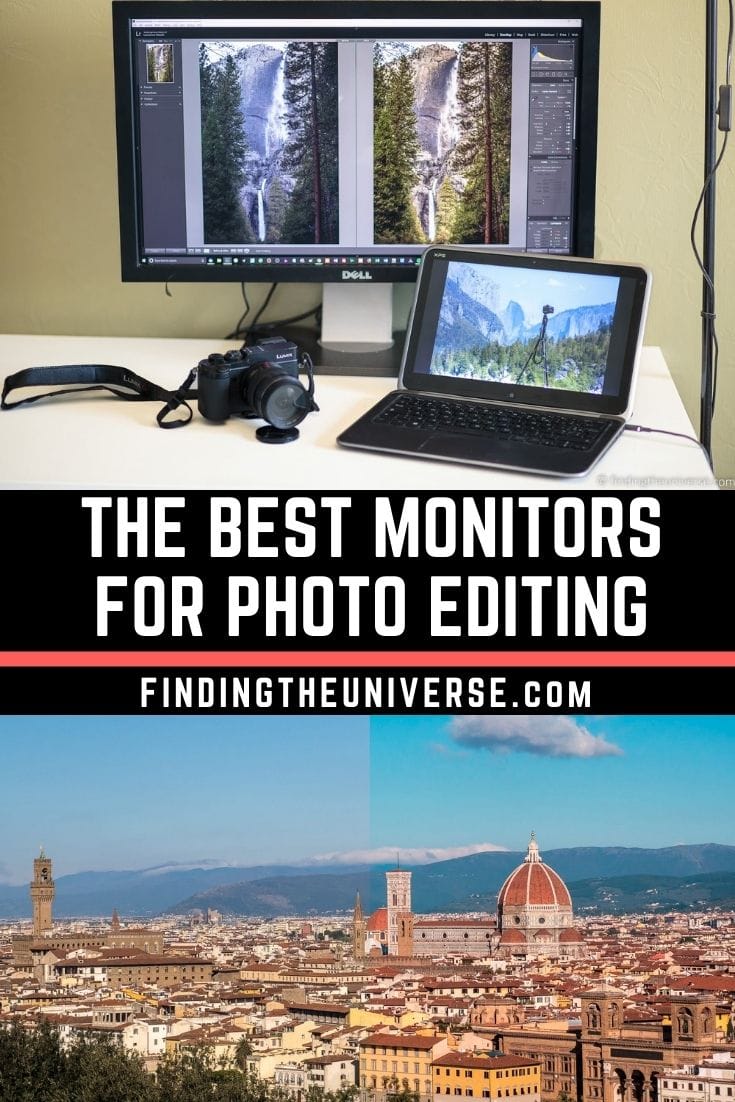
In my opinion as a photographer, one of the best upgrades you can make to your photo editing workflow is a large high-quality monitor.
Even if you primarily do your photo editing on a laptop, an external monitor for use when you are not on the move can be a great investment. It’ll give you a larger screen to work with and make the editing process easier and more enjoyable.
There’s a huge choice of monitors on the market, across a wide range of price points. In this guide, I’m going to share everything you need to know so you can pick the best monitor for photo editing for your needs and budget.
As well as a list of specific monitors I recommend, I’m going to walk you through the key specifications that matter for photo editing. That way, even if the exact model you’re looking at isn’t on this list, you’ll know what to look for.
I’ve been a professional photographer for over 15 years, and I currently do my photo editing on a QD-OLED ultrawide monitor connected to my photo editing desktop computer. Before that, I used a Dell UltraSharp IPS panel for years. I also have a background in software development, so I understand the technology side of things as well as the photography side.
One thing I’ve learned from years of editing on different screens: once you use a good monitor, you can’t go back. I had an OLED laptop screen for a while, and when the motherboard died and I replaced it with an IPS laptop, I immediately regretted not getting the OLED option. The difference in how your photos look is that significant.
Table of Contents:
What to Look for in a Monitor for Photo Editing
Before I go through my list of the best monitors for photo editing, here are the key specifications you should be looking for. There are hundreds of monitors on the market and this information will help you narrow down your choice, even if you end up picking something that isn’t on this list.
Screen Size for Photo Editing
The first thing to consider is how big a screen you want. This will depend on your desk size, how far you sit from the screen, and your budget.
Screen size is measured diagonally in inches, just like televisions. For photo editing, my recommendation is a minimum of 24 inches (61 cm). The sweet spot for most people is 27 to 32 inches (68 to 81 cm).
Above 32 inches you’re looking at either very large standard monitors or ultrawides. These can work well if you have the desk space and the budget, but for most people 27 to 32 inches is the right range.
I used a 27-inch screen for photo editing for years and it was more than large enough. I’ve since moved to a 34-inch ultrawide, which gives me space to have my editing panels alongside the image. I also use it for more than just photo editing, which makes the extra space worthwhile.
Screen Resolution for Photo Editing
As well as the physical size, you need to consider the resolution. This refers to the number of pixels that make up the screen. The most common resolutions you’ll see are:
- 1920 x 1080 (1080p / Full HD)
- 2560 x 1440 (1440p / WQHD)
- 3840 x 2160 (2160p / 4K)
More pixels means you can see more detail in your images and fit more on the screen at once. A 4K screen has four times the pixels of a 1080p screen, which is a huge difference when you’re zooming into fine details.
For photo editing, I’d recommend 1440p as the minimum for a 27-inch screen. If you’re buying a new monitor in 2026, 4K is really the standard to aim for. The prices have come down enough that 4K is available at every price point, and the difference in sharpness is immediately visible when you’re editing.
For screens larger than 27 inches, 4K is a must. At 32 inches with only 1440p, individual pixels start to become visible, which defeats the purpose of a photo editing monitor.
Colour Gamut
One of the most important specifications for a photo editing monitor is the range of colours it can display. I cover this topic in detail in my guide to monitor calibration, but here’s what you need to know.
Not all monitors can display the same range of colours. The “gamut” refers to which part of the visible colour spectrum the monitor can reproduce. There are several standard gamuts you’ll see in monitor specifications:
- sRGB is the standard colour space used across the web. Any monitor you buy for photo editing should cover at least 100% of sRGB.
- Adobe RGB is a wider colour space commonly used in print work. It covers more greens and cyans than sRGB. If you print your photos or deliver files for print, a monitor with high Adobe RGB coverage (95%+) is important.
- DCI-P3 is a colour space originally designed for digital cinema. It has become increasingly important as Apple devices and HDR content use it. Monitors with 95%+ DCI-P3 coverage will display a wider range of colours than sRGB-only monitors.
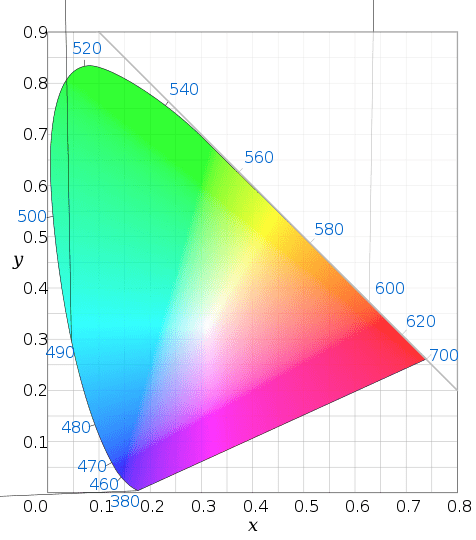
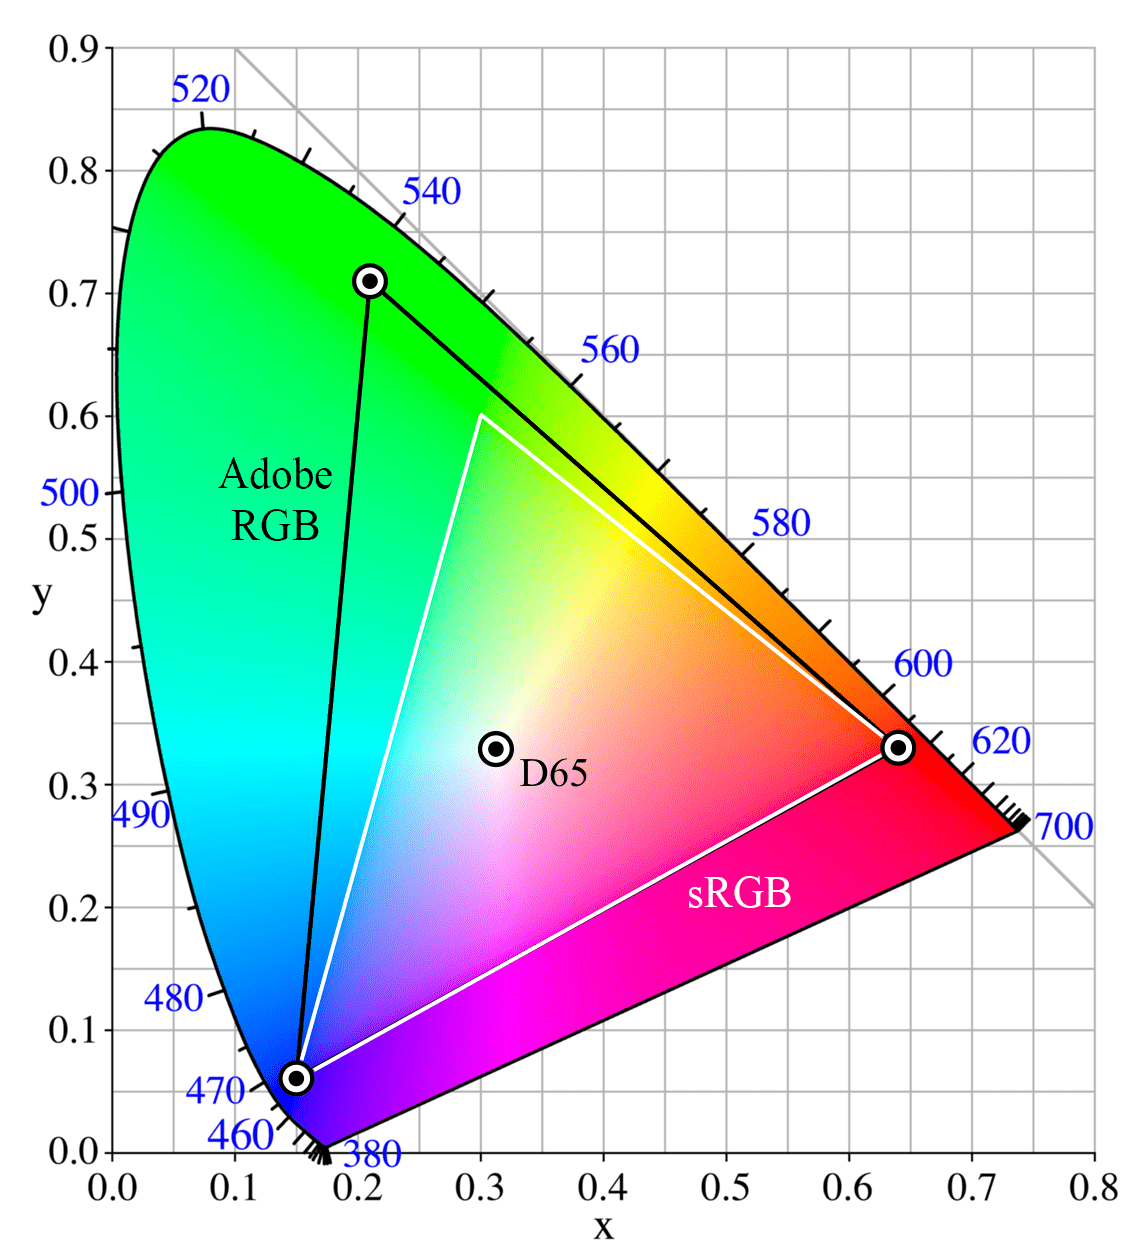
For most photographers who primarily share their work online, 100% sRGB coverage is the baseline. If you regularly work with print, you’ll want a monitor with high Adobe RGB coverage as well. And if you work with video or HDR content, DCI-P3 coverage matters.
In practice, many mid-range monitors in 2026 cover all three gamuts at 95% or above, so you don’t necessarily have to choose between them.
Colour Accuracy
Having a wide colour gamut is only useful if those colours are accurate. Colour accuracy is measured using “Delta E” (written as ΔE), where a lower number means more accurate colours.
A Delta E of 2 or less is generally considered accurate enough that most people won’t be able to see the difference between the displayed colour and the correct colour. Many monitors aimed at content creators are factory calibrated to ΔE < 2 and ship with a calibration report in the box.
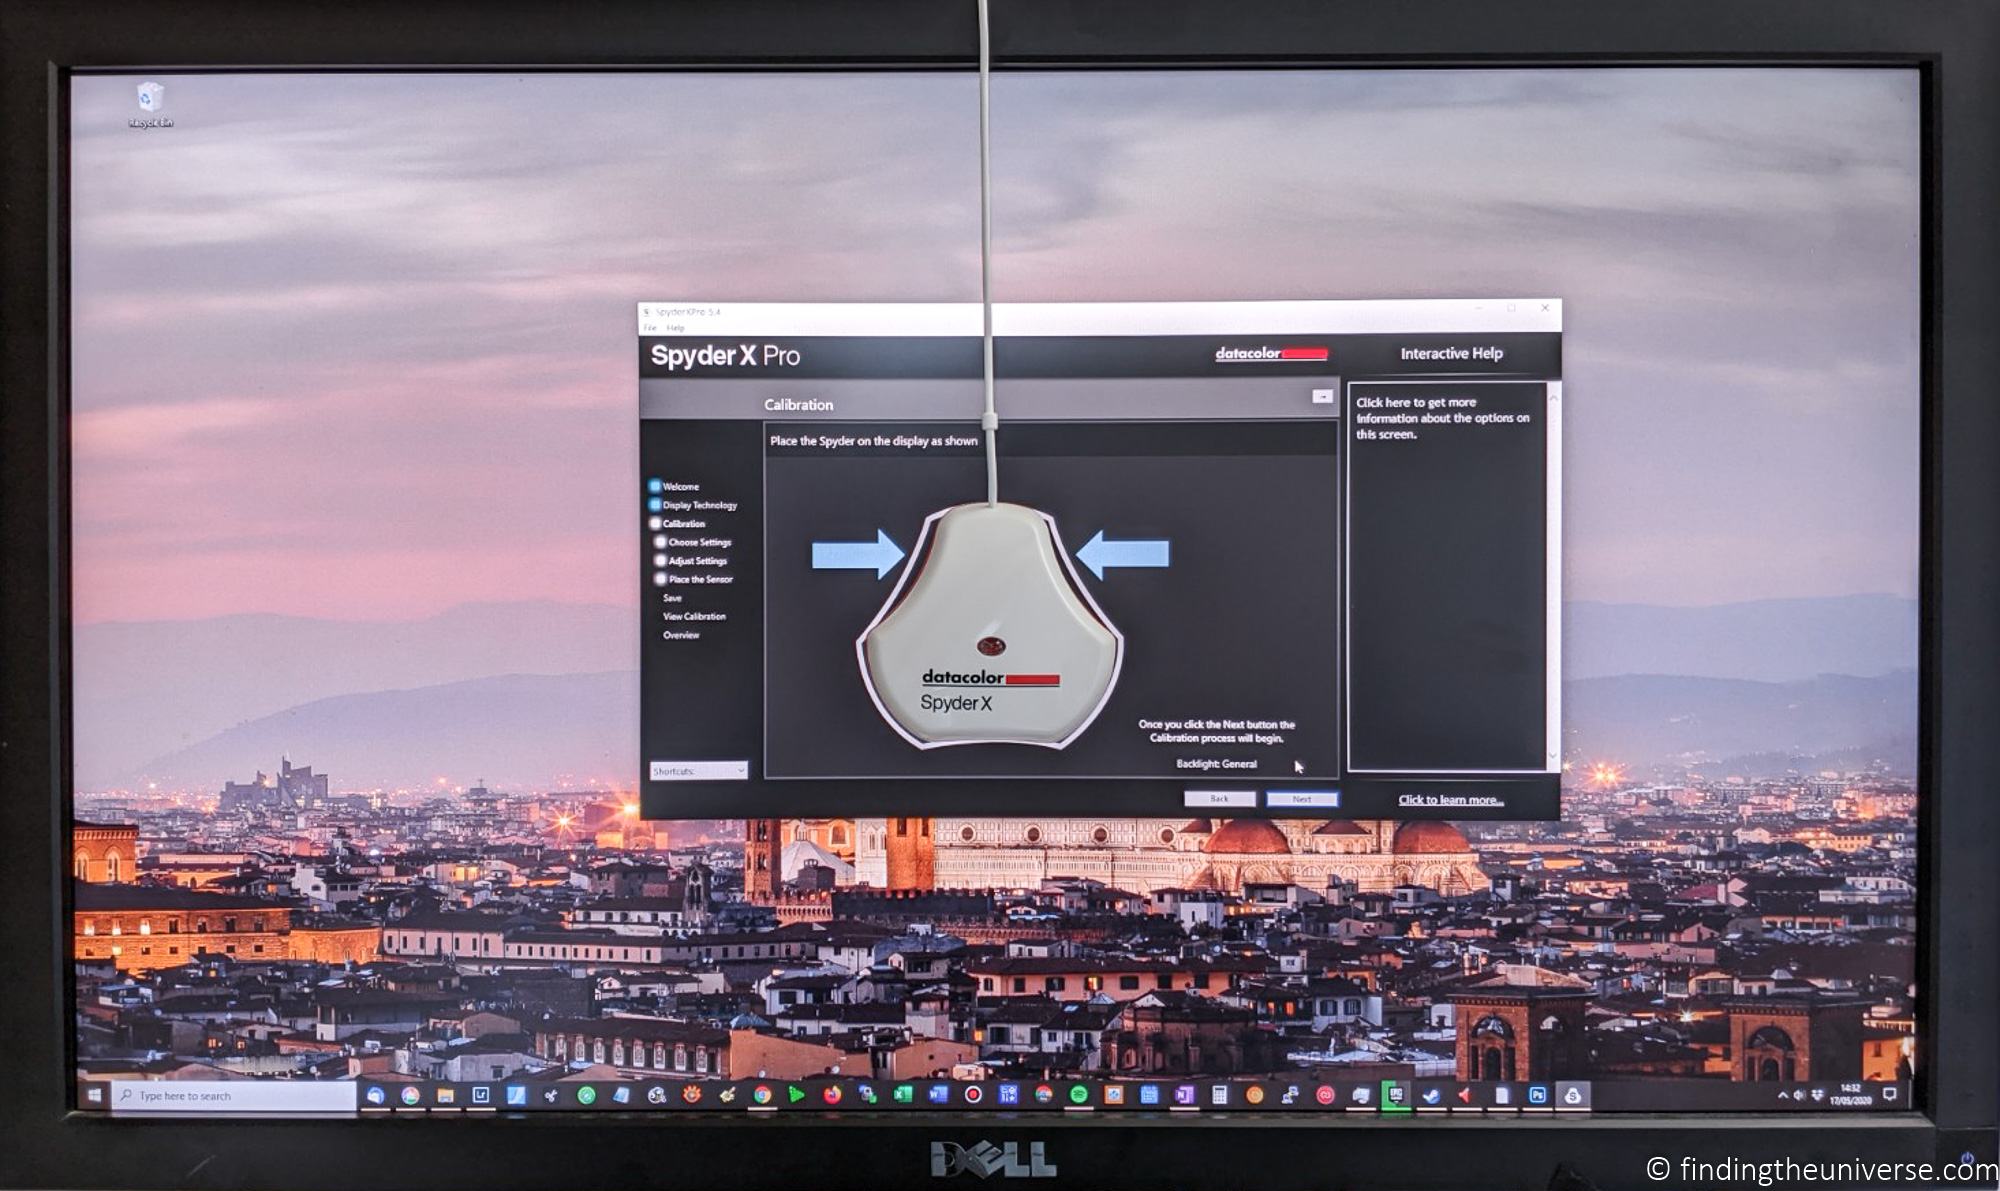
Even with factory calibration, it’s worth calibrating your monitor yourself on a regular basis. Monitors drift over time, and a hardware calibration tool will ensure your colours stay accurate. I’d recommend something like the Datacolor SpyderExpress for this.
Screen Technology: IPS, OLED, and Everything In Between
The type of panel technology in a monitor affects everything from colour accuracy to contrast to viewing angles. Here’s a quick rundown of the main types you’ll encounter in 2026.
IPS (In-Plane Switching) has been the go-to choice for photo editing for years, and it’s still a great option. IPS panels offer excellent colour accuracy, wide viewing angles, and good brightness. The main weakness is contrast: blacks on a standard IPS panel look more like dark grey than true black. Newer “IPS Black” panels (found in Dell’s UltraSharp range) have improved contrast significantly, with 2000:1 or even 3000:1 ratios compared to 1000:1 on standard IPS.
OLED (and QD-OLED) is the premium technology. Unlike IPS, which uses a backlight shining through liquid crystals, OLED pixels produce their own light. This means OLED can display true black by simply turning pixels off, resulting in essentially infinite contrast. Colours are more vivid, and the difference is immediately obvious when you see it in person.
OLED used to have two major issues for photo editing: burn-in risk and high cost. Both have improved dramatically. Modern OLED monitors include pixel-shifting and other protections that make burn-in far less of a concern for normal use. Prices have also dropped considerably, with QD-OLED ultrawides now available for under $700.
I use a QD-OLED monitor as my daily driver for both photo editing and gaming, and I love it. The blacks are something you have to see to appreciate. If you’ve only ever used IPS, the first time you open a night sky photo on an OLED monitor is a bit of a revelation.
If you’re buying a monitor primarily for photo editing, IPS is still the safer and more affordable choice, with the widest range of calibration options and the longest track record for colour-critical work. But if you want one monitor that does everything well, including photo editing, gaming, and watching films, OLED is hard to beat.
VA (Vertical Alignment) panels have better contrast than standard IPS but narrower viewing angles and less consistent colour across the screen. They’re more common in gaming and TV panels. I wouldn’t recommend VA for dedicated photo editing.
Mini-LED is a backlight technology rather than a panel type. Mini-LED backlights use thousands of tiny LEDs with local dimming zones, which dramatically improves the contrast of IPS and other LCD panel types. Apple uses mini-LED in its latest Studio Display XDR. It bridges the gap between traditional IPS and OLED in terms of contrast performance.
TN (Twisted Nematic) is the oldest LCD technology. It’s cheap, but the colour accuracy and viewing angles are poor. Avoid TN panels for photo editing.
Connectivity
Your monitor needs to connect to your computer, and the connection type matters more than it used to.
The most important development in recent years is USB-C with Power Delivery. A single USB-C cable can carry the video signal to the monitor, send data to connected peripherals (like USB drives plugged into the monitor’s hub), and charge your laptop at the same time. If you use a laptop alongside your desktop, this is a significant quality-of-life improvement.
Look for at least 65W of Power Delivery, though 90W or 140W is better if you have a more powerful laptop. Higher-end monitors now include Thunderbolt 4 ports, which support faster data transfer and more peripherals.
Beyond USB-C, the other connections you’ll want are:
- DisplayPort 1.4 for connecting to a desktop PC. This is the standard for PC displays.
- HDMI 2.0 or 2.1 for connecting to a wider range of devices. HDMI 2.1 is needed for 4K at 120Hz.
Some monitors also include ethernet ports, KVM switches (for connecting two computers and switching between them with one keyboard and mouse), and built-in USB hubs. These are nice to have, especially if your desk setup is complex.
Curved Screens for Photo Editing
Curved screens are increasingly common, especially for larger and ultrawide monitors. They can reduce the viewing angle distortion you get at the edges of a wide flat screen.
For photo editing, I’d generally recommend a flat screen for anything up to 32 inches. At ultrawide sizes (34 inches and above), a gentle curve can be beneficial because you’d otherwise have to turn your head to see the edges.
One thing to be aware of: curved screens can make straight lines in your images appear slightly curved, which can be a problem if you’re editing architecture or other subjects with strong horizontal and vertical lines. It’s not a deal-breaker, but it’s worth keeping in mind.
Budget
Monitor prices in 2026 range from under $200 to over $3,000. Here’s roughly what you can expect at different price points:
- Under $300: Good 27-inch 1440p IPS monitors with accurate sRGB colour. A solid starting point for hobbyist photo editing.
- $300 to $600: Excellent 27-inch 4K IPS monitors with wide gamut coverage (Adobe RGB and DCI-P3). This is where the best value is in 2026.
- $600 to $1,000: High-end 4K IPS monitors with advanced features like Thunderbolt hubs, 120Hz refresh rates, and improved contrast (IPS Black). Also where QD-OLED ultrawides start.
- $1,000 to $2,000: Photography-specific monitors with hardware calibration, colour hoods, and professional colour management tools. Also premium ultrawides.
- $2,000+: Top-tier professional displays including QD-OLED with built-in colorimeters, and the Apple Studio Display XDR.
Most hobby and semi-professional photographers will be very well served by something in the $300 to $800 range. If colour accuracy is part of your business and you’re delivering files for print or commercial work, it’s worth investing more.
Best Monitors for Photo Editing in 2026
Here are my picks for the best monitors for photo editing, organised by use case rather than just price. Each one fills a specific need, and I’ve included my honest take on who each monitor is best for and where it falls short.
Pricing does vary, so I’ve included links to multiple stores where you can check current prices.
Best Budget Monitor: ASUS ProArt PA278QV Gen 2 (PA278QGV)
If you’re on a tight budget but want a monitor that takes colour accuracy seriously, the ASUS ProArt PA278QGV is where I’d start.
This is a 27-inch 1440p IPS panel with 100% sRGB and 95% DCI-P3 coverage. ASUS factory calibrates it to Delta E < 2 and has it Calman Verified, which is impressive at this price point. The Gen 2 version adds a 120Hz refresh rate, which makes everything from scrolling through your photo library to general desktop use feel noticeably smoother.

Connectivity includes DisplayPort and HDMI, plus a USB hub. There’s no USB-C video input, which is the main thing you’re giving up compared to more expensive monitors. If you’re connecting to a desktop PC via DisplayPort, that’s a non-issue. If you want single-cable laptop connectivity, you’ll need to step up to the PA279CRV below.
If even $259 is more than you want to spend, the original PA278QV is still available for around $189. It has the same colour accuracy and build quality, but is limited to 60Hz and only covers sRGB (not DCI-P3). For dedicated photo editing where refresh rate doesn’t matter much, it’s a perfectly good option. But if you can stretch to the Gen 2, the 120Hz upgrade alone is worth it for daily use comfort.
Screen size and resolution: 27 inches (68 cm), 2560 x 1440 (1440p / WQHD)
Gamut: 100% sRGB, 95% DCI-P3
Technology: IPS
Connectivity: DisplayPort, HDMI, USB hub
Check price on Amazon here. The original PA278QV is available on Amazon here and B&H here.
Best Value 4K Monitor: ASUS ProArt PA279CRV
This is the monitor I’d recommend to most people reading this article. The PA279CRV has become the consensus pick for the best value photo editing monitor, and for good reason.
It’s a 27-inch 4K IPS panel with 99% Adobe RGB and 99% DCI-P3 coverage. Let that sink in for a moment: a few years ago, you’d have paid well over $1,000 for a monitor with those gamut numbers. The PA279CRV regularly sells for under $400.

ASUS factory calibrates every unit to Delta E < 2, and it’s Calman Verified. It supports 10-bit colour depth (8-bit + FRC), giving you access to over a billion on-screen colours. There are dedicated presets for sRGB, Adobe RGB, DCI-P3, and Rec.709, each individually calibrated.
The USB-C port supports DisplayPort Alt Mode and delivers 96W of power, which is enough to charge most laptops while using the monitor. You also get two DisplayPort inputs (one supports daisy chaining), two HDMI ports, and a USB hub. The stand adjusts for height, tilt, swivel, and pivot.
If there’s a downside, it’s the 60Hz refresh rate. For photo editing this doesn’t matter at all, but if you also use your monitor for gaming, you’ll notice the difference compared to a 120Hz or higher display. The build quality is also adequate rather than premium: the plastic housing feels a bit thin, and the built-in speakers are barely worth mentioning.
But at this price, with these specs, it’s hard to argue with. If you’re editing photos for web and print and you don’t want to overthink it, get this one.
Screen size and resolution: 27 inches (68 cm), 3840 x 2160 (4K)
Gamut: 99% Adobe RGB, 99% DCI-P3, 100% sRGB
Technology: IPS
Connectivity: USB-C (96W PD), 2x DisplayPort, 2x HDMI, USB hub
Check price on Amazon here and B&H here.
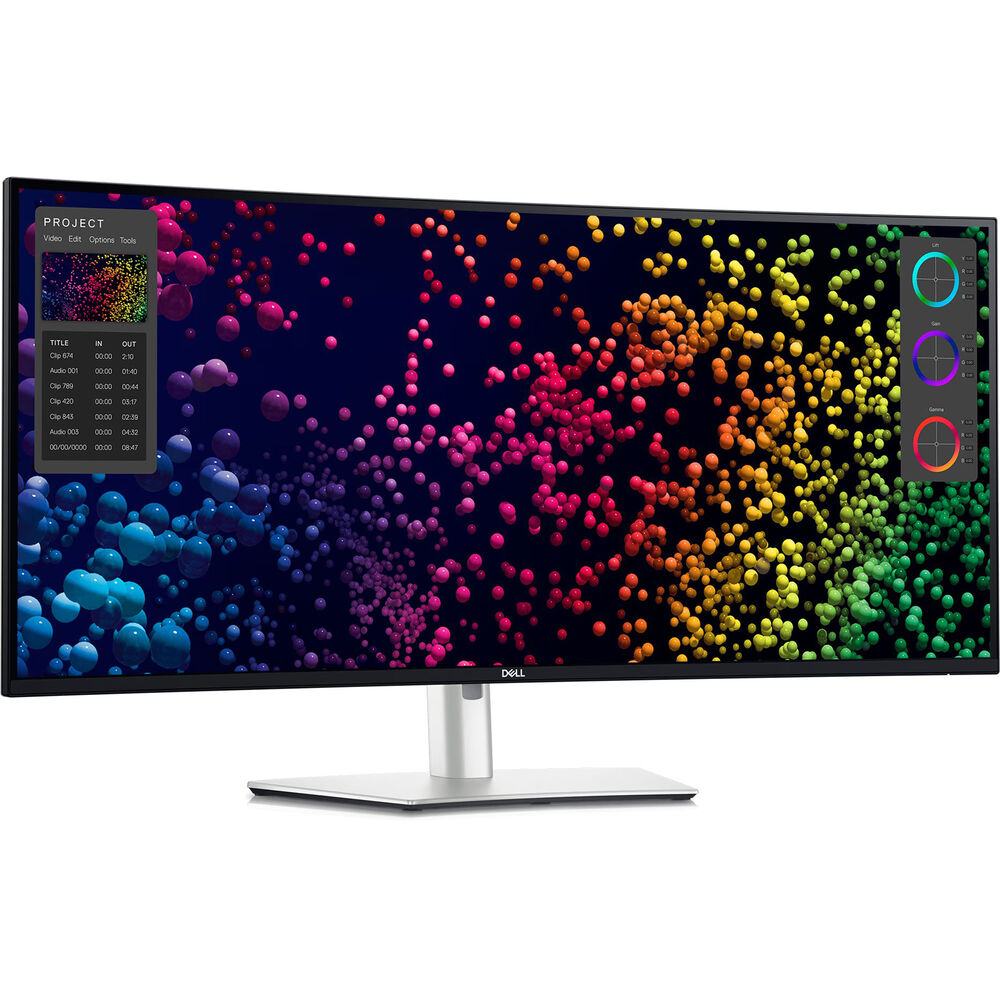
Best 32-Inch Monitor: Dell UltraSharp U3225QE
If you want a bigger screen with all the modern features, the Dell UltraSharp U3225QE is excellent.
I used a Dell UltraSharp as my go-to monitor for photo editing for years, and this latest version is the best they’ve made. It’s a 32-inch 4K display using Dell’s enhanced IPS Black technology, which pushes the contrast ratio to 3000:1. That’s three times better than a standard IPS panel, and you can see the difference in shadow detail and overall depth.
The extra screen size compared to a 27-inch monitor is more noticeable than you might expect. At 32 inches with 4K resolution, you get a lot of working space without needing to scale the interface up as much. It’s a comfortable size for extended editing sessions.

The refresh rate is 120Hz, which makes scrolling through photo libraries and general desktop work feel very smooth. Colour coverage is good: 100% sRGB and 98% DCI-P3, factory calibrated to Delta E < 2. Note that Dell doesn’t publish Adobe RGB coverage for this monitor, which is a bit odd. In practice, the DCI-P3 coverage means it handles a wide gamut well, but if Adobe RGB certification matters for your workflow, the BenQ SW272U further down might be a better fit.
Where this monitor really shines is connectivity. Thunderbolt 4 with 140W Power Delivery means it can charge even larger laptops. You get a full USB hub, ethernet port, KVM switch for connecting two computers, and a pop-out front panel with USB-C and USB-A ports for quick access. If you use a laptop and a desktop, this monitor can act as the hub for your entire desk.
Screen size and resolution: 31.5 inches (80 cm), 3840 x 2160 (4K)
Gamut: 100% sRGB, 98% DCI-P3
Technology: IPS Black (3000:1 contrast)
Connectivity: Thunderbolt 4 (140W PD), DisplayPort, HDMI 2.1, USB hub, Ethernet
Check price on Amazon here, B&H here, and direct from Dell here.
Best Monitor for Photographers: BenQ PhotoVue SW272U
If photo editing is your primary use and you want a monitor designed specifically for photographers, the BenQ SW272U is the one to look at.
BenQ has been making photography-focused monitors for years, and the SW272U is their current flagship 27-inch model. It’s a 4K IPS panel with 99% Adobe RGB and 99% DCI-P3 coverage, factory calibrated to Delta E ≤ 1.5 (tighter than most competitors).
What sets it apart from the ASUS and Dell options above is the photographer-specific features. It ships with a monitor hood (both landscape and portrait orientations) to block ambient light and reduce glare. The Nano Matte panel coating is TUV certified for anti-reflection, giving the screen an almost paper-like texture that makes editing in bright rooms more comfortable.

BenQ’s Paper Color Sync software lets you configure the monitor to simulate how your photos will look on specific paper and printer combinations. If you do a lot of printing, this can save you significant time and paper compared to test prints. The wireless Hotkey Puck G3 controller sits on your desk and lets you switch between colour presets with a physical button press, which is faster than digging through menus.
The monitor also supports hardware calibration via BenQ’s Palette Master Ultimate software, which writes calibration data directly to the monitor’s internal look-up table. This means the calibration stays with the monitor regardless of which computer you connect to it.
USB-C connectivity supports 90W Power Delivery, and there’s an SD card reader built in, which is a nice touch for photographers.
The main argument against the SW272U is the price. At around $1,500, it costs significantly more than the ASUS PA279CRV, which has very similar core specifications. What you’re paying for is the hood, the Hotkey Puck, the Nano Matte coating, the tighter factory calibration, and the hardware calibration support. If those features matter to your workflow, the premium is justified. If you mostly edit for web and don’t print much, the PA279CRV gets you 90% of the way there at a third of the price.
If your budget doesn’t quite stretch to the SW272U, consider the BenQ SW272Q, which has a 1440p resolution instead of 4K but otherwise similar features and colour coverage. It’s around half the price.
Screen size and resolution: 27 inches (68 cm), 3840 x 2160 (4K)
Gamut: 99% Adobe RGB, 99% DCI-P3, 100% sRGB
Technology: IPS with Nano Matte coating
Connectivity: USB-C (90W PD), DisplayPort, 2x HDMI, SD card reader, USB hub
Check price on Amazon here and B&H here.
Best All-Round Monitor (Including Photo Editing): MSI MPG 341CQPX QD-OLED
I use a QD-OLED ultrawide as my daily monitor for photo editing, gaming, and general work. It’s not marketed as a photo editing monitor, but hear me out.
The MSI MPG 341CQPX (the newer version of the model I use) uses a Samsung QD-OLED panel. It’s a 34-inch curved ultrawide with a 3440 x 1440 resolution and a 240Hz refresh rate. The colour coverage is excellent: 99% DCI-P3 and around 95% Adobe RGB, with good out-of-the-box accuracy. It also has USB-C with 98W Power Delivery, which is enough to charge most laptops.
The reason I’m including it here is simple: the OLED experience for photo editing is something you have to see to understand. The blacks are true black, not dark grey. When you’re editing a night sky or a dimly lit interior, the difference between OLED and IPS is stark. Colours pop in a way that IPS simply can’t match. And the response time means everything from scrolling to brush strokes feels instantaneous.
I previously had a laptop with an OLED screen, and when it died and I replaced it with an IPS model, I immediately regretted not getting OLED again. Once you get used to those blacks and that contrast, going back to IPS feels flat.
Now, there are trade-offs. The resolution is 1440p rather than 4K (though at ultrawide, you’re still getting a lot of pixels). The curve can subtly distort straight lines, which matters if you do architectural photography. And while burn-in protections have improved enormously, it’s still something to be aware of if you leave the same interface on screen for hours every day.
For photo editing specifically, the 1440p resolution and lack of Adobe RGB certification mean this isn’t the right pick if colour-critical print work is your primary use. But if you want one monitor that handles photo editing, gaming, video, and everyday work, and you want the best possible image quality when doing all of those things, a QD-OLED ultrawide is a fantastic choice.
When I’m not photo editing I also like to play games on my computer, and this monitor is amazing for that in a way that specialist photo monitors might not be (they often have lower refresh rates and lack gaming specific features like NVIDIA GSync).
This same Samsung QD-OLED panel is used in monitors from several manufacturers, including the Dell Alienware AW3425DW and the Samsung Odyssey OLED G8. I went with MSI because the price was right when I bought mine, but any of them will give you a similar experience.
Screen size and resolution: 34 inches (86 cm), 3440 x 1440 (WQHD ultrawide)
Gamut: 99% DCI-P3, ~95% Adobe RGB
Technology: QD-OLED
Connectivity: USB-C (98W PD), DisplayPort, 2x HDMI
Check price on Amazon here and B&H here.
Best Ultrawide for Photo Editing: Dell UltraSharp U4025QW
If you want an ultrawide that’s built for productivity and content creation rather than gaming, the Dell U4025QW is the best option right now.
This is a 40-inch curved ultrawide with a 5120 x 2160 resolution (sometimes called 5K2K). That’s equivalent to two 27-inch 1440p monitors side by side, but without the bezel down the middle. The extra vertical height compared to a standard 34-inch ultrawide makes a real difference for photo editing, because you can see more of the image while still having room for tool panels.
It uses Dell’s IPS Black panel technology with a 2000:1 contrast ratio, 99% DCI-P3 coverage, and factory calibration to Delta E < 2. The 120Hz refresh rate keeps everything smooth. If you’re coming from the older Dell U3821DW (which many photographers used), this is a significant upgrade in every way.
The connectivity is the same premium package as the U3225QE: Thunderbolt 4 with 140W Power Delivery, ethernet, KVM switch, and a pop-out USB hub. It also has built-in speakers, though they’re nothing special.
The main downsides are the price (around $1,800) and the desk space required. A 40-inch curved monitor has a large footprint, and you need a deep desk to sit at a comfortable distance. The curve is also something to consider for photo editing: it helps with immersion and reduces viewing angle issues at the edges, but it can make straight lines appear slightly curved.
Screen size and resolution: 39.7 inches (101 cm), 5120 x 2160 (WUHD / 5K2K)
Gamut: 99% DCI-P3, 100% sRGB
Technology: IPS Black (2000:1 contrast), curved
Connectivity: Thunderbolt 4 (140W PD), DisplayPort, HDMI 2.1, USB hub, Ethernet
Check price on B&H here and direct from Dell here.
Best Premium Creator Monitor: Dell UltraSharp U3226Q
If you want the best flat-panel OLED monitor designed specifically for colour-critical work, the Dell U3226Q is the new standard.
Released in early 2026, this is a 32-inch 4K QD-OLED monitor aimed squarely at creative professionals. Unlike the gaming-oriented QD-OLED monitors (including the MSI I use), the U3226Q is built around colour accuracy and professional workflows.
It covers 99% DCI-P3, 94% Adobe RGB, and 100% sRGB. Factory calibration is Delta E < 1 out of the box. It has a built-in colorimeter so you can recalibrate the monitor without buying a separate device. It supports 3D look-up tables for hardware-level calibration. And it has an anti-glare low-reflectance (AGLR) coating, which is a big deal for OLED: most QD-OLED monitors have a semi-glossy finish that shows reflections in bright rooms. The AGLR coating solves that problem.

The 120Hz refresh rate and true 10-bit colour (not 8-bit + FRC like most monitors in this guide) make this a proper professional-grade display. Thunderbolt 4 with 140W PD, ethernet, and a full USB hub round out the connectivity.
At $2,600, this is a serious investment. It makes sense if you’re a working professional who needs both the OLED image quality (the true blacks, the contrast, the colour vibrancy) and the calibration precision that professional print and commercial work demands. For hobbyist photo editors, the PA279CRV at a seventh of the price will get you very close in terms of colour accuracy. The U3226Q is for people who need the best.
If you’re considering this monitor alongside the EIZO ColorEdge range, the main advantage of the Dell is the OLED panel. EIZO monitors (like the CS2740 at around $1,900 or the CG2700X at around $2,500) are IPS panels with exceptional uniformity, hardware calibration, and long track records in professional colour work. If you need the absolute best colour uniformity and don’t want OLED, EIZO is still the brand that professional colour labs trust. But the Dell offers something EIZO doesn’t: infinite contrast and true black.
Dell also includes a 3-year warranty with premium panel exchange that covers OLED burn-in, which is a reassuring commitment.
Screen size and resolution: 31.5 inches (80 cm), 3840 x 2160 (4K)
Gamut: 99% DCI-P3, 94% Adobe RGB, 100% sRGB
Technology: QD-OLED with AGLR coating
Connectivity: Thunderbolt 4 (140W PD), DisplayPort, 2x HDMI 2.1, USB hub, Ethernet
Check price on B&H here and direct from Dell here.
Best Monitor for Mac: Apple Studio Display XDR
If you’re in the Apple ecosystem and want a monitor that integrates with macOS the way only Apple can do, the new Studio Display XDR is the one to look at.
Released in March 2026, the Studio Display XDR is Apple’s answer to the old Pro Display XDR (which cost $5,000). It’s a 27-inch 5K display with a mini-LED backlight using 2,304 local dimming zones. Peak HDR brightness is 2,000 nits, with 1,000 nits sustained for SDR content. It supports both P3 wide colour and Adobe RGB gamuts, and Apple claims a Delta E of less than 1.
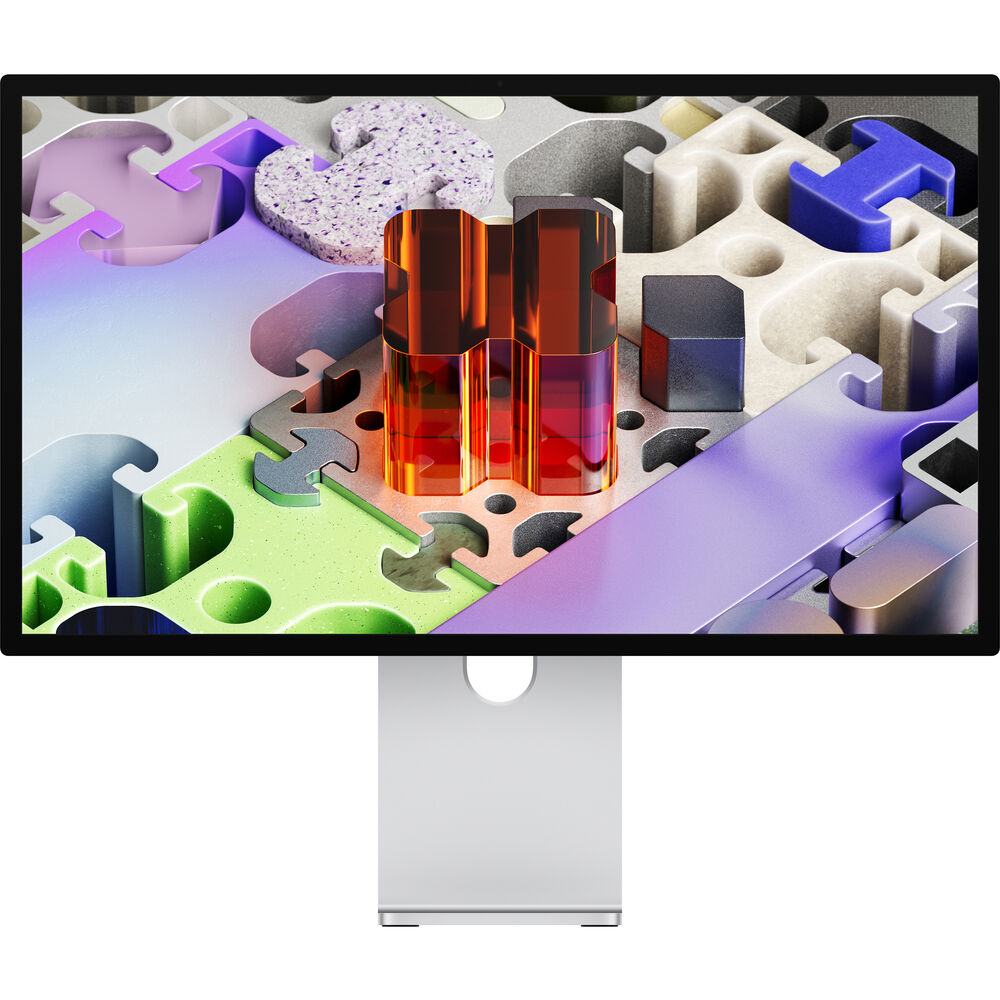
The 120Hz refresh rate is a welcome upgrade (Apple’s previous Studio Display was stuck at 60Hz for years). Thunderbolt 5 connectivity means it works as a hub for peripherals, and you can daisy-chain up to four of them from a single Mac. It also has a 12MP Centre Stage camera with Desk View, a six-speaker sound system, and a three-microphone array, so it doubles as your video conferencing setup.
The starting price of $3,299 (with the adjustable stand) is a lot. If you opt for the nano-texture glass and the adjustable stand, it’s even more. You’re paying a significant premium for the Apple integration, the build quality, and the display technology.
For photographers who work entirely in the Apple ecosystem, it’s a compelling option because of how well macOS manages colour across Apple displays. Apple’s colour management means that what you see on your Studio Display XDR will closely match what you see on your iPhone, iPad, and MacBook without any additional configuration.
If you’re a Mac user on a tighter budget, the ASUS PA279CRV works well with macOS and costs a fraction of the price. It won’t have the same level of integration, but the colour accuracy is comparable for most photo editing work.
Screen size and resolution: 27 inches (68 cm), 5120 x 2880 (5K)
Gamut: P3 wide colour, Adobe RGB support
Technology: Mini-LED with 2,304 dimming zones
Connectivity: Thunderbolt 5 (140W), 2x USB-C
Check price on B&H here and on Apple here.
Quick Summary: Best Monitor by Use Case
- Best Budget: ASUS ProArt PA278QGV
- Best Value 4K: ASUS ProArt PA279CRV
- Best 32-Inch: Dell UltraSharp U3225QE
- Best for Photographers: BenQ PhotoVue SW272U
- Best All-Rounder: MSI MPG 341CQPX QD-OLED
- Best Ultrawide: Dell UltraSharp U4025QW
- Best Premium Creator: Dell UltraSharp U3226Q
- Best for Mac: Apple Studio Display XDR
Frequently Asked Questions
Is 4K necessary for photo editing?
Not strictly necessary, but it makes a noticeable difference. A 4K monitor has four times the pixels of a 1080p screen, which means you can see more detail when zooming into your images and fit more of your photo library on screen at once.
If your budget is tight, a good 1440p monitor with accurate colours (like the ASUS ProArt PA278QGV) will do excellent work. But if you can afford 4K, it’s a worthwhile upgrade, especially at 27 inches and above where the extra sharpness is clearly visible.
Is OLED good for photo editing?
Yes, and it’s getting better every year. OLED monitors offer true black levels and much higher contrast than IPS panels, which can be a real advantage when editing images with dark areas or high dynamic range scenes.
The main concerns used to be burn-in risk and limited colour gamut options. Modern OLED monitors have largely addressed both: burn-in protections are effective for normal use, and recent QD-OLED panels cover 99% DCI-P3 and 94%+ Adobe RGB. For dedicated colour-critical print work, a high-end IPS panel with hardware calibration (like the BenQ SW272U or an EIZO ColorEdge) still has a longer track record. But for most photo editing workflows, OLED is a great choice.
Should I get a curved monitor for photo editing?
For standard-width monitors up to 32 inches, a flat screen is generally better for photo editing because it doesn’t distort straight lines. For ultrawide monitors (34 inches and above), a gentle curve can actually help by keeping the edges of the screen at a more consistent viewing distance from your eyes.
If you photograph architecture or anything with strong horizontal and vertical lines, be aware that a curved screen will make those lines appear slightly bowed. It’s subtle, but it can affect how you perceive alignment during editing.
How often should I calibrate my monitor?
I’d recommend calibrating every 2 to 4 weeks if colour accuracy is important to your work. All monitors drift over time, and regular calibration keeps your colours consistent. A hardware calibration tool like the Datacolor SpyderExpress makes the process quick and easy.
Some higher-end monitors (like the Dell U3226Q) have built-in calibration sensors that can recalibrate automatically, which is a real convenience if you don’t want to think about it.
Do I need a separate monitor for photo editing or can I use my laptop screen?
You can edit photos on a laptop screen, and many modern laptop displays are very good. But a dedicated external monitor will almost always give you a better editing experience: a larger screen for seeing more detail, more consistent colours, and a more comfortable ergonomic setup for long editing sessions.
If you travel a lot and edit on the go, a good laptop screen is fine for initial edits. But I’d recommend doing your final colour adjustments on a calibrated external monitor when you get back to your desk. I have a guide to the best laptops for photo editing if you’re looking for a portable option as well.
Further Reading
That’s my guide to the best monitors for photo editing! If you found this helpful, you might enjoy some of my other photography and tech related content. Here are some articles to get you started.
- A great monitor is no good if it’s not properly calibrated. See my guide to monitor calibration to make sure your screen is set up correctly.
- You’re going to need somewhere to put your monitor! See my guide to setting up a home photography office for some tips.
- I have a guide to my favourite photo editing software, as well as the best alternatives to Lightroom.
- You’re going to need something to run your photo editing software on. See my guide to the best laptops for photo editing and the best desktop computers for photo editing.
- If you’re in the market for a new camera, I have a detailed guide to the best travel cameras.
- Don’t lose your photos. See my guide to backing up your photos for tips on keeping all your work safe.
Looking to Improve Your Photography?
If you found this post helpful, and you want to improve your photography overall, you might want to check out my online travel photography course.
Since launching the course in 2016, I’ve already helped over 2,000 students learn how to take better photos. The course covers pretty much everything you need to know, from the basics of how a camera works, through to composition, light, and photo editing.
It also covers more advanced topics, including astrophotography, long exposure photography, flash photography, and HDR photography.
You get feedback from me as you progress, access to webinars, interviews and videos, as well as exclusive membership of a Facebook group where you can get feedback on your work and take part in regular challenges.
It’s available for an amazing one-off price for lifetime access, and I think you should check it out. Which you can do by clicking here.
And that’s it! I’d love to hear about your thoughts on your favourite monitor for photo editing, and am happy to answer any questions you have. Just pop them in the comments below and I’ll get back to you as soon as I can.
Katie H says
Hello Laurence,
Very helpful and detailed post – I do photography (as a hobby) myself but am looking for a computer monitor for my daughter who is now a junior at university in graphics design. I am wondering if all the things you are saying for photo editing for monitors would be same for graphics design work and editing (Illustrator, PhotoShop, InDesign and Canva she says are top 4 programs she currently uses)? She also does do some regular photo editing as well. She recently decided on a computer but we are hoping to be able to chip in to help her buy a monitor.
Budget is $700. Looking for something that will still be a good monitor for years to come for rest of her schooling and as she begins her carerr. Preferred color is black.
If you have any specific recs, let me know! THANKS!!!!
Laurence Norah says
Hi Katie,
Thanks very much. And that is a lovely gift for your daughter!
So yes, all the things that apply for choosing a monitor for photography apply for the tools your daughter is using for graphics design as she needs to be able to ensure color accuracy.
One thing to check is the size of the monitor your daughter would like, which is definitely going to be related to the size of her desk and how much room she has. I’d say a 27 inch or 32 inch monitor with a 4k resolution would be a good option, but you’ll want to make sure she has room for it. I’d also advise against a curved monitor, it can make any graphical work more challenging as it can make straight lines seems curved. They also don’t travel as easily.
With all that said, I’d say something like the ASUS ProArt Display PA279CV 27” 4K would be a good option and it’s also well within budget. A slightly larger option would be the BenQ PD3205U.
However, for sure you’ll want to make sure she has room for whichever monitor you choose.
Let me know if you have any follow up questions I’d be happy to help!
Laurence
Katie says
Thanks Laurence for your quick response and thoughtful advice. I checked with her and she says right now she could have up to 30 inches monitor to sit diagonally on her desk. So 30″ or below should all work fine and should be large enough to use at her next place. I will send along the ASUS one to her, do you have any recs for a 30″ one around that budget? Thanks so much again!!!
Laurence Norah says
Hey Katie!
So 30″ is actually not a common monitor size, they are pretty much all either around 27″ or they jump to 32″. So if she can stretch to fitting in 32″, then something like the BenQ PD3205U would be a possible option. Asus also makes a 32″ version of their monitor, the PA329CV. The latter is 28.63″W from side to side, so if that would fit in the space she has I’d probably recommend that.
Let me know if you’d like any more input, I’m happy to help 🙂
Laurence
Dan says
It surprises me when I have read the rave reviews about DELL screens but in fact they acknowledged the IPS tech and the panels were purchased from LG. With that in mind how come there are no LG screens in this lineup?
Laurence Norah says
Hi Dan,
Thanks for your message! In terms of specific monitors, honestly, there are a great many monitors on the market that would be great for photo editing. That’s really what the first half of the guide is about, which is to show what to look for in a photo editing monitor, rather than trying to list every monitor out there. So if you have found a monitor that meets your requirements and it lines up with our suggested specs to look for, then I would say it will probably be a good pick! Certainly, many of the manufacturers have the same underlying hardware, so as long as the specs are good, and the brand is one that you trust, then that should be good to go.
Enjoy your photo editing on whichever monitor you choose!
Laurence
Jean Starling says
Do you have any suggestions for using a tv for a monitor?
Laurence Norah says
Hi Jean,
So you can consider using a TV as a monitor and many people do do this. The technology is generally the same, and you will want to look for the same things in terms of features like color accuracy, resolution etc. There are a few extra things to consider when considering using a TV as a monitor. First, you’ll want to make sure the TV has the right types of input. Most TV’s focus more on HDMI inputs rather than say USB-C or DisplayPort, so just be sure the TV has the right inputs to match your computer. Next, most TV’s do not have very adjustable stands, unlike monitors which tend to come with stands that allow for adjusting on a desk.
I hope this helps!
Laurence
Mathew says
Hi Laurence,
Appreciate you for the detailed guidance!
I just got a new Mac Studio and am looking for a best compatible monitor. (not apple)
My budget $1000. Your opinion n suggestion.
Laurence Norah says
Hi Matthew,
It’s my pleasure. So I would probably go for the BenQ PD3205U, it’s a very capable 31.5 inch 4k monitor that comes in at around $750. I’d also look at Dell, they have some Labor Days sales going on right now on many of their monitors, including the ultrawide U3821DW 37.5″. That is also a good choice, the main decision will be budget and also desk space. A curved ultrawide needs quite a lot of space, and curved monitors can make some types of photo editing more challenging, especially those with straight lines. You also don’t get quite as high a resolution, despite the screen being bigger, so the BenQ would probably be my first pick, but it’s up to you.
Enjoy your new monitor, whatever you go for, and let me know if you have any more questions.
Laurence
Clark says
Hello Laurence
a newbie wedding photographer here. just have an older laptop (from 2015) now but wanting to upgrade to a desktop computer with a wider monitor for my work as its starting to move from weekend hobby to real career. need a bigger screen, separate keyboard, more memory (or whatever helps run photo software more quickly) and more storage.
I know you focus here is just on the monitor, but do you have any recommendations on full computer setups? or is it better to buy them separetely? it seems most computers I have looked at come with a monitor and keyboard.
no preference on Mac or Windows, fine to purchase in person or online, just needs to be available to buy in UK (based near Manchester). Budget is about £800 total for full setup (monitor, computer, keyboard), hoping enough for a decent computer and monitor? would be grateful for any recommendations or help with options!
thanks!
clark
Laurence Norah says
Hi Clark,
Great to hear from you, and congratulations on your new career 🙂 I’m happy to offer my thoughts. A desktop is generally a better option than a laptop, the performance is normally better for the price as manufacturers aren’t so constricted by power and heat issues.
I have a guide to the best laptops for photo editing you might find useful. It covers the specifications that are important for photo editing, which are pretty similar between a laptop and a desktop.
In terms of specific manufacturers, honestly, most of them build using the same components so I don’t think it’s so important. Personally I’ve always built my own computers, but I think you can get a good deal these days with a pre-built unit (and not have to worry about it all not working when you turn it on!).
I would suggest setting aside £150 – £200 for the monitor, perhaps something like the AOC U27V4EA or similar.
That would give you around £600 for the system.
I had a quick look at the Overclockers UK website and they have a desktop PC builder where you can configure the pieces. I put together a system which came to £586.
So something like that might be a good option. I did look at some other sites as well, which are worth checking out of course, but the Overclockers options seemed like a pretty good deal.
Hopefully this helps! If you find other options and want feedback I’m happy to help 🙂
Laurence