
Should you shoot in RAW? My short answer is yes, with one big caveat: you have to be willing to put in the editing work afterwards. If you know you won’t, that’s fine, and I’ll explain why later in this post. But if you’re even slightly interested in getting more from your photos, switching to RAW is one of the single biggest improvements you can make.
I’ve been shooting professionally since 2010, and I’ve taught photography to over 2,000 students through my online photography course, as well as at workshops around the world. One of the first things I encourage every student to do is switch their camera to RAW. The reaction is almost always the same: once they see what they can recover from a single RAW file, they never go back.
In this post, I’m going to explain what RAW actually is, why I think you should shoot in RAW, some good reasons why you might not want to, and how to get started. I’ll also cover some common questions, like why your RAW files look so flat compared to JPEGs, and what software you need to edit them.
Table of Contents:
What is RAW in Photography?
A RAW file is a digital image file that contains the unprocessed data from your camera’s sensor. When you press the shutter button, your camera records a massive amount of information about the light hitting the sensor. A RAW file keeps all of that information intact, without any compression or in-camera editing applied.
Think of it like this: a JPEG is a finished meal that the camera has cooked for you using its own recipe. A RAW file is all the fresh ingredients, ready for you to cook however you like.
Every camera manufacturer has their own RAW file format. Canon cameras save RAW files as .CR2 or .CR3 files. Nikon uses .NEF. Sony uses .ARW. They all contain the same basic idea (unprocessed sensor data) but each brand wraps it up in their own format.
It’s not just dedicated cameras that shoot RAW either. Many smartphones now support RAW shooting. Samsung’s Expert RAW app produces DNG files (a universal RAW format created by Adobe), and Apple’s ProRAW format is available on recent iPhones. I shoot RAW on my Samsung S23 and the results are noticeably better than the standard JPEG output when I take the time to edit them.
The other format you’ll encounter is JPEG (sometimes written JPG, they’re the same thing). JPEG stands for “Joint Photographic Experts Group”, which is the name of the group that created the format. When your camera saves a JPEG, it takes the raw sensor data, applies a series of edits (adjusting colour, contrast, sharpness, and noise reduction), compresses the result to save space, and throws away the original data. The result is a smaller file that looks good straight out of the camera and can be shared anywhere without any editing.
There are other compressed formats too. HEIF is the default on most iPhones, and offers better quality than JPEG at similar file sizes. But for the purposes of this post, the key distinction is between compressed formats (JPEG, HEIF, PNG) and uncompressed RAW files.
RAW vs JPEG: What’s the Difference?
Here’s how RAW and JPEG compare in practice:
File size. A RAW file is typically 3 to 5 times larger than a JPEG from the same camera. On my Canon EOS R5, a compressed RAW (CRAW) file is around 25-30 megabytes. A high-quality JPEG from the same camera is around 8-10 megabytes. If you’re shooting on a 20-megapixel camera, expect RAW files of roughly 20 megabytes each.
Colour information. JPEG is an 8-bit format, meaning it can store information on up to 16 million colour shades. That sounds like a lot, but RAW files store 12 or 14 bits of colour data, which translates to somewhere between 68 billion and 4.3 trillion colour shades. This extra colour data is what gives you so much more flexibility when editing.
Editing flexibility. Because a RAW file keeps all the original sensor data, you can make big adjustments to exposure, white balance, shadows, and highlights without destroying the image. With a JPEG, the camera has already made those decisions for you and thrown away the data you’d need to change them. Small edits are fine, but try to recover a blown-out sky or lift deep shadows from a JPEG and you’ll quickly see the limits.
Sharing. JPEGs work everywhere. You can email them, upload them to social media, print them, or view them on any device. RAW files need to be processed and exported before you can share them. You can’t just upload a .CR3 file to Instagram.
Camera support. Almost every mirrorless camera, DSLR, and higher-end compact camera supports RAW. Many smartphones do as well. Basic point-and-shoot cameras and older smartphones typically don’t. If you’re not sure, check your camera’s image quality settings menu, or look up your model’s specifications online.
Why is RAW Capitalised?
A quick aside: you might be wondering why “RAW” is usually written in capital letters. Unlike JPEG, RAW doesn’t actually stand for anything. It literally just means “raw”, as in unprocessed.
The convention of capitalising it probably comes from two things. First, it helps distinguish the file format from the everyday word “raw”. Second, file extensions have traditionally been written in capitals (.DOC, .XLS, .JPG), so RAW follows the same pattern even though it isn’t a single standardised file extension.
There’s no rule about it. You’ll see both “RAW” and “raw” used, and neither is wrong.
Why You Should Shoot in RAW
I’ll be direct: I think most photographers who are serious about improving their photos should shoot in RAW. Here’s why.
You Keep All the Image Data
This is the big one. When you shoot a scene, sometimes the sky is too bright, or the subject is too dark. Maybe the light changed between the time you set up and the time you pressed the shutter. With a JPEG, there’s very little you can do about it after the fact. The camera has already compressed the image and thrown away the data you’d need to fix it.
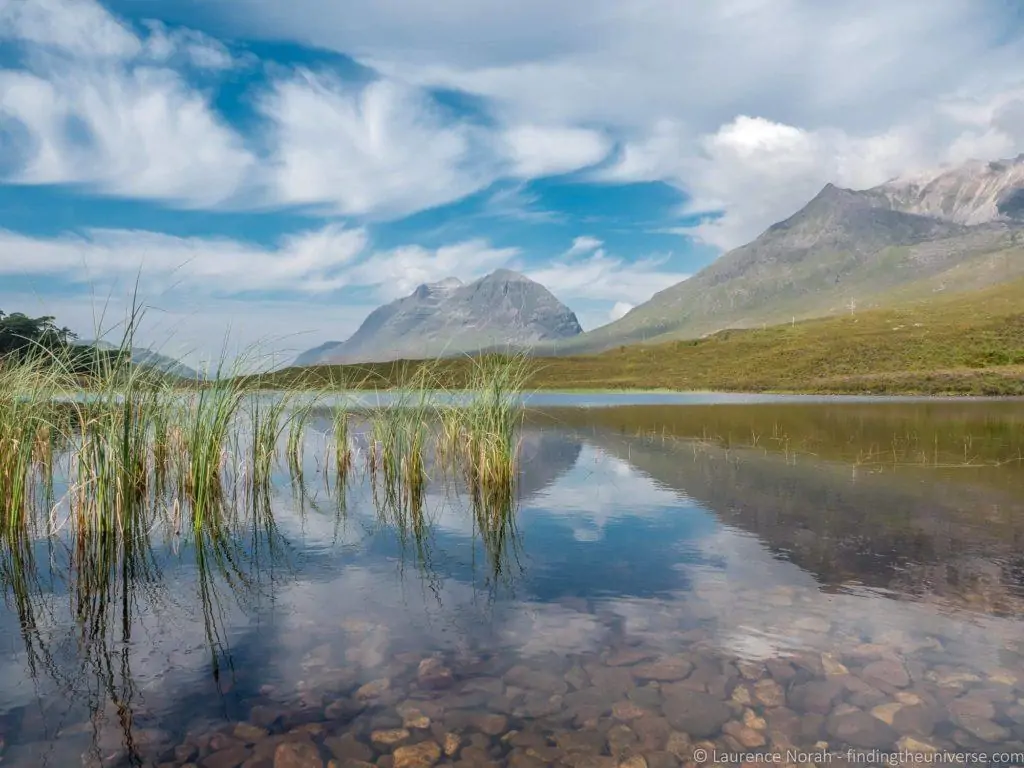
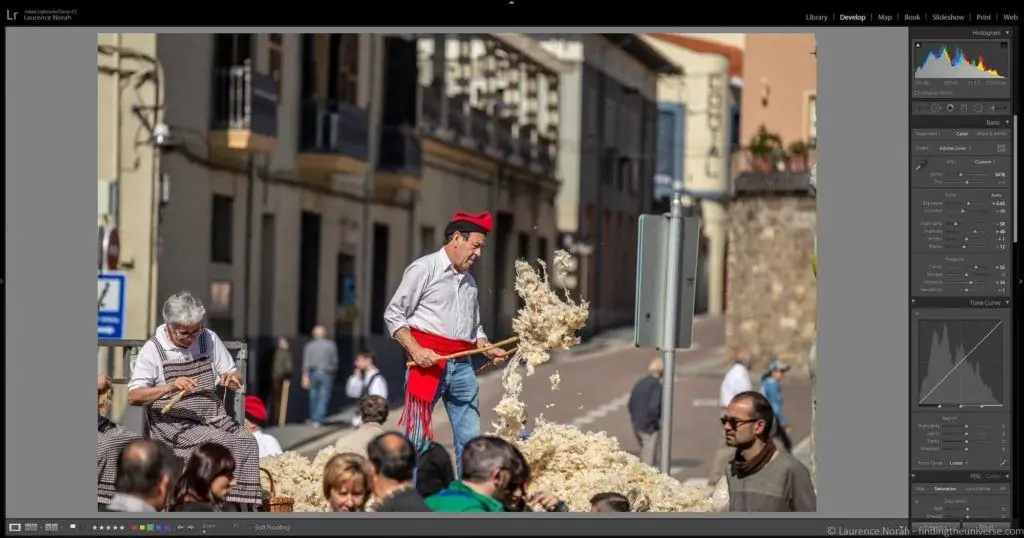
With a RAW file, all that data is still there. You can pull back a sky that’s almost completely blown out, or lift shadows that looked like solid black, and recover detail you didn’t even know was in the image.
In the example above, you can see the original RAW file on the left and the edited version on the right. I deliberately underexposed the hillside to keep the clouds and sky correctly exposed. Then, in editing, I was able to recover all the shadow detail in the hillside and create a properly balanced image.
When I give photography talks and show before-and-after edits like this, especially where the shadows go from completely black to fully detailed, I’ve had audible gasps from the audience. It really does feel like magic the first time you see how much data is hiding in a RAW file.
White Balance is Easy to Fix
White balance refers to the colour tone of your image. Different light sources produce different colour temperatures: a tungsten bulb gives a warm, yellowish light, while shade on a clear day looks cool and blue. Your camera tries to figure out the correct white balance when it takes a photo, so that white objects actually look white.
Sometimes it gets this wrong, especially in mixed lighting or tricky conditions. When you shoot in JPEG, the white balance is baked into the file. You can nudge it in editing, but any big changes will degrade the image.
With a RAW file, white balance is just a piece of metadata. You can change it completely after the fact, with zero quality loss, as if you’d set it correctly in camera from the start.
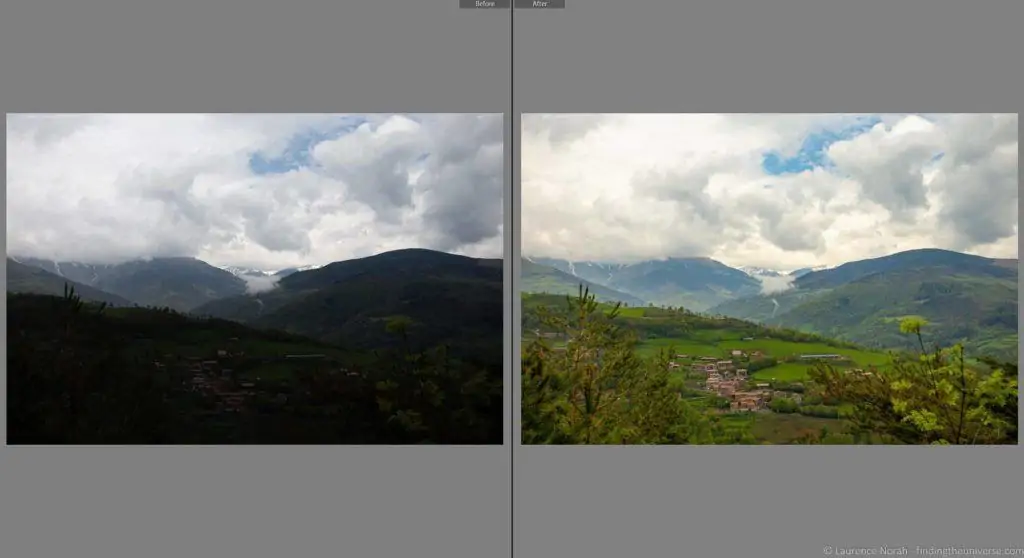
In the example above, the original image on the left has a yellow cast from warm lighting. The white bowl doesn’t look white. By adjusting the white balance in the RAW file, the corrected version on the right shows the food with much more natural, accurate colours.
Better Sharpness and Noise Control
When your camera saves a JPEG, it applies its own sharpening and noise reduction algorithms. These are okay for general use, but they’re a one-size-fits-all approach. The tiny processor inside your camera is making decisions about how much noise to remove and how much to sharpen, without knowing what the image actually needs.
Dedicated editing software like Adobe Lightroom has far more sophisticated sharpening and noise reduction tools. And AI-powered tools like Topaz Photo AI and DxO PureRAW can do things with noise that would have seemed impossible a few years ago. But these tools work best when they have the full, uncompressed RAW data to work with.
This matters most for low-light photography: indoor shots, night photography, or any situation where you’ve had to push your ISO higher than you’d like. The difference between noise reduction on a JPEG versus a RAW file from the same shot can be dramatic.
Future-Proof Your Photos
Photo editing software improves every year. The RAW files I shot in 2010 look significantly better when I process them with today’s software than they did with the tools I had at the time. Every generation of editing software extracts more detail, handles noise better, and produces cleaner results from the same RAW data.
A JPEG is a finished product. It won’t benefit from better software in the future. A RAW file is an archive of everything your camera captured, and it will keep getting better as the software catches up.
Compressed RAW: The Best of Both Worlds
One common concern about RAW is file size. A few years ago, this was a bigger deal than it is now. Storage is cheap, and most modern cameras offer a compressed RAW option that significantly reduces file sizes with no visible quality loss.
On my Canon EOS R5, I shoot exclusively in CRAW (Canon’s compressed RAW format). After five years of using it for everything from landscapes to safari wildlife, I’ve seen no difference in image quality compared to full, uncompressed RAW files. The file sizes are roughly 40% smaller, which adds up fast when you’re shooting thousands of images on a trip. Nikon, Sony, and other manufacturers have similar compressed RAW options.
So if file size has been putting you off, check whether your camera offers a compressed RAW mode. You get all the editing flexibility with a smaller storage footprint.
When You Might Not Want to Shoot in RAW
RAW isn’t the right choice for every situation, and I want to be upfront about that. Here’s where JPEG (or another compressed format) might make more sense.
You won’t edit your photos. This is the biggest one. If you know you’re not going to spend time editing, RAW files will just sit on your hard drive unprocessed. Modern cameras do a pretty good job with their JPEG processing. If you’re happy with how your photos look straight from the camera, there’s nothing wrong with sticking to JPEG. Be realistic with yourself about this.
You need fast burst shooting. Because RAW files are much larger than JPEGs, they fill up your camera’s memory buffer faster. If you’re shooting sports or fast action and need long continuous bursts, JPEG lets you keep shooting for longer before the camera slows down. This is less of an issue on newer cameras with fast memory card slots, but it’s still a factor.
Speed of delivery matters more than editing control. Press photographers at events often shoot JPEG because they need to file photos within minutes. There’s no time for a RAW editing workflow when a news outlet needs the image right now.
You’re travelling light without a laptop. If you want to share photos with friends and family while travelling and you don’t have a laptop with you, JPEG is simpler. That said, most smartphones with RAW support include built-in editors that can process RAW files on the device, so this is less of a barrier than it used to be.
A middle ground: RAW + JPEG. Most cameras let you shoot in both formats simultaneously. The camera saves a RAW file and a JPEG of each shot. The JPEG is there for quick sharing, and the RAW file is there when you want to do proper editing later. The trade-off is that this uses the most memory card space, and it can slow down burst shooting. But it’s a good transitional approach if you’re not ready to commit fully to a RAW workflow.
Why Do RAW Files Look Washed Out?
This catches almost everyone off guard the first time. You switch to RAW, load up your images, and they look flat, dull, and lifeless compared to the JPEGs your camera was producing. It’s tempting to think something has gone wrong.

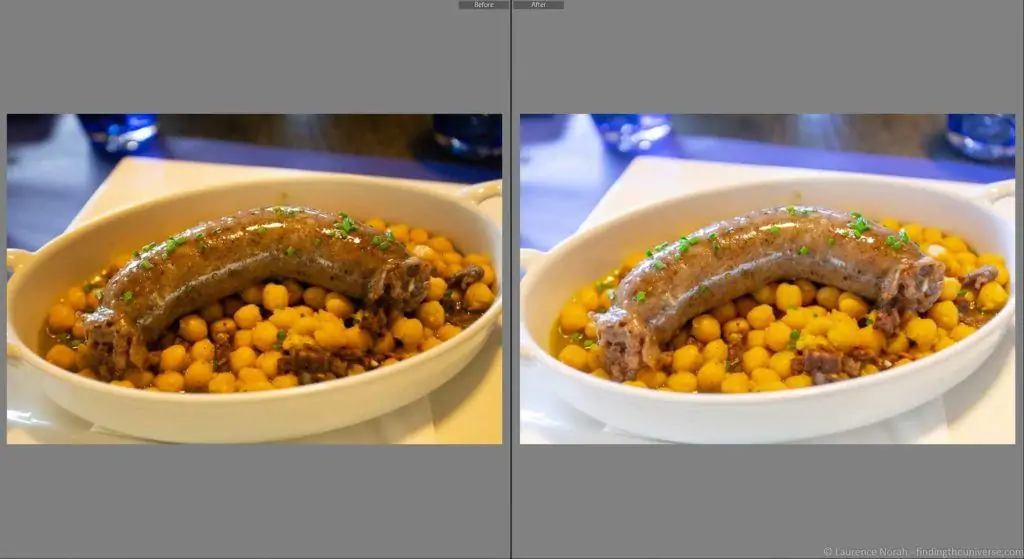
In the comparison above, the camera’s JPEG is on the left and the RAW file is on the right. The JPEG has punchier colours, more contrast, and looks sharper. The RAW file looks muted and soft.
Nothing is wrong. This is exactly how it’s supposed to work.
When your camera saves a JPEG, it applies an image profile to the data: boosting saturation, adding contrast, sharpening the image, and tweaking the colours to make everything look attractive. It’s doing the editing for you, according to a preset recipe.
A RAW file has none of that applied. It’s a blank canvas. The data is all there, ready for you to adjust into a final image with the settings you choose, rather than the ones your camera chose for you. The flat look is just the starting point, not the finished product.
Once you understand this, those washed-out RAW files stop being disappointing and start being exciting. All that flatness is potential. The first time you take a RAW file that looks like nothing special and turn it into something you’re proud of, you’ll understand why photographers get so enthusiastic about this format.
How to Enable RAW on Your Camera
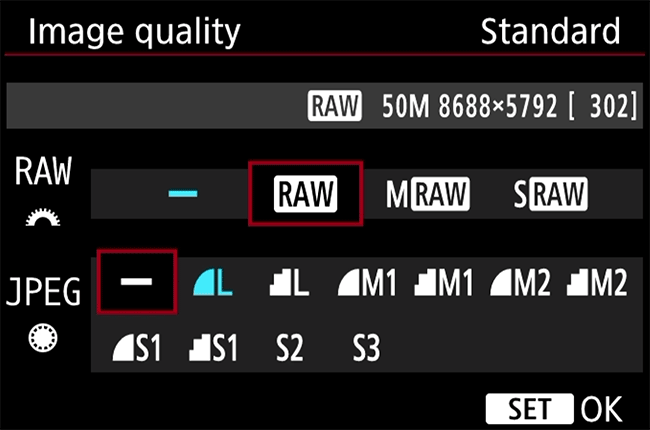
The exact steps vary by camera brand and model, but the process is broadly the same. You’re looking for an “Image Quality” setting in your camera’s menu system.
On Canon cameras, press the Menu button and look for the Image Quality option (it’s usually one of the first screens). Select it, and you’ll see options for RAW, CRAW (compressed RAW), and various JPEG quality levels. I’d recommend choosing CRAW if your camera supports it, or the highest quality RAW option if it doesn’t. You can also set a JPEG option alongside RAW if you want both.
Nikon, Sony, Panasonic, and other manufacturers all have similar menu settings. If you’re not sure how to find it on your specific camera, search for your camera model name followed by “enable RAW” and you’ll find step-by-step instructions.
On smartphones, RAW support is usually a toggle inside the camera app (or a dedicated pro/expert mode). On Samsung phones, the Expert RAW app gives you full RAW shooting. On iPhones that support ProRAW, you’ll find the toggle in Settings > Camera > Formats.
What Software Do You Need to Edit RAW Files?
To edit a RAW file, you need software that supports your camera’s specific RAW format. The good news is that all the major editing tools support RAW files from pretty much every camera currently on the market.
My preferred tool is Adobe Lightroom Classic. I’ve used it for years and it handles everything I need: photo management, RAW editing, and exporting. It’s the tool I use in my photography course and the one I’d recommend for most photographers who are serious about editing.
Lightroom does require a monthly subscription (currently $19.99/month for the Photography Plan, which includes Photoshop). If you’d prefer a one-off purchase, ON1 Photo RAW is the closest alternative I’ve found. It has a similar interface and a solid feature set. Skylum Luminar Neo takes a more automated, AI-driven approach to editing and is a good option if you want powerful results without a steep learning curve.
If you’re not ready to spend money, Darktable and RawTherapee are both free, open-source RAW editors. They’re less polished than the paid options and have fewer tutorials available online, but they’re capable tools and a good way to try RAW editing without any financial commitment.
Your camera may also have come with its own RAW editing software. Canon includes Digital Photo Professional, and Nikon provides Capture NX-D. These are free and fully support your camera’s RAW format, though they don’t offer the same breadth of features as the dedicated editors above.
For a detailed comparison of all these options, see my full guide to the best photo editing software.
Frequently Asked Questions About RAW
Should beginners shoot in RAW?
Yes, I’d recommend it, even if you don’t plan to edit every photo right away. Get into the habit early, and the RAW files will be there when you’re ready to learn editing. In the meantime, you can set your camera to shoot RAW + JPEG and use the JPEGs for sharing.
If you go back to those RAW files six months or a year later, after you’ve learned some editing, you’ll be glad you have them.
Can I shoot RAW on my phone?
Many modern smartphones support RAW shooting, though it’s not always enabled by default. Samsung Galaxy phones (S21 and newer) have a dedicated Expert RAW app. iPhones from the iPhone 12 Pro onwards support Apple ProRAW. Google Pixel phones can shoot RAW through third-party camera apps or the built-in camera’s advanced settings.
The results won’t match a dedicated camera with a larger sensor, but smartphone RAW files still give you noticeably more editing flexibility than their JPEG equivalents, especially for exposure and white balance corrections.
How much storage space do I need for RAW files?
More than for JPEGs, but storage is cheaper than it has ever been. As a rough guide, a 128GB memory card holds around 4,000 to 5,000 compressed RAW files from a 45-megapixel camera like my R5, or closer to 8,000 from a 20-megapixel camera. A 1TB external hard drive, which costs well under $50, holds tens of thousands of RAW files.
If storage was a real concern five or ten years ago, it really isn’t today. A good memory card and an external hard drive are all you need.
Does shooting RAW make my photos better automatically?
No. Shooting RAW gives you more data to work with, which means more potential. But that potential only becomes real if you edit the files. An unedited RAW file will look worse than a JPEG from the same camera, because the JPEG has been processed and the RAW file hasn’t.
The benefit is that when you do edit, you’ll get better results from a RAW file than you would from a JPEG. The ceiling is higher, but the floor is lower.
Is RAW the same as unedited?
Yes and no. A RAW file hasn’t been edited by the camera’s internal software, so in that sense it’s unedited. But the camera still records metadata alongside the RAW data, including the white balance, exposure settings, and picture style you had selected. Your editing software reads this metadata and uses it as a starting point, but you’re free to change any of it.
What does CRAW mean?
CRAW is Canon’s compressed RAW format, available on their mirrorless cameras (including the EOS R5, R6, R7, R8, and others). It applies lossless or near-lossless compression to the RAW data, significantly reducing file sizes without any visible quality loss. Nikon and Sony have similar compressed RAW options under different names.
I shoot exclusively in CRAW and have done for five years. I’ve never had a situation where I wished I’d used the larger, uncompressed RAW format.
Further Reading
If this post has helped you understand RAW and you’re ready to start shooting in it, you might find some of our other photography guides useful too.
- Our guide to the best photo editing software, which will help you choose a tool to edit your RAW files
- If you need a computer to run that software on, see our guide to the best laptops for photo editing
- Our guide to the exposure triangle, which explains how aperture, shutter speed, and ISO work together
- A guide to picking the best travel camera, all of which support RAW. We also have guides to the best mirrorless cameras, DSLR cameras, and compact cameras for travel
- Our guides to taking pictures of stars and photographing the northern lights, both of which benefit hugely from shooting in RAW
- A guide to Neutral Density filters and our overview of back button focus
Want to Improve Your Photography?
If you found this post helpful and you want to take your photography further, check out my online travel photography course.
Since launching in 2016, I’ve helped over 2,000 students learn how to take better photos. The course covers everything from the basics of how a camera works, through to composition, light, and photo editing, including a full module on RAW editing workflow.
It also covers more advanced topics like astrophotography, long exposure photography, flash photography, and HDR photography. You get feedback from me as you progress, access to webinars and videos, and membership of a Facebook group where you can get feedback on your work and take part in regular challenges.
It’s available for a one-off price for lifetime access. You can find out more here.
And that’s my guide to shooting in RAW. I hope it’s helped you understand what RAW is and why I recommend using it. As always, if you have any questions, leave them in the comments below!

Jack C. says
Note: PNG is lossless but technically “compressed.” So when you save a RAW file as PNG it becomes much smaller, but also loses data embedded into the original RAW file, including EXIF tags.
Laurence Norah says
Thanks for the clarification Jack!
Jack C. says
Before 1995 when PNG came along, BMP files were a go-to Windows format for bloated, pure pixels. For a few years, the word “compressed” made me think PNG files couldn’t look just as clean without the wasted storage space. I ended up doing a mass conversion of computer drawings from BMP to PNG.
You know the TIFF format for printing is a further topic, but I never had use for those as a non-pro.
Mark Hamblett says
Finally someone I can understand!
Thank you so much for the article which answered all the questions I had, plus the ones I should have thought of.
Am signing up!
Laurence Norah says
My pleasure Mark, glad the article helped you understand RAW! Hit me up with any questions you might have 🙂
Yobbo says
Wow.
Thank you very much for explaining RAW
Laurence Norah says
It’s my pleasure, let me know if you have any questions!
TJ Barr says
Hello, Thank you for This Wonderful Explanation of What is RAW . I knew what RAW is, But I Lacked The Other Very Useful Information To Fill in The Blanks. You Totally Nailed it. Now as a Semi Retired Person I Get to Focus on my True Passion and Love, Photography and The Great Outdoors. Thanks again
Laurence Norah says
My pleasure TJ, enjoy your photography journey, and do let me know if you have any questions 🙂
Laurence
Carol says
This is one of the best articles I have read as I am beginning to learn how to use my DLSR camera. The information is easily understood by a beginner and flows logically. It answered many of my questions.
Laurence Norah says
Thanks Carol, much appreciated! Do let me know if you have any questions as you continue your photography journey, I am happy to help 🙂
Laurence
Natasha says
Well that was quite painless! Phone has option for jpeg or raw+jpeg. No little button or question mark to tap for a brief explanation so here I am. I’ve admitted to myself that I’m close to that point where technology has passed me by and I’m in the dust.
Quick question that popped in my head when you talked about editing options for RAW only (white balance, shadows, etc). Because cell phones typically use(d) JPEG, what’s the point of photo editing apps to include those options? I don’t do much of it anymore but I can attest that making those changes sure can turn any picture ugly!
Laurence Norah says
Hi Natasha!
Glad to be able to help 🙂 So the apps include those options because they can make a small difference, but as you have noticed, if you push them too far it will usually make a mess of it. With RAW, you can push the shadows and highlights further without making a mess of things. But the options are included, as the photo apps often support RAW as well as JPG, and so having the options is good.
I hope this helps clarify!
Laurence
Dave Bain says
Great article as I found it easy to read and understand esp since I’ve had a head injury. Only thing I would suggest is sometimes when proof reading maybe change a paragraph so it’s shorter but with the same meaning, but that’s only coming from me wanting to make it easier for others as well 🙂
Thanks for the info ,the links and all the tips 🙂
Laurence Norah says
Hi Dave,
Thanks very much, and also for you input on the paragraph breaks. I try to make them smaller but I admit I get a bit carried away sometimes in a thought and don’t break them up as much as I could. So I will endeavour to keep this more in mind!
Laaurence
Michael C says
I always save raw files. However, I never shoot “in raw”. Unless one is inside their own private space, that most likely violates indecency laws in most states!
Also, what one sees on the screen when one opens a raw file is not “the raw image”. It’s one of a near infinite number of possible interpretations of the information in the raw file. How it looks is determined by what the opening application is set to use as default settings. It’s no more nor no less a legitimate interpretation of the raw data than many other interpretations. That’s why opening the same raw file with different apps will look different. They’re each using a different set of instructions to process the raw data into a viewable image.
Laurence Norah says
A fair point! Thanks for your input Michael 🙂
Mark Henhawke says
Hello ,iknow nothing about photography or cameras. This is probably a stupid question but if i download a picture off the computer, like a NASA picture and at the top it says RAW images i suppose theres no way of making this image clearer or more defined is there?. Like i want to print it off, because its a cool picture, but its a bit fuzzy ,not too clear. Is it because of the megebytes in the camera they used to take the shot with?. Im just going by your article that i read, like i said i know nada about photography or that much about computers to tell the truth. If you reply back to me my name is Mark. Please dont say : Hey dumb dumb what kind of idiot are you? Thanks ahead of time Mark.
Laurence Norah says
Hey Mark!
I’m always happy to answer any question if I can 🙂 So there are a few reasons that the image might be a bit blurry when you grab it off the internet. The first reason could be because it’s just a small image. Images are measured in pixels, so many pixels wide and so many pixels high. If it’s small, like lots of images on the web are, then it might look a bit blurry.
Another reason is that maybe the original image wasn’t good quality to begin with. This can often be the case with things like astronomical images.
My suggestion is to download the image, and then see if there’s a better quality version on the internet. You can try using the Google Image search – you can copy the downloaded image into the Google image search, and then see if there are higher resolution versions available.
I hope this helps!
Laurence
martin brighton says
I have a Huawei p30 lite.
It does not have the ability to take pictures in RAW format pre-installed.
For my previous phone I was able to edit the operating system ( jailbreak? ) to take pictures in RAW format, and the process was easy, simply change a ‘No’ to ‘Yes’ or a ‘0’ to ‘1’.
Other users of a Huawei p30 lite have tried 3rd-party apps such as Adobe Lightroom, without success.
For the Huawei p30 lite, I understand I have to first install API 2 and then change the setting in the operating system. ( or perhaps Adobe Lightroom would work if API 2 is first installed )
I have looked at the technical specification of the Huawei phone and its components, and can see that it is capable of taking pictures in the RAW format.
Do you have a method that will enable RAW format for photographs on the Huawei p30 lite?
Thank you.
Laurence Norah says
Hi Martin,
So I don’t have a method for how to do this. I believe to enable the API2 on Android you need root access (see more here), which comes with its own downsides (it can break banking apps for example). The best option would be to try to reach out to Huawei and see if they are able to update the phone so it officially supports it, although given that it’s a feature differentiator between this phone and the pro model, I suspect they might be reluctant to do that.
Best
Laurence
Ansom says
Thank you so much for sharing your experience with us,
Here 1 58 am in the morning while reading your post, couple of days ago eos 200d mark 2 arrived at home which is my dream camera but having a lot problems about how to use it correctly so more I went ahead by reading your post more I received more light into the darkness of my empty and dull mind, therefore I wanna request you to share something about ISO, SHUTTERSPEED AND APERTURE on your next post… Thank you
Laurence Norah says
Hi Ansom,
My pleasure, I am happy to have been able to help. I actually do have a post which explains those three topics in detail, which are often referred to as the exposure triangle. You can see that here:
https://www.findingtheuniverse.com/exposure-triangle-photography/
Do let me know if you have any questions! I also have a beginners guide to how to use a DSLR which you might find useful:
https://www.findingtheuniverse.com/dslr-camera-beginners-guide/
Happy photographing 😀
Laurence
Christo P says
These articles are great – so much information so clearly stated. So I thought I would pass on a tip.
On my camera at any rate (Fuji X-T3), the image you see in the viewfinder is actually determined by the film simulation set for JPEG images, regardless of whether you are shooting in RAW or not. This is worth knowing, because it is one reason why the RAW file can look a bit different on your computer than when you looked at it on the camera screen. But it also allows you to use the viewfinder to assess exposure in a useful way.
If you set the recording function to RAW + JPEG, you will of course see the JPEG version before and after shooting, as explained. So if you choose a black-and-white film simulation, what you see in the viewfinder will be in monochrome, which allows you to assess the exposure, both before and after shooting, without being distracted by the colours (I think the tonal values of colours is discussed in another of the articles here). However, you will still get a colour RAW file recorded on the SD card. You will be able to process this any way you want on your computer, as normal—and you have the additional advantage of having a preview of a black-and-white version of the image if you are undecided whether it’s better in colour. You may even find that the b/w JPEG is just fine as is.
The only downside is that you won’t be able to see a colour version of the image in camera at the time of shooting. The only way to do this is to reshoot having reset to a colour film simulation, by which time the lighting and/or subject may have changed.
I would imagine that this would work with other mirrorless cameras, as the viewfinding is entirely electronic, but only in review for DSLRs. I haven’t tried it, as I have entirely ditched my Nikon DSLR setup in favour of Fuji, and don’t know my way round other mirrorless cameras.
And, of course, histograms are pretty useful for dealing with exposure if it is critical (not to mention dynamic range!!).
Laurence Norah says
Hi Christo – thanks for sharing these tips, this is really helpful 🙂
Marlene says
Great article! Pretty straight forward. Thanks! I am not a photographer but I am learning to photograph my paintings. I shoot them in raw format even though I still feel that I do not know what I am doing, lol, (I use a tripod, lights at 45 angle, etc). I open them with Affinity Photo and make some minor adjustments (usually white balance and brightness) before I develop them. Then I save them in Affinity Photo format (sometimes Tiff). I must admit that sometimes I make no adjustments before developing and then I end up making adjustments once it’s already in Affinity Photo format. Am I doing things wrong? The reason why is because I photograph my paintings in pieces which then I stitch together so that I can have a large file to be able to make high quality large prints. When I open the raw files in Affinity Photo’s Develop Persona I am not allowed to put them all in one single document (in layers) until I develop them. So even though I have them side by side it’s really hard to see if my adjustments match the rest of the pieces. Is there still a benefit for me shooting raw even if I don’t make any adjustments before developing? I hope this makes sense. I wish I didn’t have to make any adjustments at all but the pieces always vary in terms of white balance or brightness sometimes even the colors are not right and I spent quite some time trying to match them to the original painting. Any help will be greatly appreciated.
Laurence Norah says
Hi Marlene,
Thanks for your comment! So I’ve not used Affinity Photo, but I imagine it will likely be the same as other tools. So Affinity won’t have it’s own format, it will just use one of the various formats available. TIFF for example is just an image file format, like JPG or PNG or DNG etc. The process you describe is fairly standard – you open the RAW files in the photo editor, make the adjustments, and then save them as a format. When you say you make some minor adjustments, this is what most tools refer to as developing. The process of saving them as a file like TIFF is usually the final export, so you wouldn’t normally edit them after that, although you can.
Of more concern is the fact that you are finding your individual images are coming out differently. I would recommend continuing to shoot in RAW, but setting your camera to full manual. So that is manual white balance, manual aperture, manual ISO and manual shutter speed. If your lighting conditions remain the same (which they should as you sound like you are controlling them), then every photo should come out the same. It sounds like in your case the camera is making minor adjustments to each shot, likely because the color tone of different parts of the image is different, and this is confusing the camera. Because you want every image to be the same, you will definitely get better results by doing everything in manual. Once you have the first shot right, all the other shots will look the same. Then you can merge all the images into one and edit them as one piece.
Let me know if that makes sense!
Laurence
Marlene says
That makes a LOT of sense! Thank you so much!!!
Laurence Norah says
My pleasure Marlene! Let me know if you have any further questions, I’m happy to help 🙂
Nick says
A great post!
I never realized how much JPG images were actually manipulated, I just thought they were downsized! I’ve loved playing around with JPG’s for years.
We bought a CANON EOS 2000D a couple of days ago. It has the RAW possibility.I’ve take a few photos and got them onto the laptop. But so far not onto the Gimp! Off for a 10 day holiday (hopefully) on Saturday, so will try taking some castles and the Pyrénées in RAW as well as JPG…… I really want to see the difference in quality, as I’ve complained for years about trying to edit jpg’s be it on Photoshop or the Gimp!
Laurence Norah says
It makes a huge difference for sure. I remember I once taught a class and one of the folks was terribly depressed that for his last five years of travels he had been shooting in JPG when he could have been shooting in RAW. Of course modern cameras do a fairly good job of getting it right 90% of the time, but it’s those edge cases where RAW can make a huge difference.
Would love to hear your experiences!
onyekachukwu iloanya says
Very beneficial to anyone wanting to get more out of photography… Thanks alot for the write up
Laurence Norah says
My pleasure – I’m pleased you found it useful and thanks for the lovely feedback 🙂
John Gottschalk says
Thank you for the great explanation. Raw is brand new to me.
One note however, the comparison of the jpeg and raw images side by side
needs a wording change. Both are identified as the left image.
Laurence Norah says
My pleasure John, and thanks for pointing that out! I’ve fixed it now 🙂
Ivan says
Thank you very much.
Ivan says
Thank you very much for this insightful post Jessica and Laurence. I now understand and can handle RAW photos much more competently. I bought a Canon 1300D Camera and would be even more grateful if you can suggest to me the best JPEG settings for this very model. Have you ever travelled to East Africa for safari? God bless you abundantly. Ivan, Nairobi, Kenya, East Africa.
Laurence Norah says
Hi Ivan,
If you are shooting in RAW then the JPEG settings won’t matter too much. Otherwise, I’d recommend just using the default JPG settings with the fine mode.
Jess and I have both travelled in East Africa. I have travelled in Kenya, and Jess has travelled in Tanzania. It is a beautiful part of the world!
Best
Laurence
Lance says
I might not know as much about photography as you, I am 54 just enjoy cameras lenses and my photos. Studying light current, or electronics RAW is a term from old digital electronics, is ‘read and write’ read from here (sensor) and write to there memory if you like. RAW flies are full of data other than the photo as you pointed out a lack of a standard for files is a major problem. 90% of my stuff ends up been seen on a screen, all data on a screen is a type of jpeg anyway, I like them they my friends, only use RAW when i am sure to need it, whites are a good reason. Do you know that jpeg compression uses a FFT function something like a histogram to hide the information and maths cos function to reduce the size, as numbers are near zero and therefore rounded off make lots of zeros ….to be compressed …but there are lossless jpeg formats too where there is no rounding off and more than 8 bit, there is a 12 bit lossless jpeg format but no one uses them. The transfer function is what compresses the image like magic but uncompresses it with no real loss . Also our screens are all mostly 8 bit so we editing on something poor compared the RAW we get out of a camera ..I cant afford a ten bit screen …. I think a lot of hype is used to sell cameras to fools like myself who eat it up and spend more money. However if a camera has a better DXO number even in my humble jpeg i normally can see the differences when there is a wide dynamic range in the photo. So all those bits seem to add up.
Laurence Norah says
Hi Lance,
Thanks for sharing your thoughts and experiences about JPEG and RAW files. I know what you mean about the screen – I have a wide gamut screen that is capable of showing a lot of information, but as I’m editing for the majority I tend to have my computer set up to be more reflective of the average user.
If you have any questions, please feel free to let me know 🙂 We definitely don’t pretend to know everything about photography, but we will certainly do our best!
Laurence
RezaMahendraKM says
I love this article, well made
Even tho i already know about RAW and using it often, there are so many information i didn’t know i wanted, thank you so much for writing this!
Laurence Norah says
My pleasure Reza, thank you very much for your comment!
pwdoc says
the first in-depth article on raw photography, thank you for this beautiful content 😉
Laurence Norah says
My pleasure – thanks for your kind comment 😀
G.M. Davies says
Very interesting and helpful article. I have just started to explore RAW and tied setting my LUMIX TZ61 to RAW +JPEG and have also tried RAW alone. Previously I have always used the highest quality of JPEG. As an editor I have downloaded Silkypix provided with my camera to my new Mac desktop with Mojave. I am also testing other editors but don’t want to gather a lot of clutter and for the moment, so far, I prefer Photos.
My problem with the RAW camera setting I have discovered disables the optical and the iZoom which I use a lot and the very reason for purchasing this camera. Is there anything I can do to maintain the power of this zoom? I also use it to shoot in macro.
As I like very sharp pictures I had considered changing for the TZ 200 but then would lose the more powerful zoom and other features which I use and bought my camera for.
Laurence Norah says
Thank you very much 🙂
So, reading about the i.Zoom feature, it makes sense that this doesn’t work in RAW mode, because it is effectively a digital zoom. Basically the camera takes the image file and crops it, then resizes it. So it’s not a true zoom, it’s a software trick, and as it is editing the image, it has to give you a jpg file rather than an unprocessed RAW file.
You could achieve the same thing in software with your RAW files by cropping them and then using resize software to make it larger. But if you want to do it in camera, then no, you wouldn’t be able to shoot in RAW.
It’s really up to you which you prefer. The RAW files will give you more editing control and you would be able to achieve the same effect, but it would take time and work to do so rather than doing it automatically in camera.
I hope this makes sense and helps a bit 🙂
Laurence
G.M. Davies says
Hi
Very many thanks for your prompt and very helpful explanation. For the moment I shall try the RAW route as it seems better quality will be achieved and I am happy to spend some time experimenting.
Having done point and shoot photos for years, with some very good results (although not always!), it would be interesting and rewarding to move on to a higher level. Have just finished your article on best editors which has confirmed my choices for the trials. I have always been content with PSE, a very old version, so I may update or have a change depending on my findings.
King regards
G.M. Davies
Laurence Norah says
My pleasure 🙂 I would personally lean towards the RAW editing option, but of course I appreciate not everyone wishes to get into the nitty gritty of RAW editing.
Enjoy the new adventure 🙂
Laurence
Omowunmi says
Thank you so much for this,I’m just starting photography and am delighted by our you broke this down ,please do you have any post that teaches photo editing? Thanks
Laurence Norah says
Hi Omowunmi!
My pleasure! So right now we don’t, but it is covered in my photography course which you can see here:
https://superstarblogging.nomadicmatt.com/how-to-become-a-travel-photographer/
Let me know if you have any questions!
Laurence
Bruce says
This was a very helpful post. I am looking for a camera and have been confused about the RAW format that is offered on some “super zoom” cameras such as the Lumix fz300. You answered all my basic qs about RAW photography and have peaked my interest to the point of convincing me to purchase a RAW capable camera. Thanks…Bruce, Arkansas, USA
Laurence Norah says
Our pleasure Bruce, thanks for taking the time to comment and let me know. I hope you enjoy your new camera!
Don Lewis says
Have been taking photos for a very long time and have recently decided its time to take the plunge on RAW.
I am mostly self taught on the little bit I know so I am especially grateful for discovering your site as a starting place. Its awesome & I can even understand it! Have a ton of questions but will only ask one.
Your article says a special special program is is needed to view & open RAW images. Last night I found that Photoshop 7 will open & edit them but was disappointed on finding that there was no difference in the two. Now that you have raised my hopes will the Canon Digital Professional software demonstrate enough difference to help a photographer make a choice about RAW or not?
Thanks Again
Laurence Norah says
Hey Don!
So the initial RAW image will usually look no better than the JPG, in fact, as it’s not processed, it will often look a bit worse – the colors will be muted, and it might be less sharp. This is because it’s unprocessed. However, it’s all in the processing. With a RAW file you get to have total control over the final image. This is particularly noticeable when you are shooting a scene with either dark shadows or bright highlights – the RAW editor will let you recover much more information than the JPG.
So I would suggest you would need to play with the editing tool to see what you can actually do with the RAW file before making a decision 🙂
Let me know if I can answer any more questions, I’m happy to help!
Laurence
Claudia says
Thank you for the enlightening post on RAW photography? It has helped me clearly understand the subject. I’m looking forward to your most recent posts.
Regards
Laurence Norah says
Thanks very much Claudia 🙂
Barry Starke says
Thank you. Look forward to your emails.