The term “exposure triangle” is commonly used in photography, and you’ve likely heard about it or seen a graphic depicting this concept when learning about photography. Certainly, I mention it in numerous posts on this site as I explain various photography concepts.
Having seen it so many times, you might be wondering exactly what the exposure triangle is, and what it means from a photography point of view.
Well, I am here to help. In this post, I’m going to go through exactly what the exposure triangle is, and explain why the exposure triangle is a key photography concept to understand. I’ll use real-world examples and break down all the terminology to make this as clear as possible.
If you’ve ever found yourself staring at your camera’s shutter speed, aperture and ISO settings and wondered what they are and how to use them, this post is for you.
Understanding the exposure triangle is an important part of improving your photography, and learning it will unlock many photography concepts. Once you have the hang of it, you’ll be able to take much more control over your camera and your final images, and be a better photographer overall.
I’m going to do my best to keep this explanation as simple as possible, and assume no prior photography knowledge. Let’s get started, and see how I do.
Table of Contents
What is the Exposure Triangle?
The exposure triangle is a term that is used to describe the three controls that a photographer has to control the exposure of their image.
An exposure is the term for the process that happens when you take a photograph. The term originated in the days of chemical-based photography, when you had to expose a film covered in chemicals to a certain amount of light in order to capture an image.
Today, most photographers use digital cameras with digital sensors, and we expose these sensors to the light (instead of a chemical-covered film) when we take a photo.
To get the “correct” exposure, and ensure we have an image that is not too dark or too bright, a camera has three main components that can be controlled. The degree of control varies depending on the camera type.
The three components are aperture, shutter speed, and ISO. These are the three key controls that a photographer has to manage the exposure of an image.
Because these three controls are all linked, like the three sides of a triangle, photographers use the term exposure triangle. This is to illustrate that all three controls are connected in that they all control the exposure.
However, as well as changing the exposure, each control also affects the final look of the image. So knowing which one to change for each photography situation you find yourself in is important.
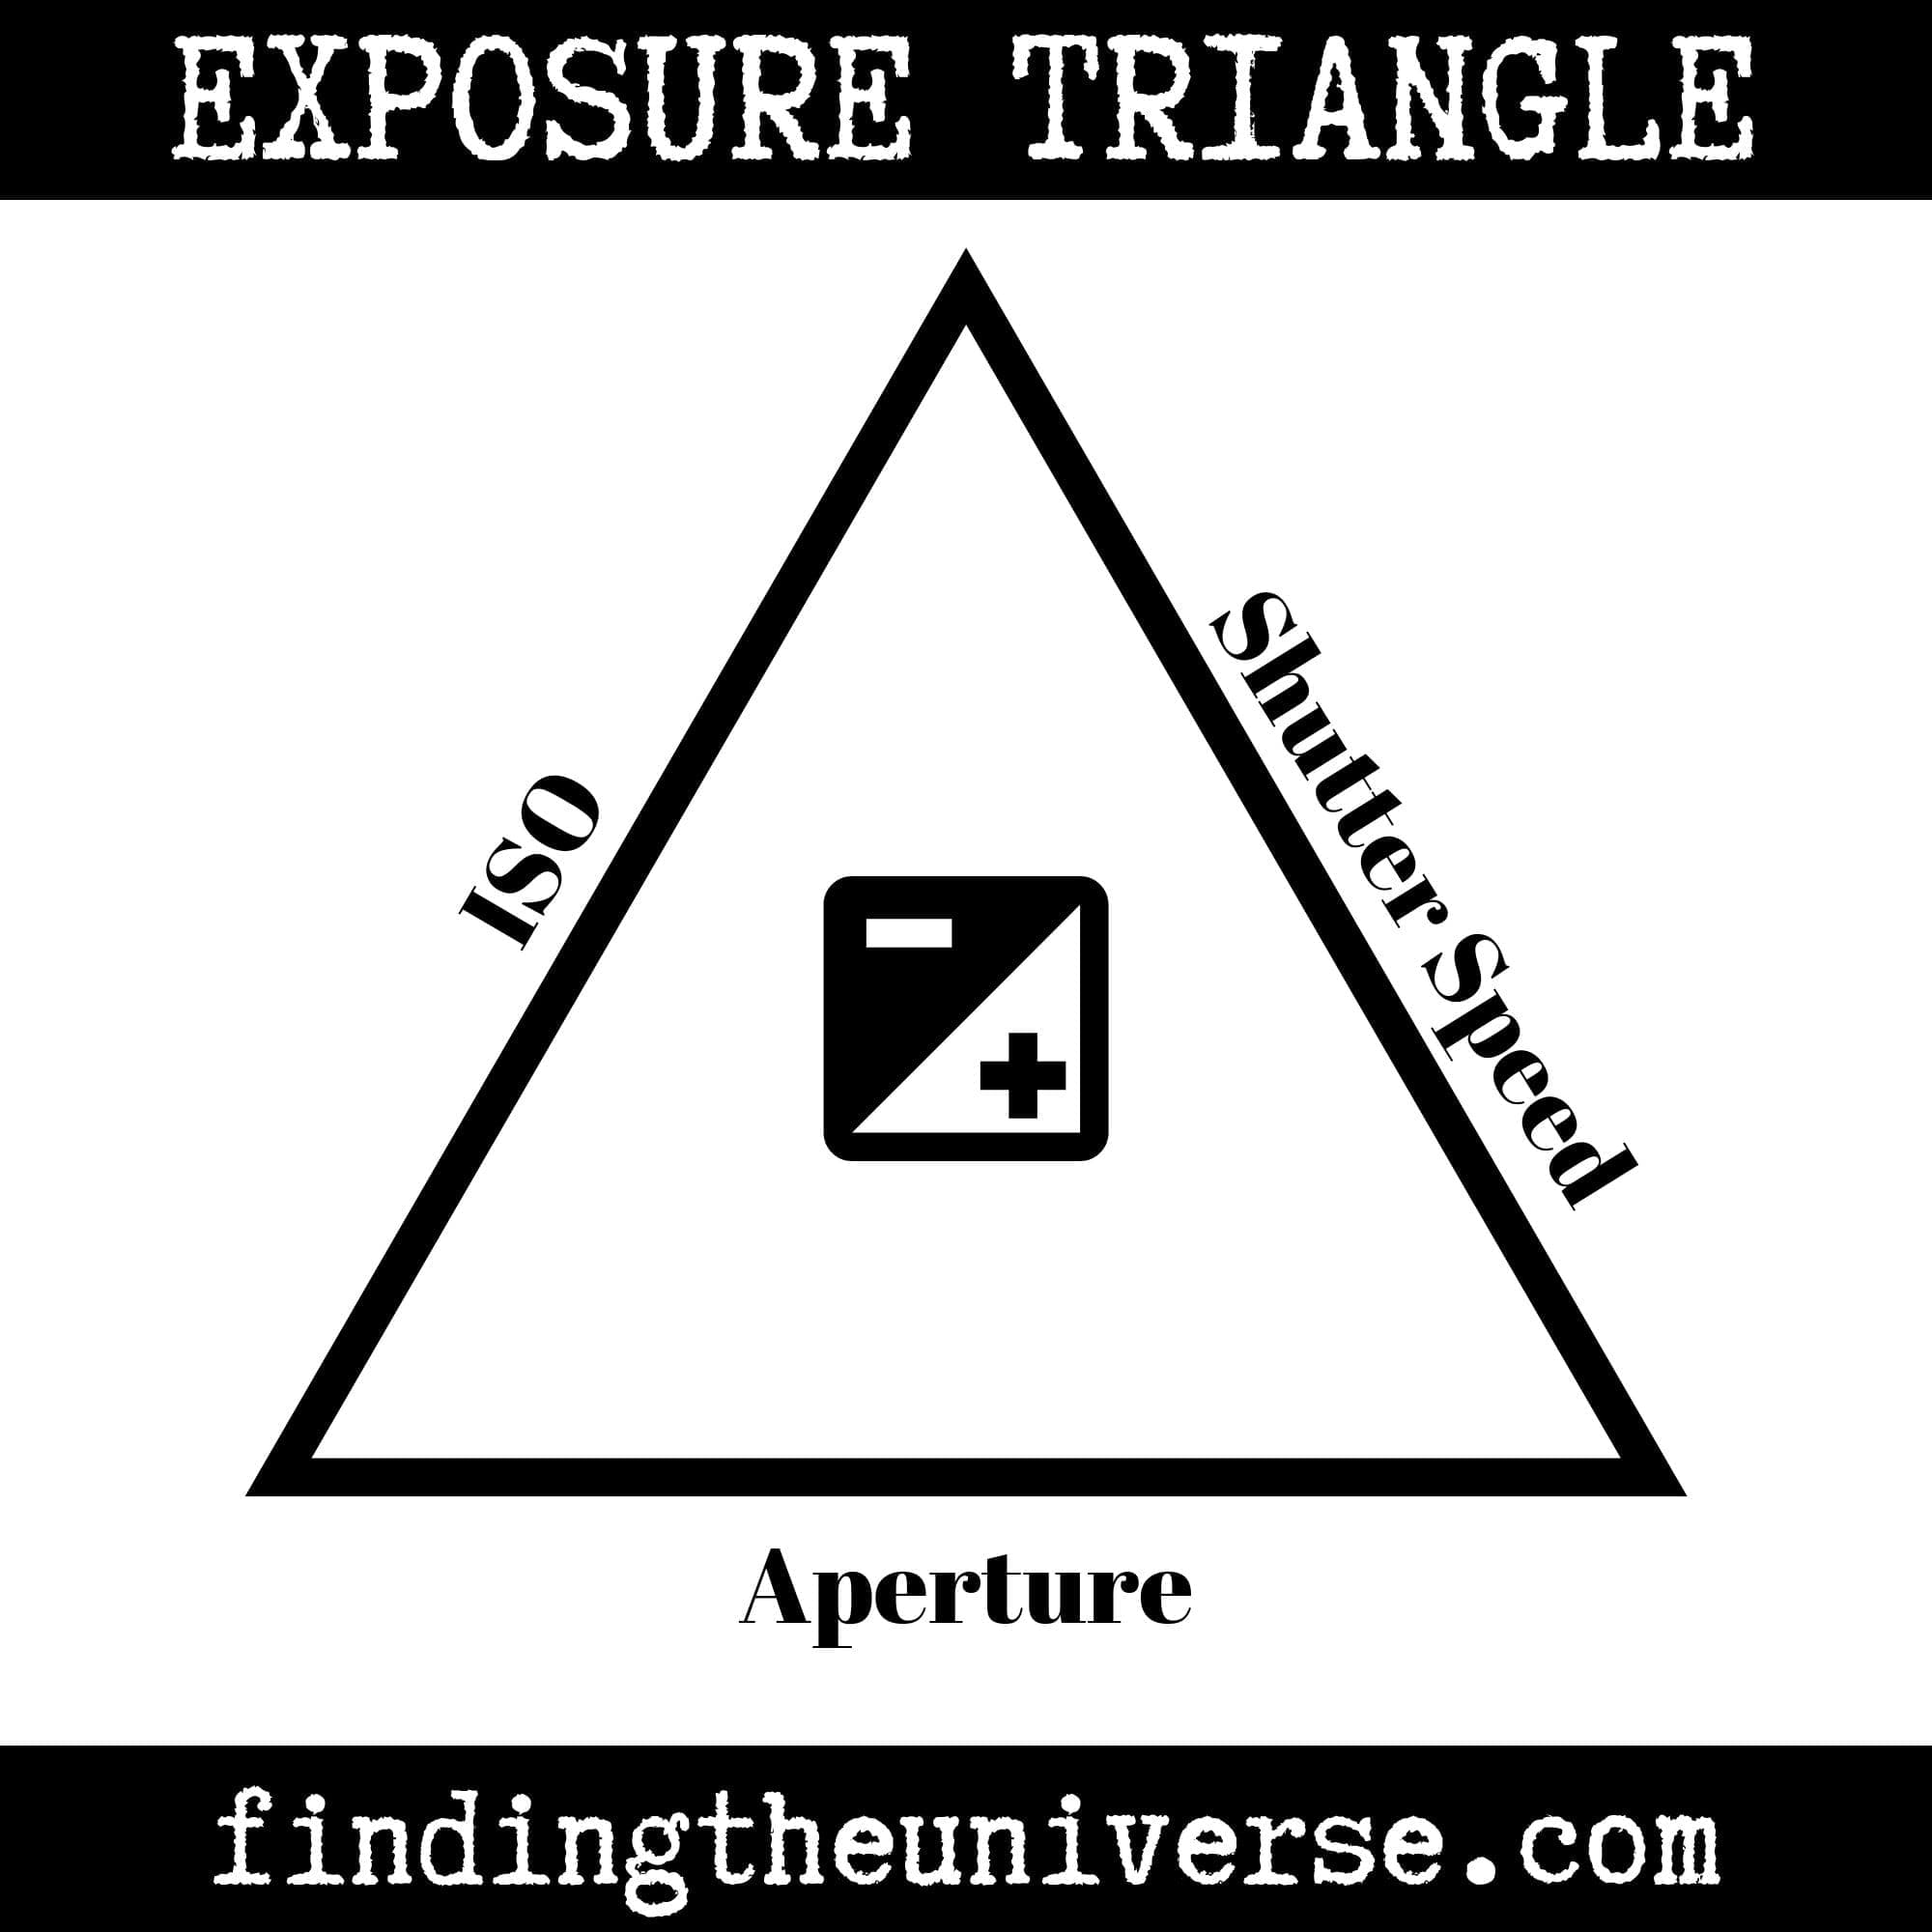
The Three Sides of the Exposure Triangle
Now I’m going to go through each “side” of the exposure triangle to explain what each of the controls does, as well as the effect that each control has on your image.
Aperture
The first control you have for managing exposure is the aperture. First I’ll explain what this is, then I’ll go through the effect that changing the aperture has on the image. Finally, I’ll walk you through how to change the aperture yourself on your camera.
What is aperture in photography?
Since cameras were first invented, the basic design hasn’t changed a great deal. Light passes through a hole and is captured on a medium. The key part is controlling the amount of light, and focusing the light so we get a correctly exposed and in focus image.
To capture and focus the light on the camera’s sensor, all modern cameras use a lens. This lens is attached to the front of the camera, and is responsible for controlling the degree of magnification of the image as well as the focus of the light.
Some cameras have lenses you can change, giving you control over things like how much zoom your camera has. However, even on devices like smartphones or compact cameras, where you can’t physically change the lens, the function remains the same.
Inside every lens there is a hole that the light passes through. This hole is called the aperture. Fun fact, the word aperture comes from the Latin word apertūra, which means opening.
Whilst some cameras, notably most smartphones and action cameras, have a fixed aperture that can’t be changed, most cameras let you change the size of the aperture.
As you might imagine, a larger aperture, or bigger hole, lets more light into the camera. A smaller aperture, or smaller hole, lets less light in.
The amount of light that goes in directly controls the exposure, hence the aperture is one of the sides of the exposure triangle.
What does changing the aperture do to the image?
As already mentioned, a larger aperture lets more light in and a smaller aperture lets less light in. So with all else being equal, in basic terms, a smaller aperture will result in a darker image (less exposed), and a larger aperture will give you a brighter image (more exposed).
However, the aperture also controls an effect known as depth of field.
Depth of field is a term for describing how much of the scene you are photographing is in focus. Here are two images to give you an idea of what I’m referring to.
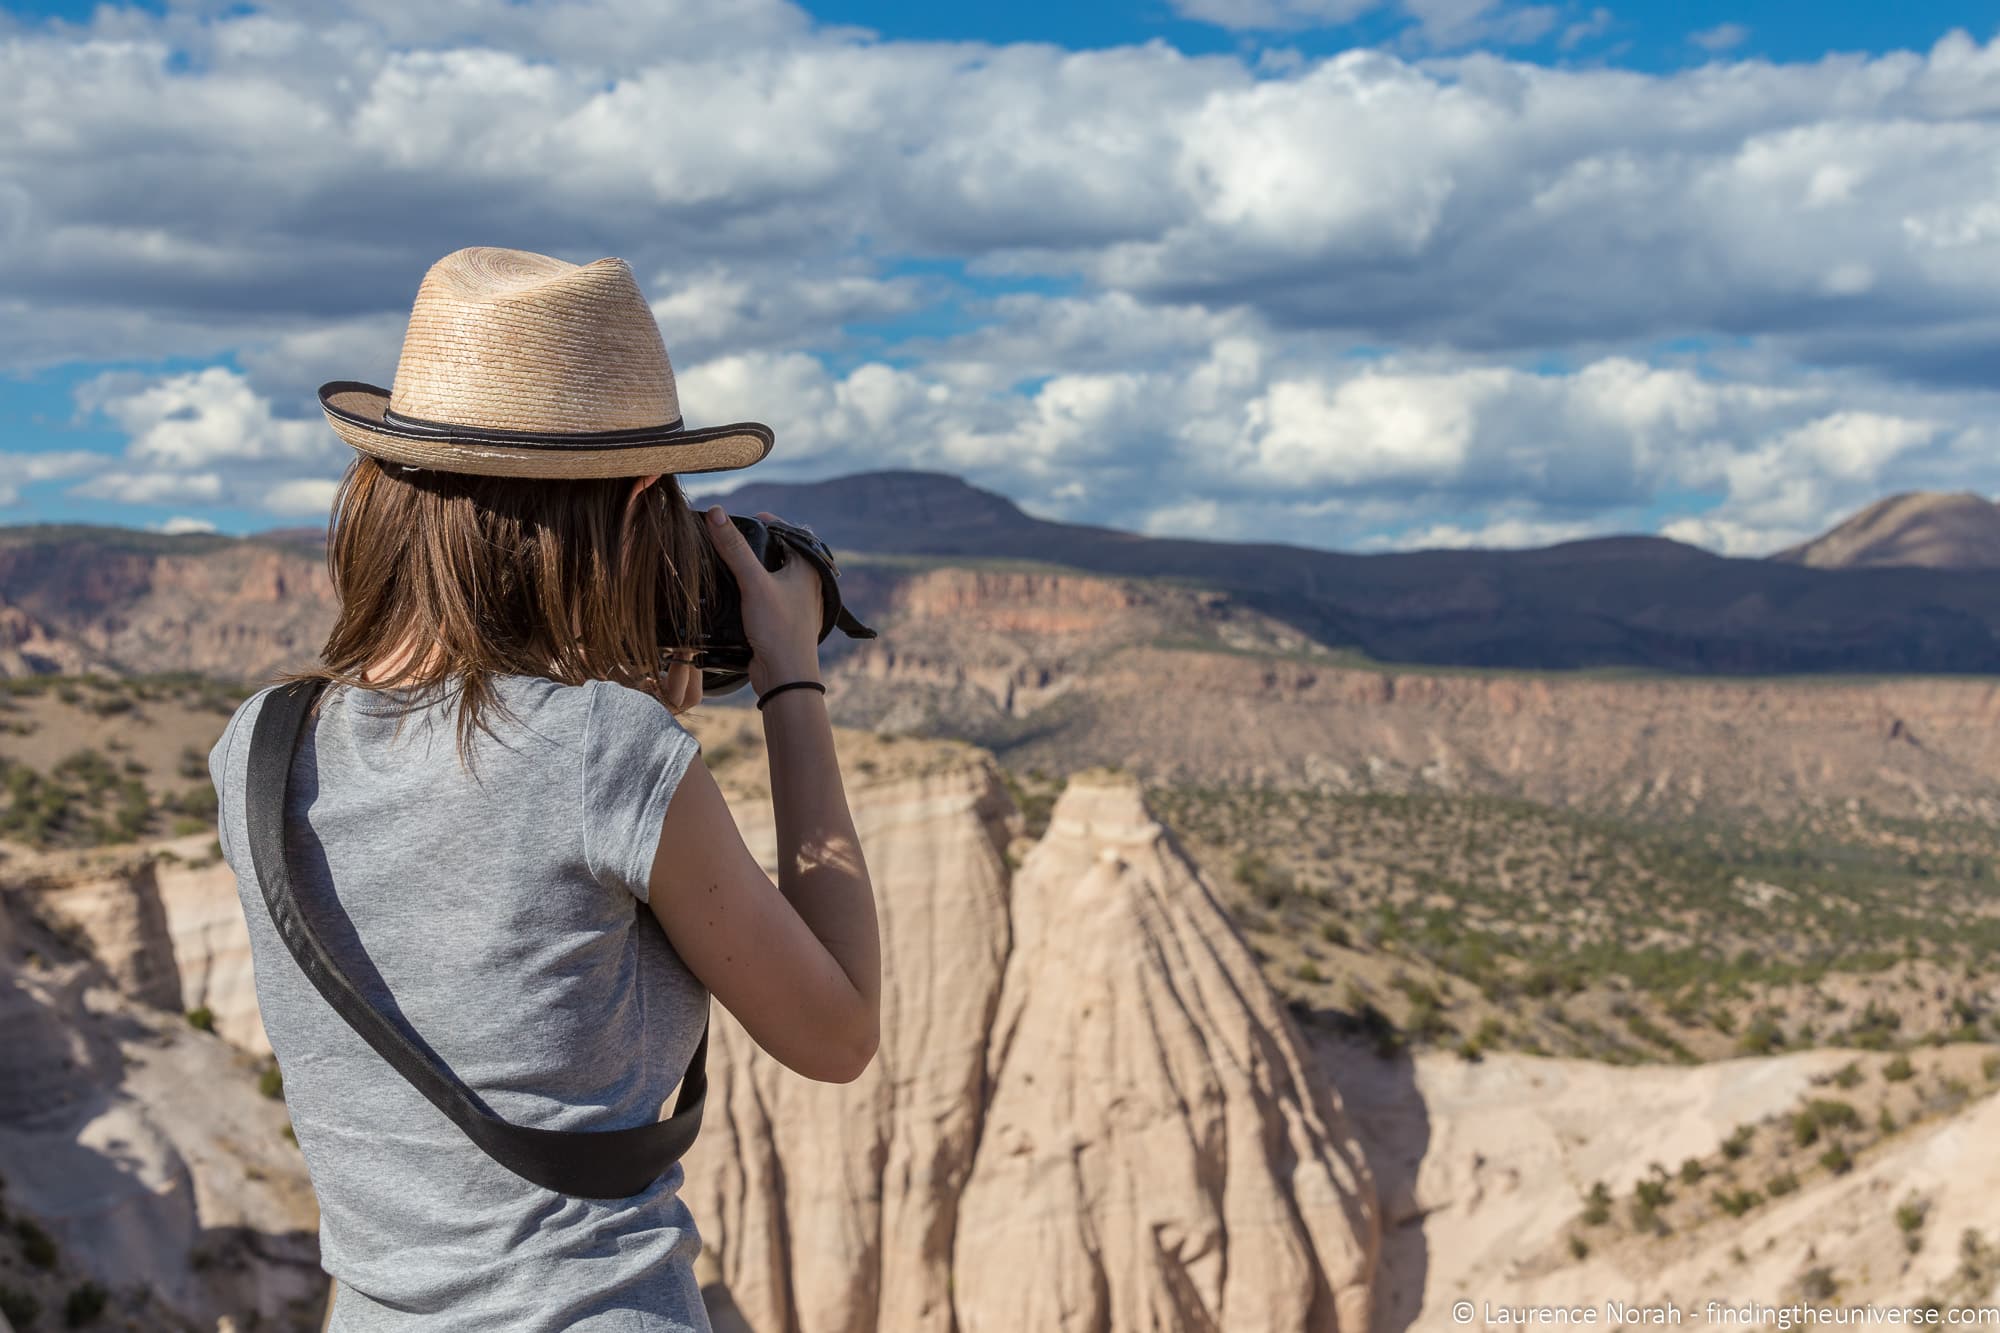
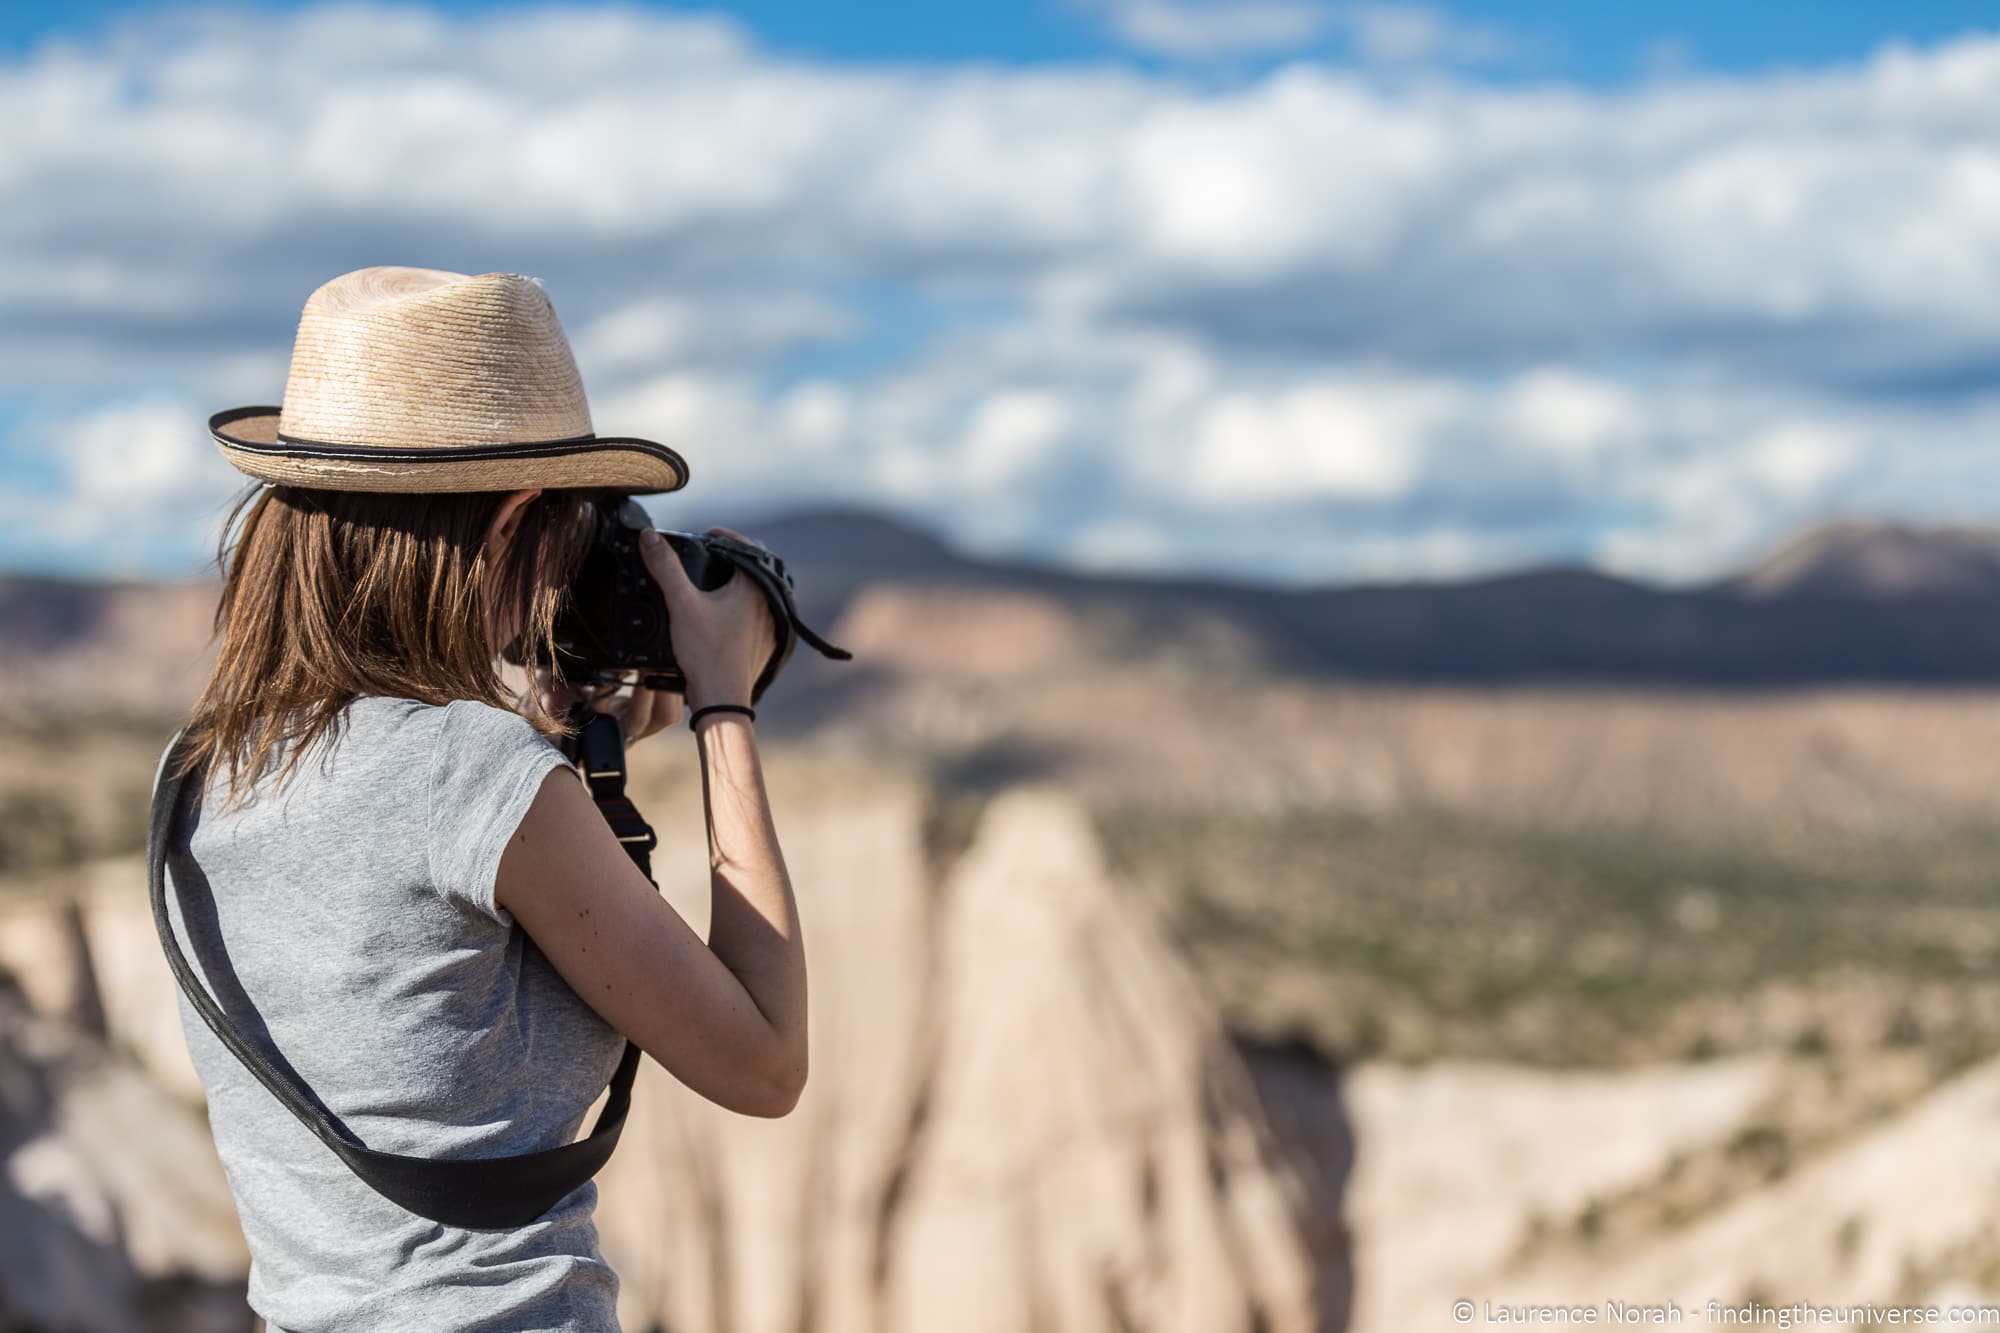
In the two images above, you can see that the scene is the same. I also focused on the same subject, Jessica taking a picture. The main control I changed was the aperture.
As you can see, in the first image the subject (Jessica taking a picture) is in focus. So too is the majority of the landscape behind her. In this photo I focused on Jessica, but due to the shot having a wide depth of field, most of the rest of the shot is clearly discernible.
The second shot is exactly the same composition and the same focus point (Jessica), but it has a shallow depth of field. You can see that other than Jessica, the rest of the scene is out of focus. This helps to draw the viewer’s eye to the subject more clearly.
To be clear, I didn’t change the focus of the camera, or change what the camera was focusing on. All I changed was the aperture, which changed the depth of field.
The depth of field of an image relates to how much of the image is in focus between the camera and the subject, and then between the subject and the background. Here’s another image to explain this concept.
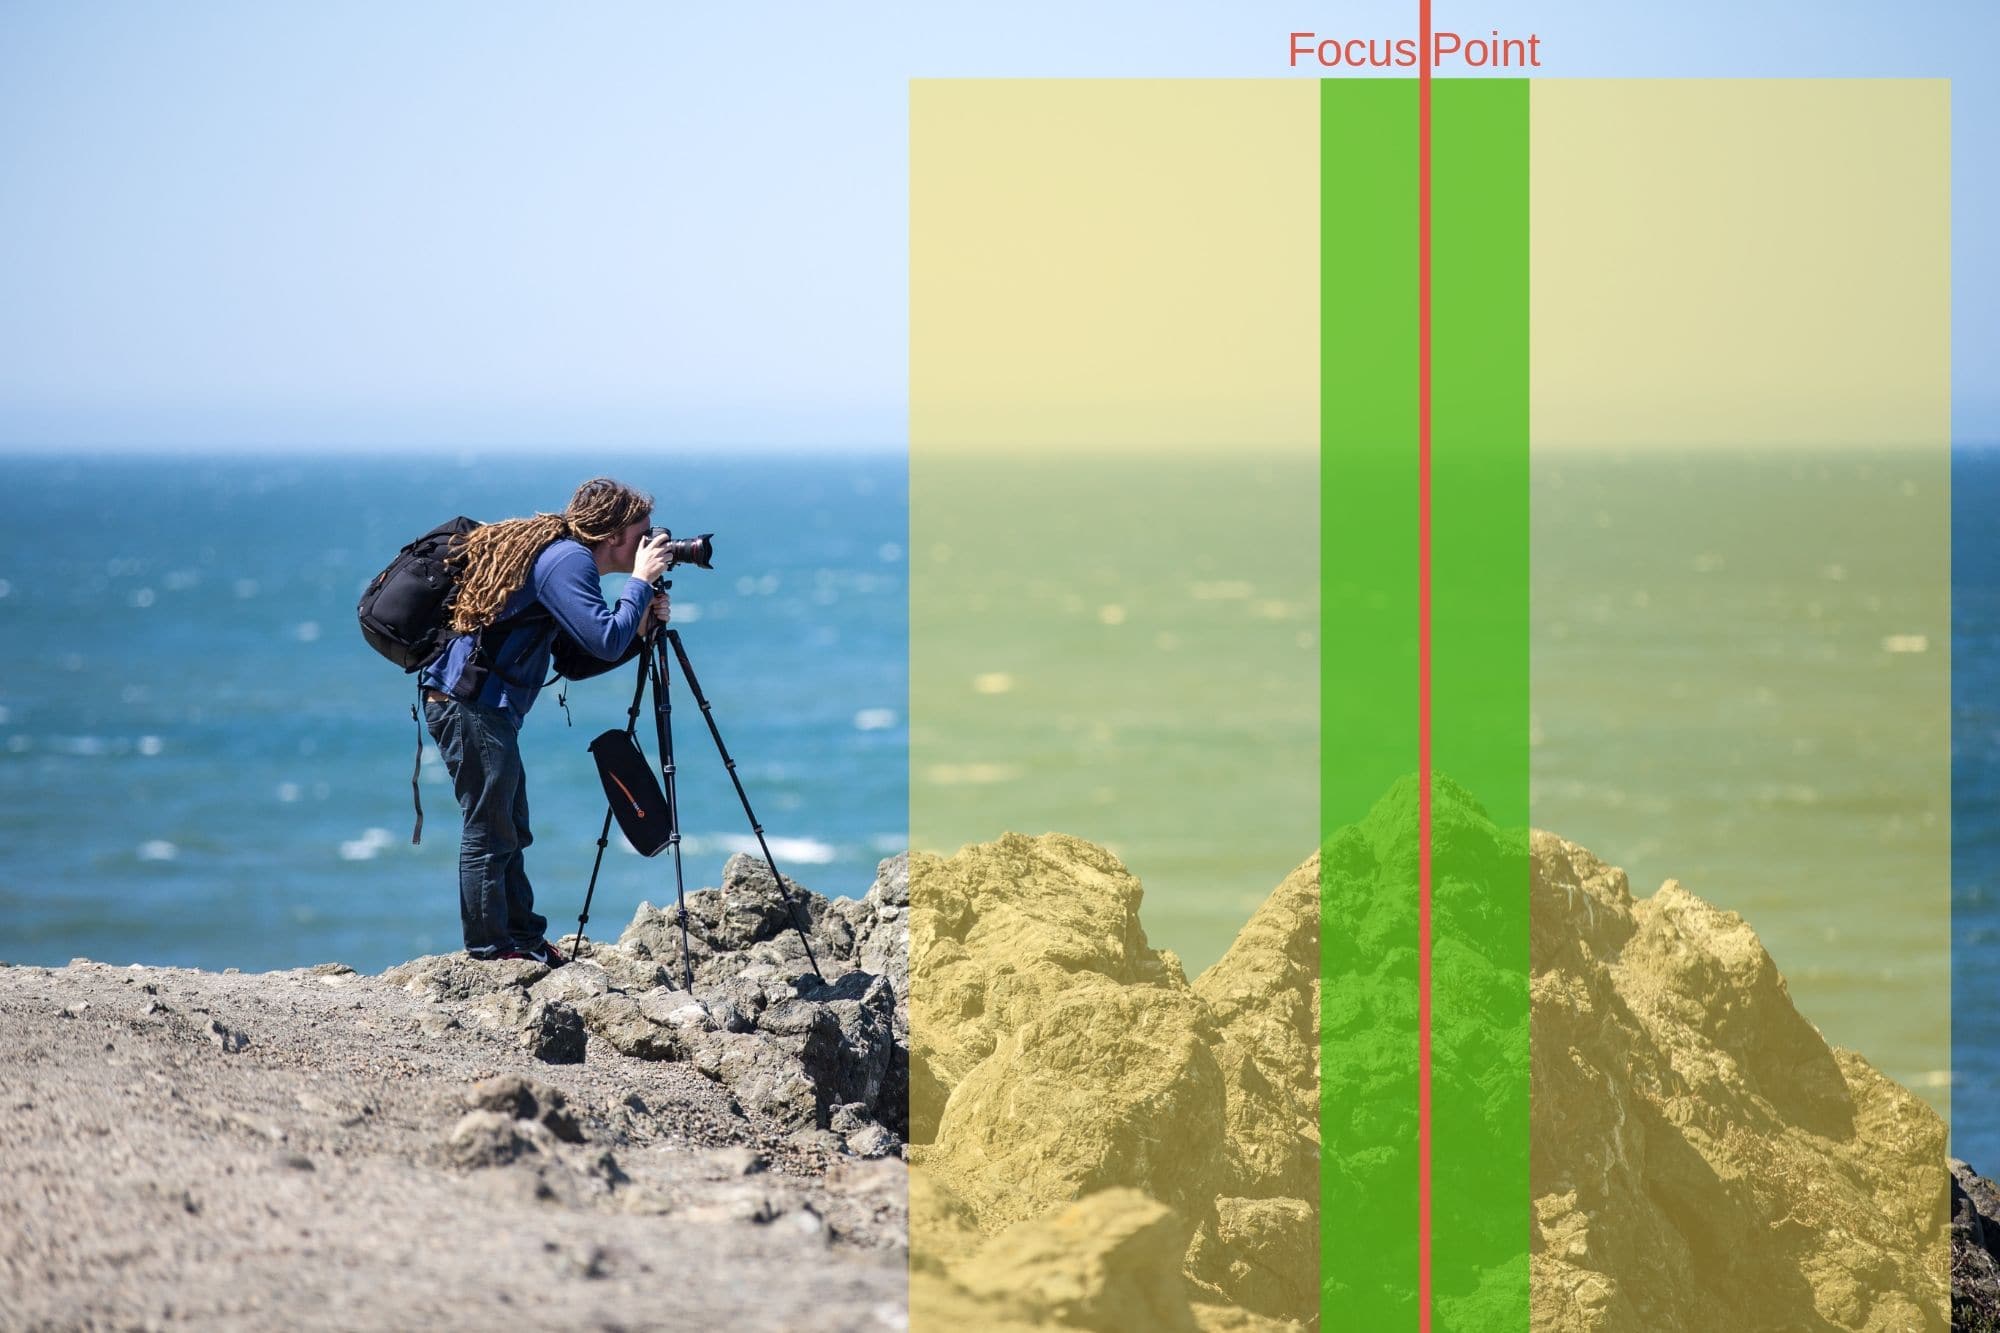
In this case, imagine the photographer in this shot is focusing on a subject where the red line is. A shallow depth of field would result in the area highlighted in green being in focus in his shot. A wide depth of field would result in the area in yellow being in focus in his shot.
For more on depth of field, see my complete guide to depth of field in photography.
Changing the aperture changes the depth of field. A smaller aperture hole, which lets less light through, also results in a wider depth of field. A larger aperture, which lets more light through, also results in a shallow depth of field.
Depth of field is an important compositional tool in photography. A shallow depth of field is good for portraits, where we want to highlight our subject and blur out any distracting backgrounds.
A wide depth of field is good for landscapes, where we want as much of the frame in focus as possible.
How do you change the aperture on a camera?
All mirrorless and DSLR cameras will let you control the aperture of your lens. Many compact cameras (aka point and shoot cameras) will also let you do this. There are a very small number of smartphones and action cameras with a variable aperture, but for the most part the aperture will be fixed on those.
The aperture in a camera can be controlled by putting the camera in either manual mode or “aperture priority” mode. You can put your camera into one of these modes using the camera’s mode dial, usually located on the top of the camera.
See our guide to using a DSLR camera for tips for that camera type, which will be similar for mirrorless cameras too.
Aperture is denoted as a number, for example “1.8”.
When you are in your camera’s aperture priority mode or manual mode, moving the camera’s control dial should change the aperture setting. The aperture will normally be displayed as a number, in a range that goes from around 1.8 to 22. The numbers will be larger or smaller depending on your lens.
You might now be wondering exactly what those numbers mean.
Apertures are on a scale, known as the f-stop scale. This consists of a sequence of numbers with an “f” before them. For example, you would denote an aperture of 1.8 as f/1.8.
The f-stop scale is as follows: f/1.4, f/2, f/2.8, f/4, f/5.6, f/8, f/11, f/16, f/22.
On your camera, you might notice more numbers between those labelled above, for example your numbers might go from 4 to 4.5 to 5 to 5.6. These are just more fine grained options for controlling the size of the aperture.
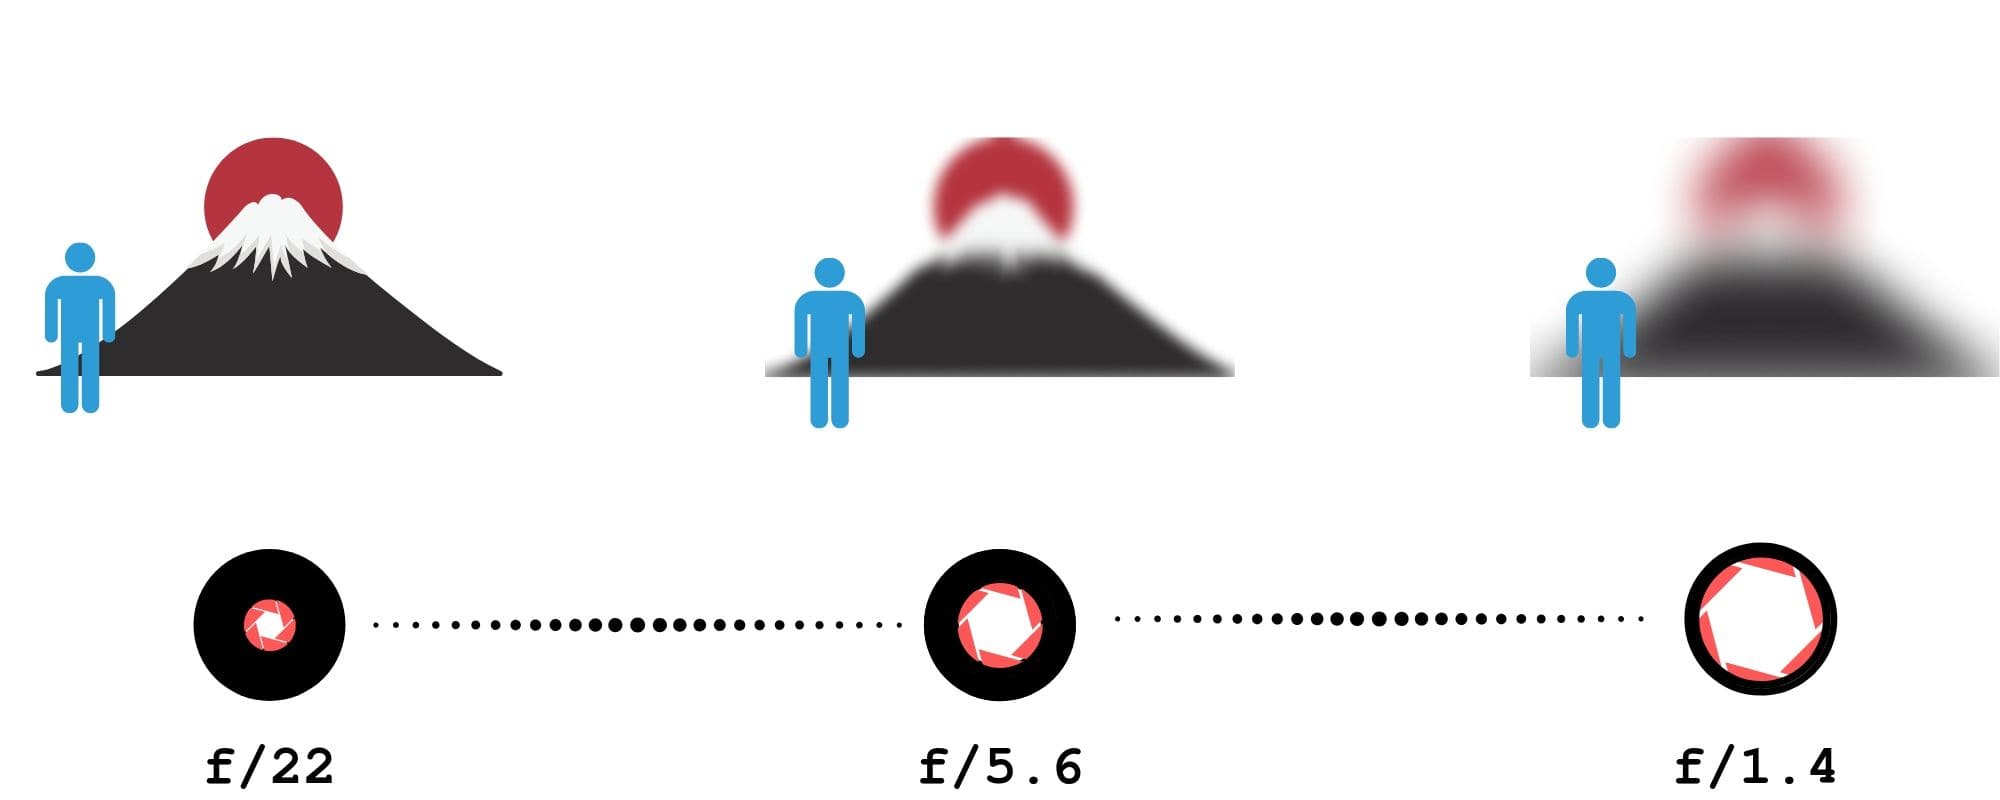
The aperture setting runs counter to common logic might dictate in terms of size of the hole. The smaller the f-stop number, the larger the hole. For example, an f/1.4 stop denotes a large aperture hole. The f/22 stop denotes a very small aperture hole.
Each f/stop on the scale above lets in half as much light as the previous f/stop. For example, if you change from f/4 to f/5.6, the hole will be half as big, and half as much light will get in.
You don’t need to memorise the f-stop scale or really worry too much about it. What matters is that you know how to access your cameras aperture setting and change it.
You should also know that changing the aperture changes the depth of field of the image. Here’s a quick reference image to demonstrate some of the concepts in this section.
Shutter Speed
The next side of the exposure triangle that we’re going to tackle is shutter speed. Shutter speed is another option you have for controlling the exposure of your image.
Again, I’ll start by explaining what shutter speed is, then I’ll go through the effect that changing the shutter speed has on the image.
Finally, I’ll walk you through how to change the shutter speed yourself on your camera.
What is the shutter speed on a camera?
After the light has passed through the aperture in the lens, it is stopped by the shutter. The shutter is a physical barrier between the camera’s sensor and the incoming light. It is usually made of cloth, metal or plastic.
The shutter controls how long the sensor is exposed to the incoming light.
In simple terms, when you press the shutter button on your camera, the shutter opens and stays open for a determined amount of time to let the light through before closing. You can set the time it stays open by setting the shutter speed.
Shutter speed is measured in time, and is usually measured in tenths or thousandths of a second. However, you can also take photos for longer periods of time, including seconds or even minutes. It all depends on what effect you are trying to achieve.
What does changing the shutter speed do to the image?
As with aperture, changing the shutter speed affects the exposure of the image. With all the other settings being the same, a longer shutter speed will result in a brighter image, and a shorter shutter speed will result in a darker image.
Changing the shutter speed of an image also affects how motion is captured.
Here are two examples.
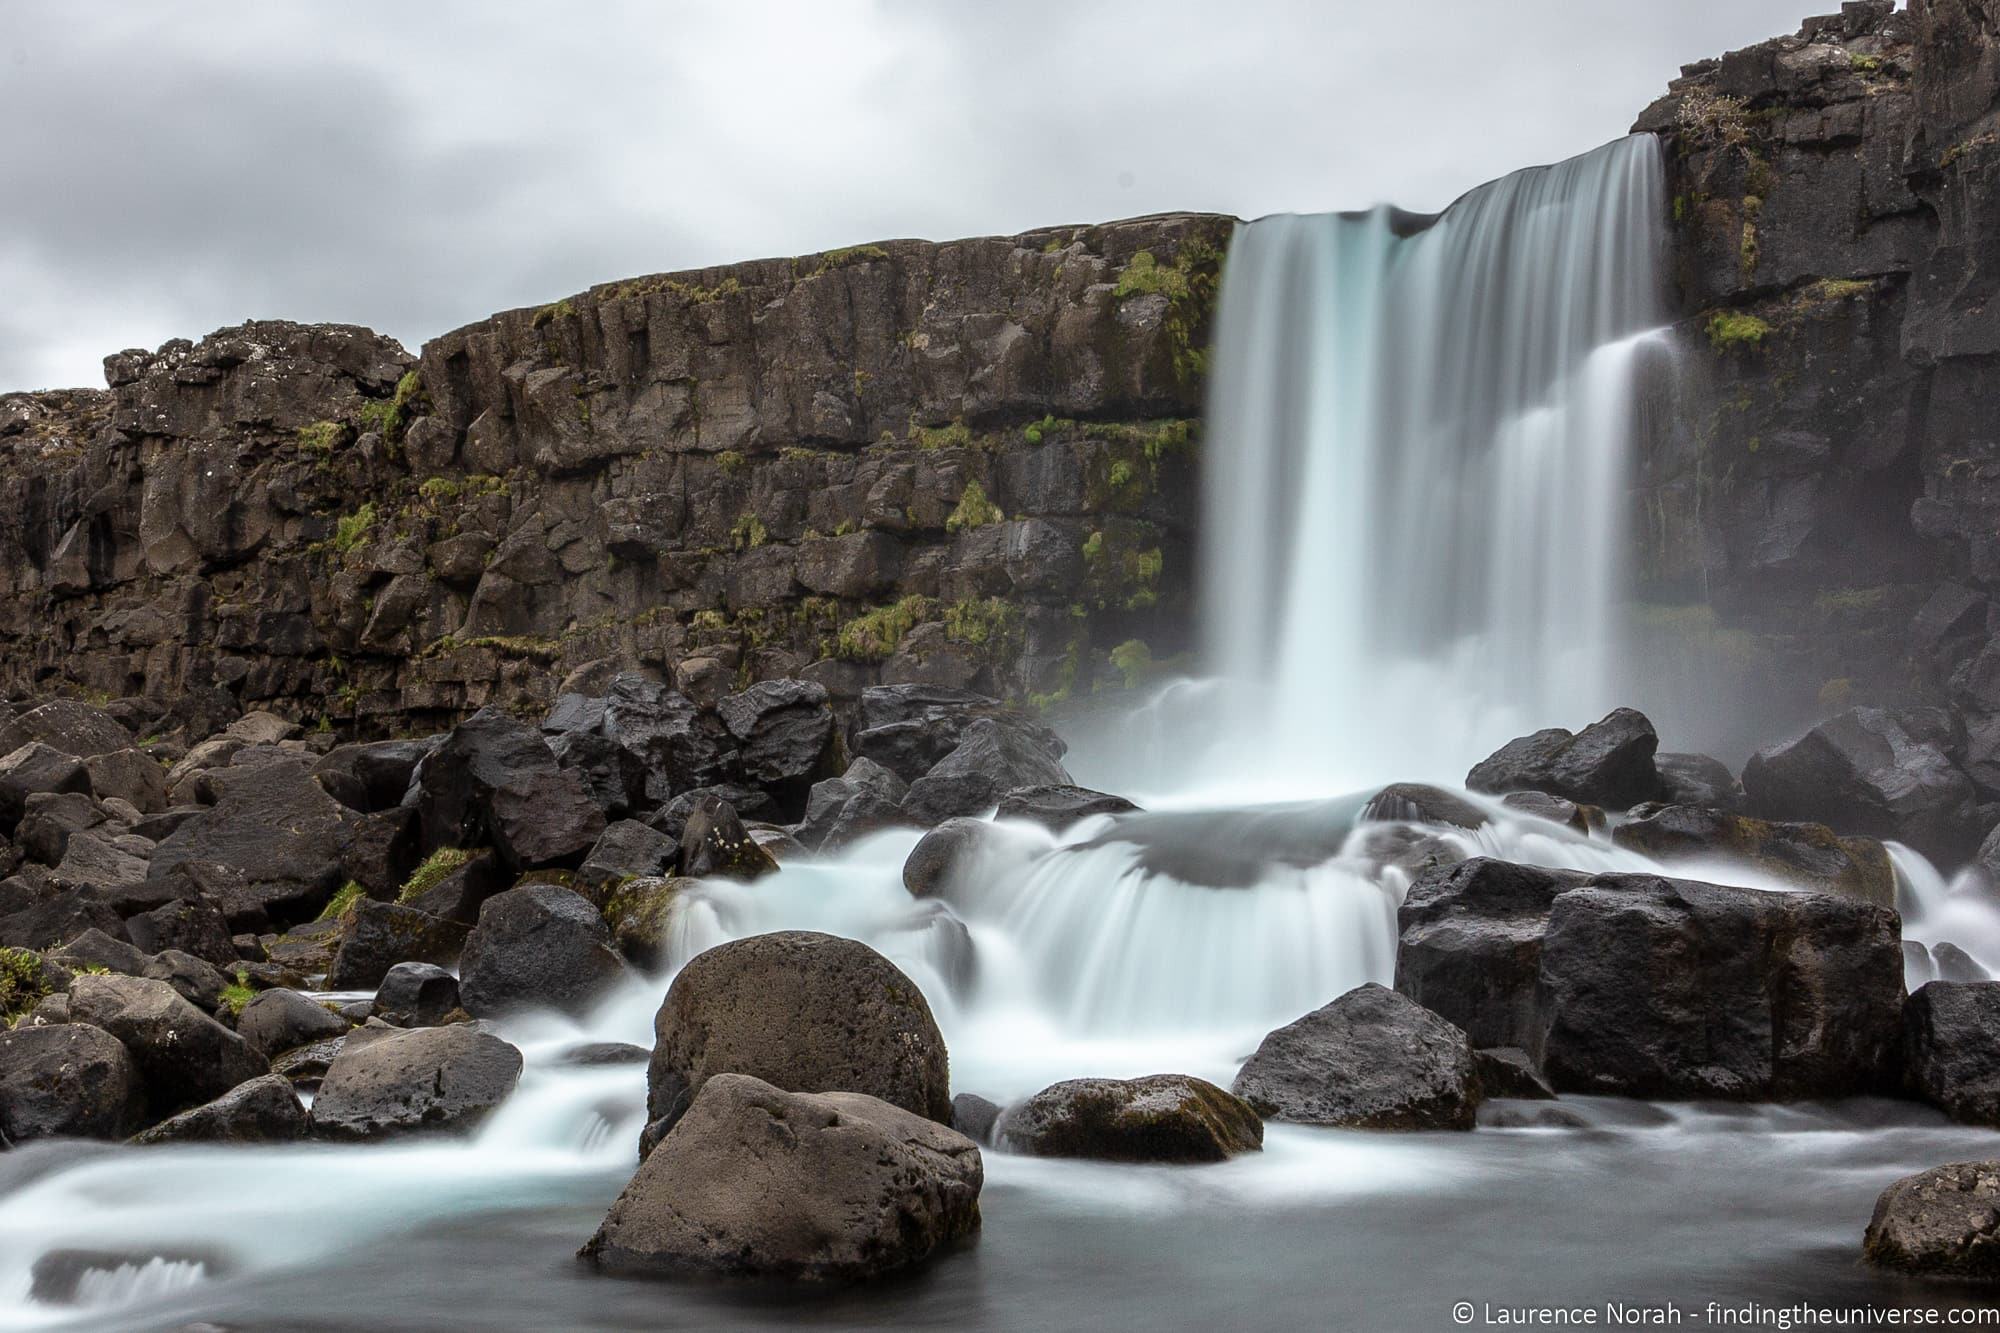
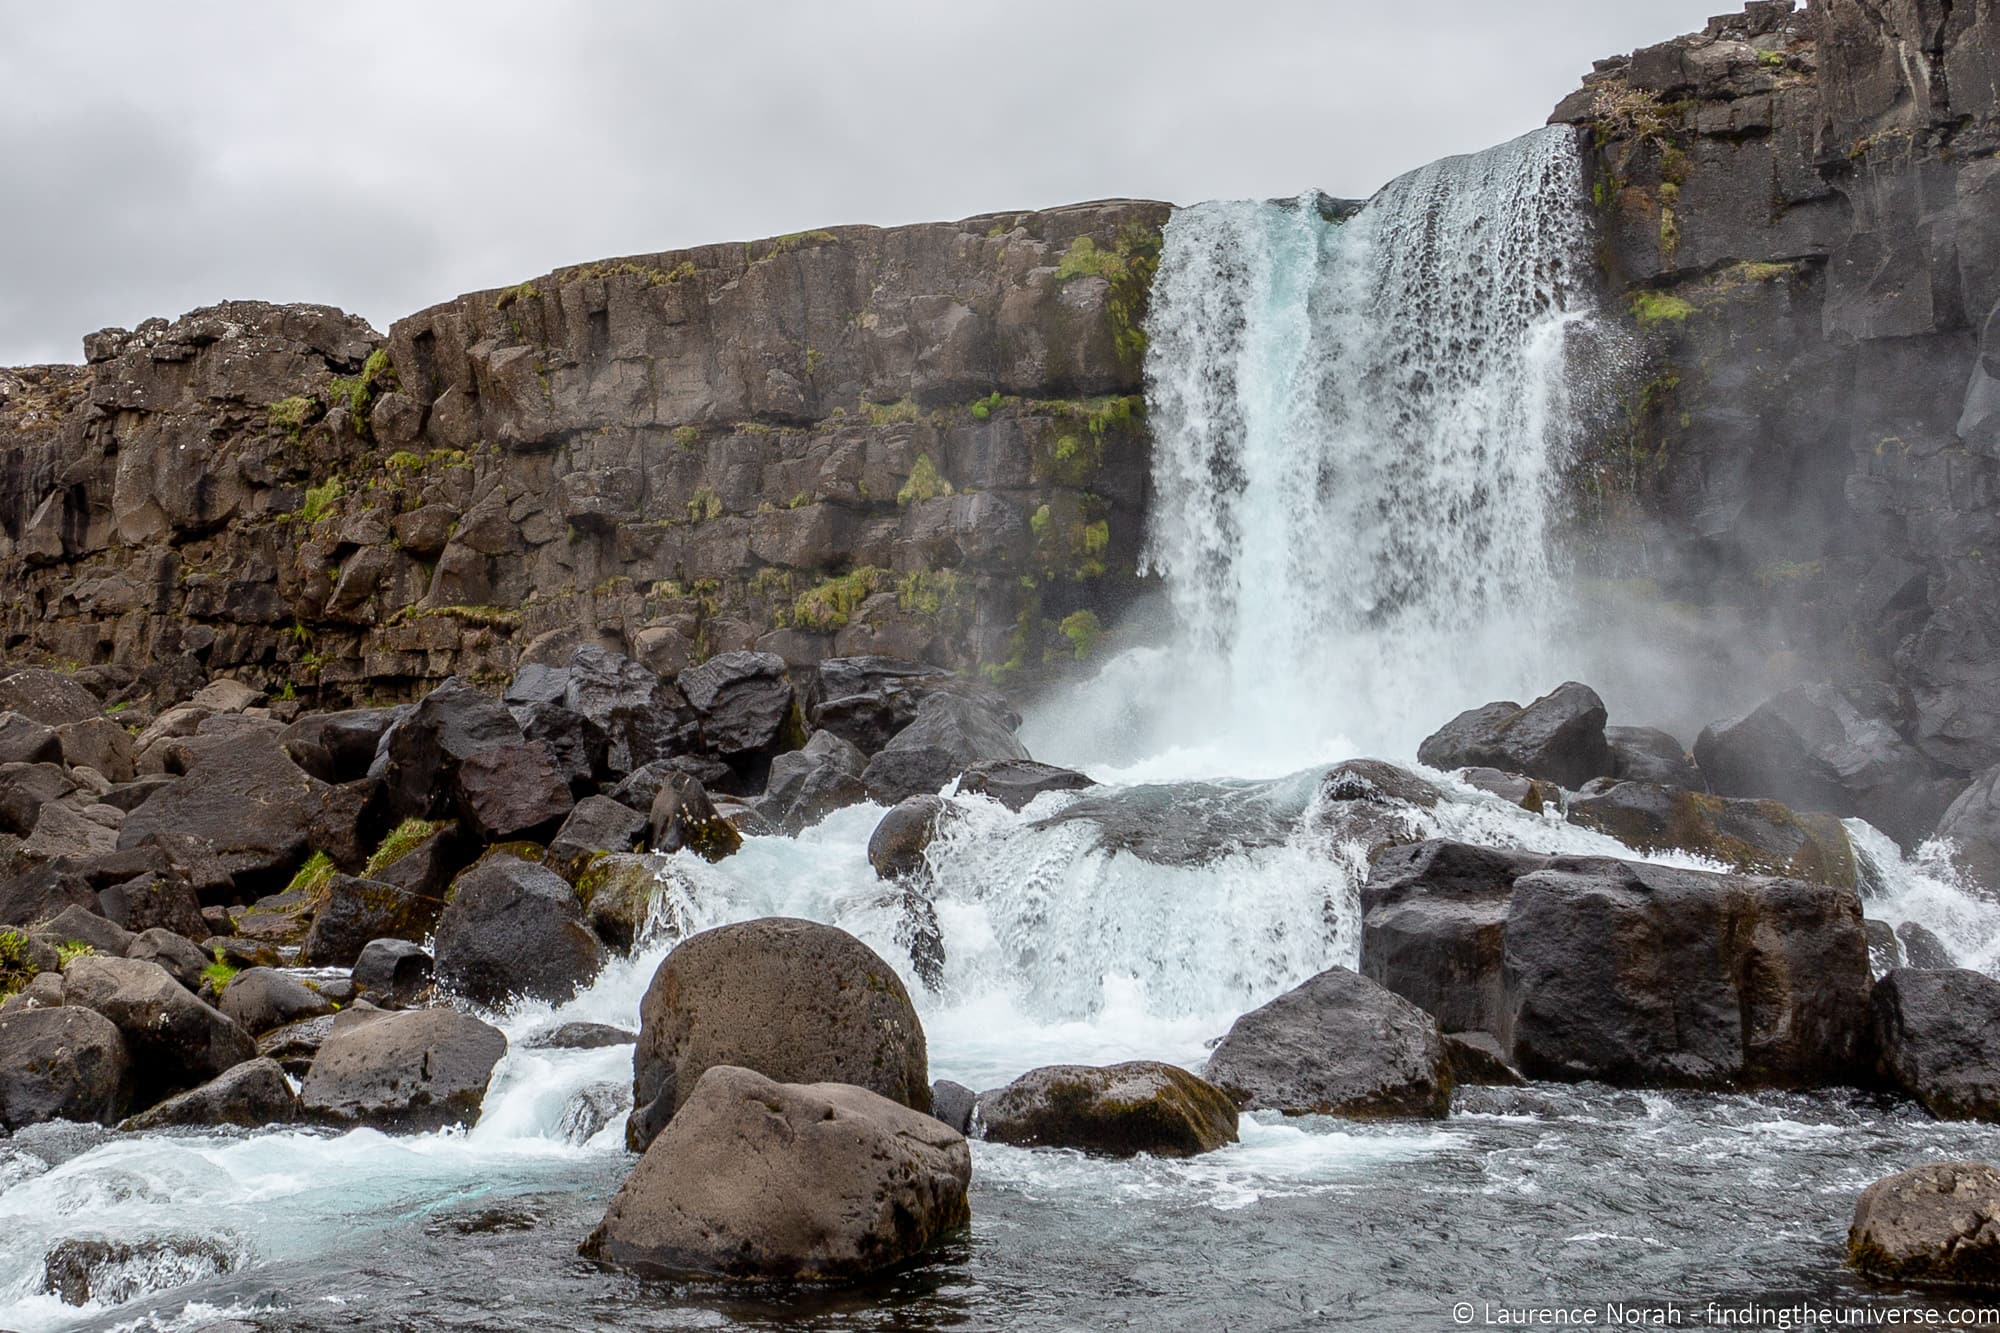
As you can see, the two images are of the same subject. The top image however was shot at an 8 second shutter speed. That has meant that all the movement in the water has been blurred into a soft effect.
At 1/160th of a second, it easier to distinguish the water droplets from each other, as they don’t move so far at that speed.
You can use even faster shutter speeds to freeze really fast motion. As an example, a hummingbird can beat it’s wings as fast as fifty times a second. That is far too fast for the human eye to see.
However, if you set your camera to a shutter speed of 1/1000th of a second of higher, the wings would hardly seem to be moving at all. For freezing high paced action, high shutter speeds are the answer.
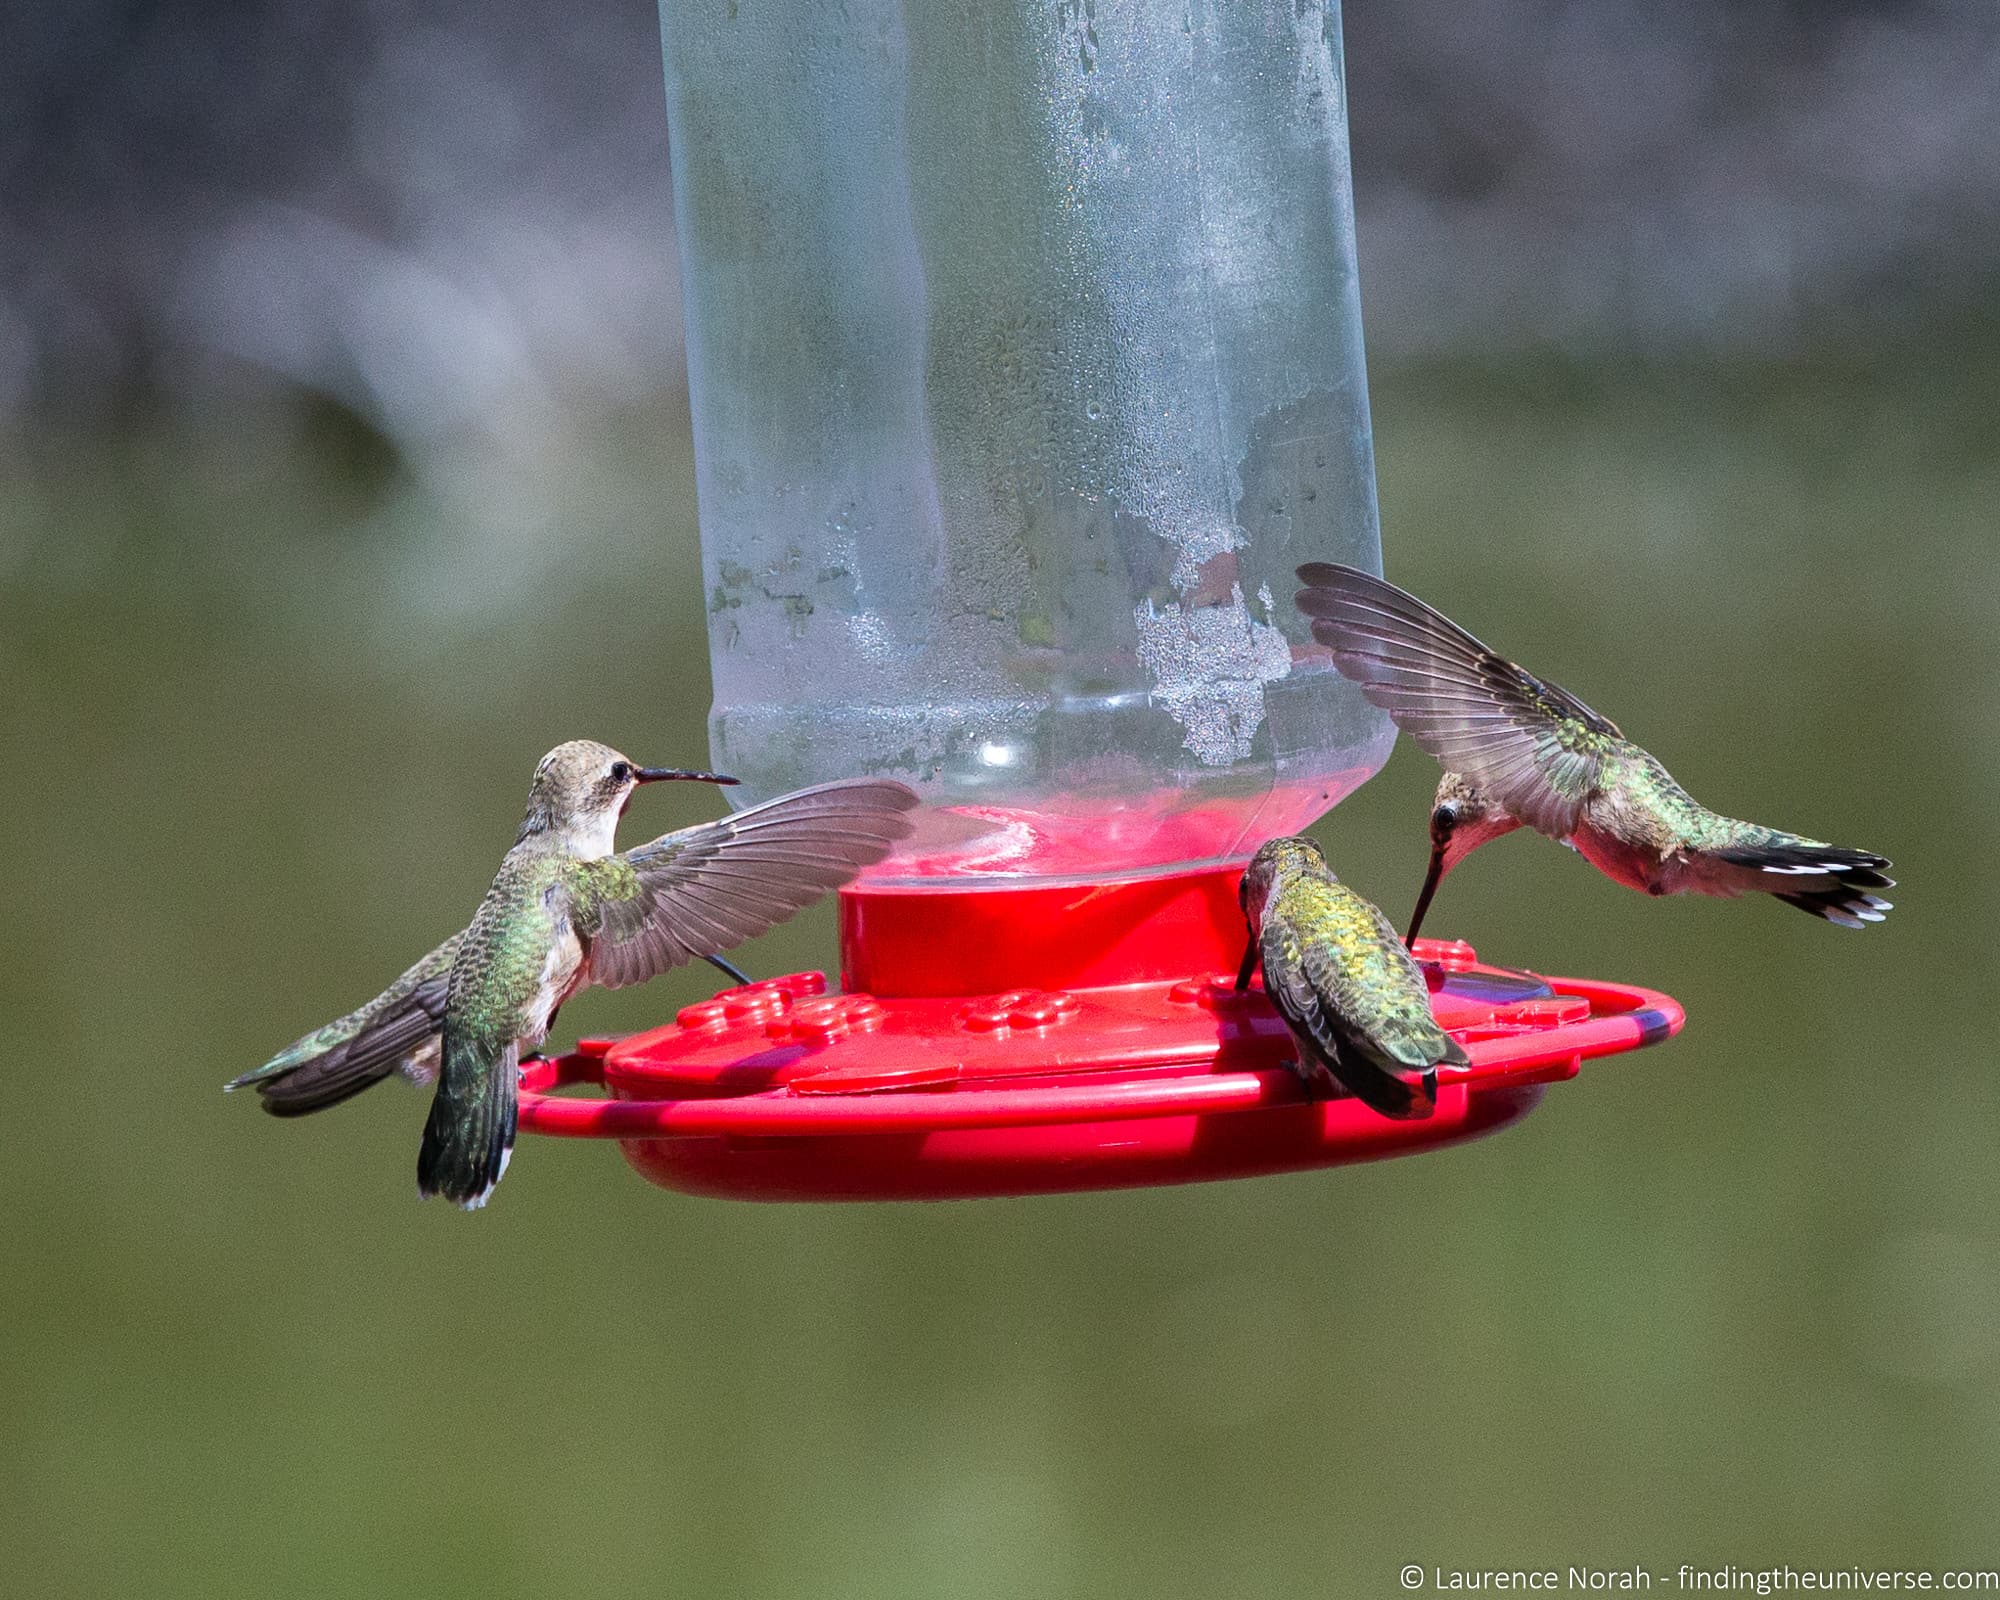
Controlling the shutter speed is ideal for action photography or sports photography, where you want to get sharp shots of fast moving subjects. It can also be effective for landscape photography if you want to capture long exposures.
How do you change the shutter speed on a camera?
On a DSLR, mirrorless camera or advanced point and shoot camera, there should be a “shutter priority” mode on the mode dial. When the camera is in this mode, you can set the shutter speed.
Many smartphone cameras will also let you set the shutter speed manually, however you might need to download an app that gives you manual controls. Basic point and shoot and action cameras are less likely to have this option.
Usually the shutter speed will be denoted as a number on the cameras screen. So 1/250th of a second for example will just be “250”.
If you choose a really slow shutter speed, 1 second or slower, this will usually be written as 1″. The double quote mark is to show you that this is a whole second. This is so you don’t get confused between 1/30th of a second and 30 seconds – which will obviously give quite different results! As an example:
1/30th of a second will often just be displayed as 30
30 seconds will often be displayed as 30″
Shutter speed is a much simpler concept than aperture, I think you will agree.
ISO
The last side of the exposure triangle is the ISO. ISO is another option you have for controlling the exposure of your image.
Again, I’ll start by explaining what ISO is, then I’ll go through the effect that changing the ISO has on the image.
Finally, I’ll walk you through how to change the ISO setting yourself on your camera.
What is ISO in photography?
You might first be wondering what ISO stands for and where this name came from.
ISO is the shortened name for the “Organisation internationale de normalisation“, an international standards organisation that sets out standards for a huge range of products and services.
Because it’s an international organisation which has different names in different languages, it was decided to adopt a simple three letter name, which actually doesn’t stand for anything – it derives from the Greek isos, which means equal.
When shooting with film, the films are labelled with different ISO numbers to show how sensitive the chemicals are to the light.
When digital cameras came along, the equivalent ISO numbers were used, even though a digital camera’s sensor doesn’t really work in the same way.
Whilst it is easier to think in terms of ISO on a digital camera adjusting the sensitivity of the sensor to a light, what it is technically doing is controlling the “gain” of the camera’s sensor.
Still, whatever it’s really doing from a technical point of view, the bottom line is that changing the ISO changes the exposure of the image.
You can increase the ISO to make the camera’s sensor seem more sensitive to the light, and you can reduce the ISO to make the camera’s sensor seem less sensitive to the light.
The smaller the ISO number, the less sensitive the camera is to the light, and the higher the ISO number, the more sensitive the camera is to the light.
What does changing the ISO do to the image?
As with shutter speed and aperture, the main reason you would change the ISO would be to increase or decrease the brightness of the exposure.
With all the other camera settings remaining the same, increasing the ISO would increase the brightness of an image, and decreasing the ISO would reduce the brightness of the image.
However, increasing the ISO also increases the noise in an image. Noise can be thought of as unwanted artefacts that the camera sensor records by mistake. It usually results in images that are either grainy, or have speckles of color in, or both.
This is actually the same as would happen in film. Higher ISO films produced noisier images.
For examples of noise, see the below two images. These were both shot of the same subject, but one was taken at a low ISO of 100, whereas the other was shot at a higher ISO of 6400.
A cursory glance of the full size image will not reveal much difference. However, if you zoom in on a part of the image, you will see how much difference this change in ISO setting has made.
To illustrate, I have highlighted an area in red, and zoomed in on that area for each image.
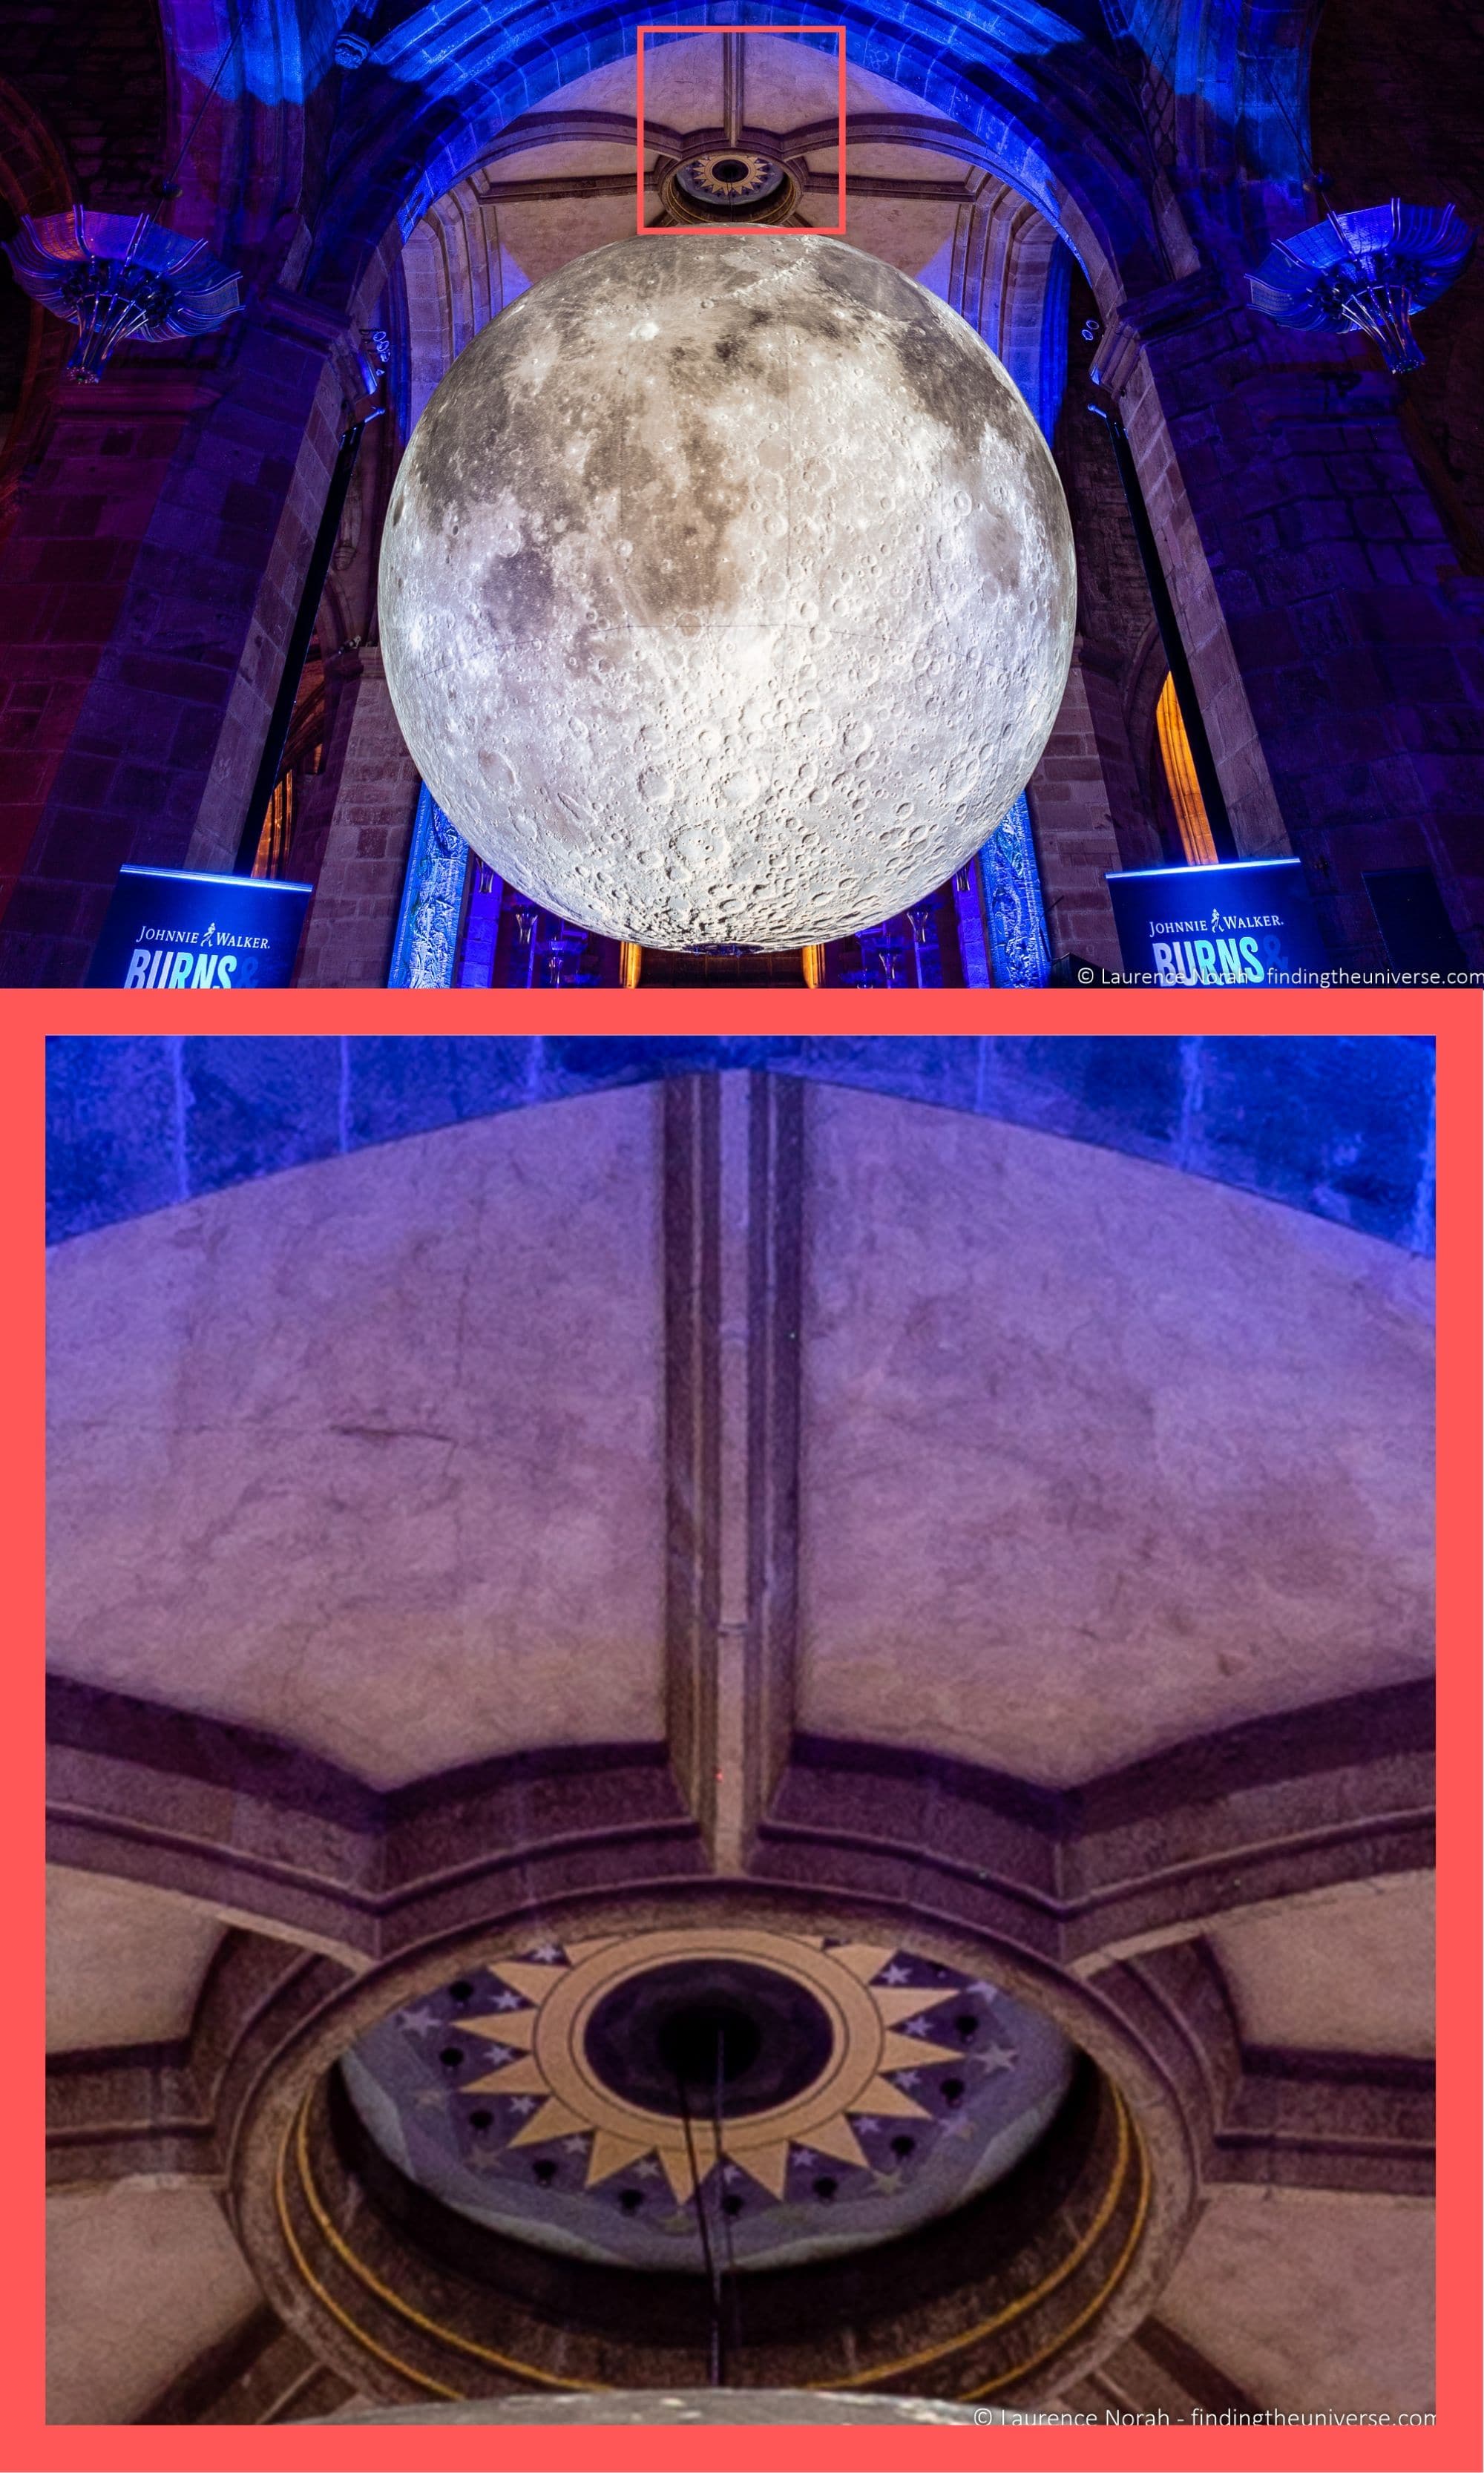
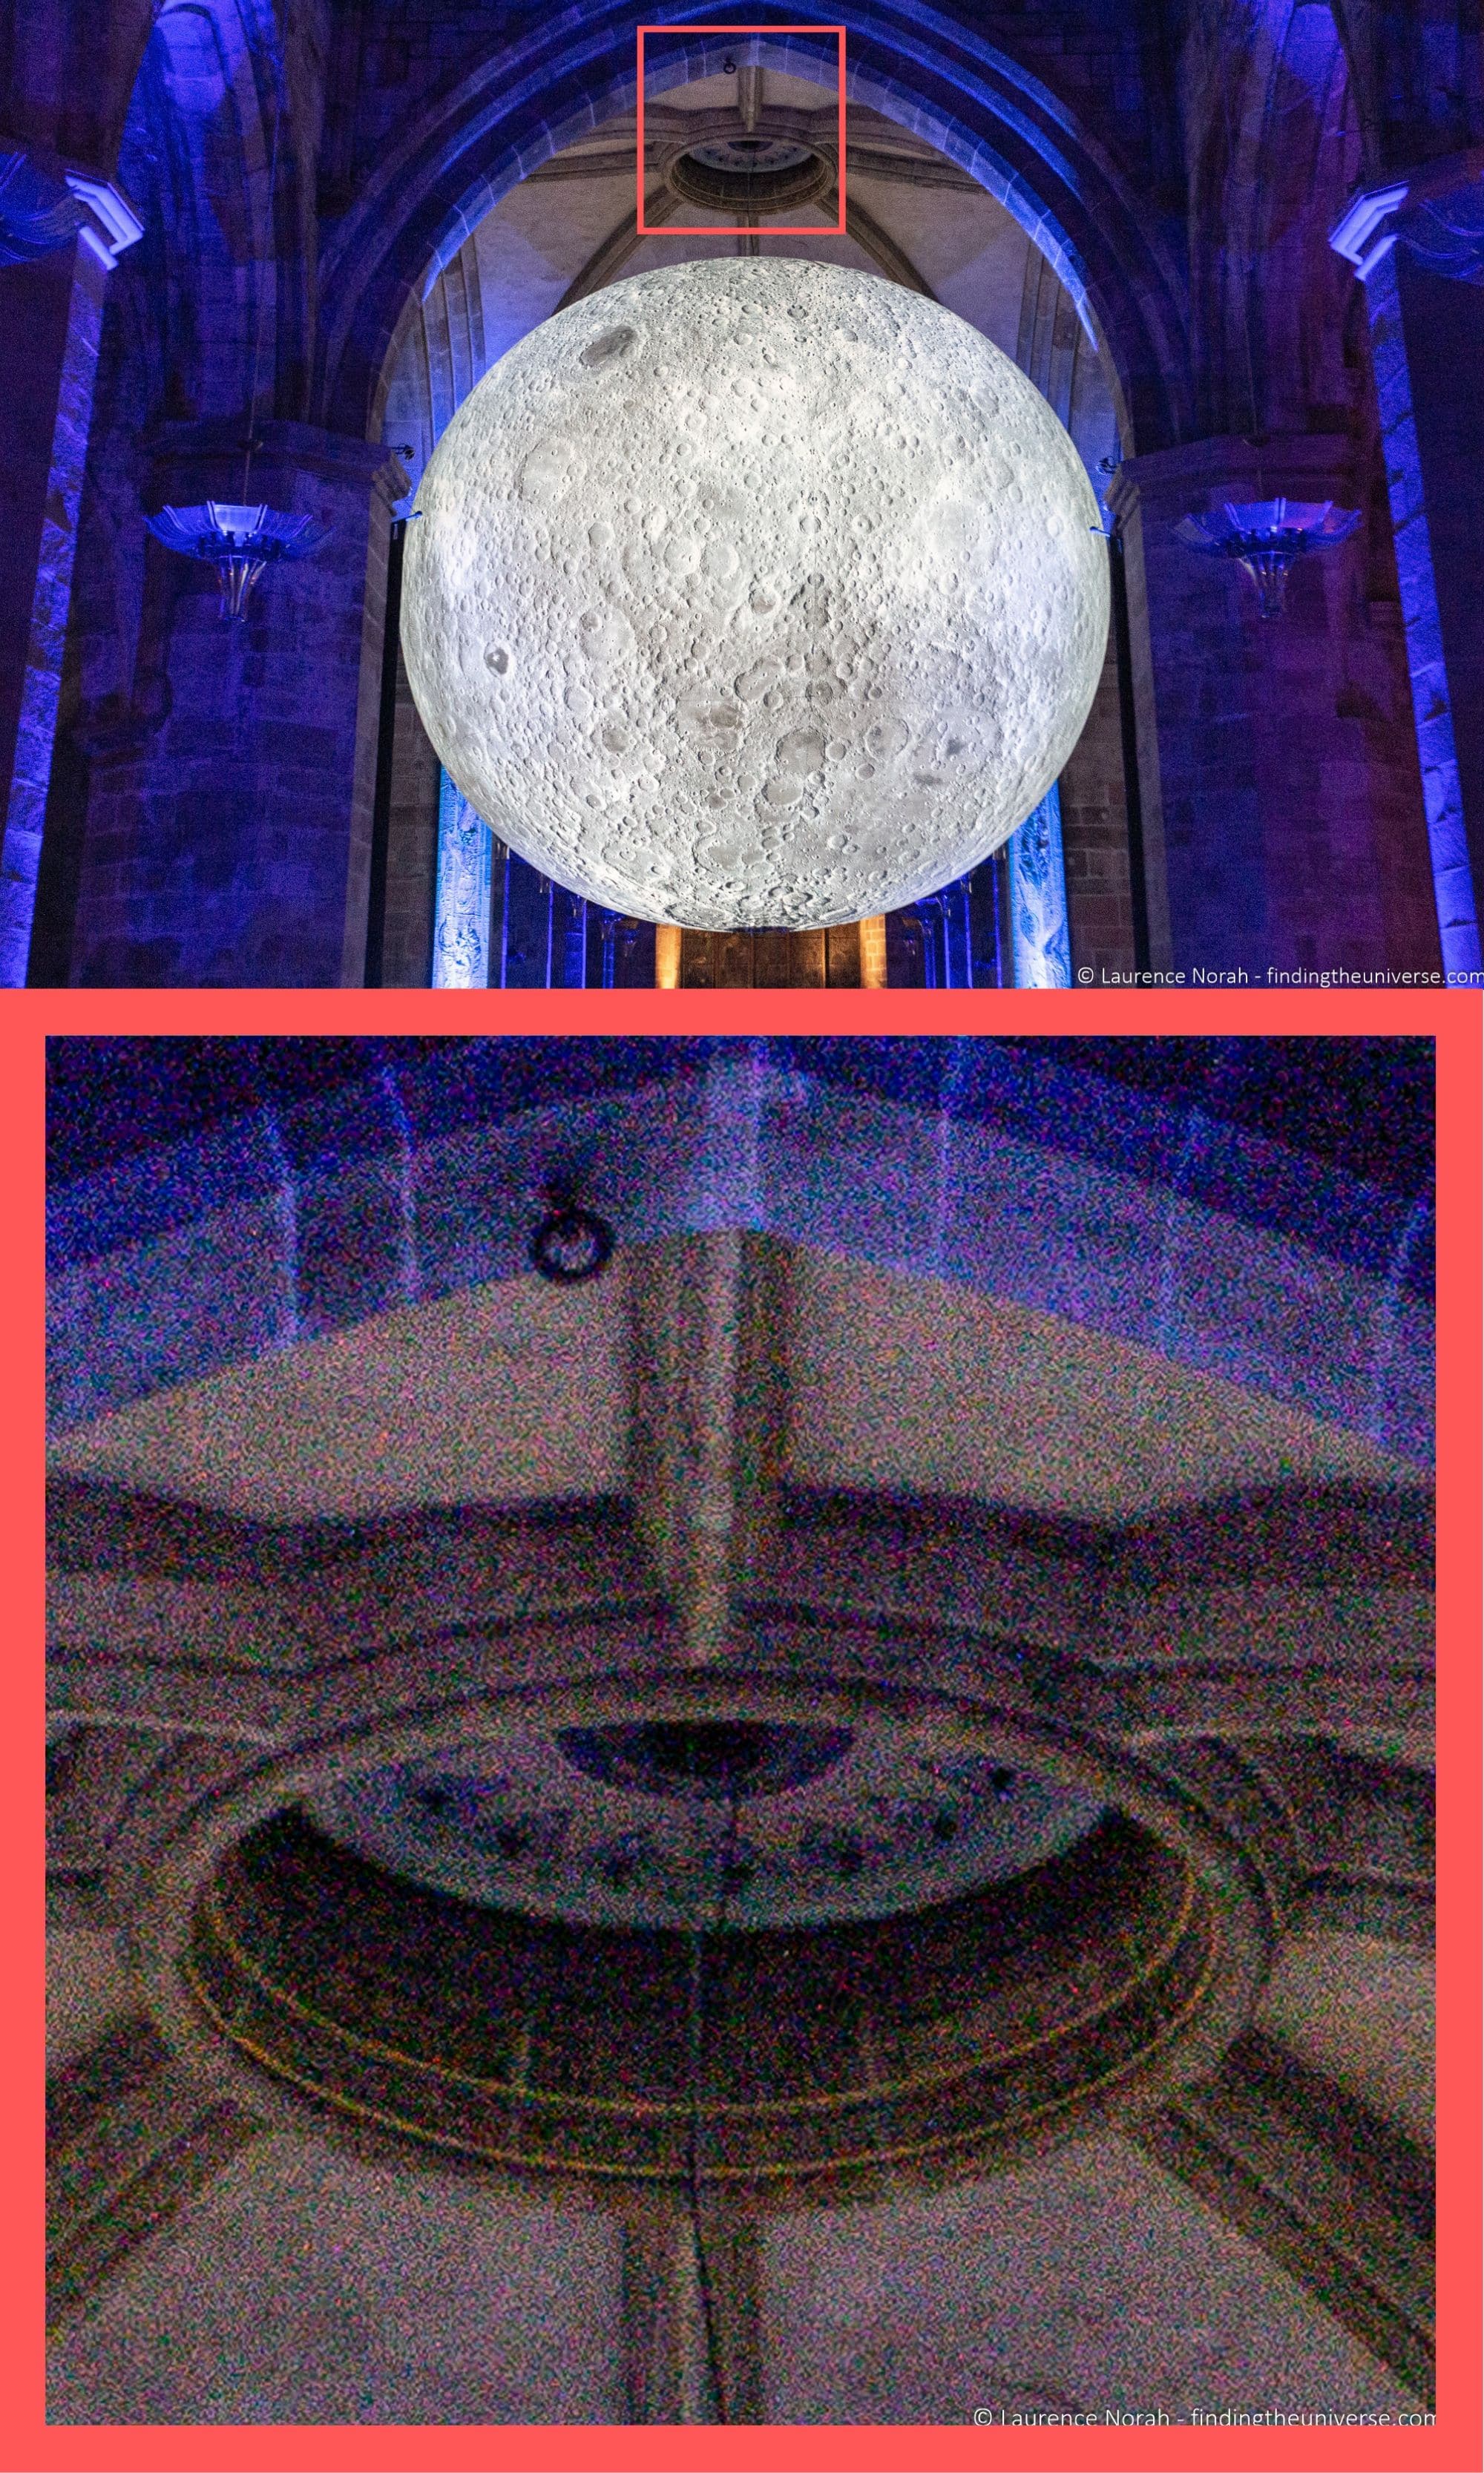
As you can see, the ISO 6400 image is exhibiting a great deal of noise, and the end result when looked at closely is certainly far from realistic or pleasing.
How do you change the ISO on a camera?
Nearly every camera on the market today, from smartphones to advanced DSLR cameras, let you set the ISO manually.
Most cameras have a dedicated ISO button somewhere on the camera which will let you change the ISO quickly. If there’s not a dedicated button, then the ISO setting should be quickly accessible via the menu – check your camera’s manual or Google “ISO setting your camera brand” to find out how to change it.
Depending on the make and model of your camera, you will have different ISO settings. Most cameras have a minimum ISO of 100 or 200, which will produce the cleanest, most noise-free images.
The value of your highest ISO will vary depending on your camera model, and will usually be somewhere between 1600 and 12800. How much noise appears on your images will also depend on your camera – high end models tend to handle noise better than low end models, but this does vary.
Usually each setting of the ISO will be double the previous setting. So for example, your camera may allow you to set the ISO to one of the following:
ISO 100, ISO 200, ISO 400, ISO 800, ISO 1600, ISO 3200, ISO 6400.
Each ISO rating doubles the exposure sensitivity of the previous setting. So with all the other settings being the same, if you go for ISO 100 to ISO 200, you would double the brightness of the image.
I would recommend evaluating your cameras performance to see how well it performs at different ISO levels to decide what you are happy with and what range you should use when shooting.
Usually, as a photographer, ISO would be the last setting you would want to change. In most situations, you want a lower ISO to produce a cleaner image.
In the real world, this is however not always possible. Let’s walk through an example. You want to take a picture of a person moving at night outside and you are holding your camera in your hand.
For slow moving people, with a hand held camera, you generally don’t want the shutter speed to be any slower than 1/60th of a second.
You are taking a picture of a person so a shallow depth of field is OK. You open the aperture as wide as it goes, to say f/2.8.
At this point, you might still find that your exposures are too dark. You can’t reduce the shutter speed any more as your image will be blurry. You can’t increase the aperture as it is already as wide as it will go.
Your only option in this situation is therefore to increase the ISO until you get a correctly exposed image.
There is good news when it comes to high ISO photography. First, as you saw from my example images, noise is only really apparent when you blow an image up. So for most digital and social media sharing and even small prints, shooting at high ISOs isn’t a big problem. If you want to print your images, it’s only as you scale them to larger prints that the noise will become an issue.
The other good news is that photo editing software is pretty good at managing noise, and many mid and high range cameras also have great in-camera noise reduction.
Here’s that same crop of the high ISO photo from before, run through noise reduction in photo editing software.
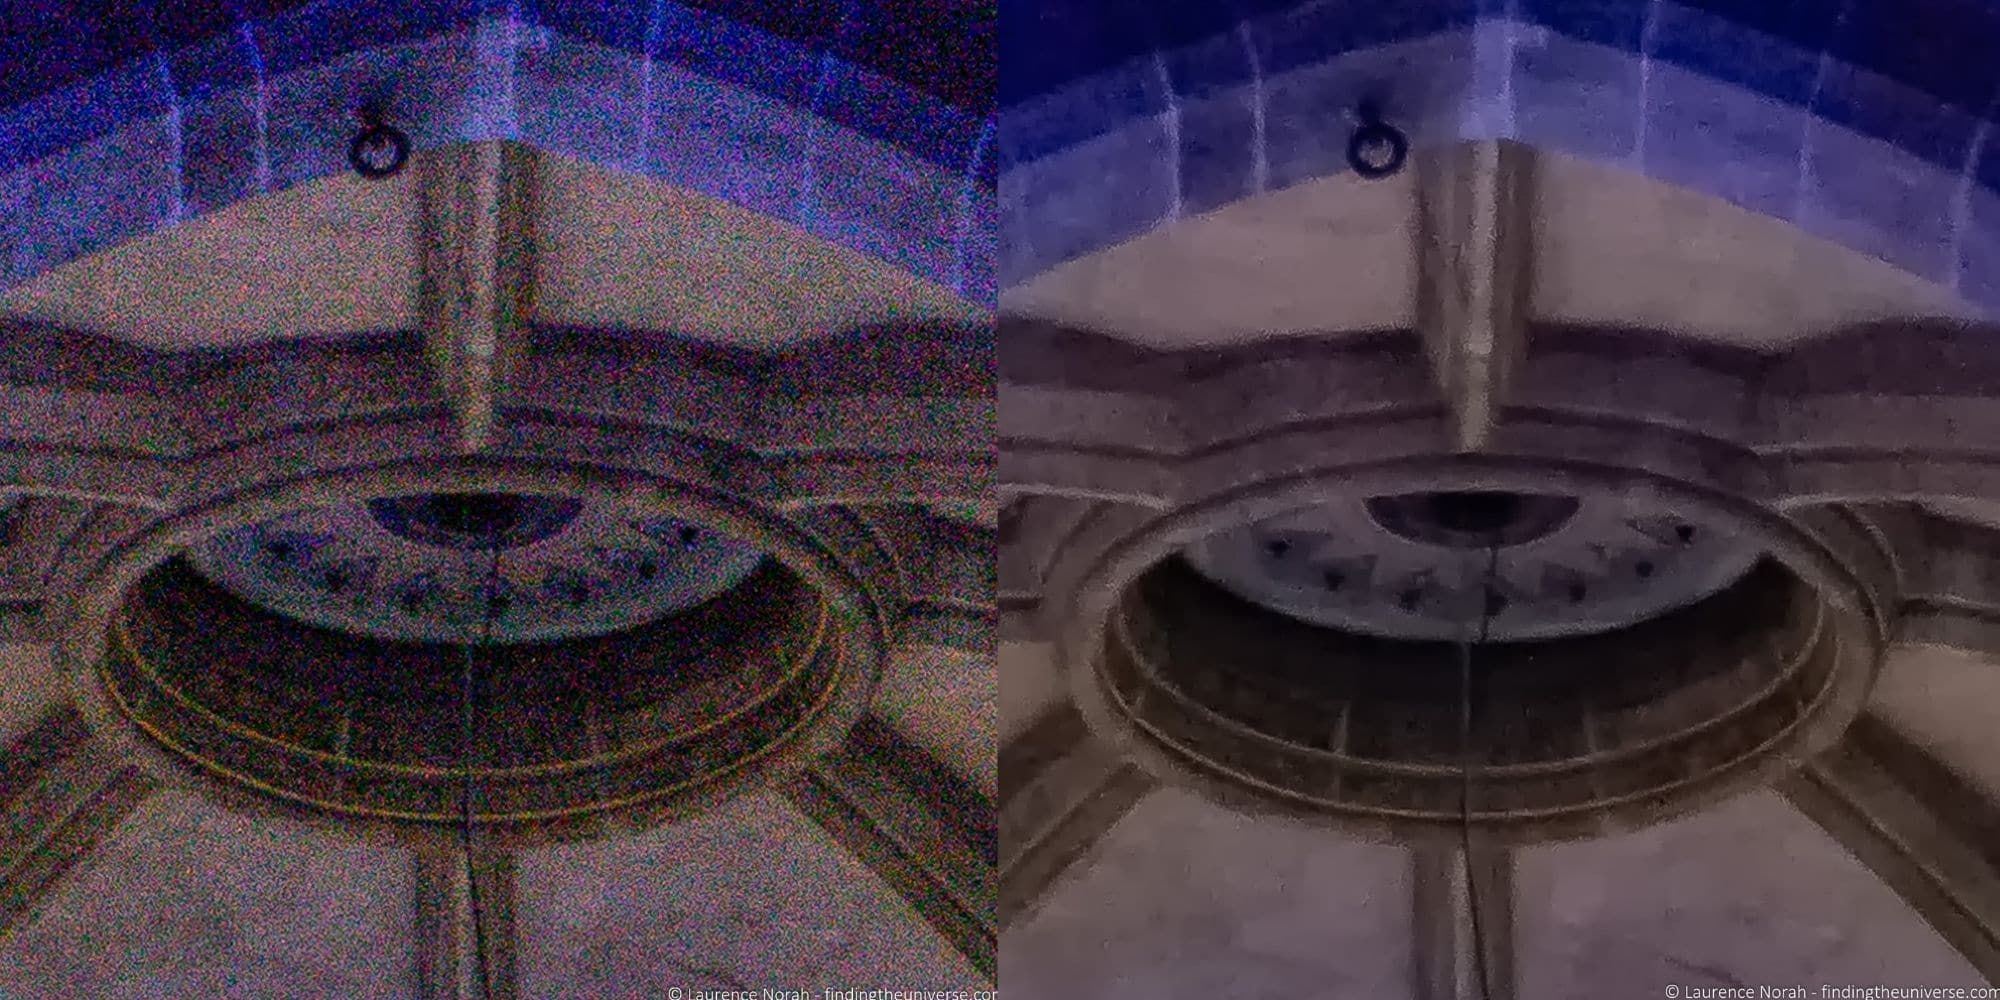
As you can see, much of the grain has been removed and the image is definitely much improved. The end result is a little softer, but you could spend more time tweaking this if you wanted.
In summary, ISO should be the last setting you increase to adjust your exposure, however, don’t be afraid to do so if the situation requires it. A noisy image is preferable to a blurry image, which is what can happen if you reduce the shutter speed too much.
The Exposure Triangle: Putting it all together
Hopefully you now have an understanding of the three major controls you have for adjusting the exposure of an image: shutter speed, ISO, and aperture.
You should also have an understanding of the effect that changing each of these settings has on an image.
This latter is key, because whilst changing each setting will change the brightness of the shot, it will also change the look of the image. Let’s take a look at the two images of Jessica from earlier, but this time reveal the full camera settings.


As you can see, the two images have exactly the same exposure – they are basically the same brightness.
However you will notice that the camera settings are very different.
The first image has a wide depth of field, achieved by setting a small aperture of f/13. Because the aperture is small, the shutter speed is slower to let more light in.
The second shot has a narrow depth of field, achieved by setting a wide open aperture of f/2.8. That lets a lot of light in. Had we kept the same shutter speed, the image would have been overexposed. To compensate, we used a faster shutter speed of 1/1600th.
Hopefully, this makes it clear that you can achieve the same exposure in an image by choosing different settings for each of controls available.
If you increase the light coming in by increasing the shutter speed for example, you can decrease the light coming in by making the aperture smaller.
What is a “stop” in Photography
A stop is a term that photographers use to describe the amount of light coming in. Each stop describes a doubling of the exposure.
For example:
- changing the ISO from 100 to ISO 200 is a one stop increase.
- changing the ISO from 100 to ISO 400 is a two stop increase
- changing the aperture from f/2.8 to f/4 is a one stop decrease
- changing the aperture from f/2.8 to f/5.6 is a two stop decrease
- changing the shutter speed from 1/250th to 1/125th is a one stop increase
Stops are useful because it gives us a quick reference for making settings changes. If we want to widen the aperture to achieve a more shallow depth of field, we can change it by two stops.
This will let two more stops worth of light in. We can then reduce the shutter speed by two stops, to reduce two stops of light coming in. The end result will be the same in terms of the exposure, but it will have a different depth of field.
Exposure Triangle Cheat Sheet
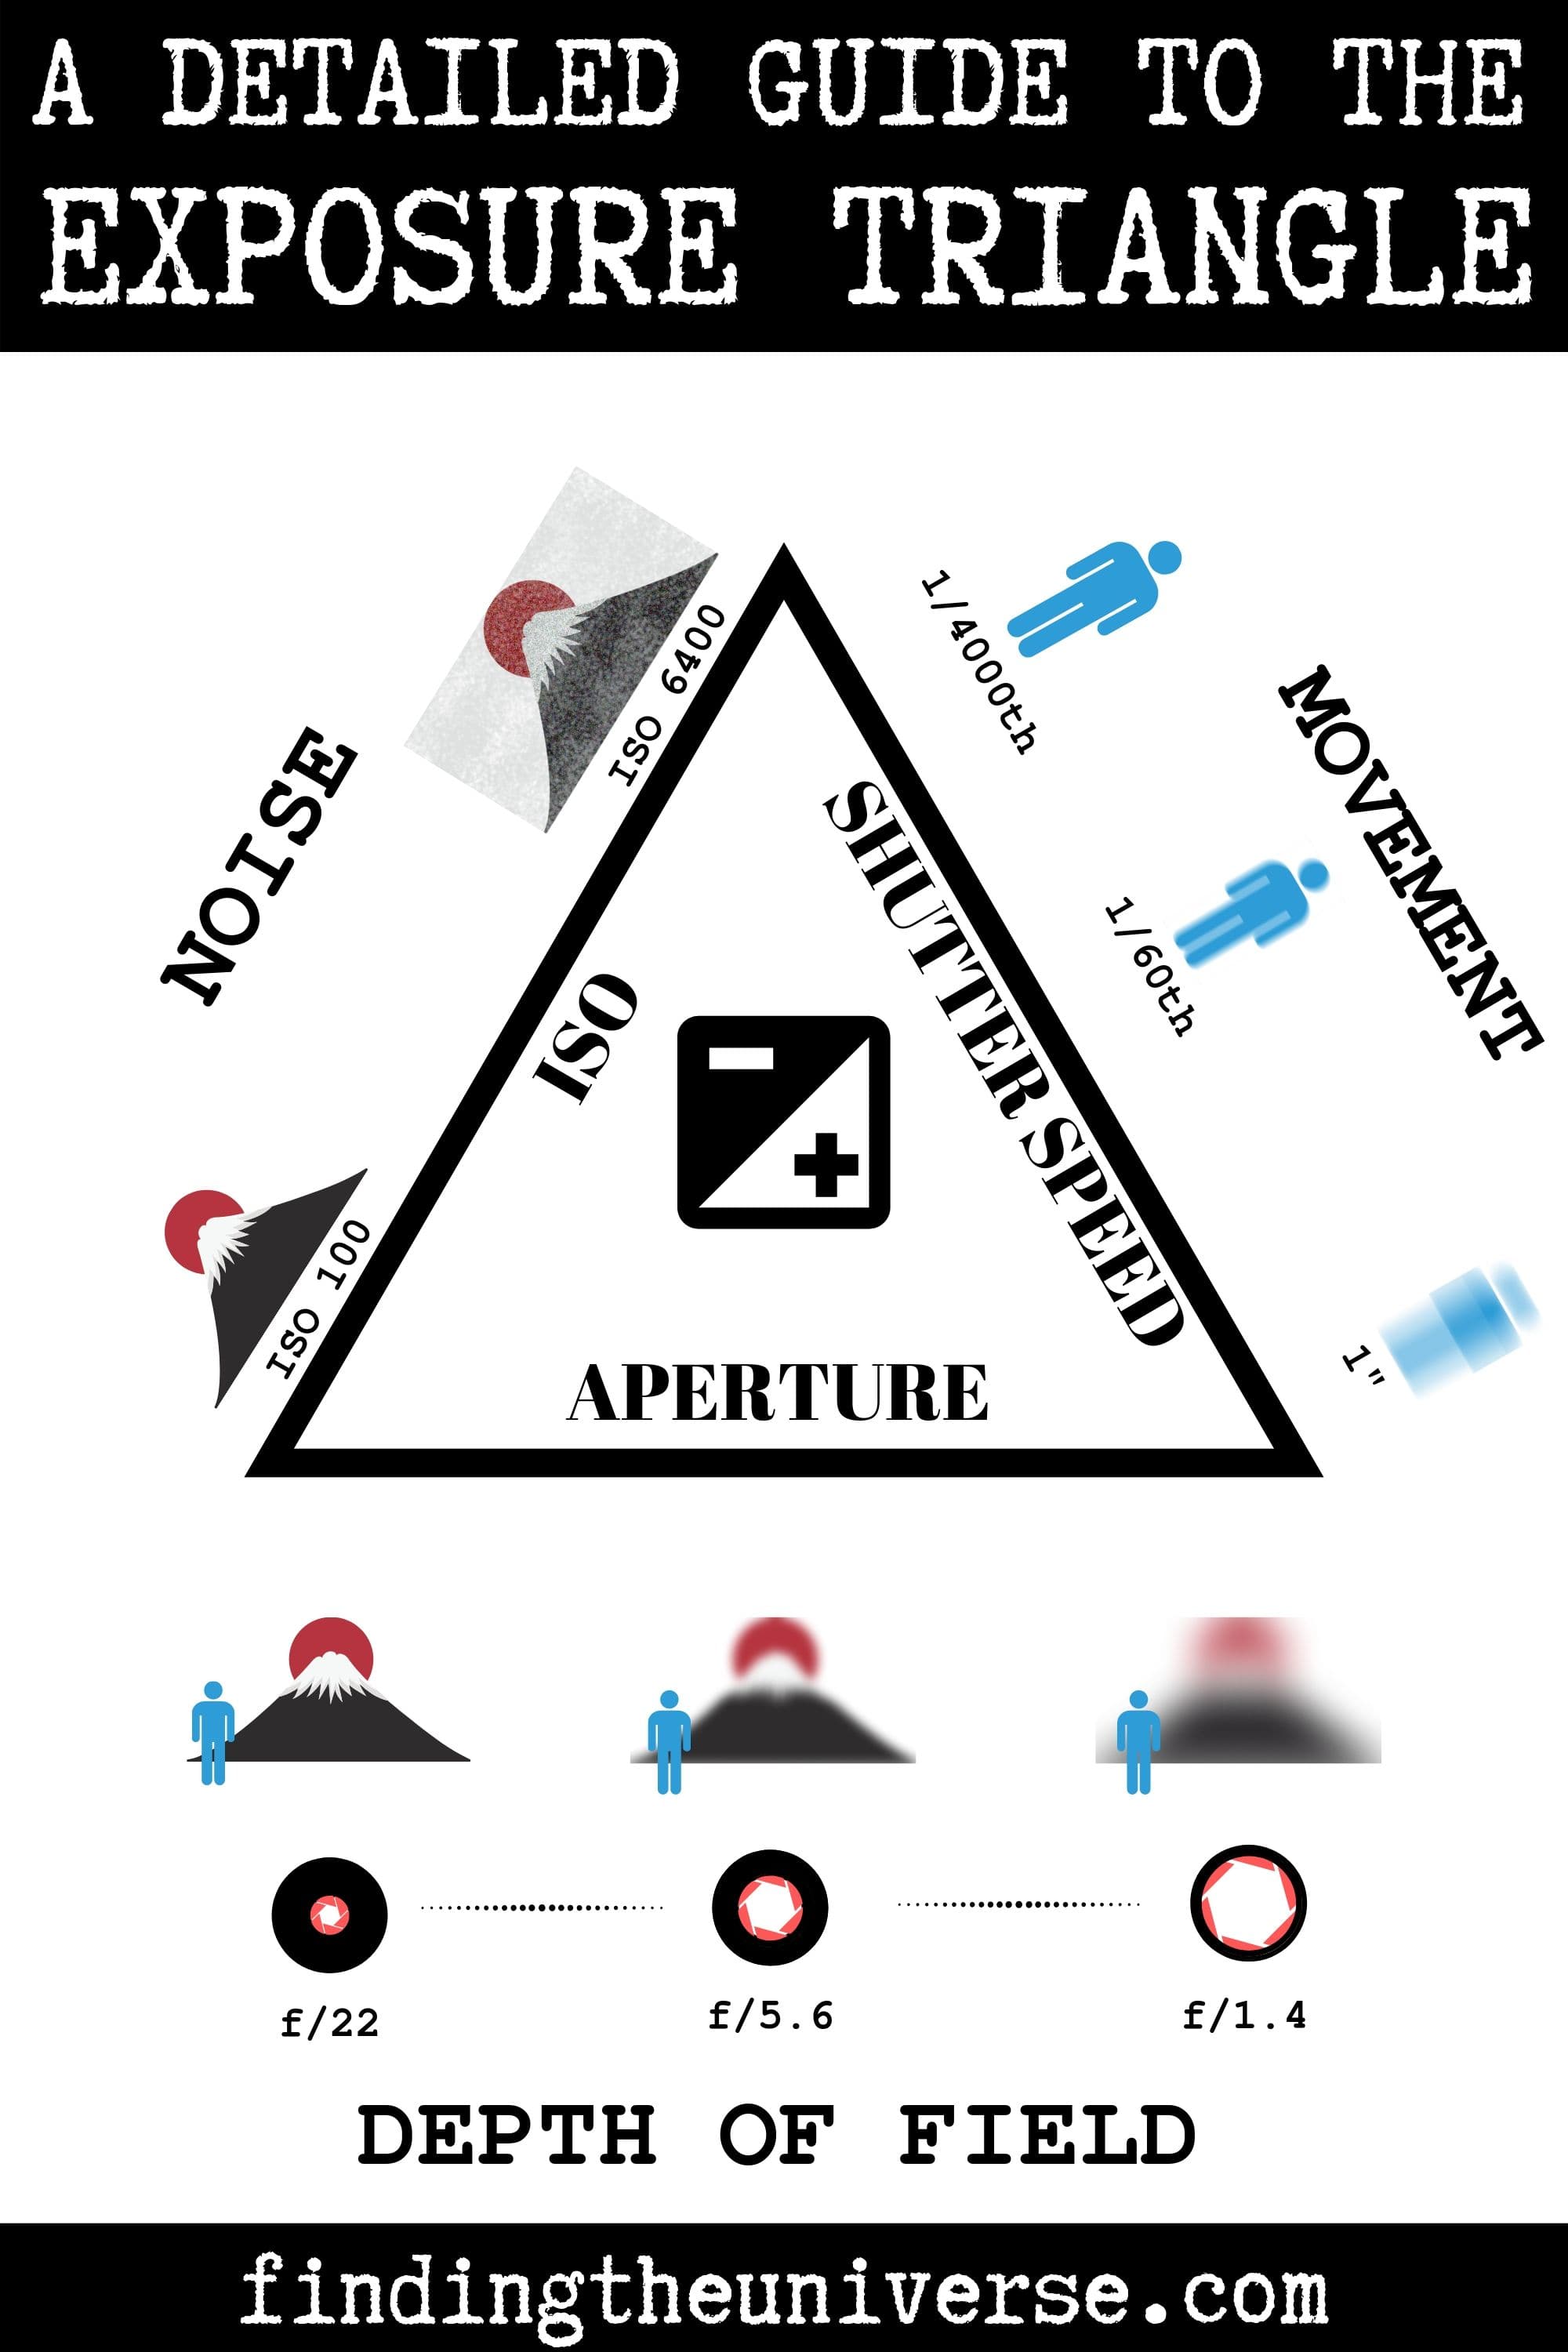
To demonstrate how all the parts of the exposure triangle work, I’ve put together this graphic for quick reference. Feel free to pin this image or to save it for reference.
Further Reading
Hopefully this post has helped explain the exposure triangle photography concept in some detail. I appreciate this is a fairly complex subject, and it is something that can take a bit of time to process.
Practice is also important when it comes to photography, as putting these ideas into practice will definitely be the best way to have it all make sense.
Finally, the more you research, the more all these concepts will make sense. With that in mind, I wanted to share some of the many other photography related posts and resources we’ve put together to help you on your photography journey.
- We have a beginner’s guide to photography to help you get started
- Knowing how to compose a great photo is a key photography skill. See our guide to composition in photography for lots of tips on this subject
- We’ve covered aperture in this post, which affects depth of field. Read more about what depth of field is and when you would want to use it.
- If you have a lens with a zoom feature, you can take advantage of something called lens compression to make objects seem closer together than they are.
- We are big fans of getting the most out of your digital photo files, and do to that you will need to shoot in RAW. See our guide to RAW in photography to understand what RAW is, and why you should switch to RAW as soon as you can.
- You’re going to need some way of editing your photos. See our guide to the best photo editing software, as well our our guide to the best laptops for photo editing
- We have a guide to improving Adobe Lightroom Classic CC performance. It’s our favourite editing software, but can be a bit slow if not properly configured!
- If you’re looking for advice on specific tips for different scenes, we also have you covered. See our guide to Northern Lights photography, long exposure photography, fireworks photography, tips for taking photos of stars, and cold weather photography.
- You may hear photographers talking about a concept called back button focus. If you’ve ever wondered what that is, and want to know how to start using it, see our guide to back button focus.
- For landscape photography, you might find you need filters to achieve the look you want. See our guide to ND filters for more on that.
- If you’re looking for a great gift for a photography loving friend or family member (or yourself!), take a look at our photography gift guide for some inspiration
- If you’re in the market for a new camera, we have a detailed guide to the best travel camera, as well as specific guides for the best camera for hiking and backpacking, the best compact camera, best mirrorless camera, best action camera, and best DSLR camera. We also have a guide to the best camera lenses for those using mirrorless and DSLR cameras.
- We have a detailed guide to how to use a DSLR camera
- We have a guide to why you need a tripod, and a guide to choosing a travel tripod
- If you’d like a book to help you understand all this, check out this guide to mastering shutter speed, aperture and ISO
- Finally, if you want to improve your photography overall, you can join over 2,000 students on my travel photography course. I’ve been running this since 2016, and it has helped lots of people take their photography to the next level.
And that’s it for our detailed guide to the exposure triangle in photography! As always, we’re happy to take feedback and answer your questions – just pop them in the comments below and we’ll get back to you as soon as we can.
Markus says
Thanks for this very good explanation and useful examples. But shouldn’t it read
* changing the aperture from f/2.8 to f/4 is a one stop DEcrease
* changing the aperture from f/2.8 to f/5.6 is a two stop DEcrease
instead of increase?
And one further question: How does +/- EV relate to ISO/exposure on digital cameras?
Thanks again,
Markus
Laurence Norah says
Hi Markus!
My pleasure, and you are absolutely right about that aperture wording. I’ve updated the post accordingly!
So the +/- EV just increases or decreases the exposure by the number of stops you set. It is only related to exposure rather than ISO specifically, however the camera can choose to adjust ISO to achieve the desired EV compensation.
So for example, if you are shooting in aperture priority mode, you set the aperture and the camera will normally set the shutter speed. If you are in Auto ISO, it will also set the ISO. If you use the EV +/- feature, as you have fixed the aperture the camera will change either the shutter speed or ISO to achieve the +/- setting you choose. So if you choose to increase the exposure by +1, it will either halve the shutter speed or double the ISO.
Hopefully that makes sense, let me know if not!
Laurence
Chris says
Hi Laurence, thanks for a great article, I am new to enthusiast photography and have been struggling with the aperture side off things. I think as there is so much emphasis on low f-stop aperture lenses especially in more expensive models. You are lead to belief you need a F 1.2 lense etc. but with your explanation I now understand it is more to do with what you are actually photographing. I think some times we get caught up in gear specs when we are new to something. Your examples with images were very helpful. Thanks again
Laurence Norah says
Hey Chris!
It’s my pleasure. So absolutely, many photographers will often want to get those wider aperture lenses, but it’s worth bearing in mind that they are only really useful in specific situations. For wedding / event photography for example, they let you work in lower light conditions, and also to get that nice bokeh effect. However, for landscape photography as an example, that wider aperture usually just means carrying a heavier, more expensive lens where you set it to f/8 – f/11 and see no benefit! That’s why I have a f/4 lens as my landscape wide angle – I don’t have a need for f/2.8.
It is definitely very easy to get caught up in specs, and photography is a hobby which can get expensive very quickly! My advice would be to get a general walk around lens with a variable focal length (zoom) for the type of photography you enjoy, and then pick up an inexpensive fixed focal length (prime) lens at f/1.8. The 50mm f/1.8 for example is an excellent choice for Canon / Nikon and other systems, and is usually available at around the $100. That way you can play with shallow depth of field and portraits, without breaking the bank!
Let me know if you have any questions, I am always happy to help 🙂
Laurence