
I’ve been using the desktop version of Lightroom for many years as the centre of my photography editing workflow. I love the way it handles pretty much everything I need in terms of managing my photos and editing them, and I use it for 95% of all my photography post-processing.
As a travel photographer, I find Lightroom Classic to be the best photo editing software, and an indispensable tool. The monthly subscription is a price well worth paying, and I recommend it to all my students on my travel photography course.
One thing I don’t love about Lightroom though is how slow and painful it sometimes can be to use. Every release seems to add new features that demand more from your hardware, especially on larger monitors, and despite running a fast desktop machine with all the bells and whistles, I still find myself waiting for things to render more than I’d like.
Because of this, I’ve become slightly obsessed with optimising Lightroom so it runs as well as is possible. With my background as a software developer and as someone who has been using Lightroom daily for over a decade, I’ve put a lot of work into figuring out what actually makes a difference and what doesn’t.
A quick note on naming: Adobe has rebranded Lightroom’s desktop application a few times over the years. It was originally just “Lightroom”, then became “Lightroom Classic CC” in 2017, and is now simply “Lightroom Classic”. Throughout this guide, I’ll use the current name. If you’ve seen it called Lightroom Classic CC elsewhere, it’s the same application.
Read on for my top tips for improving Lightroom Classic performance!
Table of Contents:
Why is Lightroom Classic Slow?
There are a number of reasons Lightroom Classic might be running slowly. Lightroom is a complex application that performs the dual functions of photography management and photography editing, and both of those put serious demands on your hardware.
To manage your photo library, Lightroom builds a large database of your images. This allows you to do all sorts of useful things from a workflow perspective, like finding images shot with a specific lens, or at a specific shutter speed. Plus there are all the tools like keyword management, labelling and so on. The flip side is that a more complicated database takes more power to run.
From a photo editing perspective, Lightroom is what is known as a non-destructive editor. Every edit you make can be rolled back, and the original image file remains on disk. This also means that every edit you make has to be applied and calculated against all the previous edits. So as you make more and more edits to an image, the slower this process becomes.
On top of all that, recent versions of Lightroom Classic have added AI-powered features like Denoise, Super Resolution, Generative Remove, Reflection Removal, and Lens Blur. These features make a real difference to image quality, but they put a heavy load on both your GPU and your processor. If you’ve noticed Lightroom getting slower recently, these AI tools are likely part of the reason.
The good news is that you can improve Lightroom Classic performance by following a number of practical tips. Whilst there will always be limitations based on the underlying hardware, these tips should help you get the most out of Lightroom on your computer.
What Hardware Does Lightroom Classic Need?
Adobe’s official recommended requirements for Lightroom Classic (version 15 and later) are as follows:
- An Intel or AMD processor with SSE 4.2 support (2GHz or faster), or an Apple Silicon processor
- 16GB of RAM or more
- A 1920 x 1080 display or greater
- A GPU with DirectX 12 (Windows) or Metal (macOS) support and at least 4GB of VRAM for 4K displays. For full GPU acceleration and AI features like Denoise and Lens Blur, Adobe recommends 8GB of dedicated GPU memory, or 16GB of shared/unified memory on Apple Silicon Macs
- A fast SSD for your catalog, previews, and Camera Raw cache
In my experience, the “recommended” specs are closer to a realistic minimum. Lightroom will happily consume whatever resources you give it. On my ASUS ROG G14 laptop with 32GB of RAM, Lightroom will suck up 10 to 15GB of that. On my desktop (a Ryzen 9 7950X3D with 64GB of DDR5), Lightroom routinely sits at 20 to 25GB of usage.
If I’m editing large panoramas, or moving images between Lightroom, Photoshop and Topaz DeNoise, my desktop will often be running at 40 to 50GB of RAM usage across all the applications.
I’d say 16GB is the bare minimum for a usable experience today, 32GB is the sweet spot for most photographers, and up to 64GB is worth it if you regularly work with large files or run AI tools like Denoise on batches of images. More than 64GB is unlikely to help unless you have very specific needs.
For GPU memory, the bar has gone up since Adobe added AI features. My RTX 4070 with 12GB of VRAM handles everything Lightroom can throw at it, including AI Denoise, without issues. If your GPU has less than 4GB of VRAM, you’ll probably find the AI features slow or unavailable.
For more on choosing the right hardware, see my guides to the best desktop computer for photo editing, the best laptop for photo editing, and the best monitor for photo editing.
How To Speed Up Lightroom Classic
Here are my top tips for improving Lightroom Classic performance to help speed up your photography workflow. Some of these are quick settings changes that take 30 seconds, and others involve hardware decisions. I’ve ordered them roughly by impact, so if you’re in a hurry, start at the top.
1. Put your Catalog File on a Fast SSD
If your computer has a mix of older mechanical hard drives and newer SSDs, you’ll want your Lightroom catalog on the fastest drive you have. Ideally, that’s an NVMe SSD rather than a SATA SSD (NVMe drives are typically 3 to 5 times faster at sequential reads).
The fast speeds of an SSD means Lightroom can access image information much faster. Lightroom stores all its preview files in the same location as the catalog, and the preview file is what Lightroom renders when you’re browsing your library. So you want that to be somewhere fast.
Personally, I have a dedicated NVMe SSD just for my Lightroom catalog and previews. This isn’t a must, but as I have a large catalog and generate a lot of previews, it takes up significant space. A dedicated drive makes that easier to manage. I then have a separate NVMe SSD for Windows and program files, and larger drives for long-term photo storage.
Storing your photos on a slower drive is perfectly fine, because most of the time you’ll be working from the previews that Lightroom is pulling off the fast SSD.
Moving your catalog file is just a question of locating its current location and then moving it in either Windows Explorer or Finder. Full instructions on this Adobe page.
2. Increase your Camera Raw Cache Size
Lightroom has two places where it caches image data. One is the preview cache (stored with your catalog file, used in the Library module), and the other is the Camera Raw cache.
When you switch to the Develop module, Lightroom loads the image data into its Camera Raw cache. This defaults to a size of just 1GB, which is pitiful. With a cache that small, Lightroom is constantly having to swap images in and out, which slows everything down.
I’d suggest setting this to at least 30GB, and I personally run mine at 50GB. Put the Camera Raw cache on an NVMe SSD if you can, ideally the same drive as your catalog. I’ve found that Lightroom runs slightly faster when this cache is on a separate drive to my system files, but I have no hard evidence to back this claim up. Still, worth a try if you have multiple fast drives.
You can set your Camera Raw cache size and location from Edit (Windows) or Lightroom Classic (Mac) then Preferences, and then choosing the “Performance” tab.

3. Configure GPU Acceleration
Adobe has been steadily improving Lightroom Classic’s GPU support over the last few years, and with version 15 it’s more useful than ever. Lightroom can now use your GPU for image processing in the Develop module, image export, preview generation, and AI-powered features like Denoise and Lens Blur.
You’ll find the settings under Preferences, then the Performance tab.
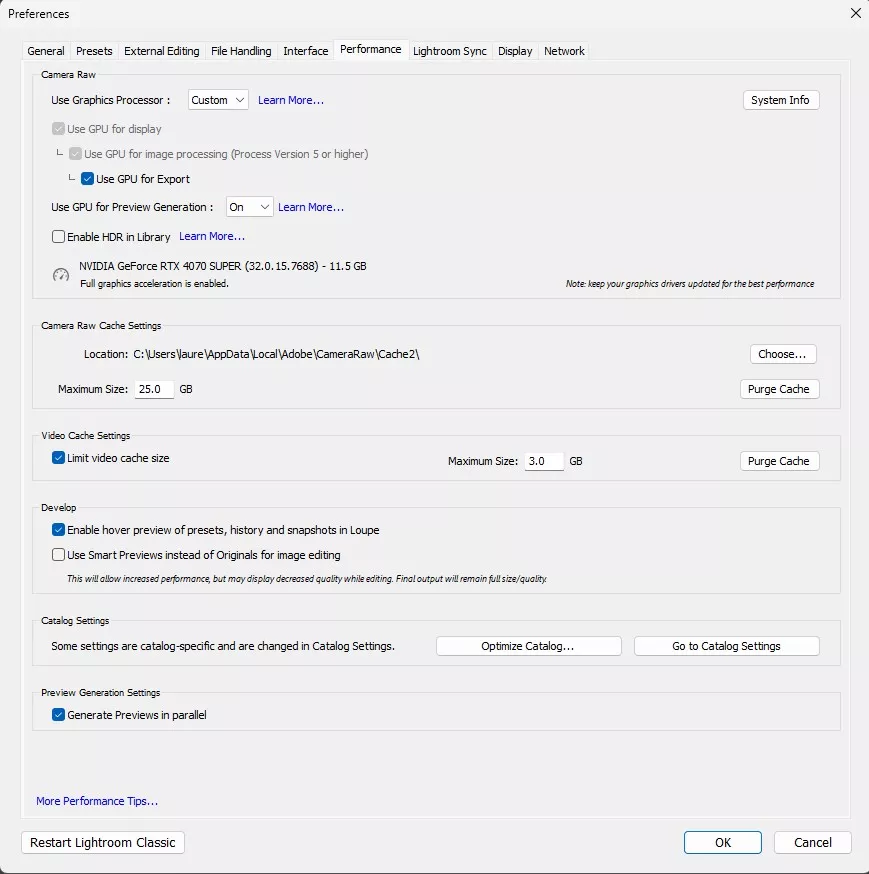
The default setting is “Auto”, where Lightroom detects the capabilities of your graphics card and decides what to accelerate. In my experience on every computer I’ve used, “Auto” has been conservative, only enabling basic acceleration even when the hardware could handle more.
I’d recommend switching to “Custom” in the dropdown. This gives you individual checkboxes for:
- Use GPU for display (basic acceleration for smoother scrolling and panning)
- Use GPU for image processing (applies GPU power to Develop module edits)
- Use GPU for export (can roughly halve export times on capable GPUs)
- Use GPU for preview generation (added in mid-2025, speeds up building previews)
On my desktop with an RTX 4070, I run all four options enabled and the difference is noticeable. Export times are roughly half what they were without GPU acceleration, and slider adjustments in the Develop module feel more responsive, especially on my large high-resolution monitor.
Laptop users with less powerful integrated graphics may see less benefit, or even a slight slowdown with GPU image processing enabled. The overhead of shuffling data between the CPU and GPU isn’t always worth it on lower-end hardware. Try it both ways and see what feels faster for you.
One thing to be aware of: GPU image processing only works for images using Process Version 5 or higher. Process Version 5 was introduced in 2018, so if you have older photos that haven’t been updated, they’ll still use the CPU. You can batch-update your library by selecting all photos (Ctrl+A), right-clicking, choosing Develop Settings, then “Update to Current Process Version”. Back up your catalog first, because changing process version can subtly affect how your images look.
4. Manage Background Tasks
Lightroom runs several background tasks that can slow things down while you’re actively editing. The main culprits are:
Face detection and address lookup. Lightroom can search for faces in your photos and look up GPS addresses. These run in the background by default and eat into your processing power. Pause them while you’re editing by clicking your name in the top left corner of Lightroom and hitting the pause button next to each task.
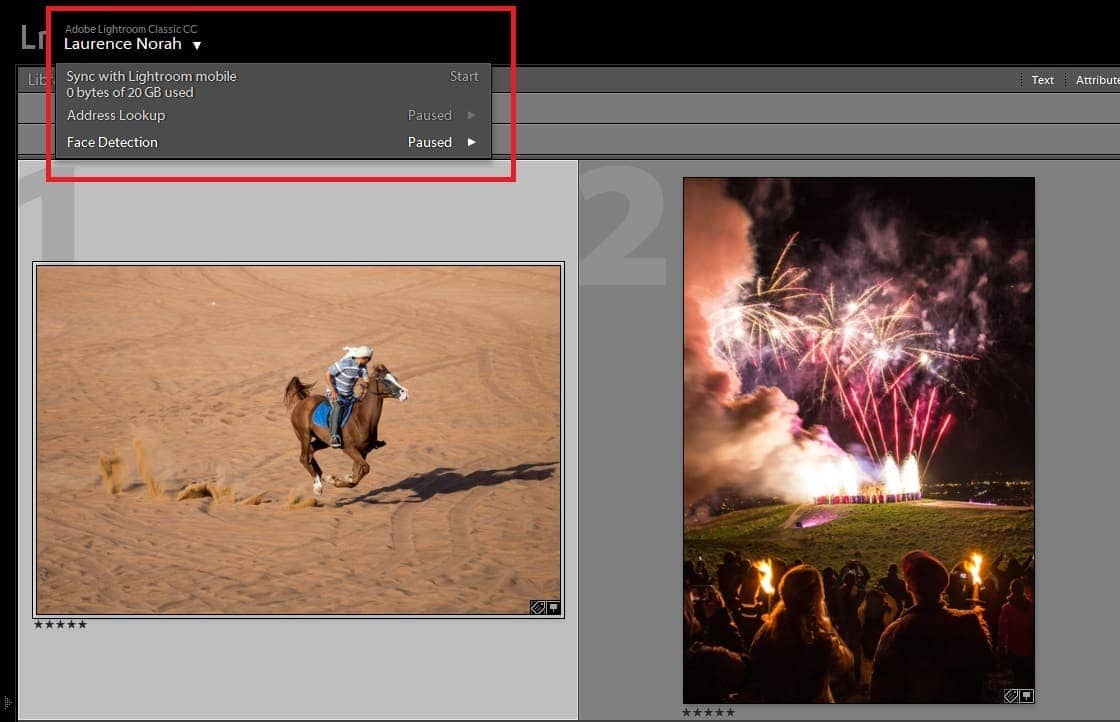
Cloud synchronisation. If you sync images to the web for access from other devices, Lightroom will try to sync your edits as you make them, generating thumbnails and uploading them after every slider adjustment. Pause syncing while you’re actively editing, and let it catch up when you’re done.
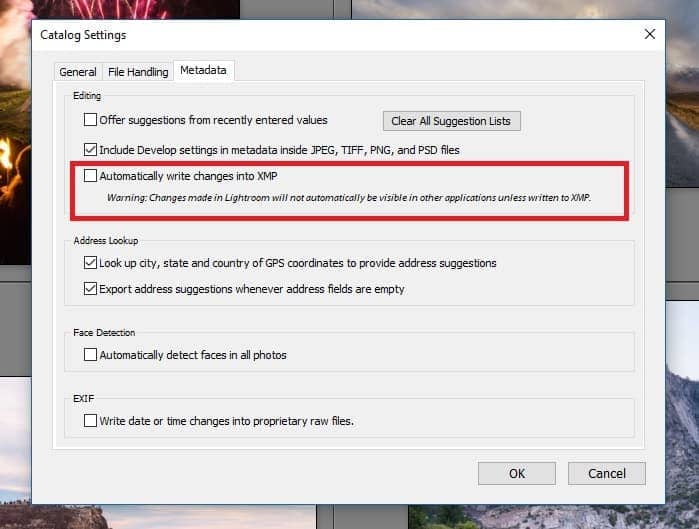
XMP writing. Lightroom can save your edit data into small XMP sidecar files alongside your RAW files. This used to cause noticeable slowdowns, but Adobe has improved the process significantly. As of version 14.4 (June 2025), XMP data for the active image is only written every 10 seconds rather than after each edit, and Lightroom now pauses XMP writing automatically during imports. I’d now recommend leaving “Automatically write changes into XMP” enabled in your Catalog Settings. You can still pause it manually from the dropdown menu under your name if you’re doing intensive editing and want every last bit of performance.
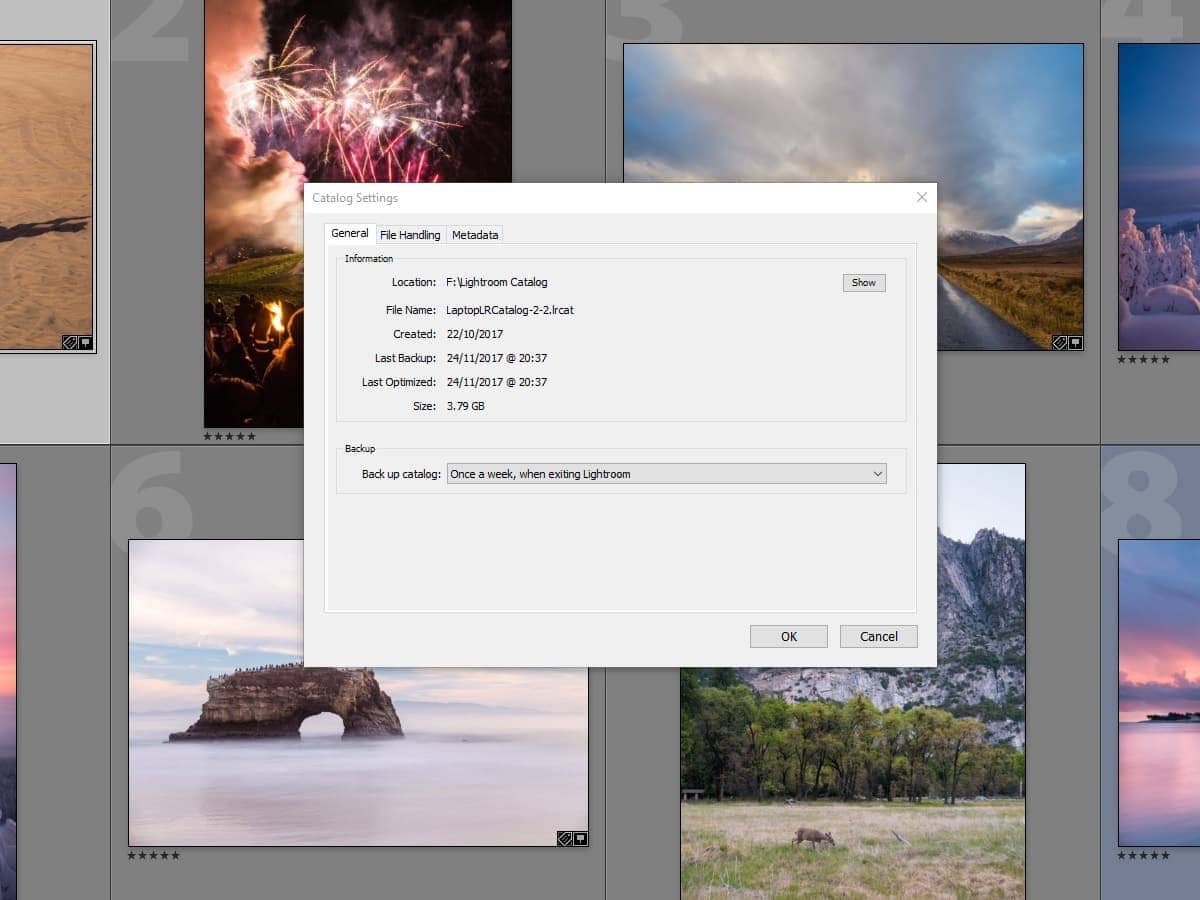
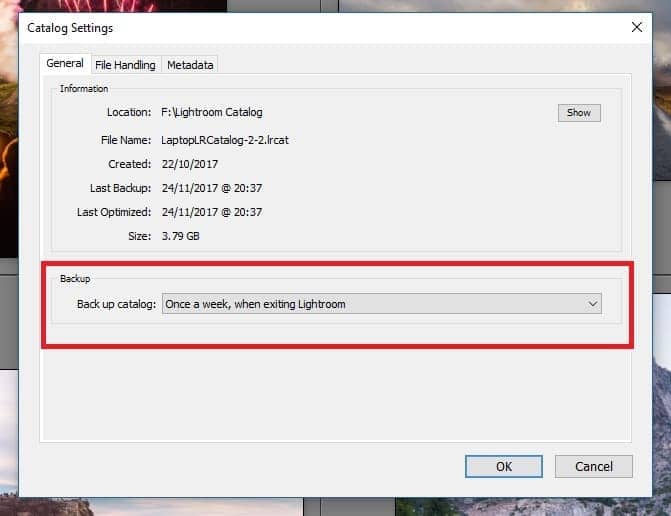
Also, back up your Lightroom catalog regularly and keep a copy somewhere safe. It won’t make Lightroom faster, but it will save you a lot of heartache if your catalog ever becomes corrupt. You can set your backup schedule in the Catalog Settings under the “General” tab.
5. Build Standard Size Previews on Import
When you import photos into Lightroom, you have a number of preview options. My suggestion is to build standard previews on import. This slows down the import process, but it makes the Library module far more responsive when you come to browse your imported images, because Lightroom will be rendering from pre-built previews rather than generating them from the RAW files on the fly.
There’s also an “Embedded & Sidecar” option which uses the preview that your camera embeds in the RAW file. These load faster initially, but in my experience they look quite different to the previews Lightroom generates, simply because Lightroom’s RAW processor renders images differently to my camera. I want to see images the way Lightroom does, so I build standard previews. Your preference may differ, so experiment.
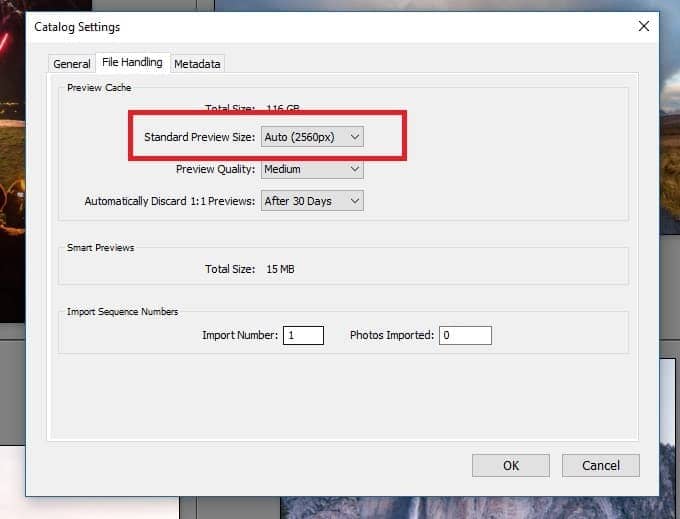
If you choose standard previews, set the preview size correctly for your monitor. The size should be close to your screen width but not smaller. So if you have a 1920×1080 monitor, pick 2048 pixels. For a 4K display, pick a size of 3840 or higher if available. You can set this in the File Handling section of Catalog Settings.
As of Lightroom Classic 15.0, you can also set a preview cache size limit. This stops your preview files from eating up your entire SSD over time. If disk space is a concern, set a limit that’s generous but sustainable for your drive.
6. Build 1:1 Previews Before You Edit
Lightroom also has the option to create 1:1 previews, which are full-size versions of an image. You can generate these on import, but this slows imports considerably and uses a lot of disk space.
My suggestion is to add an extra step to your workflow. Once you’ve culled your images and chosen the ones you’re going to edit (usually possible with standard previews), select them, and from the Library menu choose to build 1:1 previews.
This takes a few minutes depending on how many photos you’ve selected, but it speeds up the Develop module significantly because Lightroom won’t have to build full-size renders on the fly as you edit.
7. Edit Images Sequentially
Lightroom automatically pre-loads the next and previous images in the filmstrip into memory when you’re in the Develop module. The actively edited image is highlighted, and the images on either side will already be cached in RAM for faster access.

The tip here is to work through your images in order rather than hopping around. I use the Library module to filter and flag the images I want to edit, and only load them into the Develop module when I have a series ready to work through. Editing them sequentially means the pre-loaded images are almost always the ones I need next, and the whole experience feels much snappier.
8. Apply Develop Edits in an Optimal Order
The order in which you apply corrections in the Develop module affects performance. Every time you make a new edit, Lightroom has to recalculate all the previous adjustments. The more edits stacked up, the slower the module becomes.
Some adjustments are particularly expensive. Noise reduction, for example, can slow things down noticeably. According to Adobe, the most efficient order for editing is:
- Spot healing
- Geometry corrections (lens correction profiles, manual keystone corrections)
- Global adjustments (exposure, white balance)
- Local corrections (gradient filter, adjustment brush, masks)
- Detail corrections (noise reduction, sharpening)
In recent versions of Lightroom you can reorder the Develop module panels, so you might find it helpful to arrange them in this order.
If you want to do really detailed compositing or heavy retouching on a particular image, Photoshop is usually a better tool for that job. Lightroom’s strength is in batch processing and non-destructive adjustment, not pixel-level editing.
9. Smart Previews: Experiment and Decide
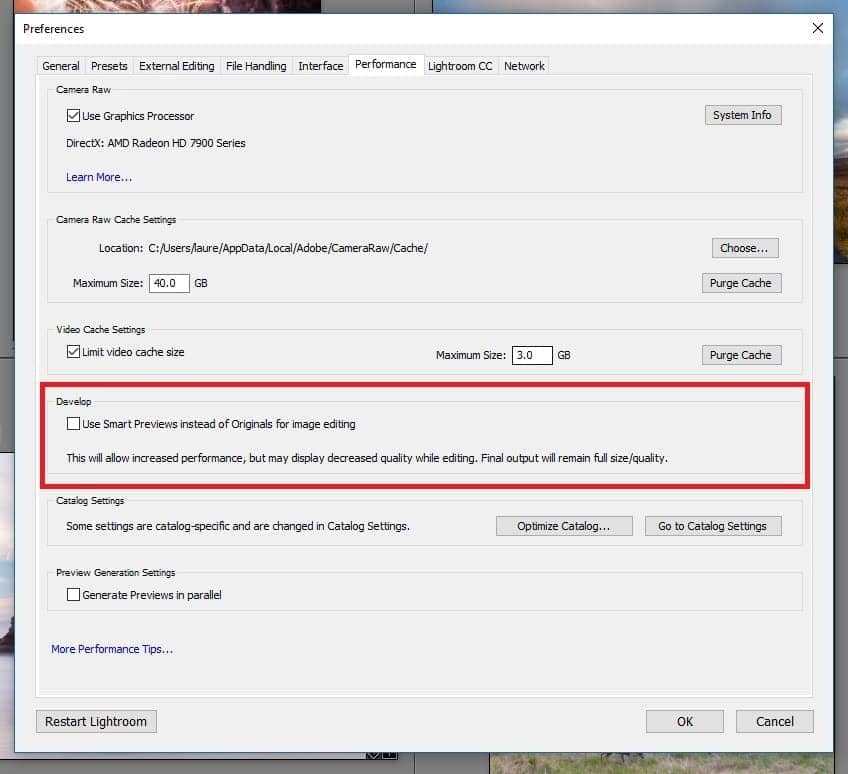
Smart previews are compressed versions of your RAW files. Adobe originally introduced them so you could edit photos on a laptop without bringing your full image library. Because they’re smaller files, editing from smart previews can be faster than editing from full RAW files.
Lightroom Classic lets you choose to edit smart previews instead of originals from the Performance tab in Preferences. In practice, the speed benefit is noticeable for quick adjustments, but as soon as you zoom to 1:1, Lightroom has to load the original RAW file anyway, and the advantage disappears.
Smart previews do take up extra disk space on your SSD, so there’s a trade-off. If you find your Develop module feels sluggish and you’re not doing a lot of 1:1 zooming, building smart previews on import and editing from them is worth trying. If you mostly work at 1:1 zoom (as I tend to, for sharpness checks), the benefit may not justify the extra space.
10. Manage AI Features for Performance
This is new territory that didn’t exist when I first wrote this guide. Lightroom Classic now includes several AI-powered tools, and they’re among the most GPU and RAM-hungry operations in the application.
The main ones to be aware of are:
AI Denoise is brilliant for cleaning up high-ISO images, and I use it regularly. But each Denoise operation requires significant GPU processing. Batch-denoising 50 images will hammer your system. I’ve found it faster to denoise selectively (only the images that really need it) rather than applying it across an entire shoot.
Generative Remove and Reflection Removal use AI to intelligently fill areas after removing objects or reflections. These run locally on your machine and are GPU-intensive. The quality is impressive, but if your GPU has less than 8GB of VRAM, expect slower processing.
Assisted Culling (added in v15.0) uses AI to help you sort through large sets of images, identifying sharpness and eye contact. It’s useful after a portrait session, but it chews through processing power. Run it before you start editing, not during.
If you’re running into performance issues and you use these AI features, keep an eye on your GPU memory usage. Windows Task Manager (Performance tab, GPU section) will show you whether your VRAM is maxing out.
11. Optimise your Catalog
This won’t transform your experience, but if you’ve never done it (or it’s been a while), optimising your catalog file is worth the 30 seconds it takes.
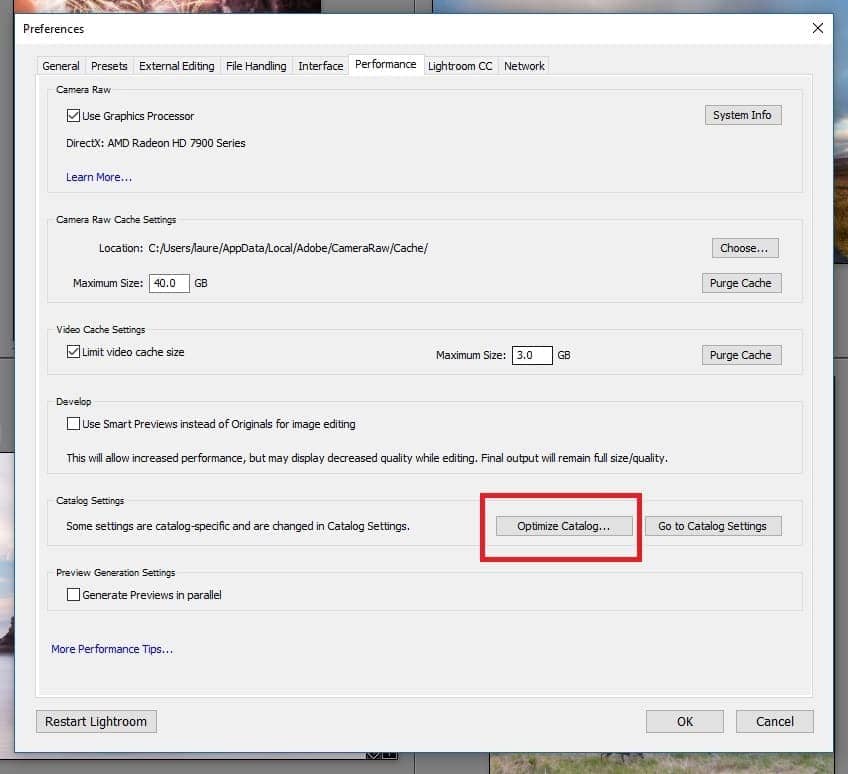
As you use Lightroom, it constantly updates the catalog database, and over time the data structure becomes less efficient. Lightroom has a one-click “Optimise Catalog” option that tidies this up. My suggestion is to set Lightroom to back up your catalog on a regular schedule (weekly works well), and enable the “optimise catalog” checkbox as part of the backup process. That way it happens automatically.
12. Keep Lightroom Updated (But Read the Release Notes)
Adobe regularly pushes out updates, and many of them include performance improvements. The October 2025 release (v15.0) brought significant performance improvements including faster cropping, smoother hover previews, and Assisted Culling. The February 2026 release (v15.2) fixed a serious Windows bug where repeated exports would progressively slow down, sometimes taking up to three times longer than the first export in a session. Independent testing by Puget Systems showed that updating from v15.0 to v15.2 improved overall benchmark scores by 49 to 59% on Windows machines.
My one caveat: don’t blindly update on the day a new version drops. Read the release notes and check photography forums first. Major version releases occasionally introduce new bugs (as v15.0 demonstrated). Waiting a week or two for the dust to settle is usually wise.
You can check for updates from Help then Updates. If you’re on an older version, updating is one of the single highest-impact things you can do.
13. Restart Lightroom During Long Sessions
The old “turn it off and on again” advice is as old as computing itself, but it’s still around for a reason. In my experience, Lightroom gradually slows down over extended editing sessions, even on a high-end machine. I don’t know exactly why (memory fragmentation, cache bloat, take your pick), but closing and reopening Lightroom after a couple of hours of heavy editing consistently helps.
You don’t need to restart your whole computer. Just close Lightroom and start it up again.
14. Upgrade Your Hardware (If Nothing Else Helps)
In an ideal world, all these tips would solve any performance issues. But there is only so much you can do with the hardware you have. If your computer is more than five or six years old, or if you’re running a budget laptop, an upgrade may be the most effective fix.
If possible, I’d suggest investing in a desktop, as these have much greater expansion options and higher-powered components. I build my own desktops (computer science degree finally paying off), but pre-built systems from companies like Puget Systems are also worth considering if you want a machine specifically tuned for photo editing.
Key specs to prioritise for Lightroom in 2026:
- A recent processor: AMD Ryzen 7 or 9 (7000 series or newer) or Intel Core i7/i9 (12th gen or newer). For Apple users, any M-series chip (M1, M2, M3, M4) runs Lightroom very well, and the unified memory architecture means the GPU recommendations are different (16GB unified memory or more)
- At least 32GB of RAM (64GB if your budget allows)
- An NVMe SSD for your catalog and Camera Raw cache (SATA SSDs are fine for photo storage)
- A dedicated GPU with at least 8GB of VRAM if you plan to use AI features (NVIDIA GeForce RTX 4060 or better, or AMD equivalent)
For more detailed recommendations, check out my guides to the best desktop computer for photo editing and the best laptop for photo editing.
15. Keep at Least 20% Free Space on Your Drives
This is easy to overlook but can make a real difference. SSDs slow down as they fill up, and Lightroom needs temporary space for cache files, previews, and processing. Adobe recommends keeping at least 20% of your catalog drive free at all times.
If your SSD is getting full, deleting old preview files (Lightroom will rebuild them as needed) or moving your Camera Raw cache to a drive with more space are quick fixes.
Frequently Asked Questions
Why is Lightroom Classic so slow on my computer?
The most common causes are a catalog stored on a mechanical hard drive instead of an SSD, insufficient RAM (less than 16GB), a small Camera Raw cache (the default 1GB is far too low), and background tasks running while you edit. AI features like Denoise and Generative Remove also require significant GPU resources.
Start with the quick fixes: move your catalog to an SSD, increase the Camera Raw cache to at least 30GB, pause background tasks, and enable GPU acceleration in Custom mode. These four changes together often make the biggest difference.
How much RAM does Lightroom Classic actually need?
Adobe recommends 16GB, and that’s usable. In practice, 32GB is a much better experience, especially if you also run Photoshop or AI Denoise. Lightroom will comfortably use 20 to 25GB on a machine with 64GB available. Beyond 64GB, you’re unlikely to see further improvement unless you’re working with exceptionally large files or running multiple demanding applications at the same time.
Should I use GPU acceleration in Lightroom Classic?
On most modern computers, yes. Switch from “Auto” to “Custom” in Preferences and enable all four GPU options (display, image processing, export, and preview generation). On desktop machines with dedicated GPUs, this typically speeds up exports by around 50% and makes Develop module sliders noticeably more responsive.
Laptops with integrated or low-end graphics may see less benefit. If things feel slower after enabling GPU acceleration, switch back to Auto or Off and test again.
Does Lightroom Classic run well on Apple Silicon Macs?
Yes, very well. Lightroom Classic has run natively on Apple Silicon since mid-2021, and performance on M-series chips is excellent. The unified memory architecture means a Mac with 16GB of unified memory handles Lightroom (including AI features) about as well as a Windows machine with dedicated GPU and separate RAM. If you’re buying a Mac for photo editing, 16GB of unified memory is the minimum, and 32GB or more is ideal for heavy users.
Is it better to use Smart Previews or original RAW files for editing?
For quick adjustments where you don’t need to zoom in, Smart Previews are faster because the file sizes are smaller. But as soon as you zoom to 1:1 (which most photographers do for sharpness checks), Lightroom loads the original RAW file anyway. I edit from originals and keep Smart Previews disabled for Develop, but if your machine is struggling and you mostly edit at lower zoom levels, enabling Smart Previews for editing is worth trying.
Further Reading
This guide to improving Lightroom performance is just one of our photography guides. Here are some more which we think you’ll find helpful for improving your photography.
- We have a complete guide to the best photo editing software, as well as our favourite Lightroom alternatives if you’d prefer not to use Lightroom. If your machine is struggling with Lightroom, one of these alternatives may run better on your hardware.
- Colour accuracy is important for photography. See our guide to monitor calibration to ensure your screen is set up correctly, and our guide to the best monitor for photo editing.
- For hardware recommendations, see our guides to the best desktop computer for photo editing and the best laptop for photo editing.
- Our guide to picking the best travel camera, which features a range of cameras at various price points. We also have a dedicated guide to picking a compact camera for travel, a guide to picking a mirrorless travel camera, a guide to the best action camera, the best bridge camera, and a guide to picking a DSLR travel camera.
- If you need a new lens, we have a guide to the best travel camera lenses which covers the majority of camera types available today.
- Our detailed guide to gifts for photographers, if you’re looking for something to buy for a photographer in your life (or to send to friends and family as a hint!).
- We have a guide to taking better pictures of yourself, how and why to use back button focus, how to take pictures of stars, an overview of Neutral Density filters and a guide to shooting in RAW.
- We also have an always expanding series of Photography Location Guides, to help you get the best shot in locations around the world.
- A Beginners’ Guide to Improving your Travel Photos for those starting out in travel photography.
- Our reasons why you need a travel tripod.
Looking to Improve Your Photography?
If you found this post helpful and you want to improve your photography overall, you might want to check out my online travel photography course.
Since launching the course in 2016, I’ve already helped over 2,000+ students learn how to take better photos. The course covers pretty much everything you need to know, from the basics of how a camera works, through to composition, light, and photo editing.
It also covers more advanced topics, including astrophotography, long exposure photography, flash photography and HDR photography.
You get feedback from me as you progress, access to webinars, interviews and videos, as well as exclusive membership of a Facebook group where you can get feedback on your work and take part in regular challenges.
It’s available for a one-off price for lifetime access, and I think you should check it out. Which you can do by clicking here.
And that’s it for my guide to improving Lightroom Classic performance for organising and editing your photos! Do you have any tips on improving Lightroom performance? Let me know in the comments below!

bielousov says
“Edit Images Sequentially: Since Lightroom CC 2015.6 (& Lightroom 6.6), Lightroom has implemented a feature to intelligently cache images for faster performance when you are in the Develop module”
While this sure was the case a few years back, I personally no longer see any evidence of this happening in 2024 (LRC v13).
Laurence Norah says
Interesting point! I will have to take a look and see. I pretty much only edit sequentially so haven’t tested doing it out of order for a while. Thanks for sharing 🙂
Vito says
I just started editing off a Synology NAS—LR seems much slower–do you think I should use an SSD to edit-then move the photos to a NAS for long term storage?
Laurence Norah says
Hi Vito,
Yes, in most cases local editing from an SSD is going to be a lot faster than from a NAS. A NAS makes more sense for backup / long term storage 🙂
Laurence
Dale says
I really dont like to report this because I think this is a failing of lightroom but the difference in performance between 32Gb and 64Gb is the difference between light and day. I have always struggled with 32Gb and a good CPU to get any sort of good workflow but with 64Gb it is lighting fast
Laurence Norah says
Hi Dale,
Thanks for your input. On my main desktop PC I also have 64GB, which in my experience definitely helps when using Lightroom along with other programs like Photoshop. From what I’ve seen, LR tops out at around 25GB of memory usage, but usually uses less than that. Of course, this will vary a lot depending on file sizes, but I’m glad you figured out a setup that improves performance in your case!
Laurence
David Evans says
Laurence, very quick and clear answer, thank you and appreciated.
David Evans says
Hi
Very useful information, thank you.
A question – does Point 11 about optimal editing order change at all with the new Version 11 of Classic please?
I’m not technical but have read that the AI masking tools required a change from vector to bitmap editing, so wondered if this affects the editing order?
Thanks.
Laurence Norah says
Hi David,
Great question! So it’s only the AI tools, specifically Sky Selection and Subject Selection that use bitmap-based masks. The other tools all still used vector based masks. In theory, bitmap based masking is slightly faster, but I’ve honestly not noticed much performance difference. So for now I’m going to say that it shouldn’t affect the editing order.
Laurence
JEANNINE says
THANK YOU!!!
Laurence Norah says
My pleasure Jeannine 🙂
Adrian says
PS … I should have said, I’m using an 8 port usb 3 hub for my 2TB SSD’s.
Adrian says
Wow, a huge thanks for your extensive insight into what’s going on behind the scenes in Lightroom!
I dont know if this has already been covered but here goes anyway.
My 2014 Mac has a 500GB SSD which is nearly full and I dont store (raw) photo’s on it.
I’ve been using an 8TB external hard drive to store photo’s going back to 1995 and it’s about 75% full. I have a separate 8TB external hard drive running Time Machine to back them up.
As external SSD’s are becoming reasonably priced now I purchased a 2TB SSD, copied some photo’s onto it and LR ran notieably faster so I bought 3 more 2TB drives giving me the same 8TB as my mechanical hard drive.
I’ve now split my LR catalogue into 4 separate catalogues, one on each of the 4 SSD’s and I’m currently building standard previews so when I view in grid, all photos are shown immediately without having to wait for them to be generated.
My question, (finally!), is could I or should I create a separate Camera Raw Cache folder for each catalogue on each SSD to further improve speed as I’m still using the original cache file located on the internal SSD? Or is there only one primary cache folder for all catalogues?
BTW, I’ve increased my cache file from 20GB to 100GB as building standard previews has already generated 34GB and I’m only half way through.
Thanks again and kind regards 🙂
Laurence Norah says
Hi Adrian,
Thanks very much! So as far as I’m aware there is only one Camera RAW cache folder, regardless of how many catalogue files you have. So I don’t think you’d be able to create multiple RAW cache folders for each catalogue. As long as the RAW cache folder is on an SSD, internal or external, then you should be good.
So you know, the Camera RAW cache folder doesn’t hold the preview files. The Preview files are held in subfolders wherever the Lightroom catalogue is. So in your case, each catalogue you have created will have it’s own previews folder on each SSD.
The Camera RAW cache is used only in the develop module for editing and viewing RAW files. The Standard previews cache is used in the library module when you’re browsing images, and I am guessing that’s the size you are seeing. That will take up space on your external SSD. There’s no way to control the preview cache size (or in fact to clear it without manually deleting the preview folder).
I hope this helps and makes sense!
Best
Laurence
Adrian says
Thanks Laurence and yes that does make sense.
Best regards from the UK 🙂
Andrew says
Thanks for this. My M1 Mac was a dog in LR for some reason. Now it’s super fast.
Laurence Norah says
My pleasure Andrew 🙂
John Blowes says
Great Article – and I havent caught up with your blogs for a couple of years.
I was trying to edit in LR Develop module, and bang, just green screens and locked out. Even shutting down other applications didn’t help and powering down iMac. Applied a couple of your recommendations and working much better.
Question about LR Catalog. I have all my pictures on an external SSD but the LR Catalog is on my internal drive. I wanted to move it to the SSD as well but wanted to check with you if this is a good or a bad idea.
John
Laurence Norah says
Hey John – thanks very much, I’m pleased to have been able to help!
For the catalog on the SSD option, the answer depends a little bit on how you are connecting the SSD to your computer. If it’s over a very fast interface like Thunderbolt then that should be ok, but if it’s something slower like USB 2, then this will definitely slow the process down. Most external drives are a little slower than an internal drive due to the interface, and because Lightroom stores its previews where the catalog is, there can be a noticeable difference when using an external hard drive.
I hope this helps!
Laurence
John Blowes says
Hi Laurence,
Appreciate the fast feedback.
You got me thinking, and so I have checked details of my iMac which has a HDD drive and according to MacRumours, SDDs (connected via USB-3) are much, much faster than internal drives (I hadn’t realised by how much).
So, if I move my Catalog to SSD drive it looks like I should see more improvements.
I use Adobe Creative Cloud, so assume I can leave this alone and move the Catalogs (and this wont affect Photoshop etc).
Thanks again,
John
Laurence Norah says
Hey John,
My pleasure! So I hadn’t realised your internal drive was an HDD. In which case, yes, you will definitely notice an improvement by shifting to an SSD. In fact, I’d generally recommend upgrading your internal drive to an SSD as well if that is possible on your iMac, it will make a big difference to everything. Although this might be easier said than done, Apple have a habit of making this kind of upgrade rather challenging.
You can definitely move the catalog without upsetting Adobe Creative Cloud or Lightroom. Those don’t mind where the catalog is opened from.
Laurence
Cheshire Isaacs says
Thank you! I’m on a MacBook Pro 2017 that’s maxed out, but the 2020 LRC update really slowed down my spot adjustment tool. It was torture. Turning off the graphics accelerator did the trick!
Laurence Norah says
My pleasure Cheshire! GPU acceleration is definitely an odd one – it sounds like it should improve performance, but in some cases it definitely degrades performance instead. Happy to have solved your issues 🙂
Nancy Strahinic says
I was reading another blog on this topic of LR performance, and stated something as important as your tip on GPU, however it didn’t explain why. Your article is more insightful technically. Thank you. Do you agree with the following advice: “Avoid putting the [LR] cache on the same drive as your operating system, if possible.” *Why is that, what will happen? My concern stems from migrating everything to my newly purchased laptop which has a 2tb ssd card in 1 PCIE M.2 slot. I look forward to your response.
Laurence Norah says
Hi Nancy,
Thank you very much! I definitely believe in trying to explain the reasoning behind the advice, because then it’s easier to understand when it might apply 🙂
Your hard drive question is a good one. The reason for the advice to use two drives is that a drive has a maximum read and write speed. If the operating system is using the main drive and reading data from that, and Lightroom tries to read it’s cache at the same time, it could slow it down.
However, this advice really harkens back to days of yore when hard drive speeds were a lot slower, and drives were a lot smaller. In addition, many people were using mechanical hard drives. A fast mechanical hard drive for example had a read speed of 80 – 160 megabytes per second. You can see how reading a few large RAW files might quickly overwhelm that sort of speed, so shifting the Lightroom cache onto a different hard drive could help. The situation was helped when SSDs came along on the SATA slot, but even these were limited to 600MB/s. However, in the early days these SSD were quite small, and it’s well known that SSDs get slower as they get more full. So again, using a separate drive made sense so you didn’t slow your operating system down by filling it up with the Lightroom cache.
Fast forward to your system. The M.2 slot is capable of read speeds of between 1000MB/s and 4000MB/s. So that is not going to be a bottleneck! In addition, with 2TB to spare, you are not going to be running low on space to the point where it will impact system performance, and even if it did, there is so much headroom to play with that you needn’t worry.
So in summary, no, you don’t need to worry about putting the LR cache on a separate drive with your system 🙂
I hope this helps, let me know if I can be of any more help!
Laurence
Alan says
Good article. Better written than many. Thanks.
I have a few additions that may also help…
1. Do NOT use import/move in Lr. Ever. Put the photos in the folder(s) where you’ll want them to be and then use import/add. Lr will then leave the photo files wherever they are, you’ll be able to find them with other software as required, and you won’t be waiting for Lr to relocate the files.
2. Double the size of your ACR cache. If it ever gets to 3/4 full then double it again. Lr almost never fills the cache and that could make you think it is not being used and that a bigger cache will not be beneficial, when in fact it usually will be. And of course, have it on an ssd.
3. Put your image files on a big ssd if you can. See next point.
4. Let Lr use all of your cpu cores. This will drastically speed up initial preview building during import by using almost 100% of CPU capacity instead of just a single core – especially if your files are on ssd instead of a hdd. A hdd could choke while trying to deliver so many files to Lr so quickly.
4. And while it’s working so efficiently, you might as well build bigger previews to speed up browsing in the Lr Library module. However, it won’t help so much in the Develop module because that always reloads the file you are about to edit.
5. If you need to relocate image files in bulk – such as a whole folder – then do it outside Lr and tell Lr where to find them. When it finds one it will automatically find the rest because they are still all together. Normally it is best to move files within Lr so that the catalogue is kept up to date without you have to tell Lr, individually, where the files went, but not so with bulk folder transfers.
6. Some ssds are inherently faster than others due to their technology, but where you plug them in on the motherboard can make a big difference too, especially for the m.2 nvme and pcie ssds, and especially on older computers. You want them talking to the CPU / NorthBridge as directly as possible, with the fastest interface available. e.g. PCIe gen. 3 rather than gen. 2. This is managed in the BIOS.
7. Some of these and other Lr speed-up tips work best when you’re looking at filtered sets of images that are not all physically located in sequence beside each other. It’s that sort of “semi-random” file access that better reveals the benefits of ssds ove hdds.
Cheers.
Laurence Norah says
Hi Alan,
Thanks for all these ideas, much appreciated! I have just a couple of points:
– larger previews only make a difference if your monitor supports them, or if you plan on zooming in on an image in the library module. Otherwise it saves cache space and make more sense to use a preview size that matches your monitor resolution so you can view an image fullscreen.
– for point 4, I think LR uses all the CPU cores by default. At least, I’m not aware of a setting to change how many cores it can use.
Thanks again!
Laurence
Mark says
I’ve been using Lightroom 6 for approx 2 years. It’s slow.
I don’t intend on ever upgrading to the subscription packages. I don’t see too much benefit or anything ground breaking that will make my life easier or work any better.
I’ve tried most of these tips above and noticed a slight improvement. I even purchased an nvme drive (fast SSD) this did not even help.
As an example, if I load 500 images in to a new catalogue, on average the photo will take 2-3 seconds to render properly in the develop module before i can adjust the sliders. This equates to approx 16 minutes of wait time alone. Crazy right!
I will cut my losses and put it down to Lightroom just isn’t optimised well.
Sadly Adobe have cut support for this stand alone version.
You could arguably say the subscription versions are a small percentage faster in some areas.
For me the best tips which worked for me are rendering 1:1 previews on to the SSD and keep RAW images on mechanical disk to save space on SSD. Having the RAW images on the SSD did not see any speed improvement in the develop module.
Also the final thing which worked/helped was allowing smart previews instead of originals for image editing.
I don’t use Lightroom for image culling. I’m a wedding photographer and have success with a program called Photo Mechanic. RAW images load instantly with no buffering.
In summary, SSD’s or nvme drives help a little, but may not be worth it from a financial point of view for little return. If you can pick up a reasonably priced SSD for your catalogues and previews, it’s worth the upgrade. Stay away from nvme m.2. You will be sadly dissapointed.
Thanks for your tips Laurence and Jessica.
Laurence Norah says
Hi Mark,
Thanks for all your input. I have lots of positive things about photo mechanic. For me, I find that building the standard previews on import solves the stuttering issue, but of course that is does take time. I’d also say that LR CC has improved a great deal in 2019 in terms of speed improvements, but I agree, this shouldn’t really require a subscription in order to provide a solid experience! I also agree that the catalog / preview files on an SSD is probably the easiest and most significant upgrade that most people can make.
Have a great 2020 😀
Laurence
Claire says
Best summary article I’ve come across on how to improve Lightroom performance particularly use of Graphic Acceleration. Clear, concise, and very helpful. Thanks.
Laurence Norah says
Thank you very much Claire. Your comment was very timely as I’ve actually been meaning to add a tip to this guide! I just added a note on disabling Lightroom Sync as well 🙂
Thanks for stopping by and your feedback, it’s much appreciated!
Laurence
Francisco says
In terms of performance, what is the implication of a 10+ year catalog with 100K+ images on it?
Laurence Norah says
hi Francisco,
Personally I have a similar age catalog with 400,000 images in, and I think it runs just fine. I have read anecdotal stories about smaller catalogues being faster, but I prefer to have all my images in one searchable location, and it seems to be just fine 🙂
Laurence
Francisco says
Hi Laurence, that’s a very helpful answer indeed thank you.
Whilst you read about some photographers using separate catalogs for each shoot, I personally think that just makes things more time consuming because you’d need to switch catalogs to access different photo shoots and you’d also need to repeat certain configurations in each catalog. One big catalog is my preference too, unless someone says otherwise and provides hard evidence, smaller catalogs have pretty much the same performance, other then when performing tasks which impact the whole catalog, where the smaller the catalog, the faster the catalog-wide task will complete (assuming the same computer specs).
Thank You!
Laurence Norah says
My pleasure Francisco! I’ve also spoken with other photographers who prefer a larger catalog – it’s so much easier to manage. Of course, different photographers will have different use cases and needs, but for me it works just fine 🙂
Brian Borchers says
Awesome stuff! looking forward to see how all my changes go in the next couple of days 🙂
Laurence Norah says
Thanks Brian – do let me know if it makes a difference for you!
Konstantin Lopyrev says
I have something else that would be useful to add to your document, so that it is easier for other to find it. I spent like 4 hours debugging this issue, with some advanced tools.
On Windows 10, I had power plan set to “Power Saver”. As a result, Lightroom was extremely slow. Switching to “Balanced” made it more reasonable. I got even better performance from “High Performance”.
Laurence Norah says
Thanks Konstantin 🙂 Stan also mentioned this in a previous comment 😀
Paul MrPK says
Hi, thanks for all info. I’m planing a hardware upgrade and found few test results that may be helpfull for others who want to use optimal PC hardware (those testa are from 2017):
https://www.pugetsystems.com/recommended/Recommended-Systems-for-Adobe-Lightroom-Classic-CC-141/Hardware-Recommendations
https://www.pugetsystems.com/labs/articles/Adobe-Lightroom-CC-2015-8-Intel-Core-i7-7700K-i5-7600K-Performance-880/#
Laurence Norah says
Hey Paul, these are great links. I really like the Puget systems benchmarks, they’re one of the few sites who regularly benchmark Lightroom and different hardware configurations. Thanks for sharing.
Jody says
This post is sooooo helpful! Thank you for the time and attention it took to produce it.
Laurence Norah says
My pleasure, thanks for commenting to let me know 😀
Stan Carter says
In all the articles I’ve read on optimising performance in Lightroom there’s one thing I’ve never seen mentioned, but is hugely important, and that is to set the power options on the computer to maximum performance. This single step will make a bigger difference to performance than all the other changes put together, particularly when editing on a laptop where power options are invariably set to balanced or other power saving option. Make sure the charger is plugged in and don’t even think about editing on battery power.
Laurence Norah says
That is an excellent point Stan! Thanks for sharing 🙂
Stan Carter says
Thanks Laurence, and I should also have added “Thanks for the article. It’s very well written and contains some excellent tips that will go a long way to helping users get the best out of the software”
Cheers.
Laurence Norah says
No worries Stan – pleased you found it useful and thanks for the contribution, most appreciated!