Back when I had a film camera, a common feature was the ability to add a date onto photos. This was a really handy feature, meaning that when you got the prints back from being developed, you could easily see exactly when you took each photo.
This was particularly useful when looking back at old photos, as it’s often hard to remember exactly what date a photo is taken, and a nice date stamp printed out on the photo makes this a lot easier.
With the rise in digital cameras, the popularity of the date stamp has definitely waned. Digital images have lots of information stored with them, including when the picture was taken, so a physical date stamp is not a commonly desired feature.
However, we have been contacted a number of times by readers asking how to put a date stamp onto a photo on a digital camera. So we thought a guide to your options for how to do this might be a good idea.
This guide will cover what a date stamp is, as well as why you would want to add a date stamp onto a photo. Then there are detailed walkthroughs on actually adding a date stamp to your photo, either in your camera or using editing software. Finally, there’s a guide to removing a date stamp from your photos.
Table of Contents
What is a Photo Date Stamp?
Before we start, let’s answer the question of what a date stamp is in case you aren’t familiar with the concept.
A date stamp is a section of text overlaid onto your photo, which shows the date the photo was taken. In some cameras it can be added automatically when you take the photo, or you can add it in software later.
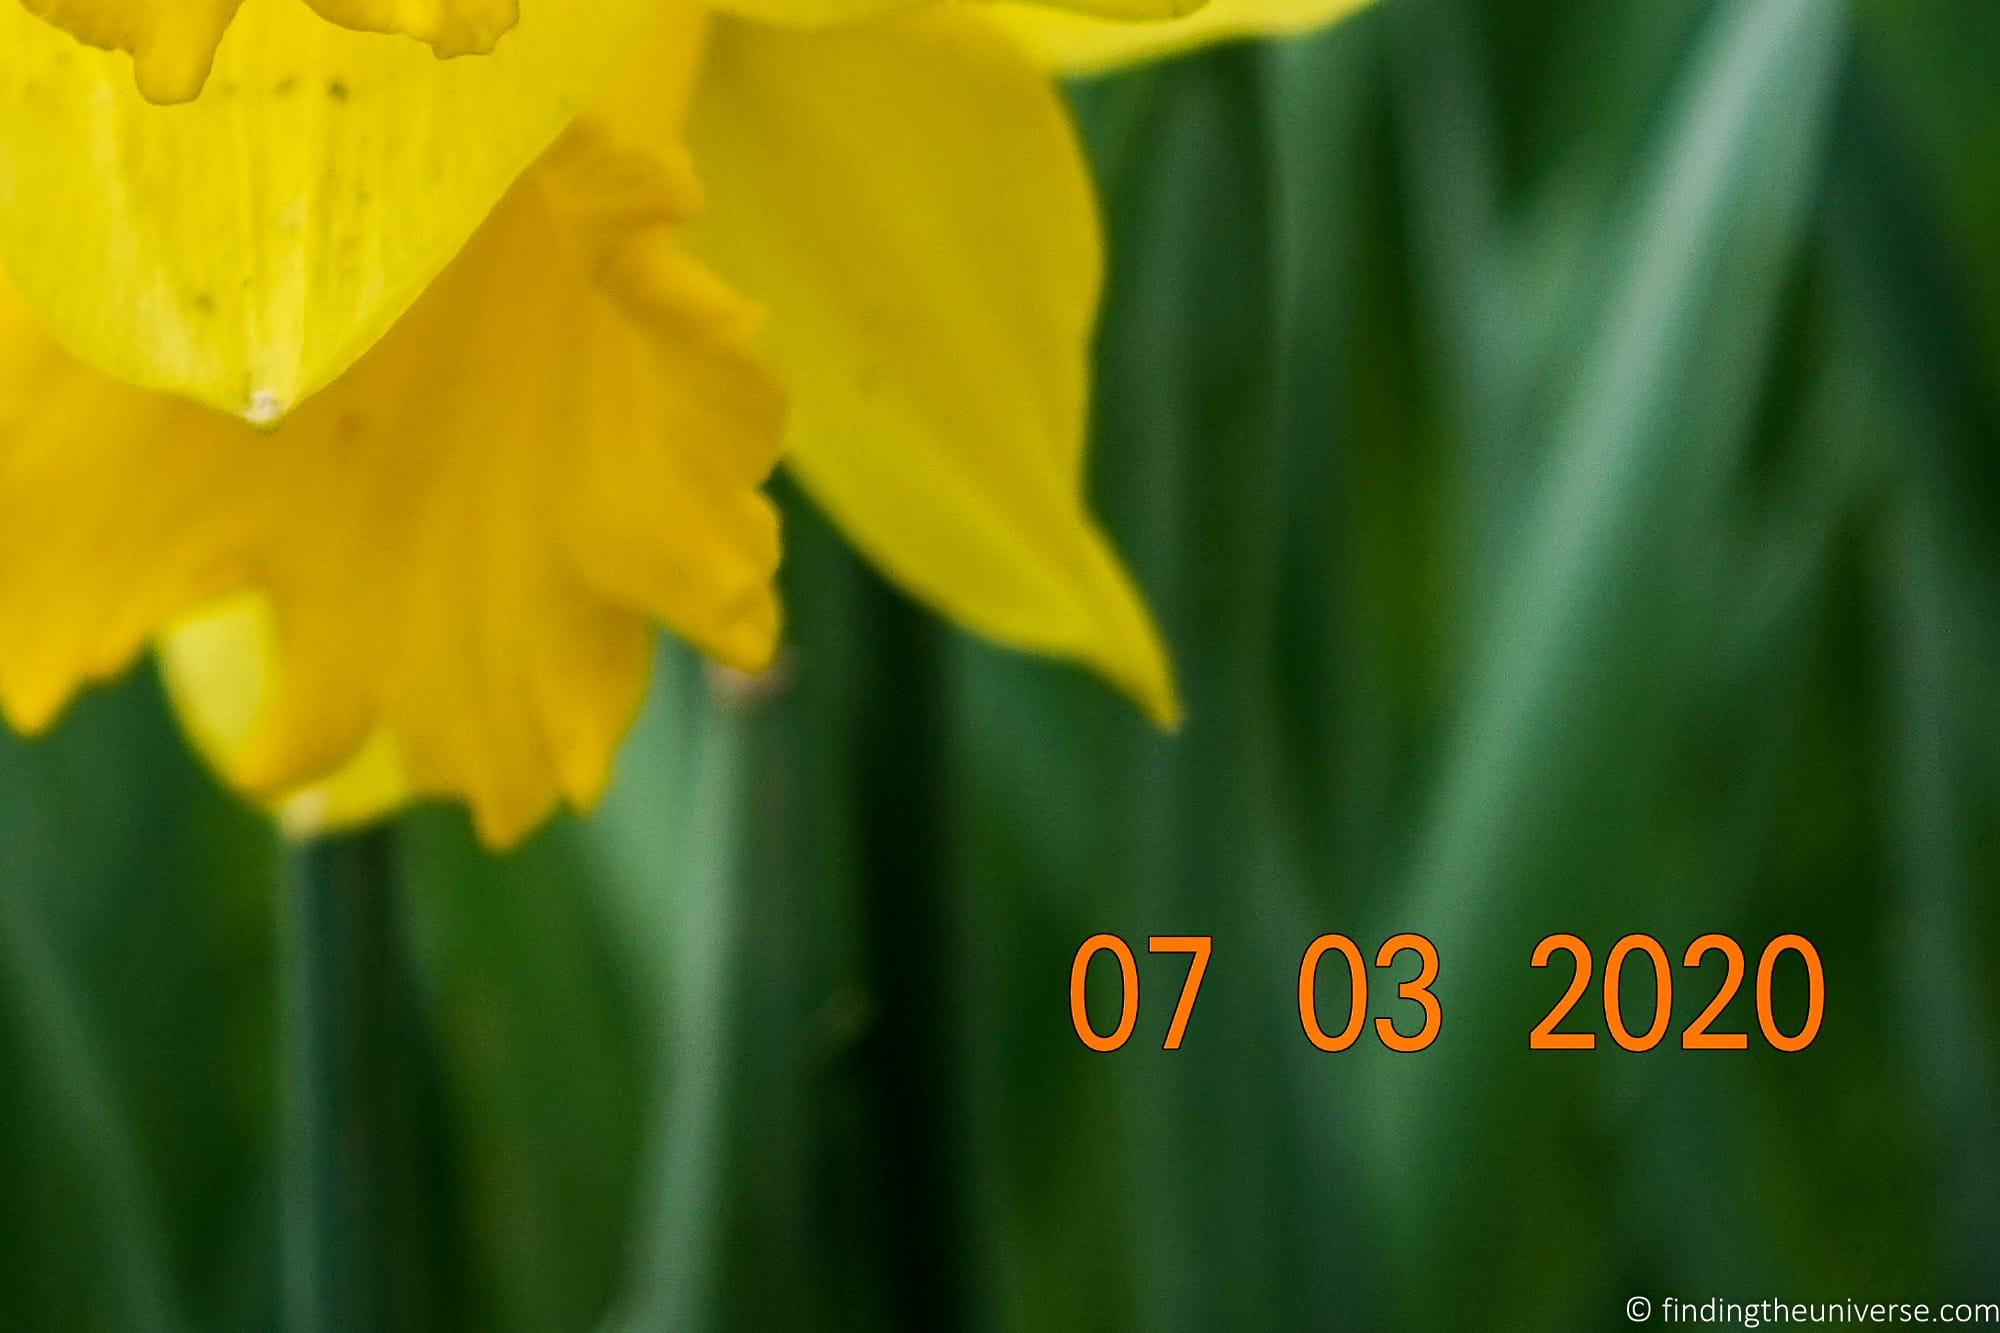
Here’s a crop of the bottom right of an image with the date stamp added in camera as an example.
Reasons to Add a Date Stamp to Your Photos
Before we go into the how, let’s cover the why!
Here are some reasons you might want to add a date stamp to your photos.
- To keep track of when printed photos were taken
- You want them to look like film photos
- To have proof of dates and times for business or legal reasons
- You enjoy a retro look to printed photos
- To be able to compare printed photos over time of an ongoing project
As you can see, there are quite a few reasons to add a date to your photos. Now, let’s look at some options for actually doing that.
How to Add a Date Stamp to Your Photos
In this guide, I’m going to go through the main options you have for adding a date stamp to your photos. There are three main options for adding a date stamp to your photo – you can do it in camera, you can do it in photo editing software, or you can do it when you print the photo.
I’ll also go through the pros and cons of each approach, so you can decide which might be best for you.
Enabling the Date Stamp Feature in Your Camera
Many cameras still allow you to put a date stamp directly onto the image at time of capture. In our experience, this feature is more widely available in compact cameras rather than mirrorless or DSLR cameras, although some more advanced models do have this as a feature.
Some camera models that include a date stamp feature in camera are:
- Sony RX100 compact camera range
- Panasonic ZS200 compact camera
- Nikon D3500 DSLR camera
- Panasonic G9 mirrorless camera
- Panasonic Lumix GX9 mirrorless camera
- Fujifulm X-A7 mirrorless camera
In our experience, cameras from Panasonic seem to have the best time stamp features in camera across their range. Other manufacturers primarily only add this feature to their compact cameras.
So the first step would be to check to make sure this feature is offered by your camera. You may need to check your camera’s manual.
Next you need to make sure that your date and time is currently set on your camera as the date stamp will be pulled from the camera’s settings. Be sure to check and change this as needed when traveling across time zones!
If your camera allows you to add date stamps, you will then need to activate this feature. To enable this feature, you will need to go into your camera’s menu and look for an option that will likely be labelled “date stamp”, “time stamp”, “text stamp”, or similar.
For example, on our Sony RX100 V compact camera, the feature is called “write date”, and is found in the camera settings menu. Some cameras like the Panasonic ZS200 call this a “text stamp”. The best option is definitely to check your camera manual for your specific model if it’s not obvious.
Note that on some cameras, the date stamp feature may only work when the camera is on certain settings. For example, on our Sony RX100 camera, this feature only becomes available when the camera is set to shoot in JPG, but it doesn’t work if the camera is set to RAW. If the camera is in RAW mode, the menu item disappears entirely, which can be a bit confusing if you aren’t expecting this to happen!
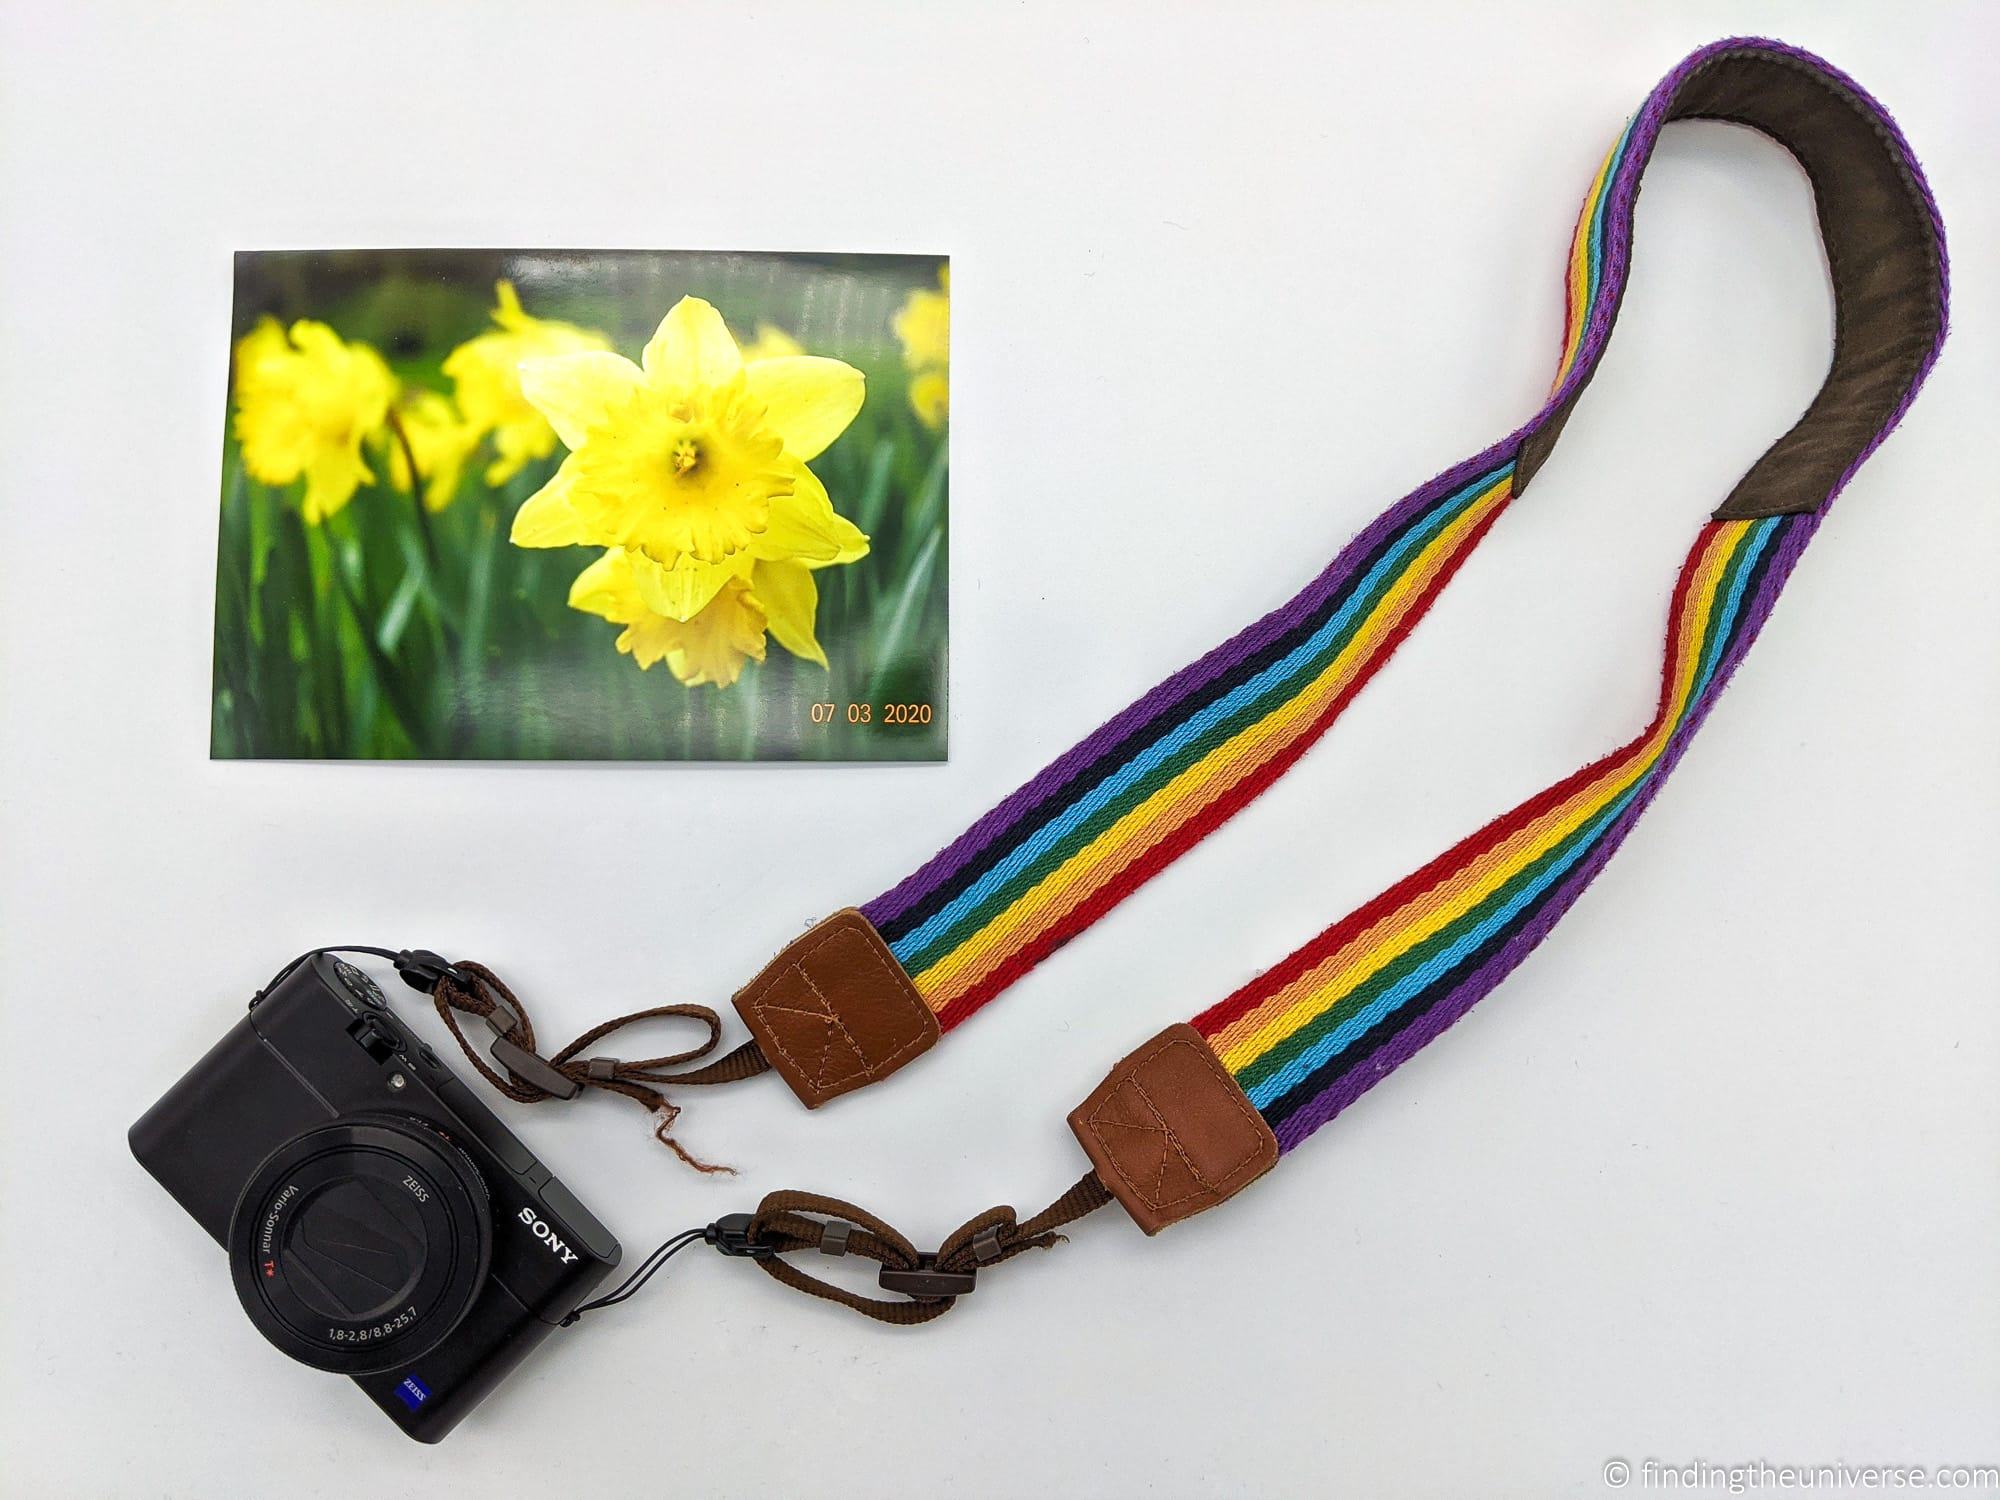
When the feature is enabled, the current date and time will be permanently saved onto your image. Usually this takes the form of an orange colored text added to the bottom right of the image. It should be immediately visible when reviewing your images on camera.
The advantage of using the date stamp feature in your camera is that it will automatically add the date to all of your photos as you take them. You don’t need to use any software to add it, making this the easiest option.
You can also turn it on and off as you go, so you can add it to some photos but not others as required.
However, the disadvantage is that the images will have the date stamp permanently added to them, and saved as part of the image. It’s not a temporary change or something that can be deleted or removed within your camera. The image file is saved to the memory card and to all intents and purposes the date stamp is just another part of the image.
The only way to remove it is with digital manipulation software, something we explain a little further on in the post.
For this reason, we generally advise people not to add the date stamp into the photo via your camera settings. It is often much better to make changes like this in software, so you don’t change the original look and feel of the image.
Of course, if you are certain you want the date to be permanently visible in your photos, then this is the easiest option for doing that. Just make sure you set the date and time correctly in your camera first!
How to Add a Date Stamp to a Photo Using Your Computer
If your camera doesn’t let you add a date stamp, or you want to have more control over the whole process, then our recommended option is to add the date stamp using software on your computer.
The capture time of an image is stored with the image, in what is called EXIF data. This data contains lots of information about the image, including the settings of the camera when the shot was taken, the date of the capture, camera model etc. Some software allows you to pull this data from the image EXIF and add it directly to your image.
Other editing software allows you to manually add text to your image. The former option is definitely preferred as it is faster when editing a number of images, however if you have only a few images you want the date stamp on, doing it manually is an option.
There are a number of options you have for adding a date stamp, both free and paid. I’ll walk you through two of these options now.
How to Add a Date Stamp or Watermark to a Photo for Free on a Computer
First, let’s look at a free option for adding date stamps to an image: FastStone Image Viewer. This is a freeware image viewing tool available for Windows, which also lets you edit EXIF data and batch edit photos. Whilst there are a lot of free options for Windows, most of the tools available for Mac are paid. However, you can try watermark PRO, which lets you add a date to images for free.
Generally the principle of adding a date stamp to an image in one of these free tools is quite similar. Some tools make it more easy than others of course, although the more advanced tools tend to give you much more flexibility in the output.
For example, here’s a walkthrough of adding a date stamp to an image using FastStone on Windows. This supports a wide variety of file formats including many RAW image formats.
Open up FastStone and locate the images you want to add a date stamp to. I have one image, so I have selected just one, but you can apply a date stamp to all your images at the same time if you prefer.
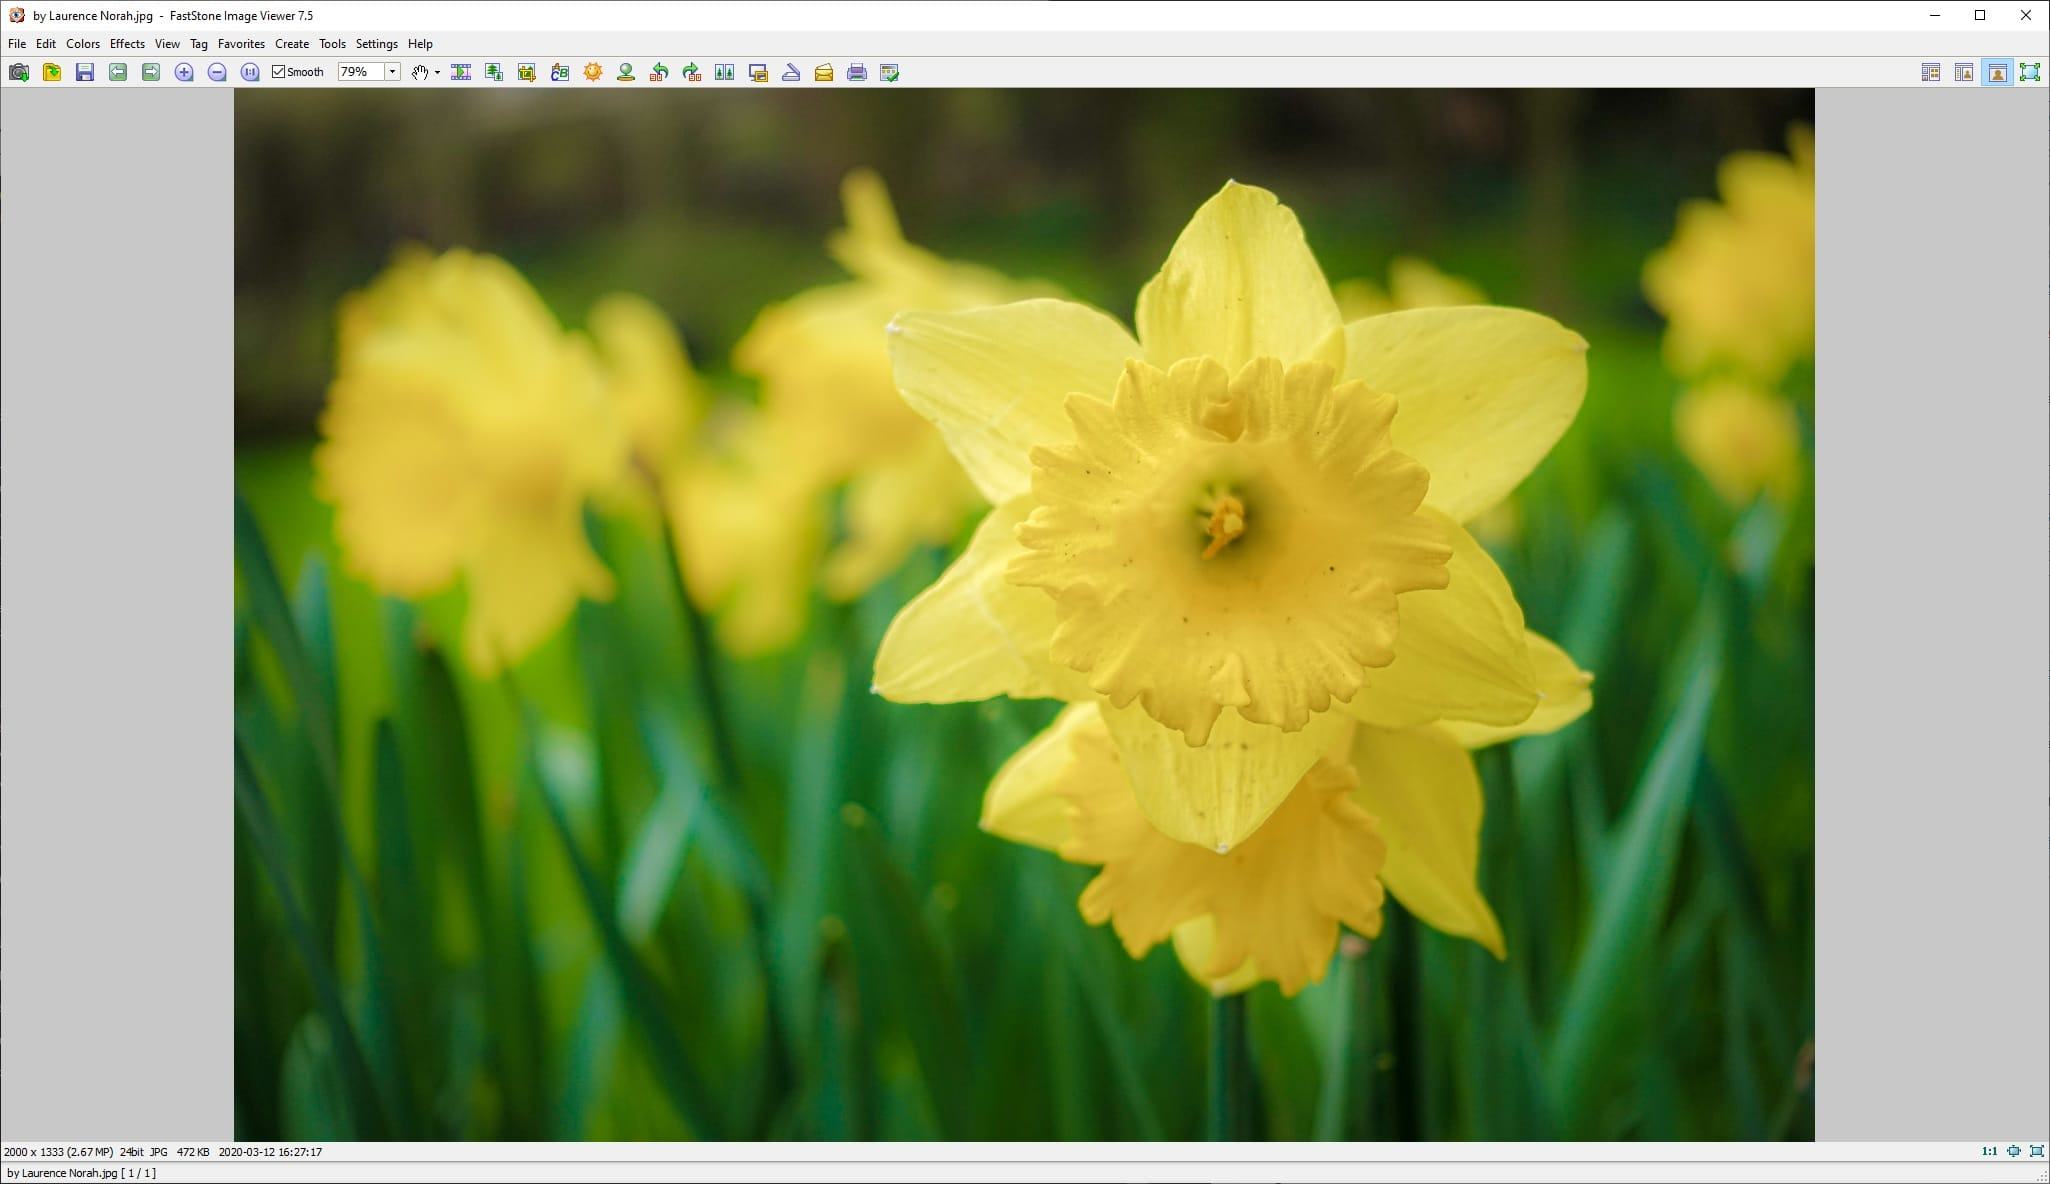
From the menu at the top of the page, press the “Tools” menu item, followed by the “Batch Convert Selected Images” option. You can also just press F3.
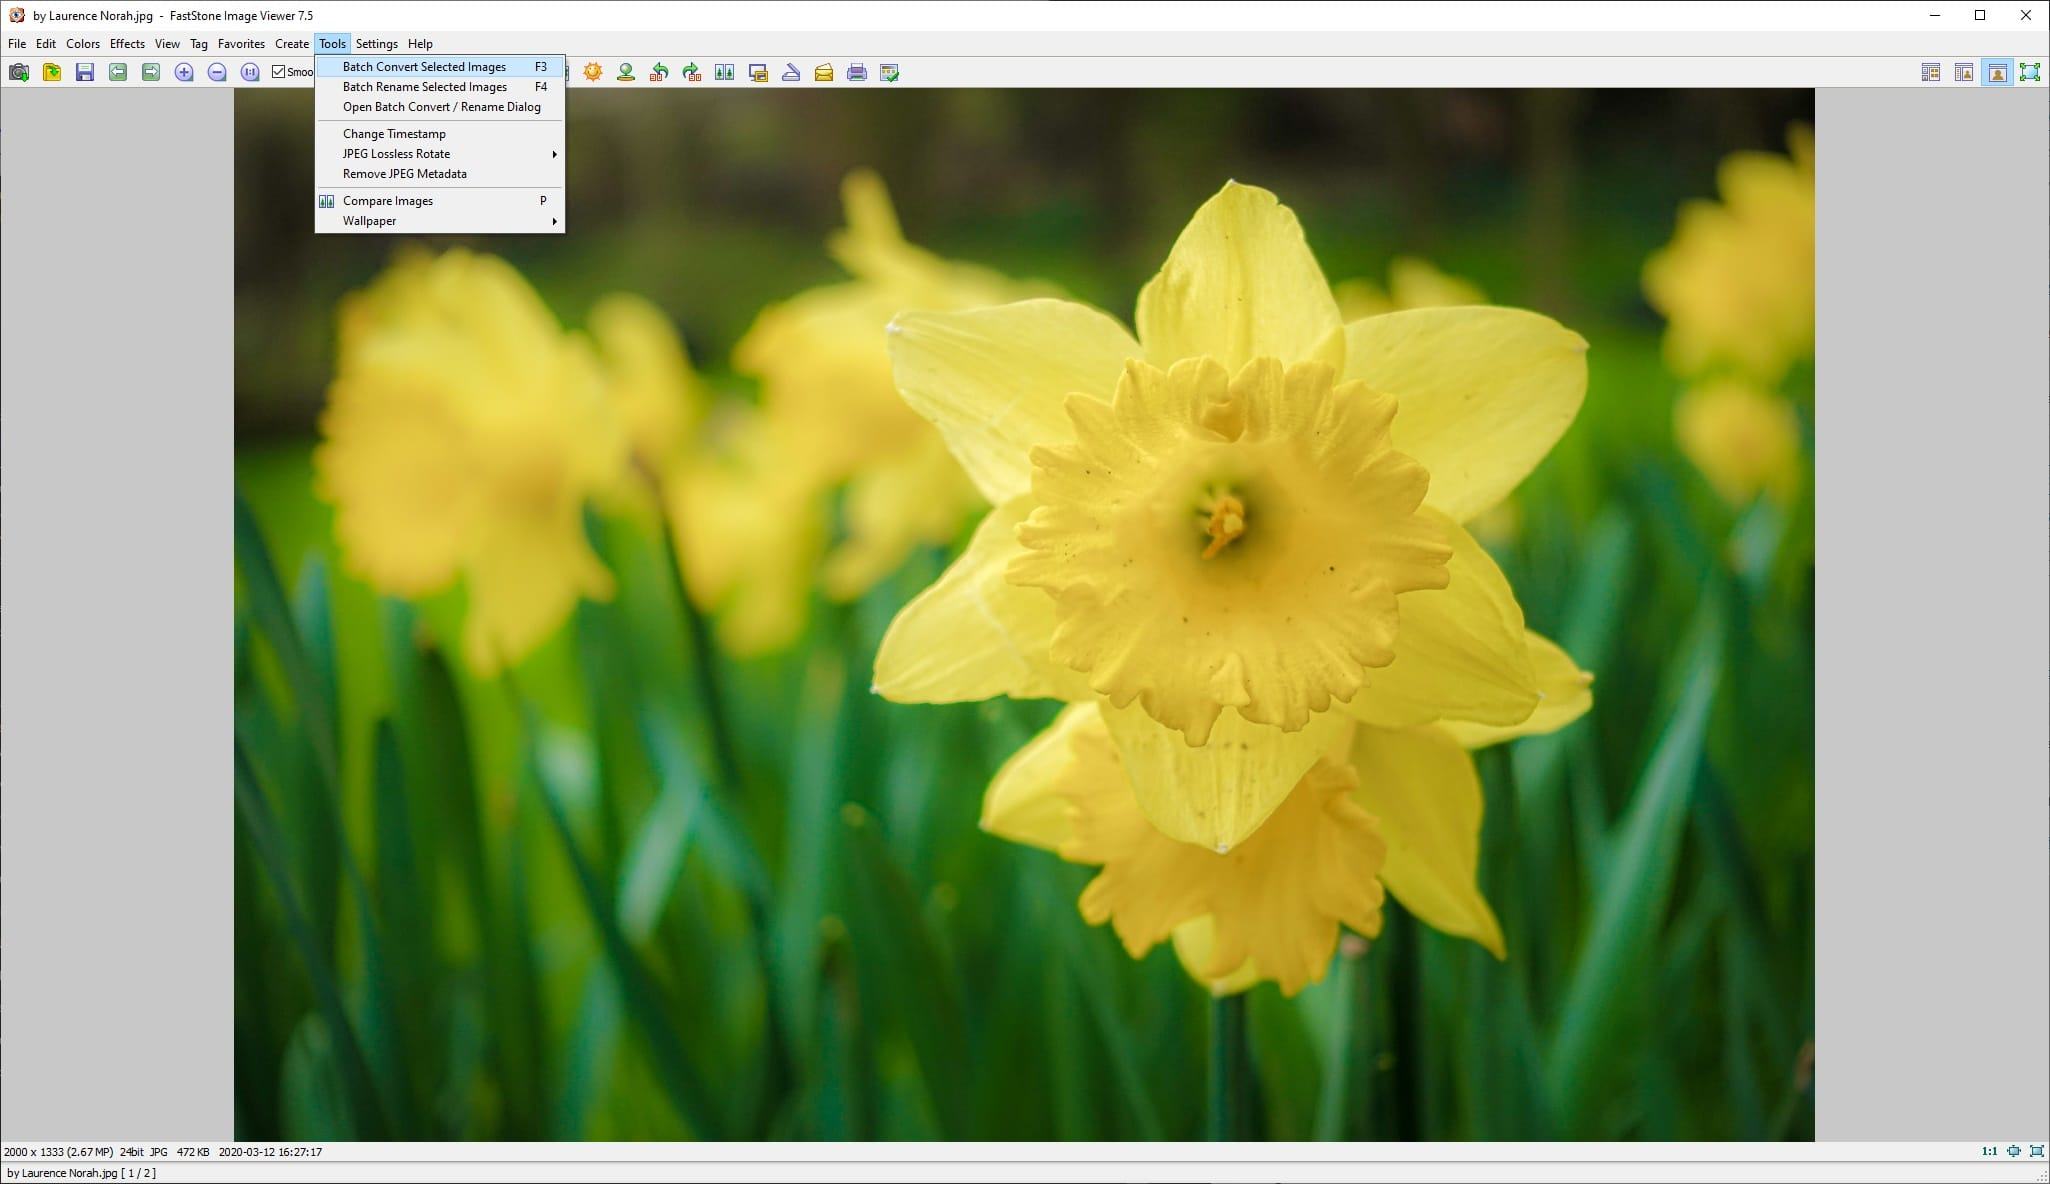
This will bring up a new window, titled “Batch Image Convert / Rename”.
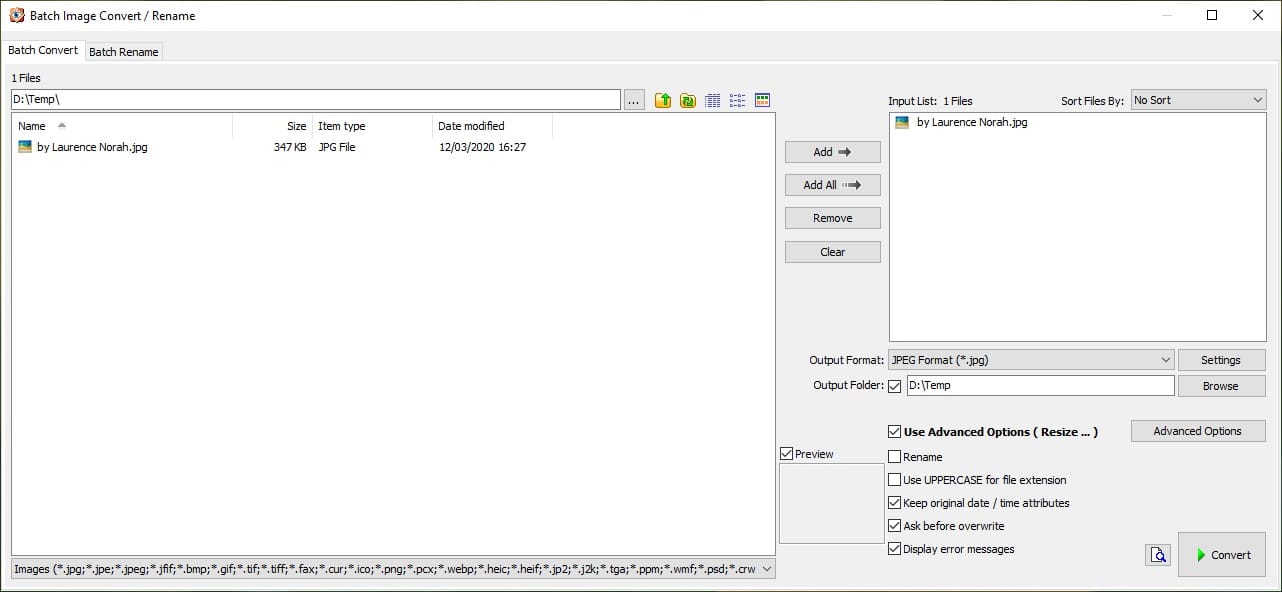
From this window, check the box titled “Use Advanced Options” in the bottom right. Then press the “Advanced Options button”. You will be presented with another window, titled “Advanced Options”.
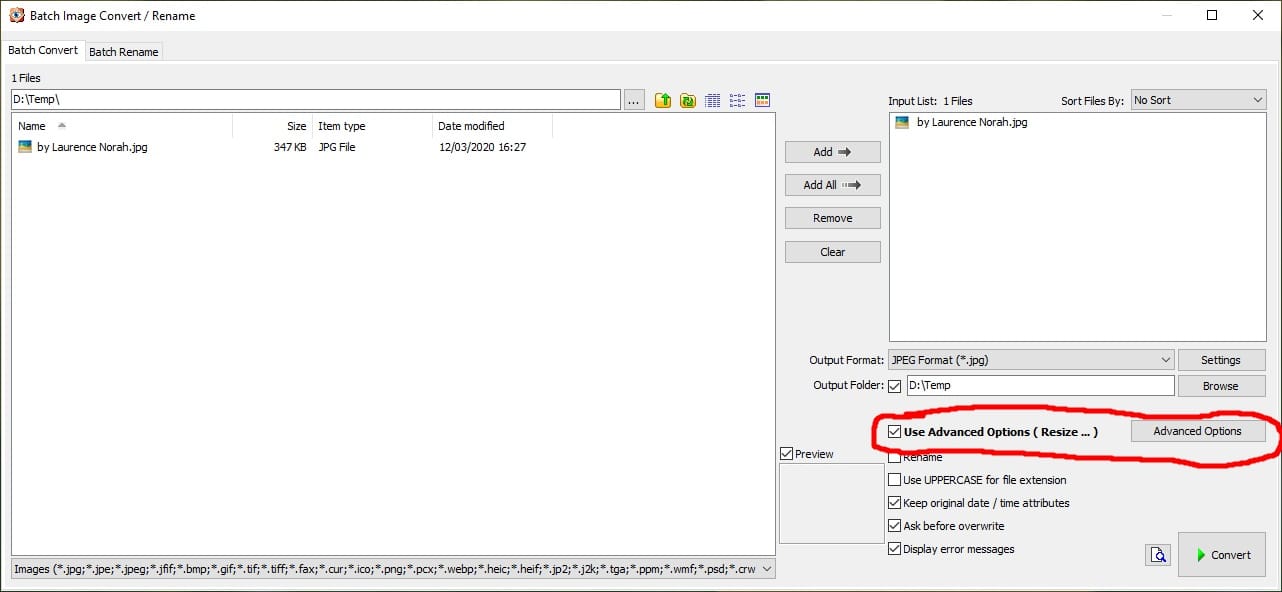
The advanced options window has a lot of tools to help you batch edit your photos, but the one you are looking for is the tab called text. Choose the text tab.
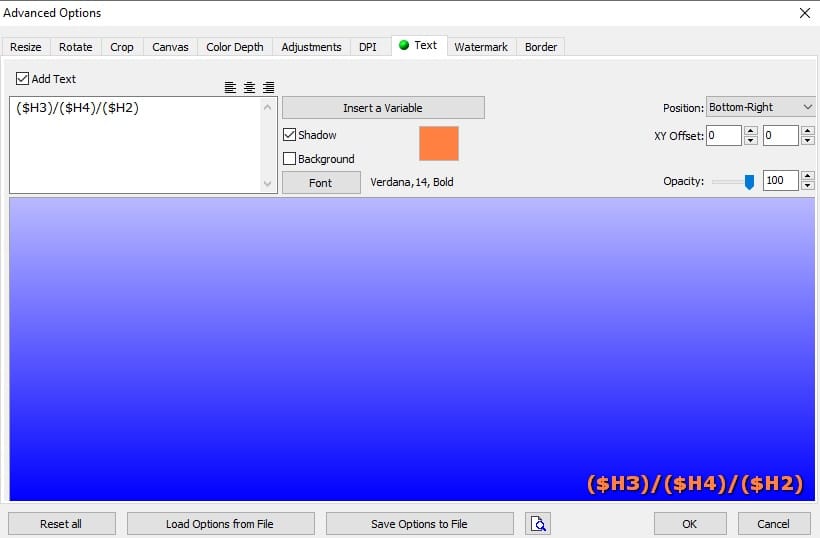
You now have the option to add text to the image. Because the date and time for each image is a piece of data that is stored in the image file (the EXIF data), you want to use this data rather than manually typing in the date for each image.
Of course, that is an option as well, however if you are processing a lot of images with different dates, using the EXIF data will be a lot faster. This will pull the capture time of the image from the image file itself.
To do this press the “insert a variable” button to the right of the text box. A list of options will popup, and you want to choose the EXIF DateTime option. This has a submenu with a number of options, which you can choose from depending on what information you want, and in what order you want it displayed.
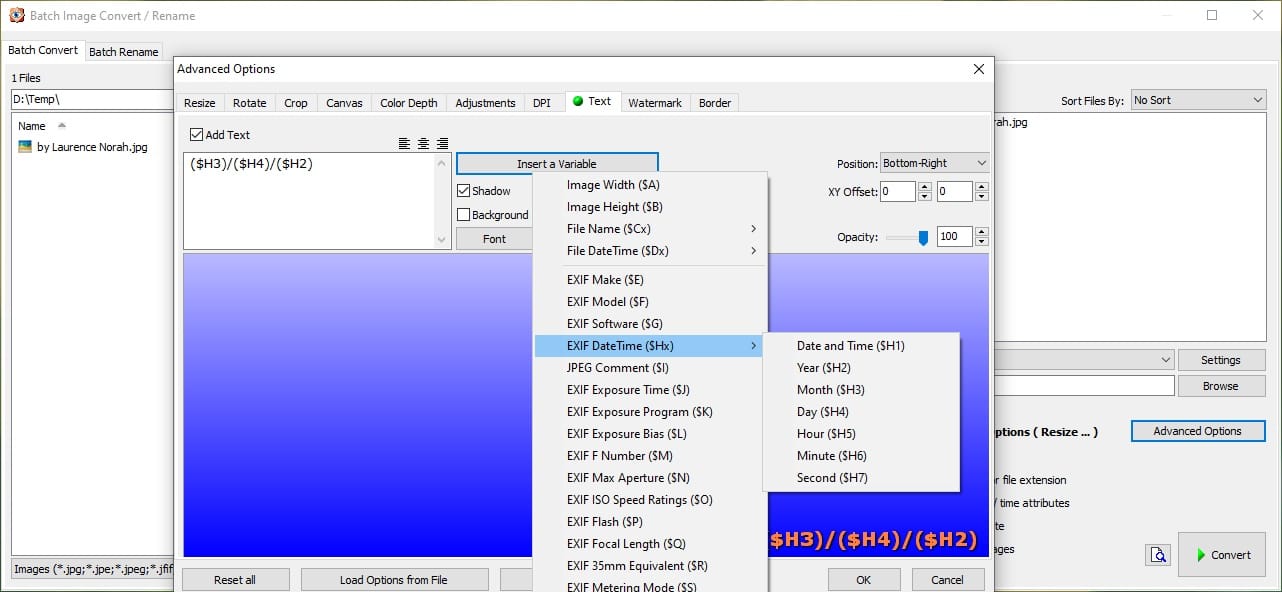
For my example, I have chosen the following $H3 (month), $H4 (day), and $H2 (year). I have put a “/” between each entry as that is how I want it to be appear on the photos, for example, month/day/year, or 03/07/2020 in the case of this image.
Of course, you can add any text you want. On the text screen, you can also adjust the size of the text, the color, and the font used. You can also select where on the image it will go, and if there is an offset (how far from the edges it is).
For my example, I’ve tried to go for a similar look and feel to how my camera does it, with orange text.
When you have the text set up as you want, you can press ok to close this window. You also have the option to save the settings to a file, so in the future you can just load your settings and quickly convert your images without having to set up the font and variables again.
Press ok, to return to the main Batch Image Convert / Rename window. Make sure you have an output folder selected which is different to where your images are, and then press the convert button.
This will create a new series of files with the date added, hopefully looking something like this:
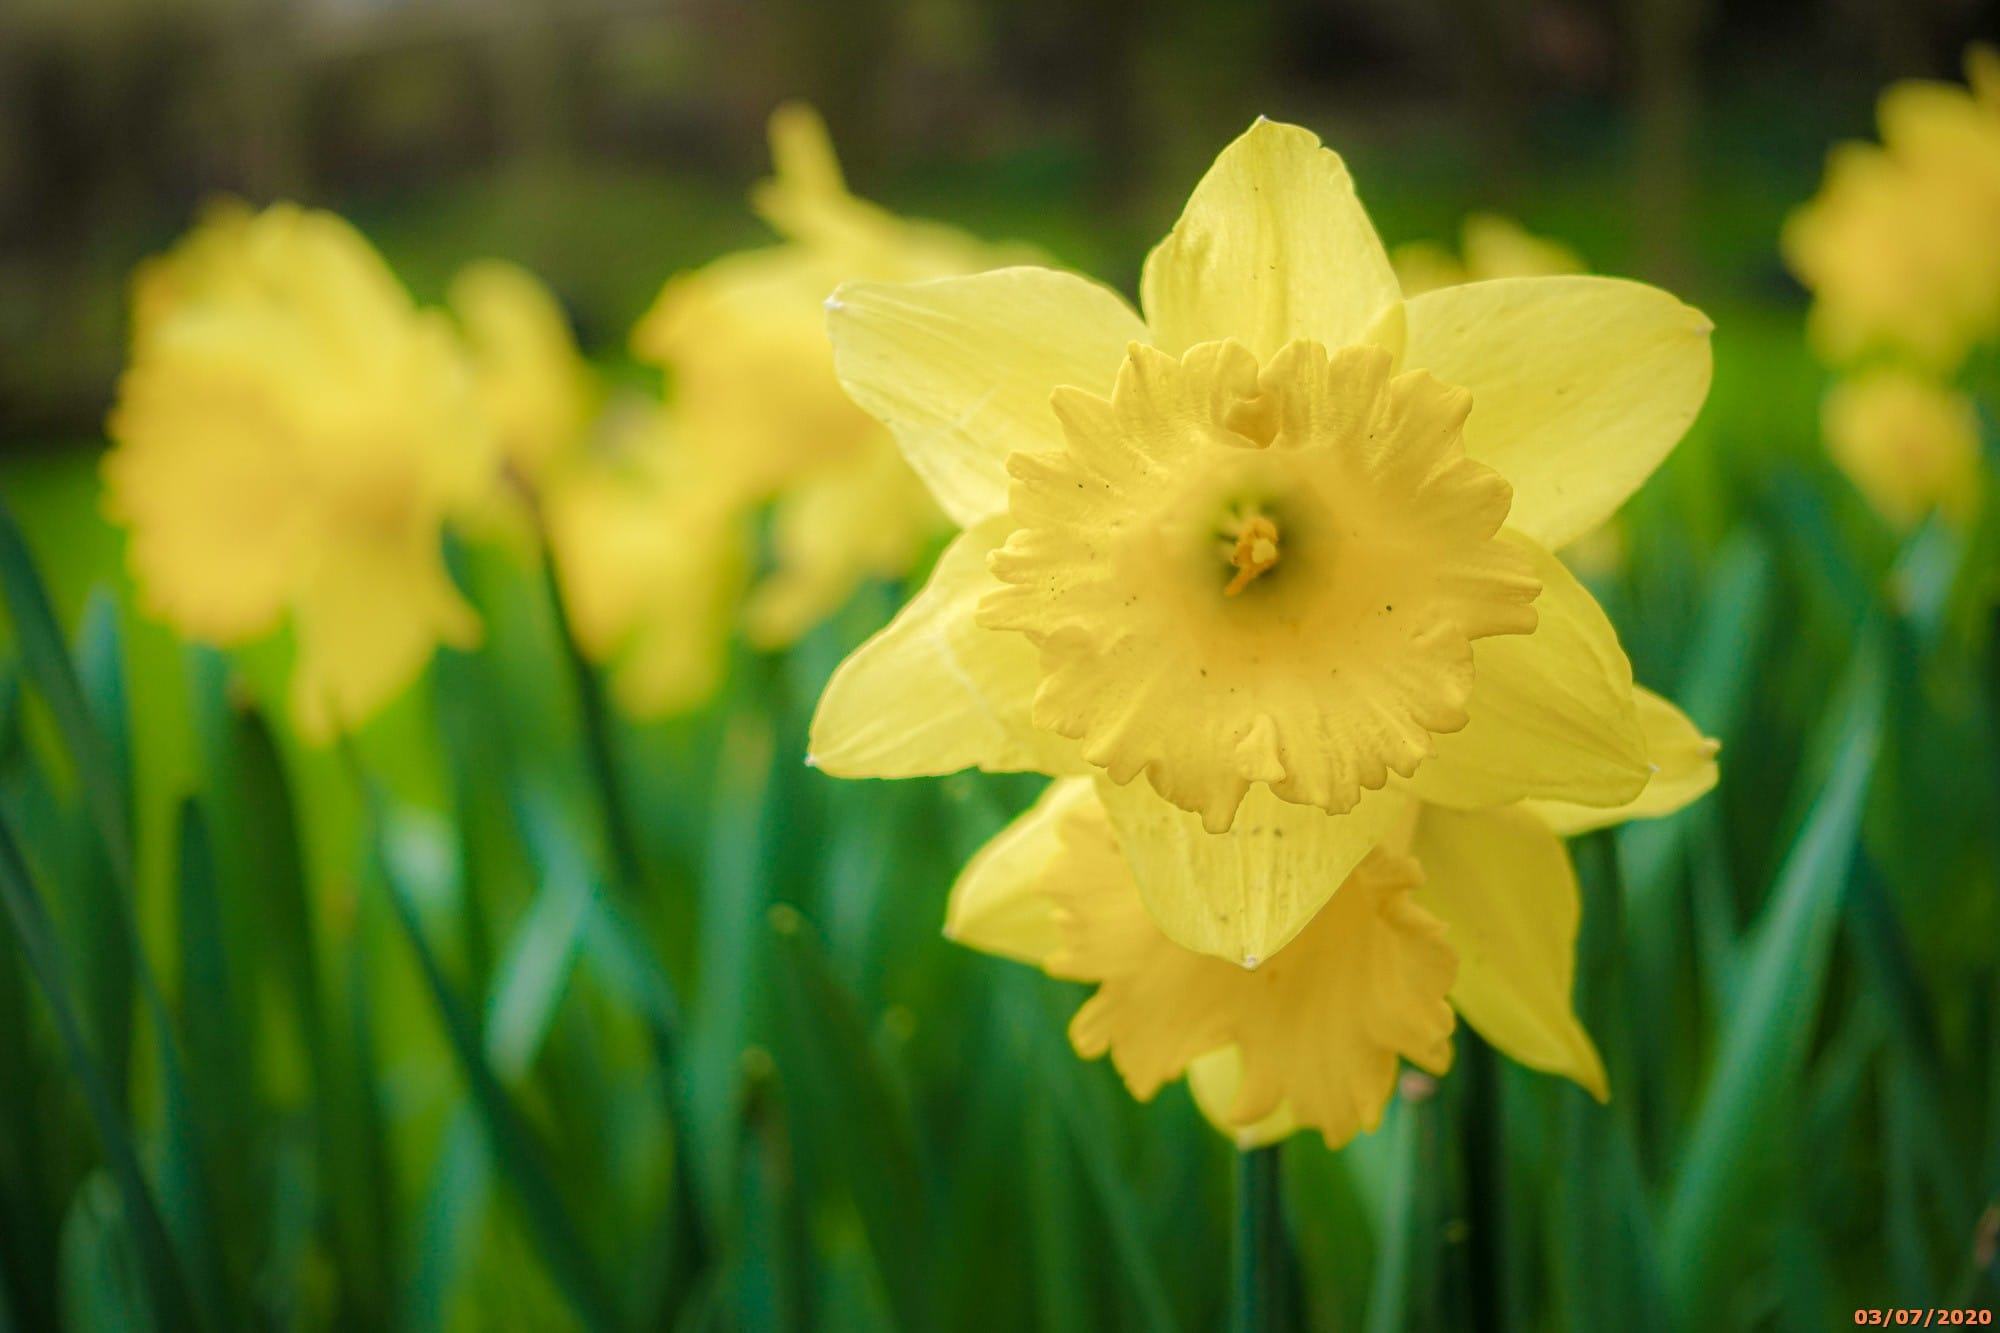
You also won’t have lost any of your original photos, so if you choose not to have the date and time on your originals, you don’t have to.
How to Add a Date Stamp or Watermark to a Photo Using Lightroom
If you already have photo editing software that you use, you might be able to add date stamps to your photos using the software. We use Adobe Photoshop Lightroom CC for all our editing, and it’s our favourite photo editing software.
However, most paid photo editing software will have similar functionality. Let me walk you through adding a date stamp in Adobe Lightroom to show you how to do it.
In Lightroom, you add a date stamp as part of the export feature. This is how you save any photo in Lightroom for use such as printing or uploading to the internet.
You can access the export option from the File menu. Just press File, then choose the Export option. You can also use the keyboard shortcut Ctrl+Shift+E (Windows) or Cmd+Shift+E (Mac).
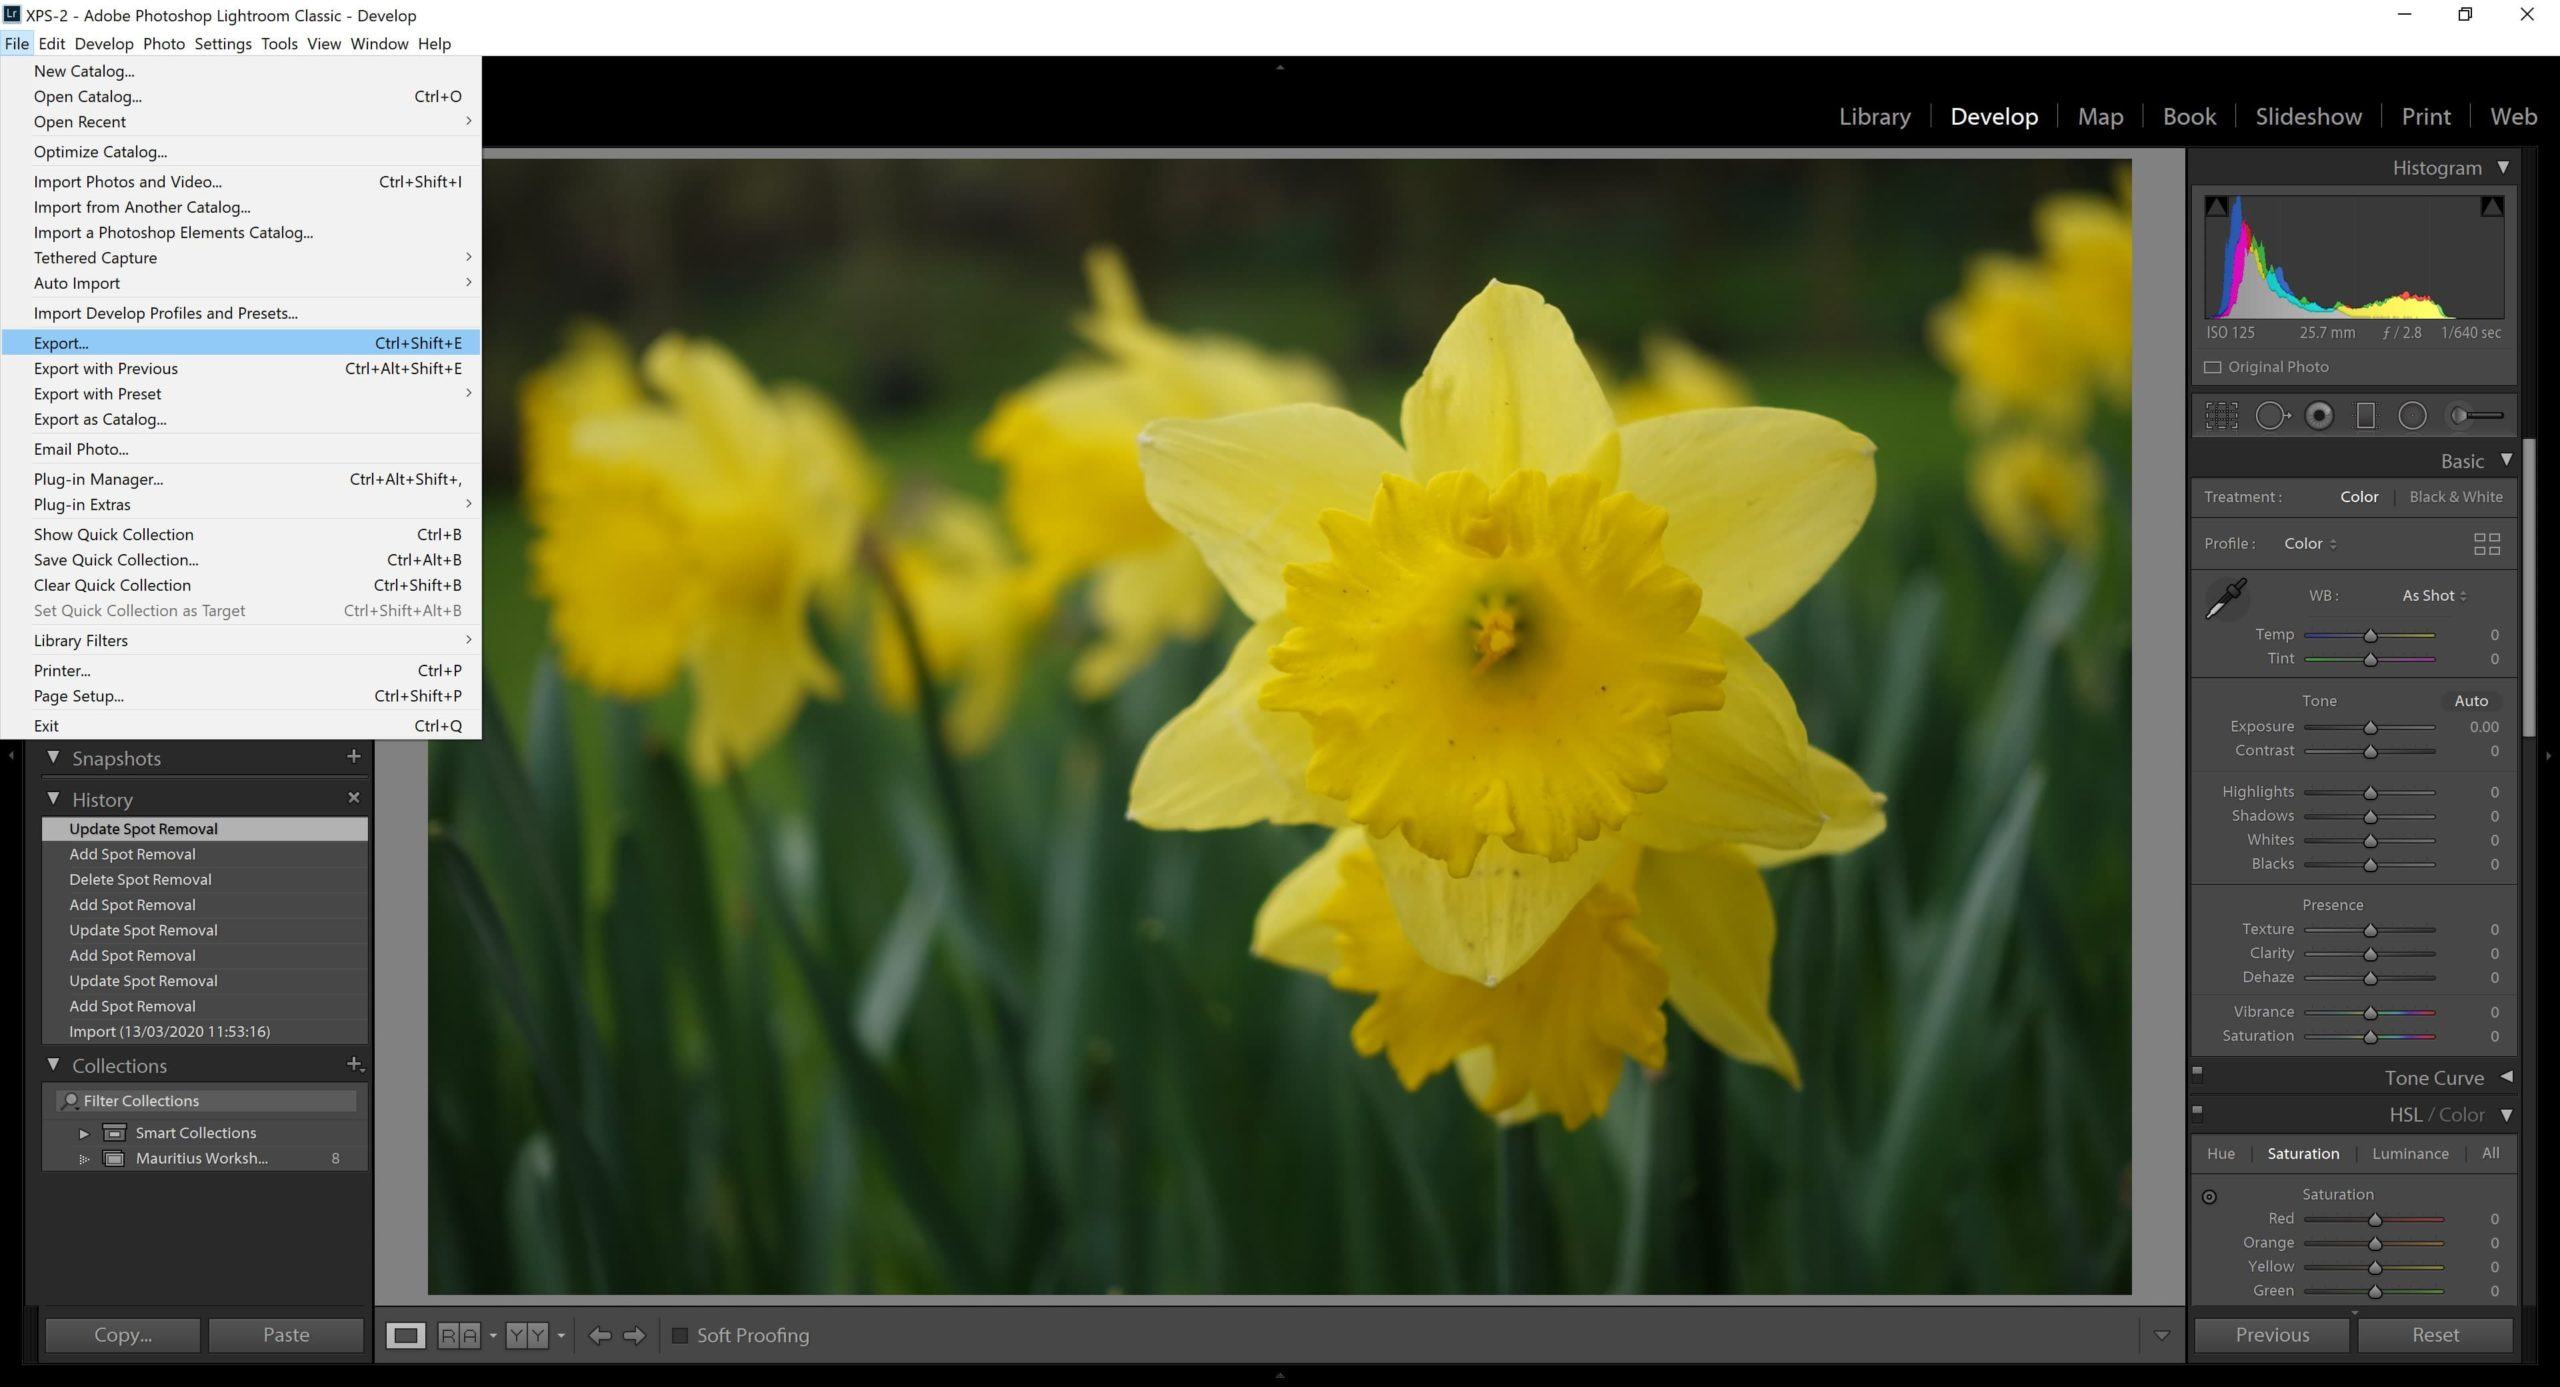
Choosing the Export option will popup an export window with a number of options.
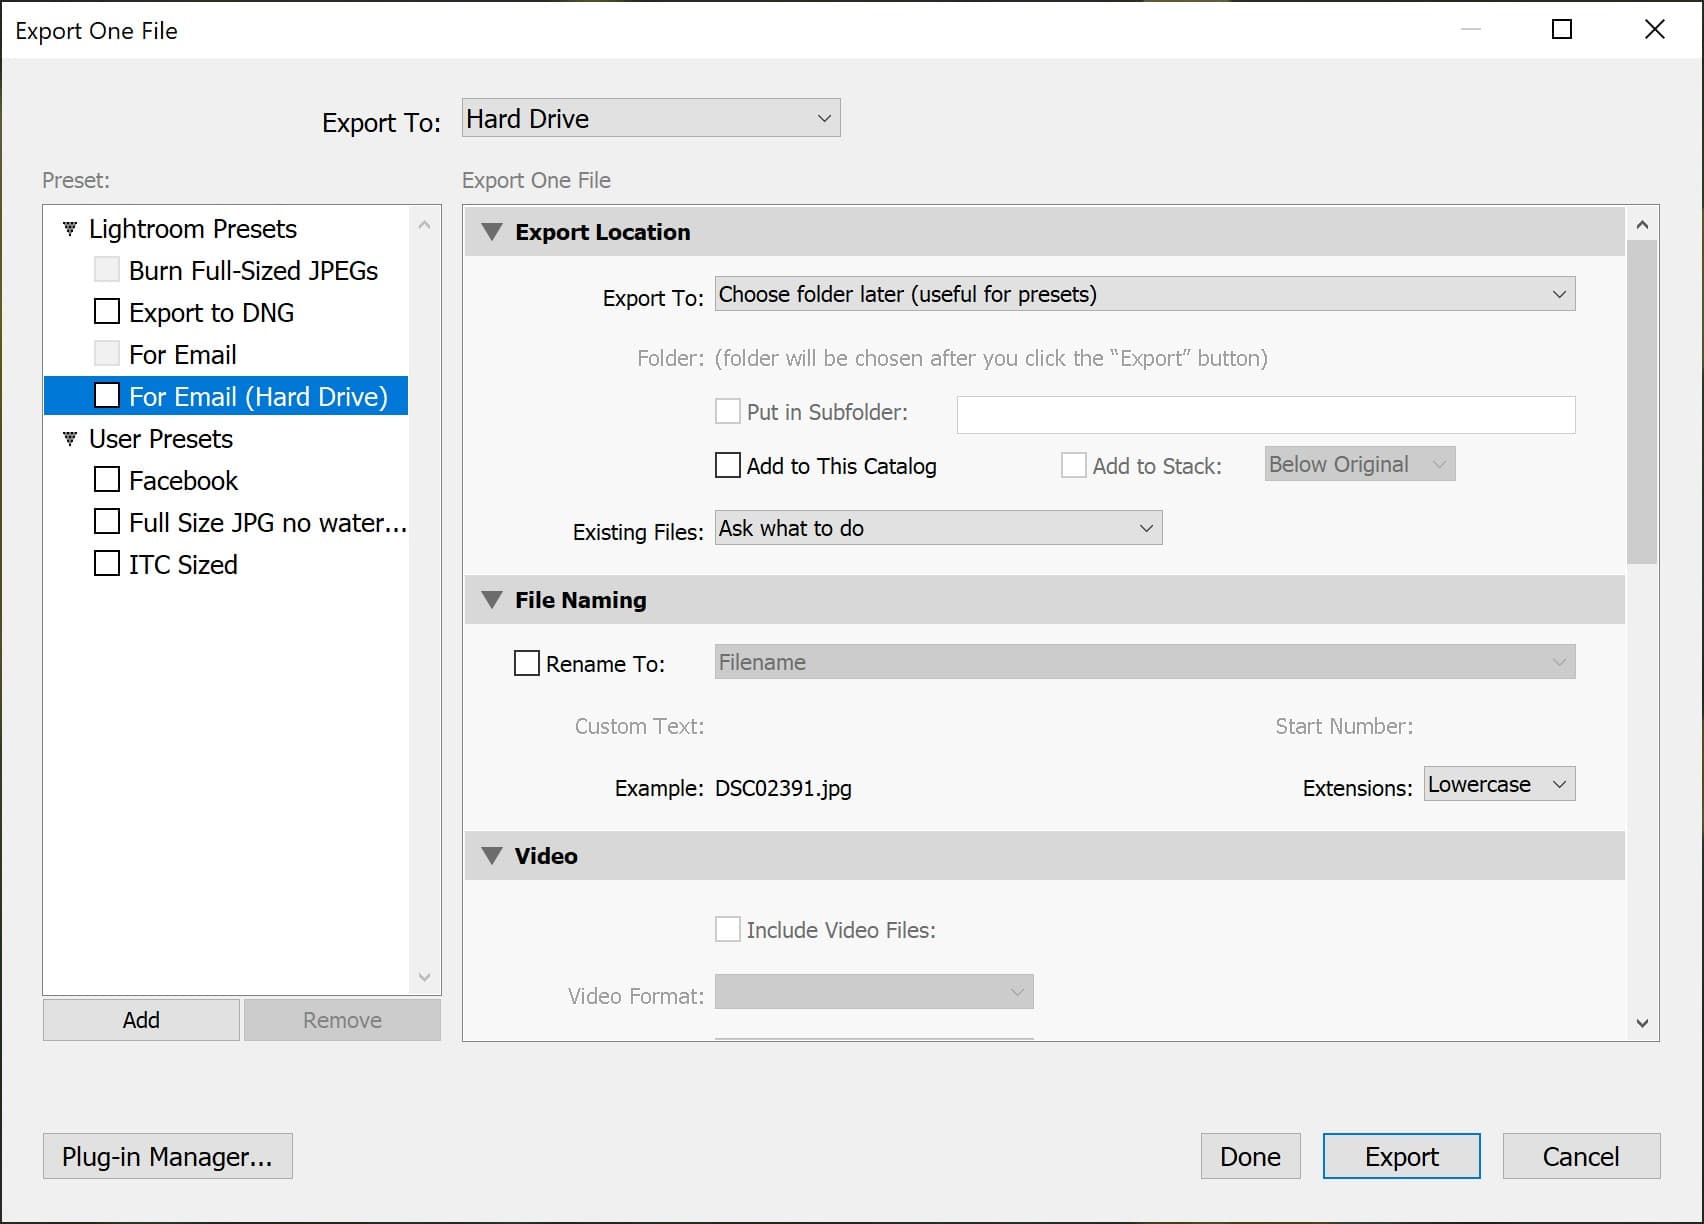
Down the left hand side of the export window are what are called export presets. On the right hand side are the settings you want to apply to your image when you export it.
The Lightroom export tool, like many features in Lightroom, is very powerful and as a result, can seem somewhat overwhelming in features and choice.
For now, we’re going to focus on adding a date to your image, but you can also do all sorts of other things, from renaming to changing file format to resizing your image. You can also save the settings you select as a preset for future use.
To add a date, you will use the Watermarking function of Lightroom. This can be used to add any text or image to a photo, and as the name suggests, is commonly used to add a copyright logo or text to an image.
In the right hand window, scroll down to the Watermarking section, and check the “Watermark” box. I’ve marked this with a red line in the image below.
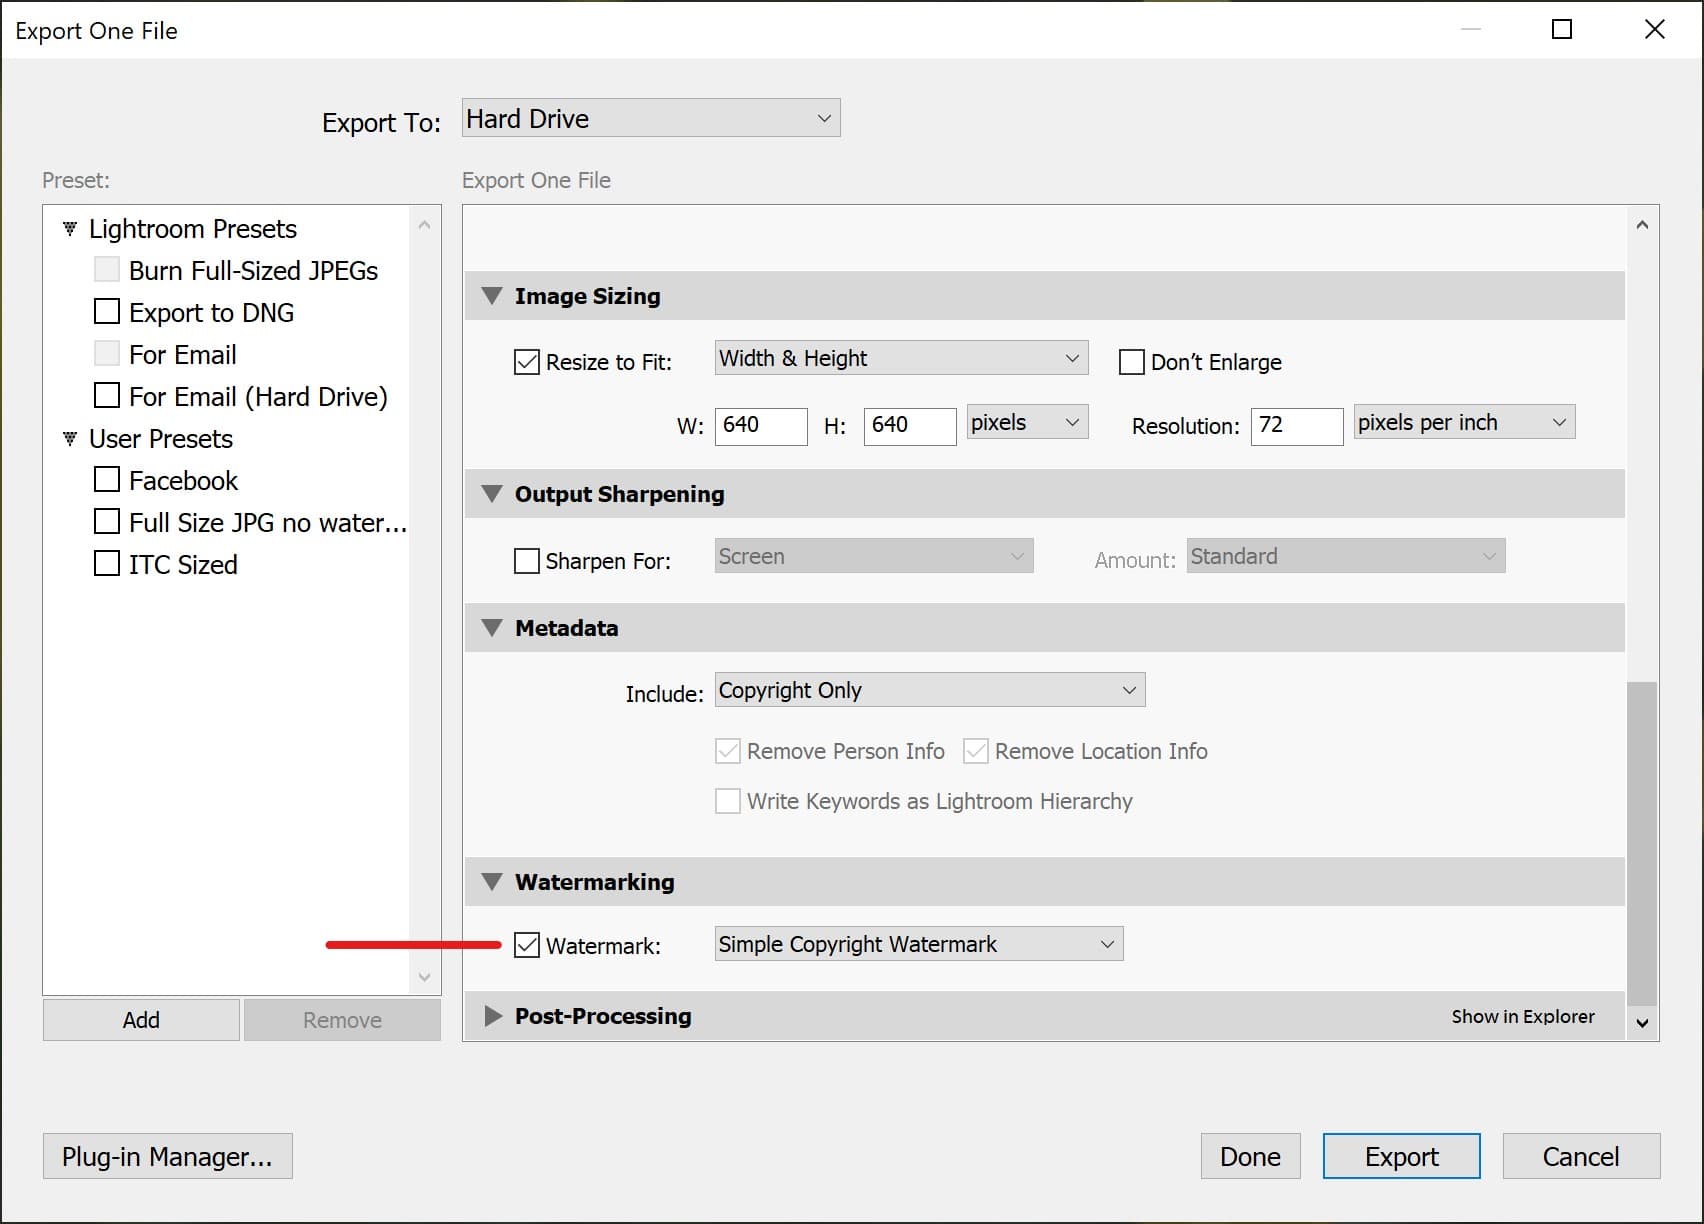
You will see there is a dropdown box with the text “Simple Copyright Watermark” next to the watermark checkbox. Select this text, and then choose the “edit watermarks” option at the bottom of the popup.
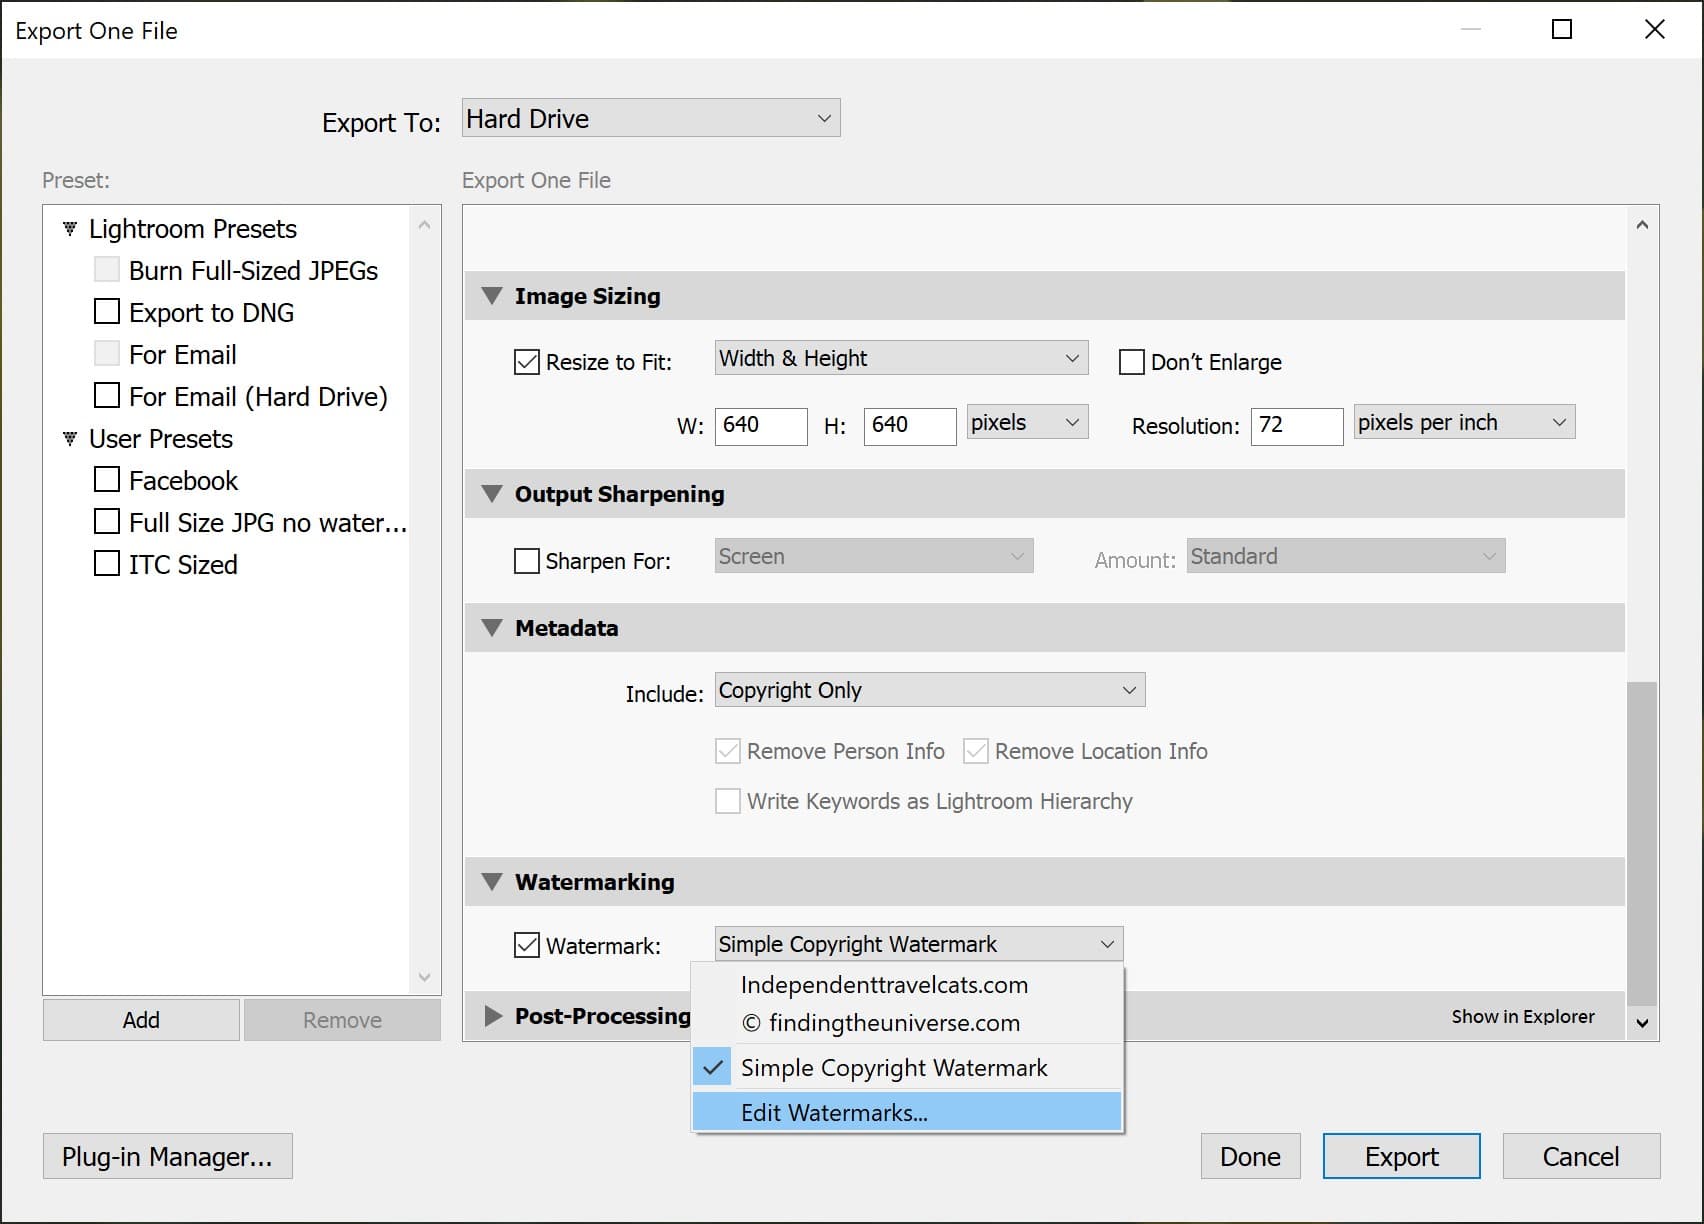
You can see from my drop down that I have some existing watermarks set up.
This will bring you to the watermark editor tool. Unfortunately, Lightroom does not currently have the functionality to pull the date from the EXIF date, so you need to enter this manually.
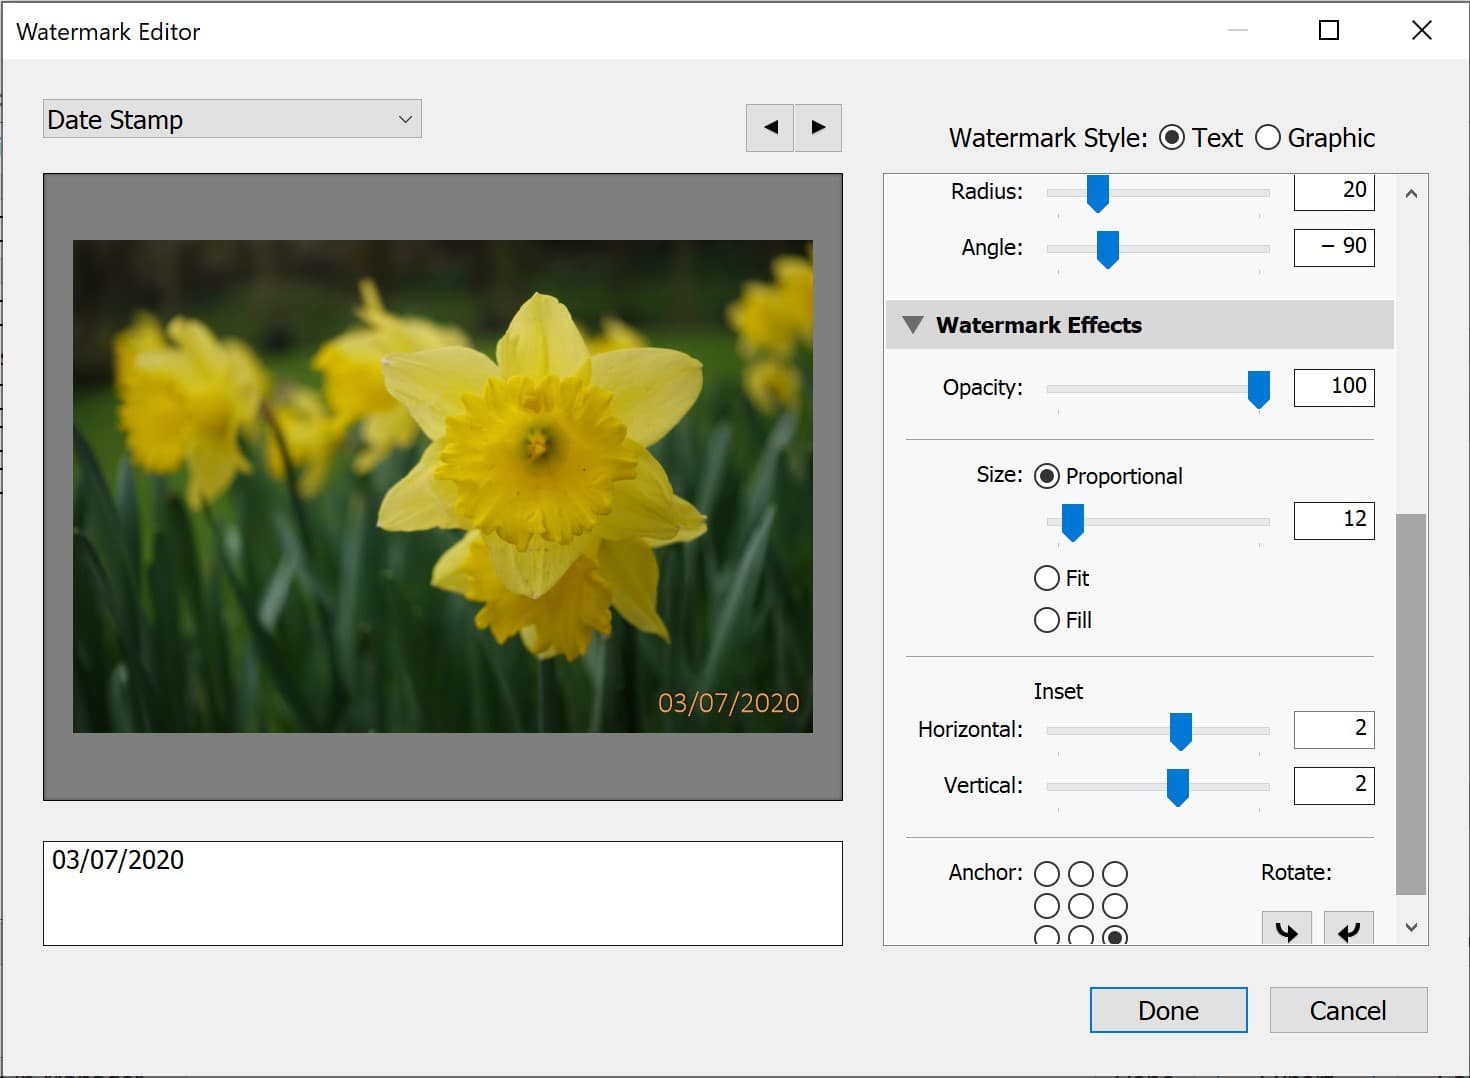
This is fine for one or two photos, but if you have lots of photos across multiple days, you will find a batch tool like the previously mentioned FastStone is going to be a much faster option.
Enter the date in the text box under the image. You can then adjust things like font, size, color and location of the date stamp with the options in the right hand window. Again, I’ve gone for an orange text at the bottom right.
When you have all the settings as you want them, you can press the text box above the image. A drop down will appear, with one of the options being “Save Current Settings as New Preset…”. If you press this, you can enter a name for your preset.
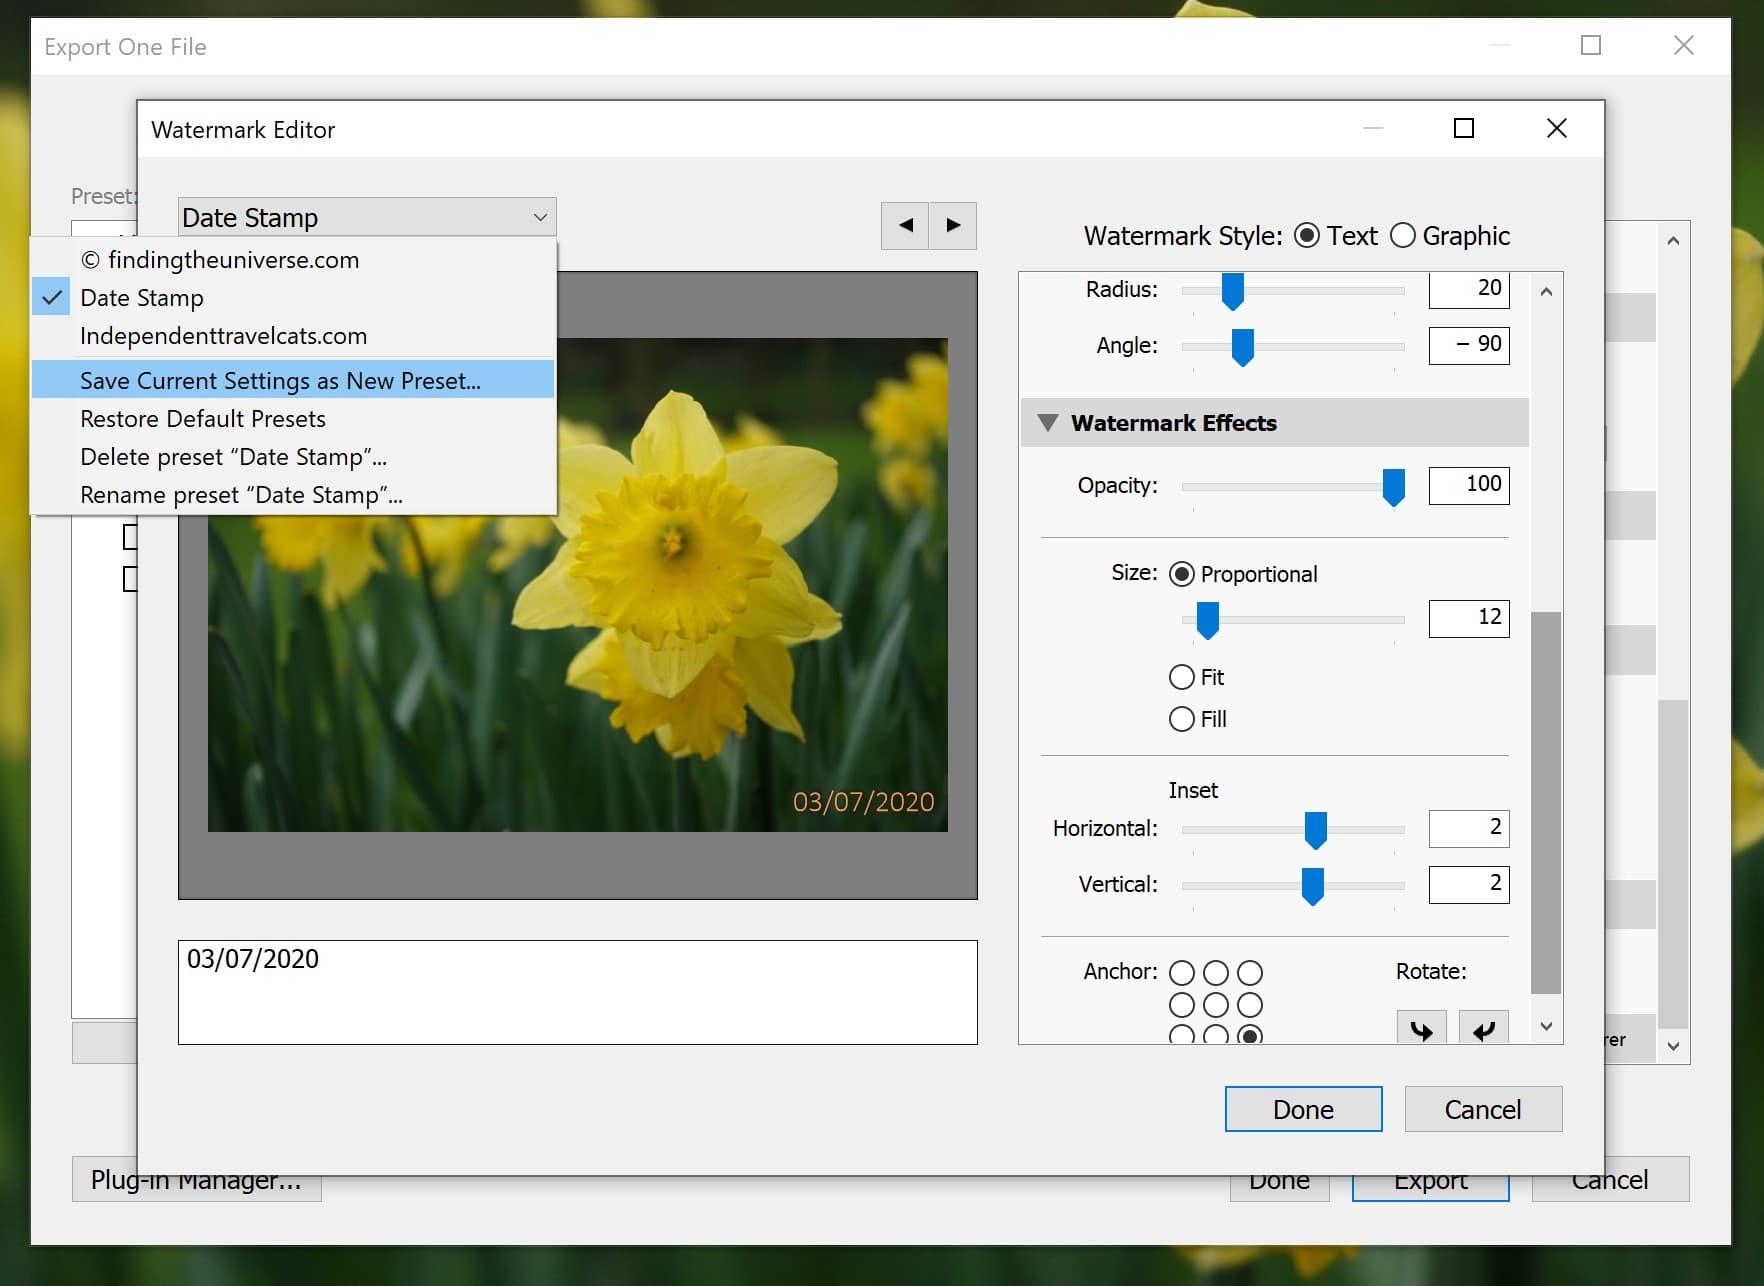
As you can see, I chose “Date Stamp” as the name for my watermark preset. In the future, you can use your saved Date Stamp preset – just remember to change the date for each image.
Once you are done, return to the export window. Ensure all the other settings are correct in terms of file size and format, and then export your image. Here’s the final result of my image with the settings I chose:

Adding a Date Stamp When Printing a Photo
Another option you have for adding a date stamp is when you have your photos printed.
Some printers come with software that lets you add a date stamp to an image before you print it, so if you have a photo printer you can check the software it came with to see if it has this feature.
Many cameras also have a feature called DPOF, or Digital Print Order Format. This is a tool on the camera which lets you define which images you want to print from your camera, and it often allows you to add a date stamp as part of the print job. This will work either with your compatible home printer, or at a print shop.
Many photo printing kiosks, which you can often find at drugstores and other retail outlets, have a range of editing options. These let you do things like cropping your image, adjusting colors, and removing red-eye. Many will also often let you add a date stamp to your images, as well as custom text.
Here’s a photo I took of a photo printing kiosk a few days ago – you can see the option to add the date stamp as a checkbox on the right hand side of the image.
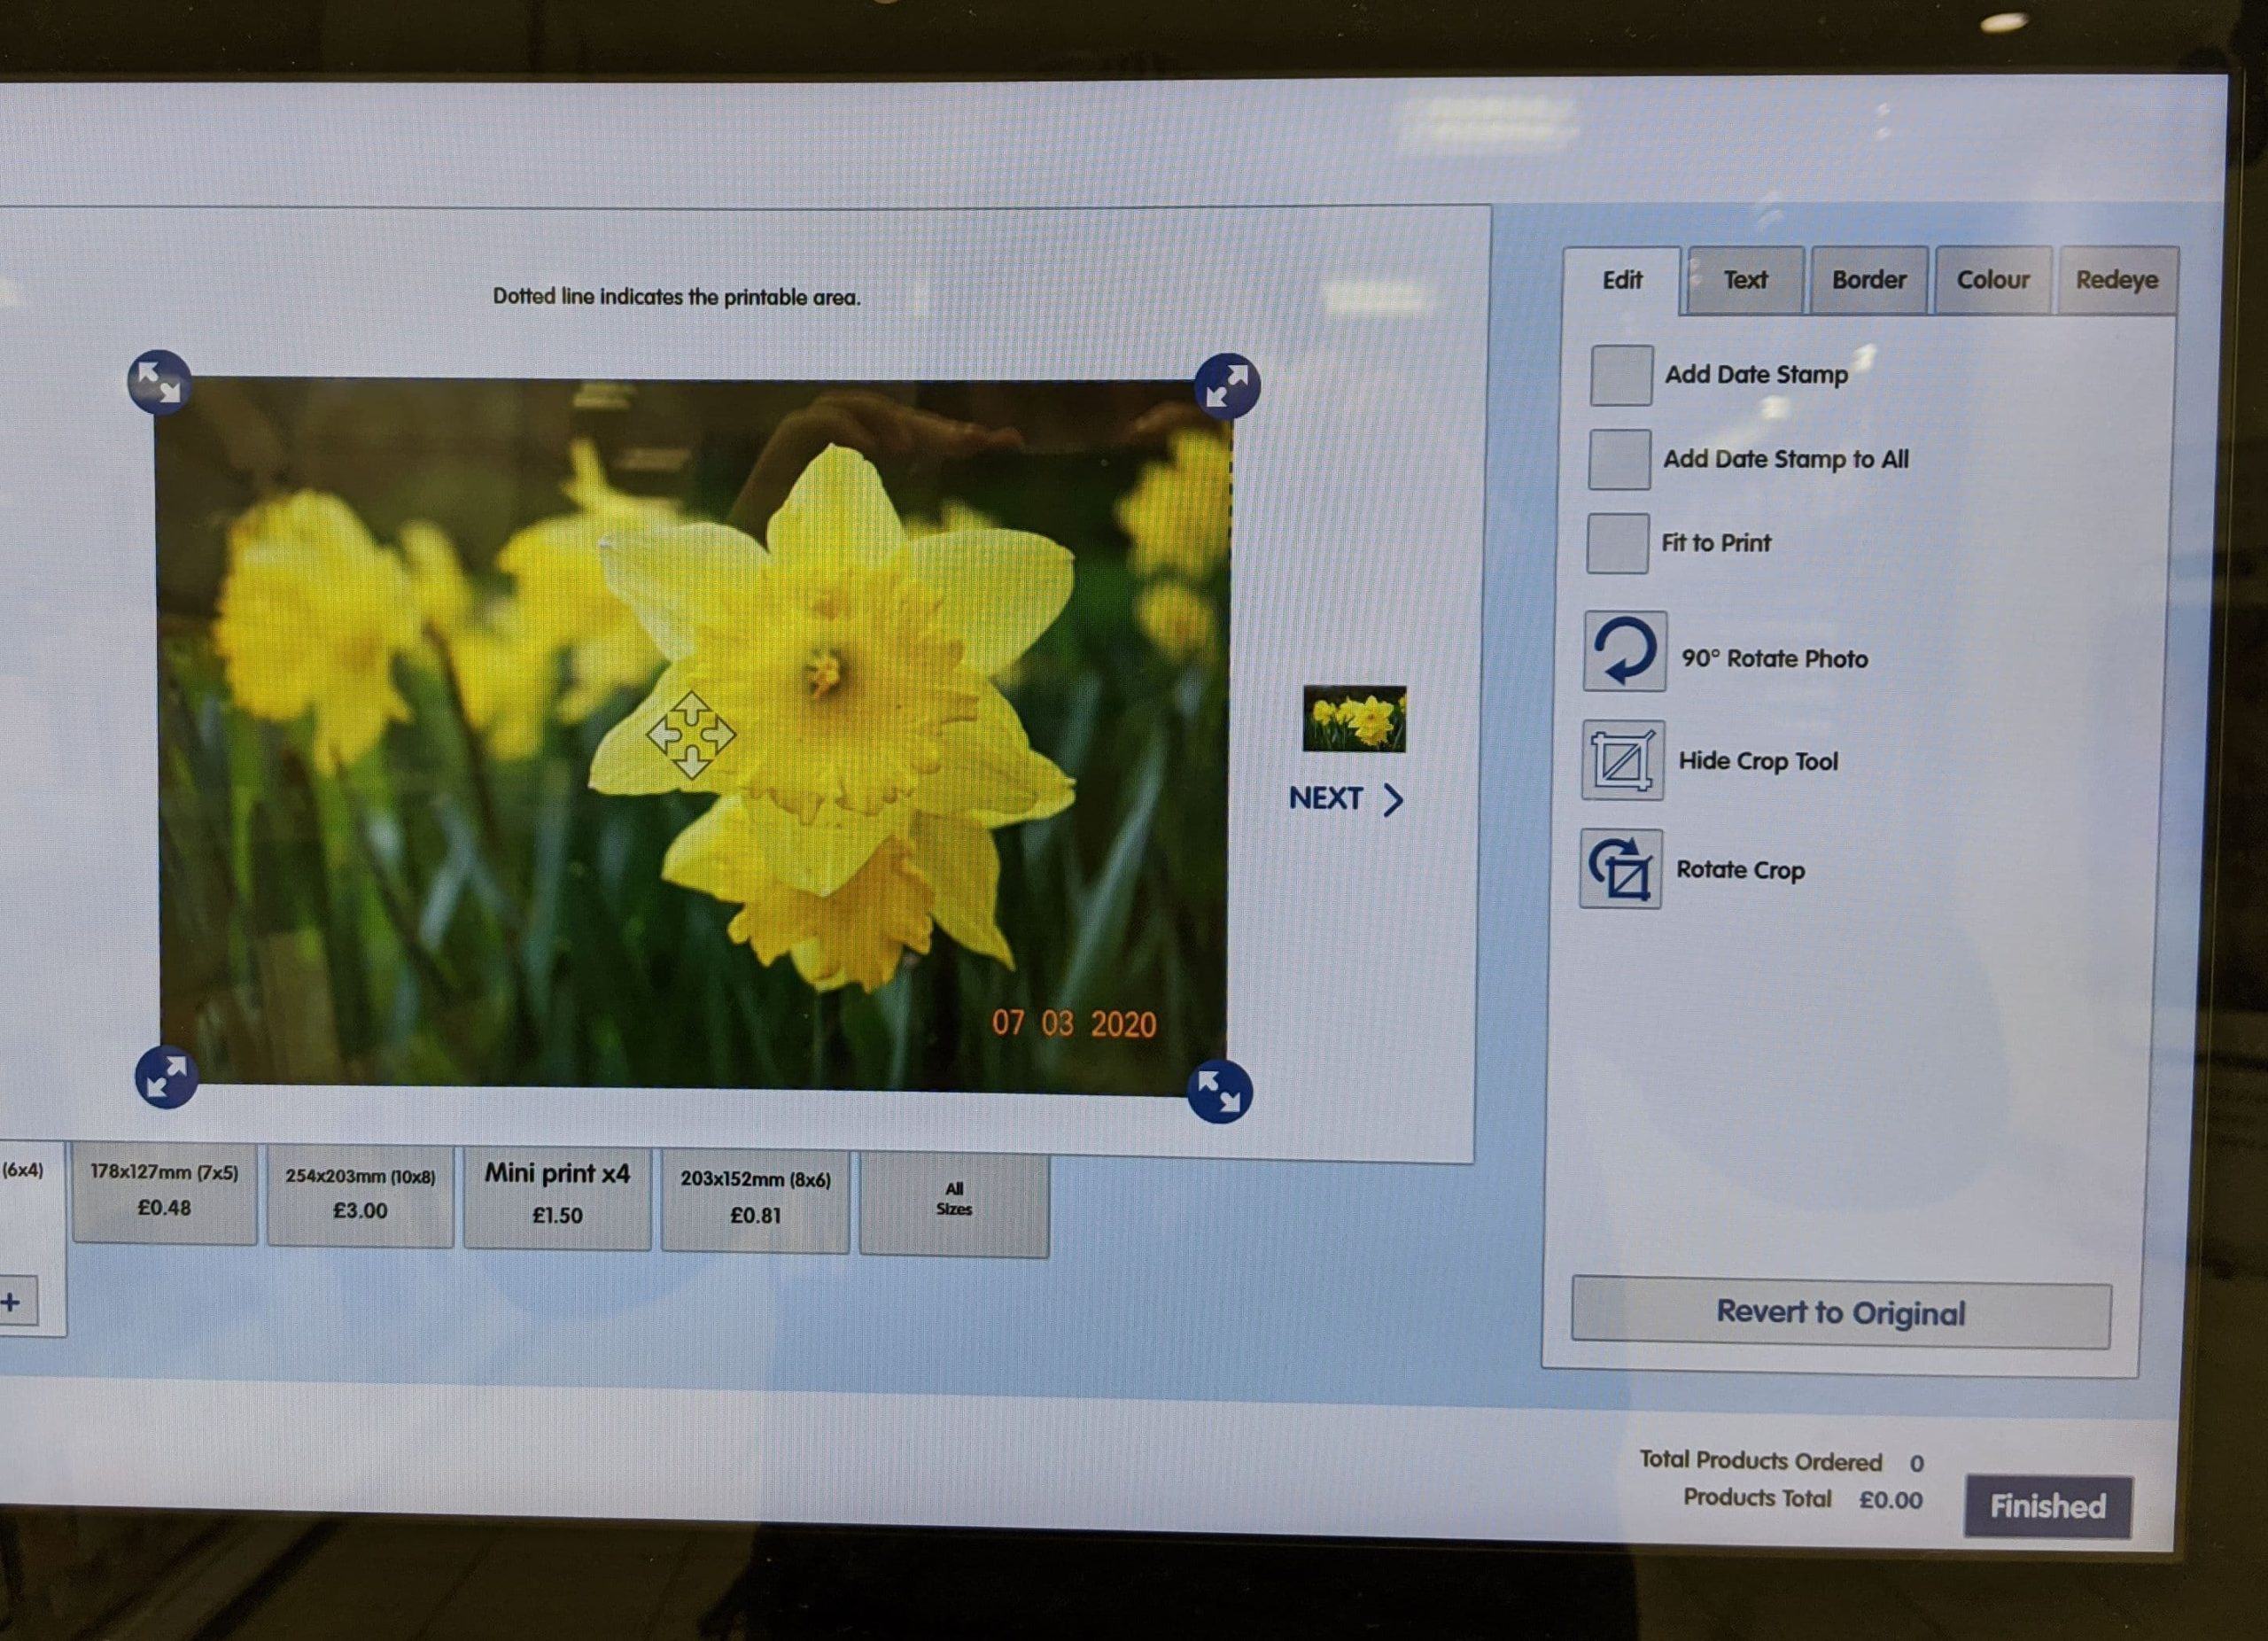
Normally the date will be pulled from the images EXIF data. You may have options for the format and placement of the date stamp.
This can be a really easy way to have the date stamp added to printed versions of your photos without having to do much work. However it does obviously require the date to have been correct on your camera when you took the images for it to work properly.
What to Think About When Adding a Date to a Photo
There are a few things to be aware of when adding a date stamp to your image.
First, if you decide to add a date stamp using your camera’s features it will make a permanent change to your image file. The camera modifies the saved image with the date text, and there is no easy way to remove this (see the section later on in the guide for some options if you do want to remove this).
Second, the date marked on the image will be whatever date you have set in the camera when the image is taken. This is the case regardless of how you choose to write the date – either in camera or later on using software.
It is obviously therefore very important to ensure that your camera date and time is set properly before using this feature! If you are travelling, make sure you set the camera to the local time zone before you start taking photos, otherwise you run the risk of your images being permanently marked with the incorrect date and time information.
Of course, if you choose to add the date stamp in software, which is our recommended approach, then you can adjust the date and time on the image file before saving it by editing the image capture date. However, this is extra work, and does require you to remember the correct time the images were taken, which isn’t always so easy.
Finally, if you plan on adding a date stamp to your images, this is something you should take into account when composing your images. The date stamp is usually inserted at the bottom right hand corner of an image and so you don’t want to have any important parts of your composition or image in that part of your image.
How to Remove a Date Stamp from Your Photos
If you find yourself in a situation where you have date stamps on your photos but you want to remove them, this is possible for digital image files.
It might be that you accidentally set your camera to have the date stamp feature enabled, or perhaps the date was set incorrectly. Or maybe you just changed your mind!
The results will vary depending on the exact content of the image you want to remove the date stamp from, but it should be possible in most images to remove any evidence of a date stamp.
Removing a date stamp is definitely a lot more work than adding it, and it will require you to edit each image individually using photo editing software. I’ll walk you through doing this with Adobe Lightroom, but most photo editing software such as Luminar (available with a one-off fee rather than a subscription) will have similar capabilities.
First, load up the image in the editing window of your software. In Lightroom, this is called the Develop Module. For this example I’m using a picture which I took on my Sony RX100 V, with the date stamp camera feature enabled. You can see the date stamp is large and obvious in the bottom right.
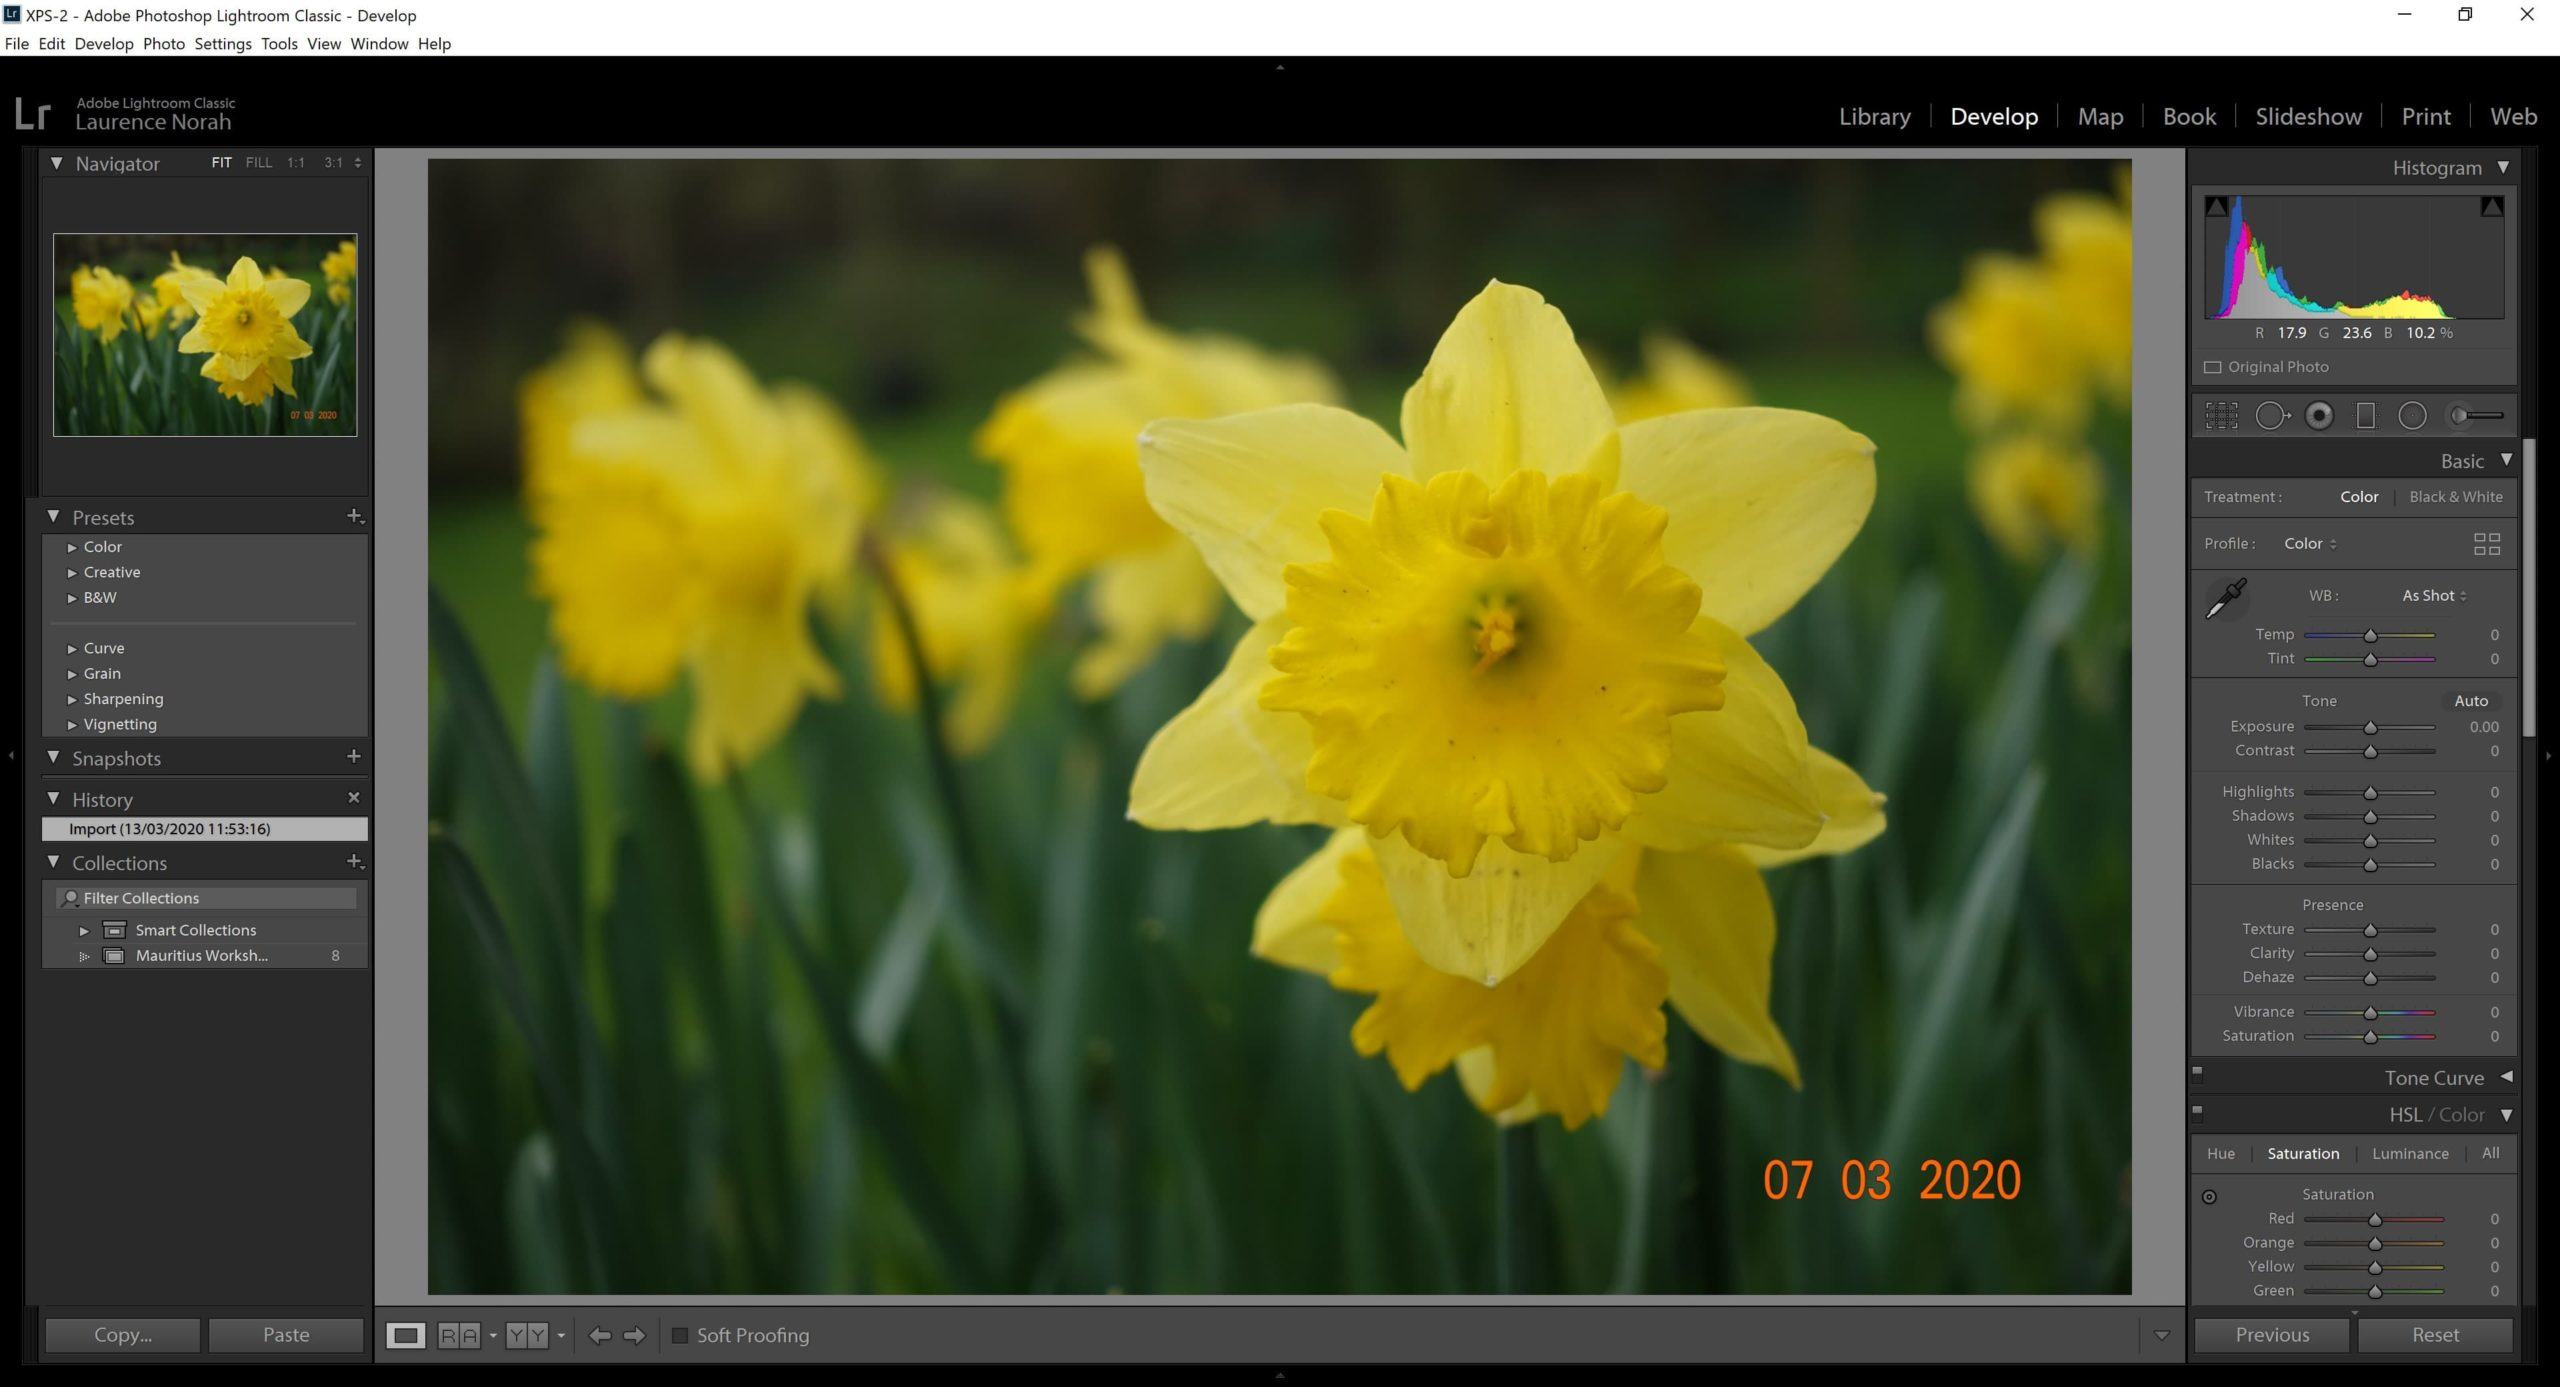
To remove the date stamp, we’re going to use the retouch tool. This can be used to remove a variety of elements of an image, from unwanted people through to skin blemishes. It works best when the background around the element you are trying to remove is not too complicated. If there are a lot of patterns, lines, or other complex elements, the results can vary.
In the case of the image in the example, the background is a fairly uniform area of green. It’s also quite de-focused thanks to using a shallow depth of field. This will also help with the retouching.
The retouch tool is located under the histogram at the top right of the develop panel. It looks like a little circle with an arrow coming out of it, and in Lightroom it’s called the Spot Removal tool. You can select it with your mouse, or with the keyboard shortcut “Q”.
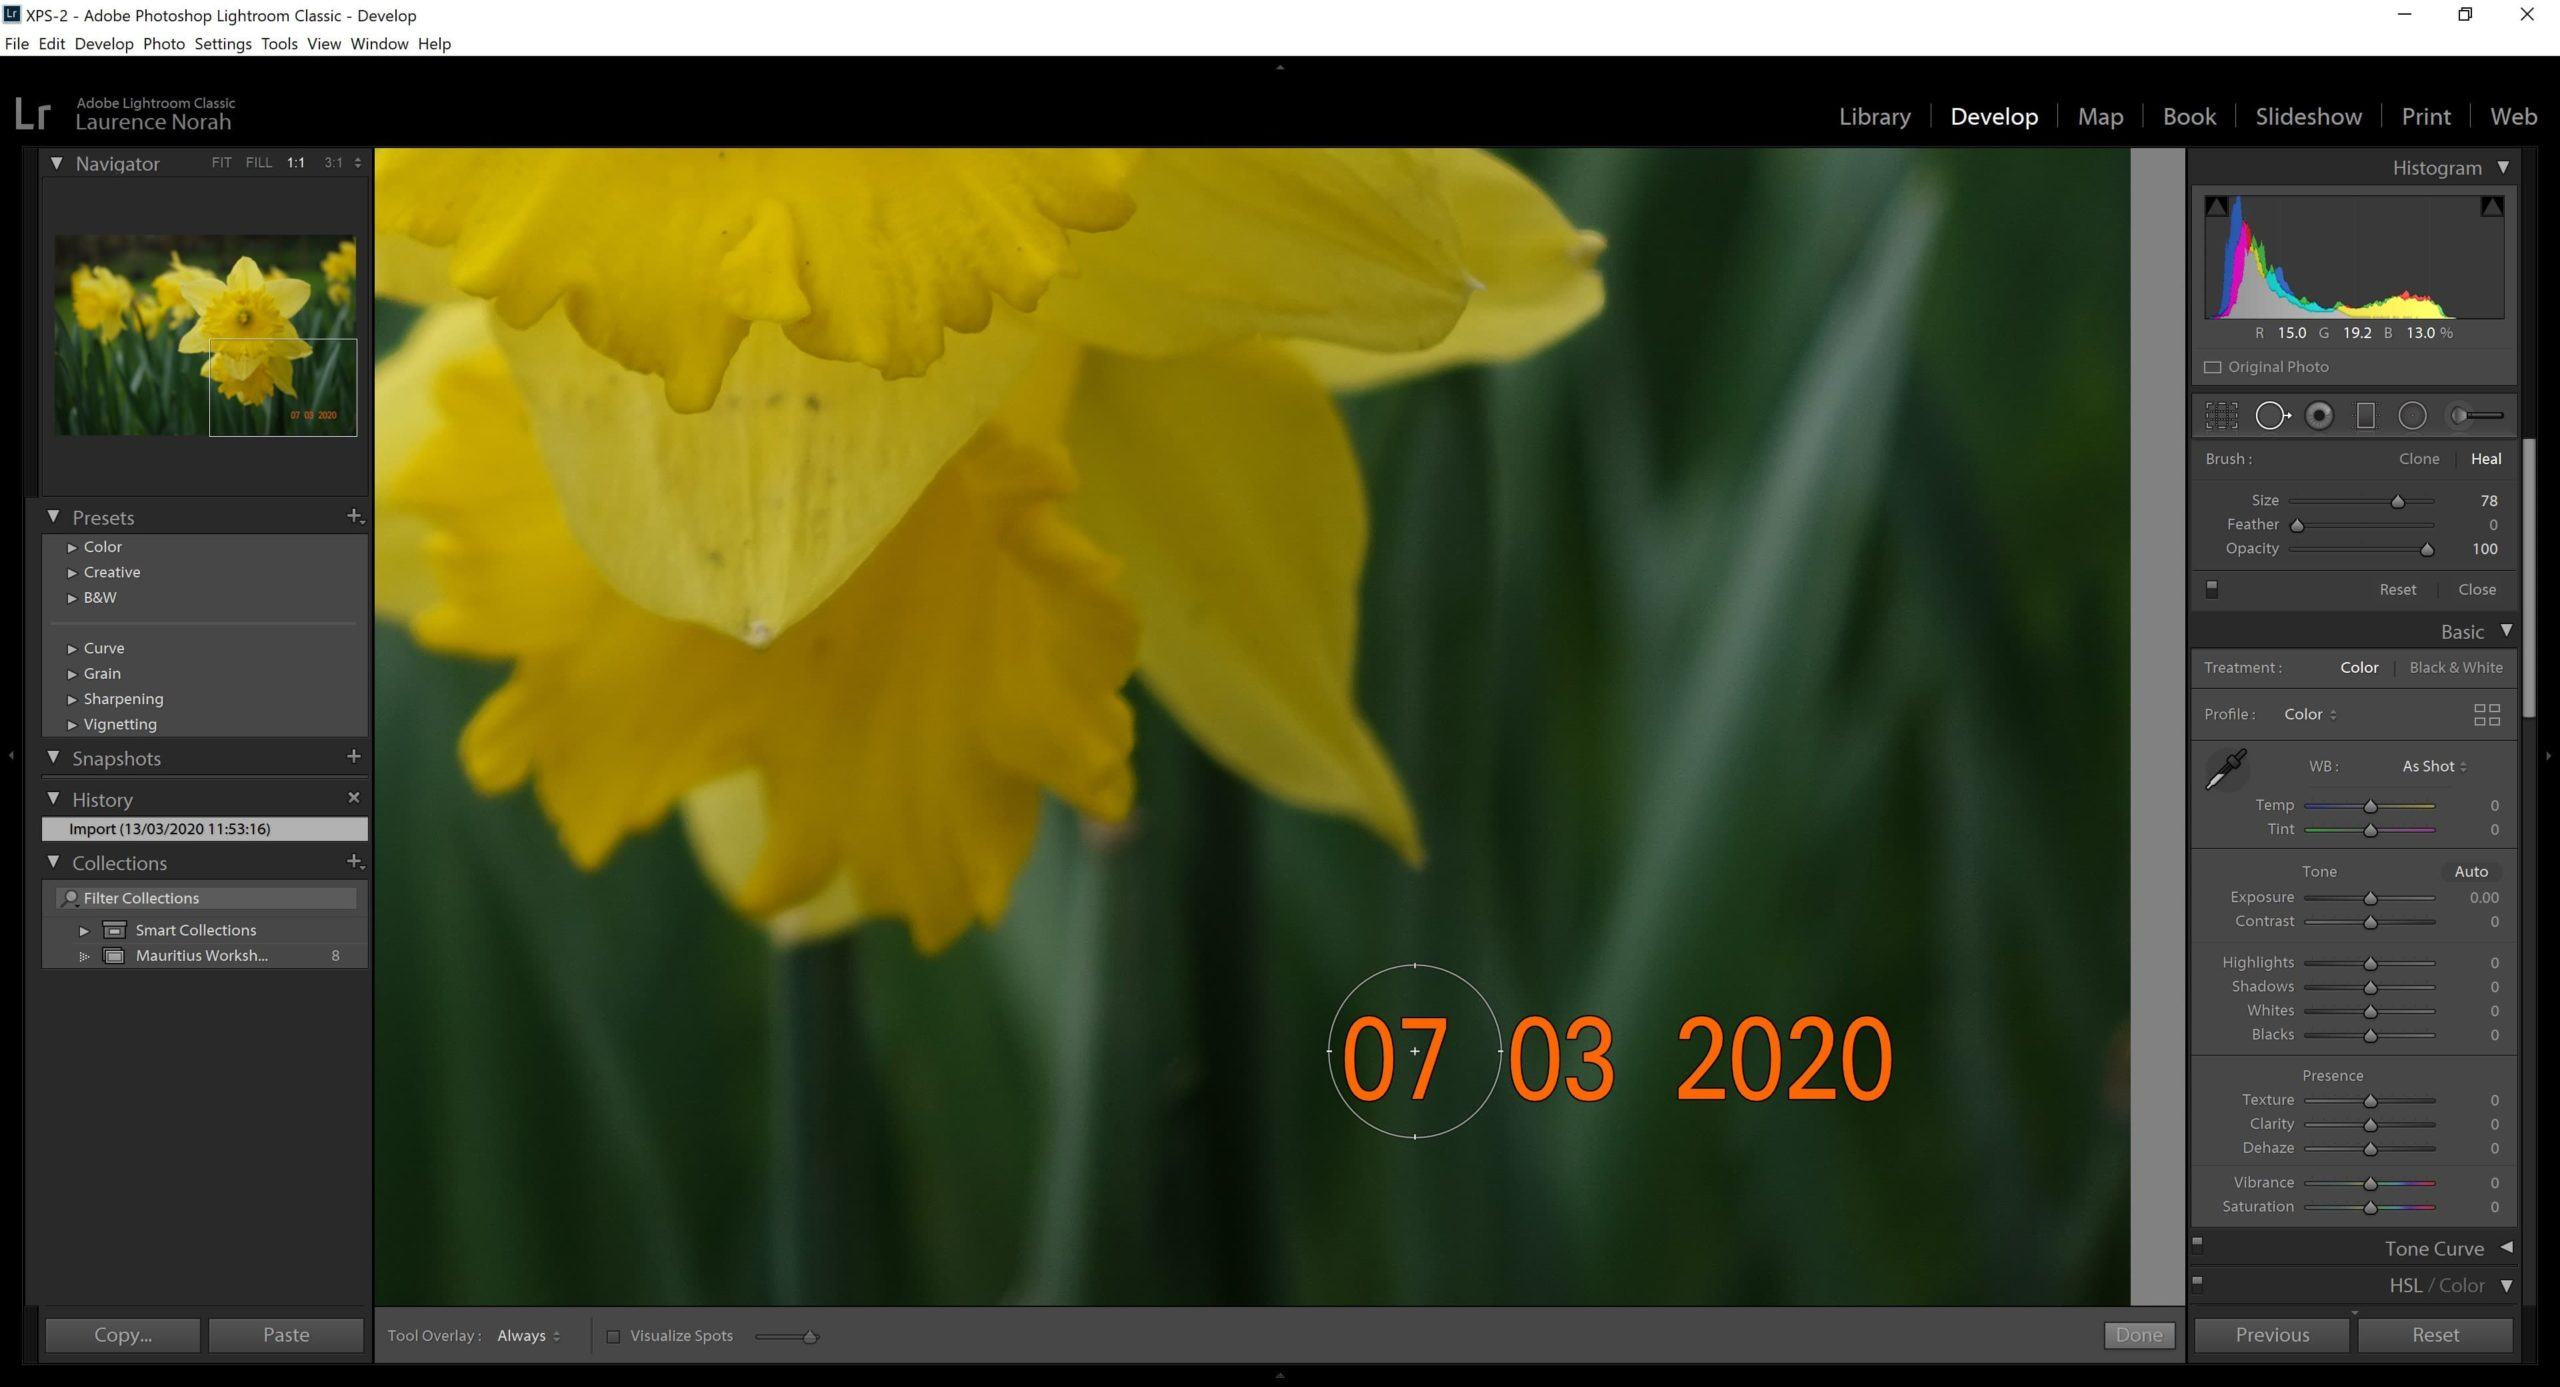
Before you select the spot removal tool, I recommend zooming in on the area you want to work in. This will let you make finer grained adjustments. The smaller the area you try to work with, the more effective the tool in my experience. If you have already selected the spot removal tool, you can press the spacebar to activate the zoom feature.
When the spot removal tool is active, the cursor will change to a large circle. In addition, a new panel will appear under the brush with some sliders and options. You want to ensure the brush is set to “heal”.
You can then adjust the size of the brush with the “size” slider. You want to make this as small as is required to just paint over the letters. If you have a mousewheel, you can usually adjust the size of the brush by scrolling up and down.
Once you have the brush at the right size, paint over the numbers. You can do that just by clicking the mouse button and holding it down as you draw over the area you want to remove. When you are have “painted” over the area to remove, release the mouse button.
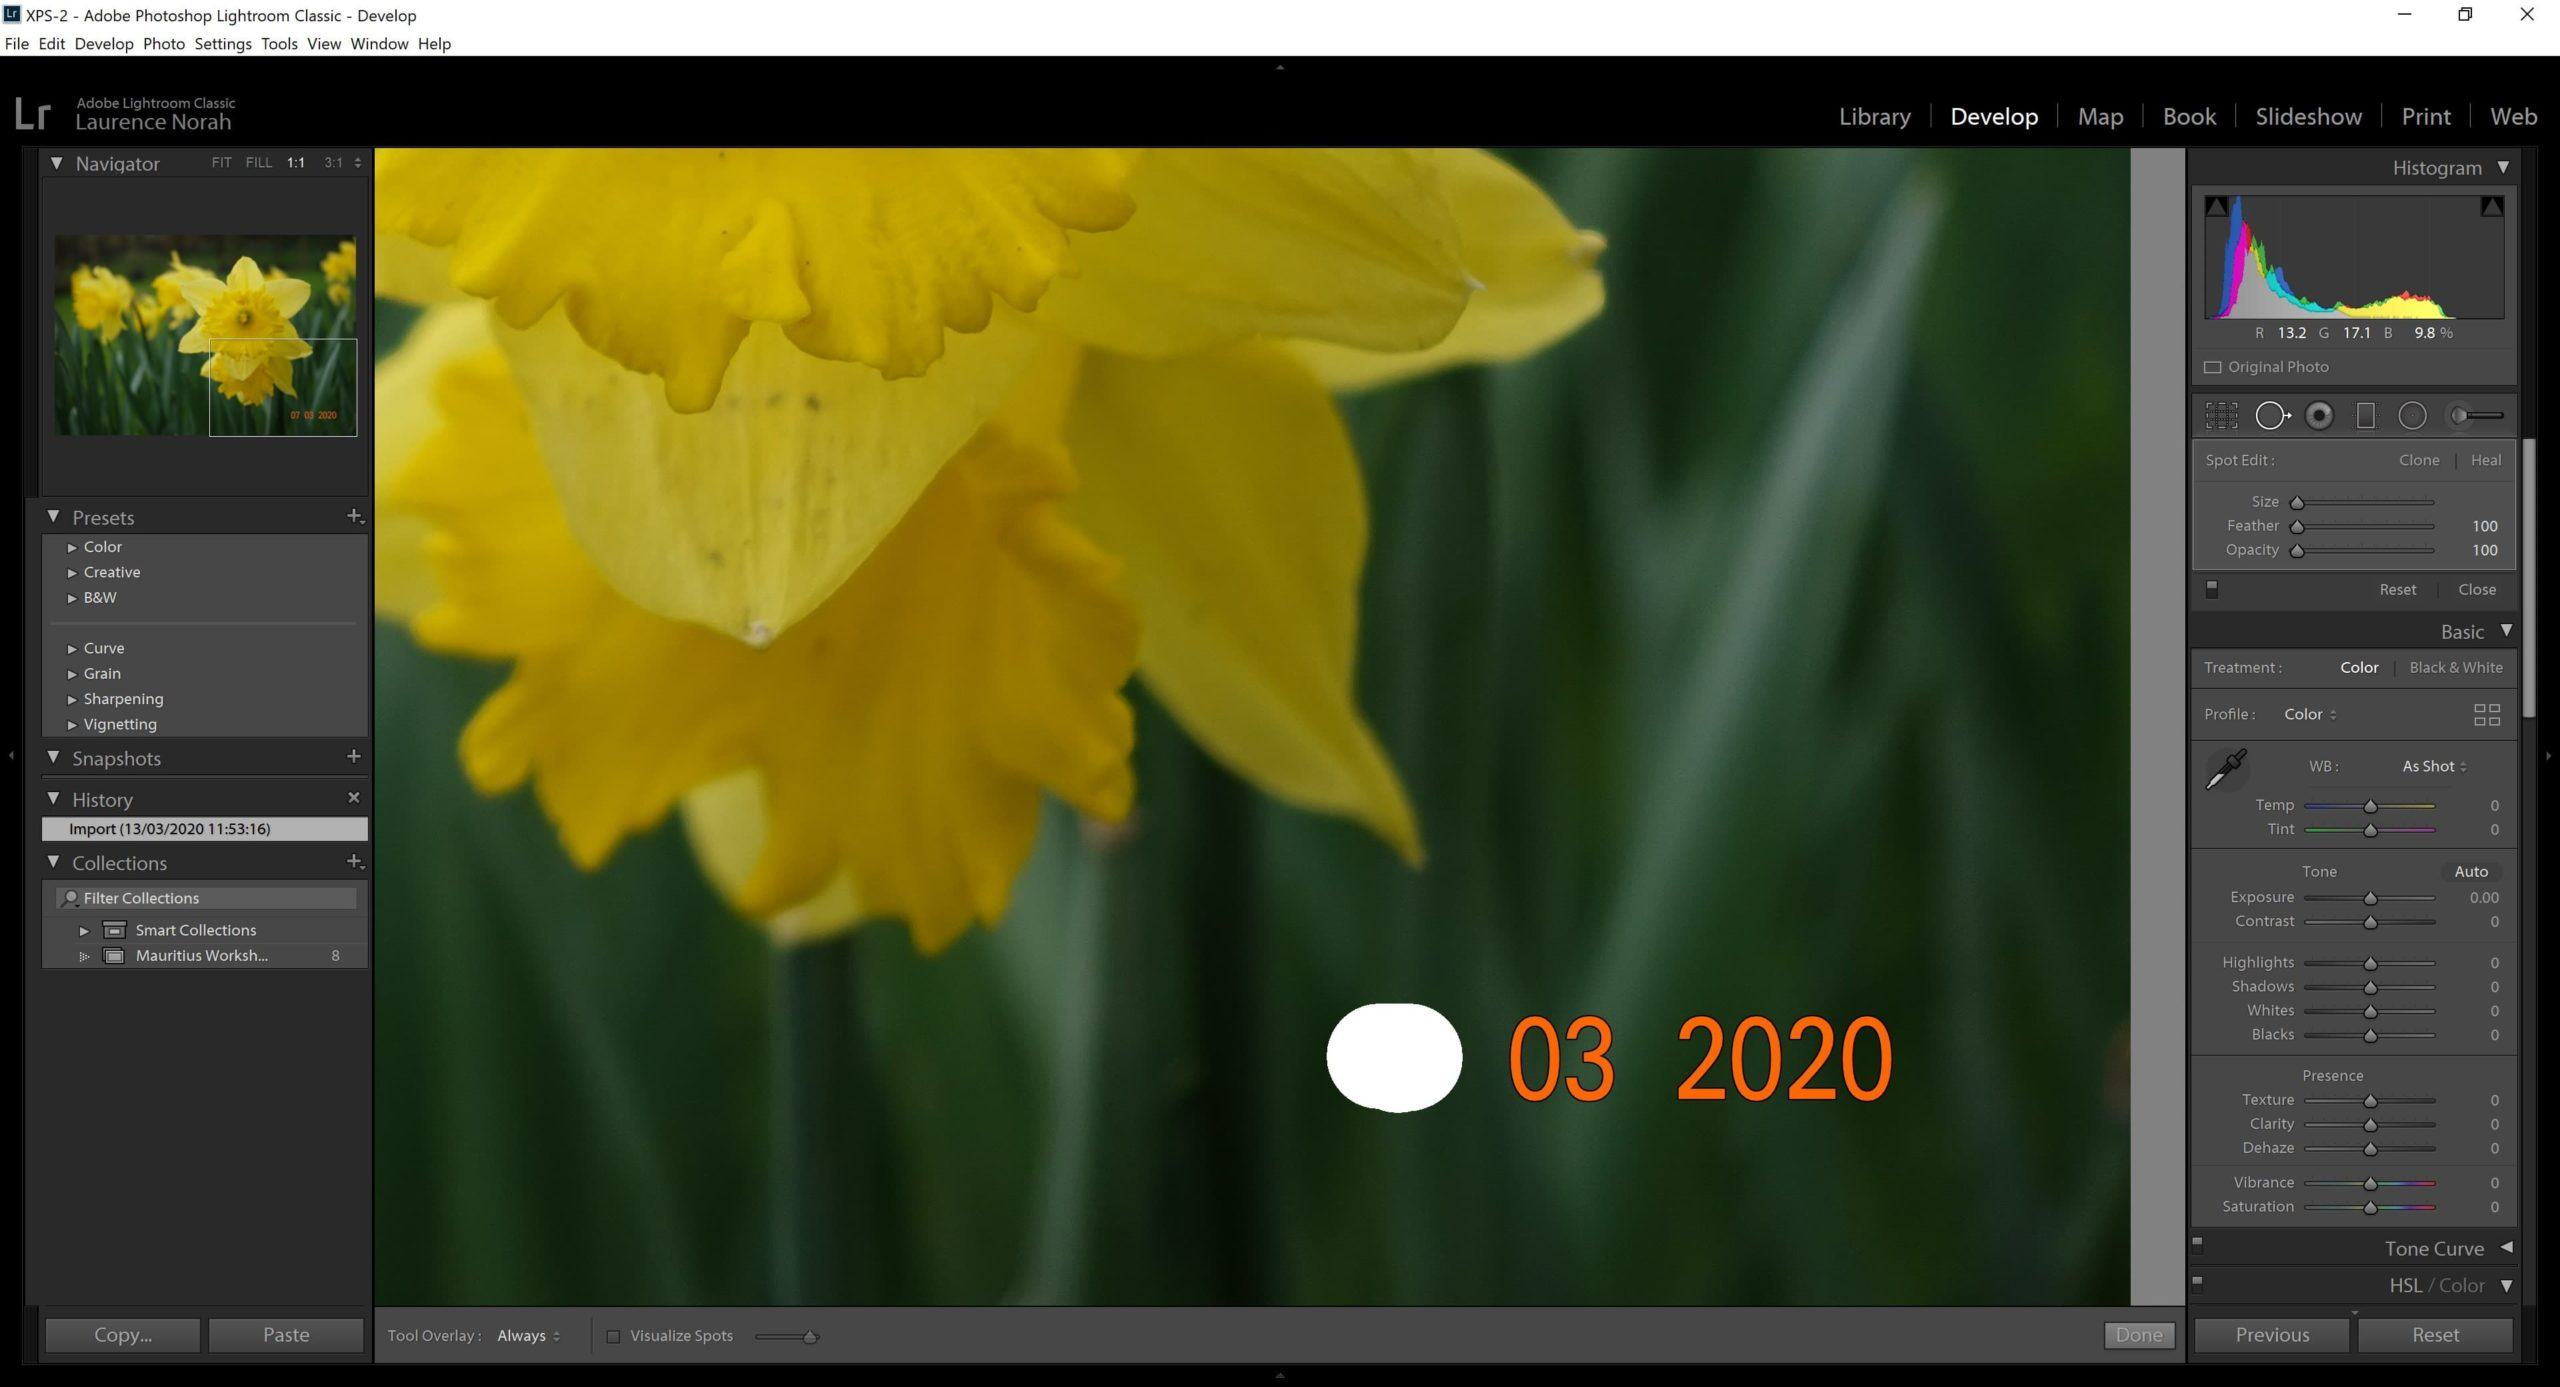
When you release the mouse button, Lightroom will analyse the area you want to remove, compare to to the surrounding area, and attempt to fill in the replaced area in a way that makes the change blend in seamlessly with its surroundings.
It does this by identifying a similar area elsewhere in the image, and generating a replacement section. A little patch in the same shape and size that you drew will appear elsewhere in the image.
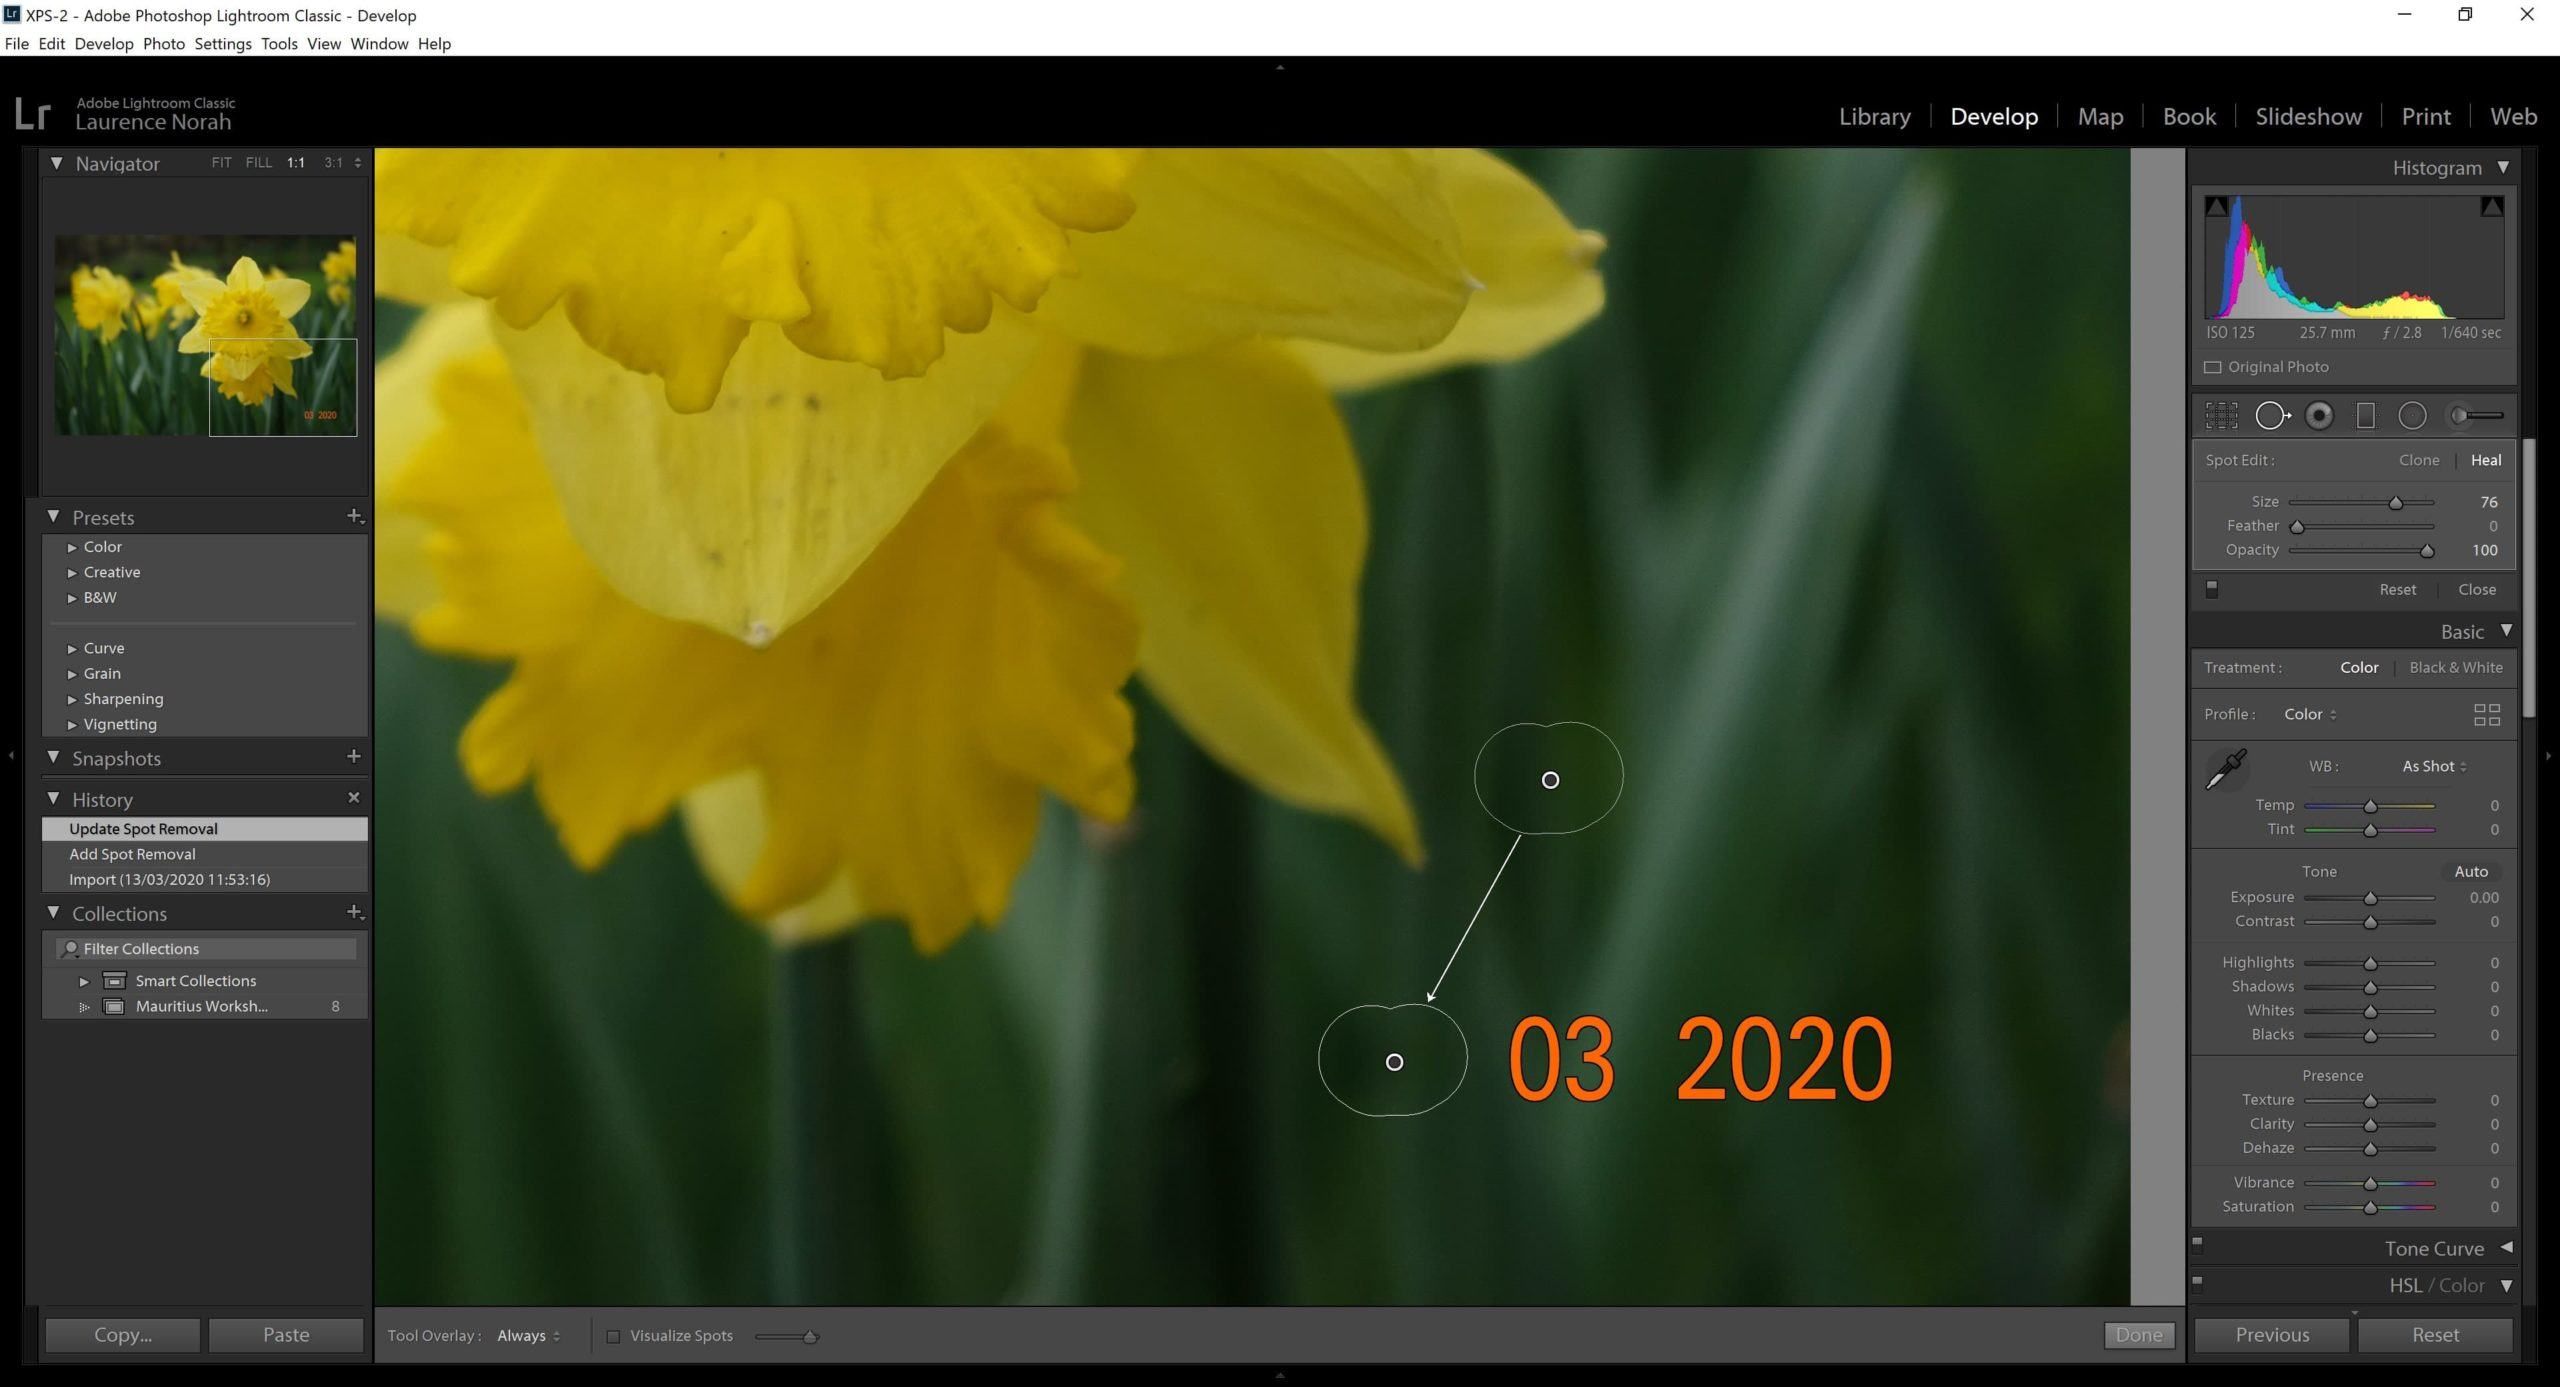
Sometimes Lightroom doesn’t get this quite right, and the patch will look obviously wrong. In this case, you can move the replacement patch area to a more appropriate part of the image to see if that works. Just click the replacement patch and move it around.
As you move it, you will see the look of the area you have replaced change. An arrow will also appear between the area you are moving around and the are you are replacing to make it obvious which patch you are changing.
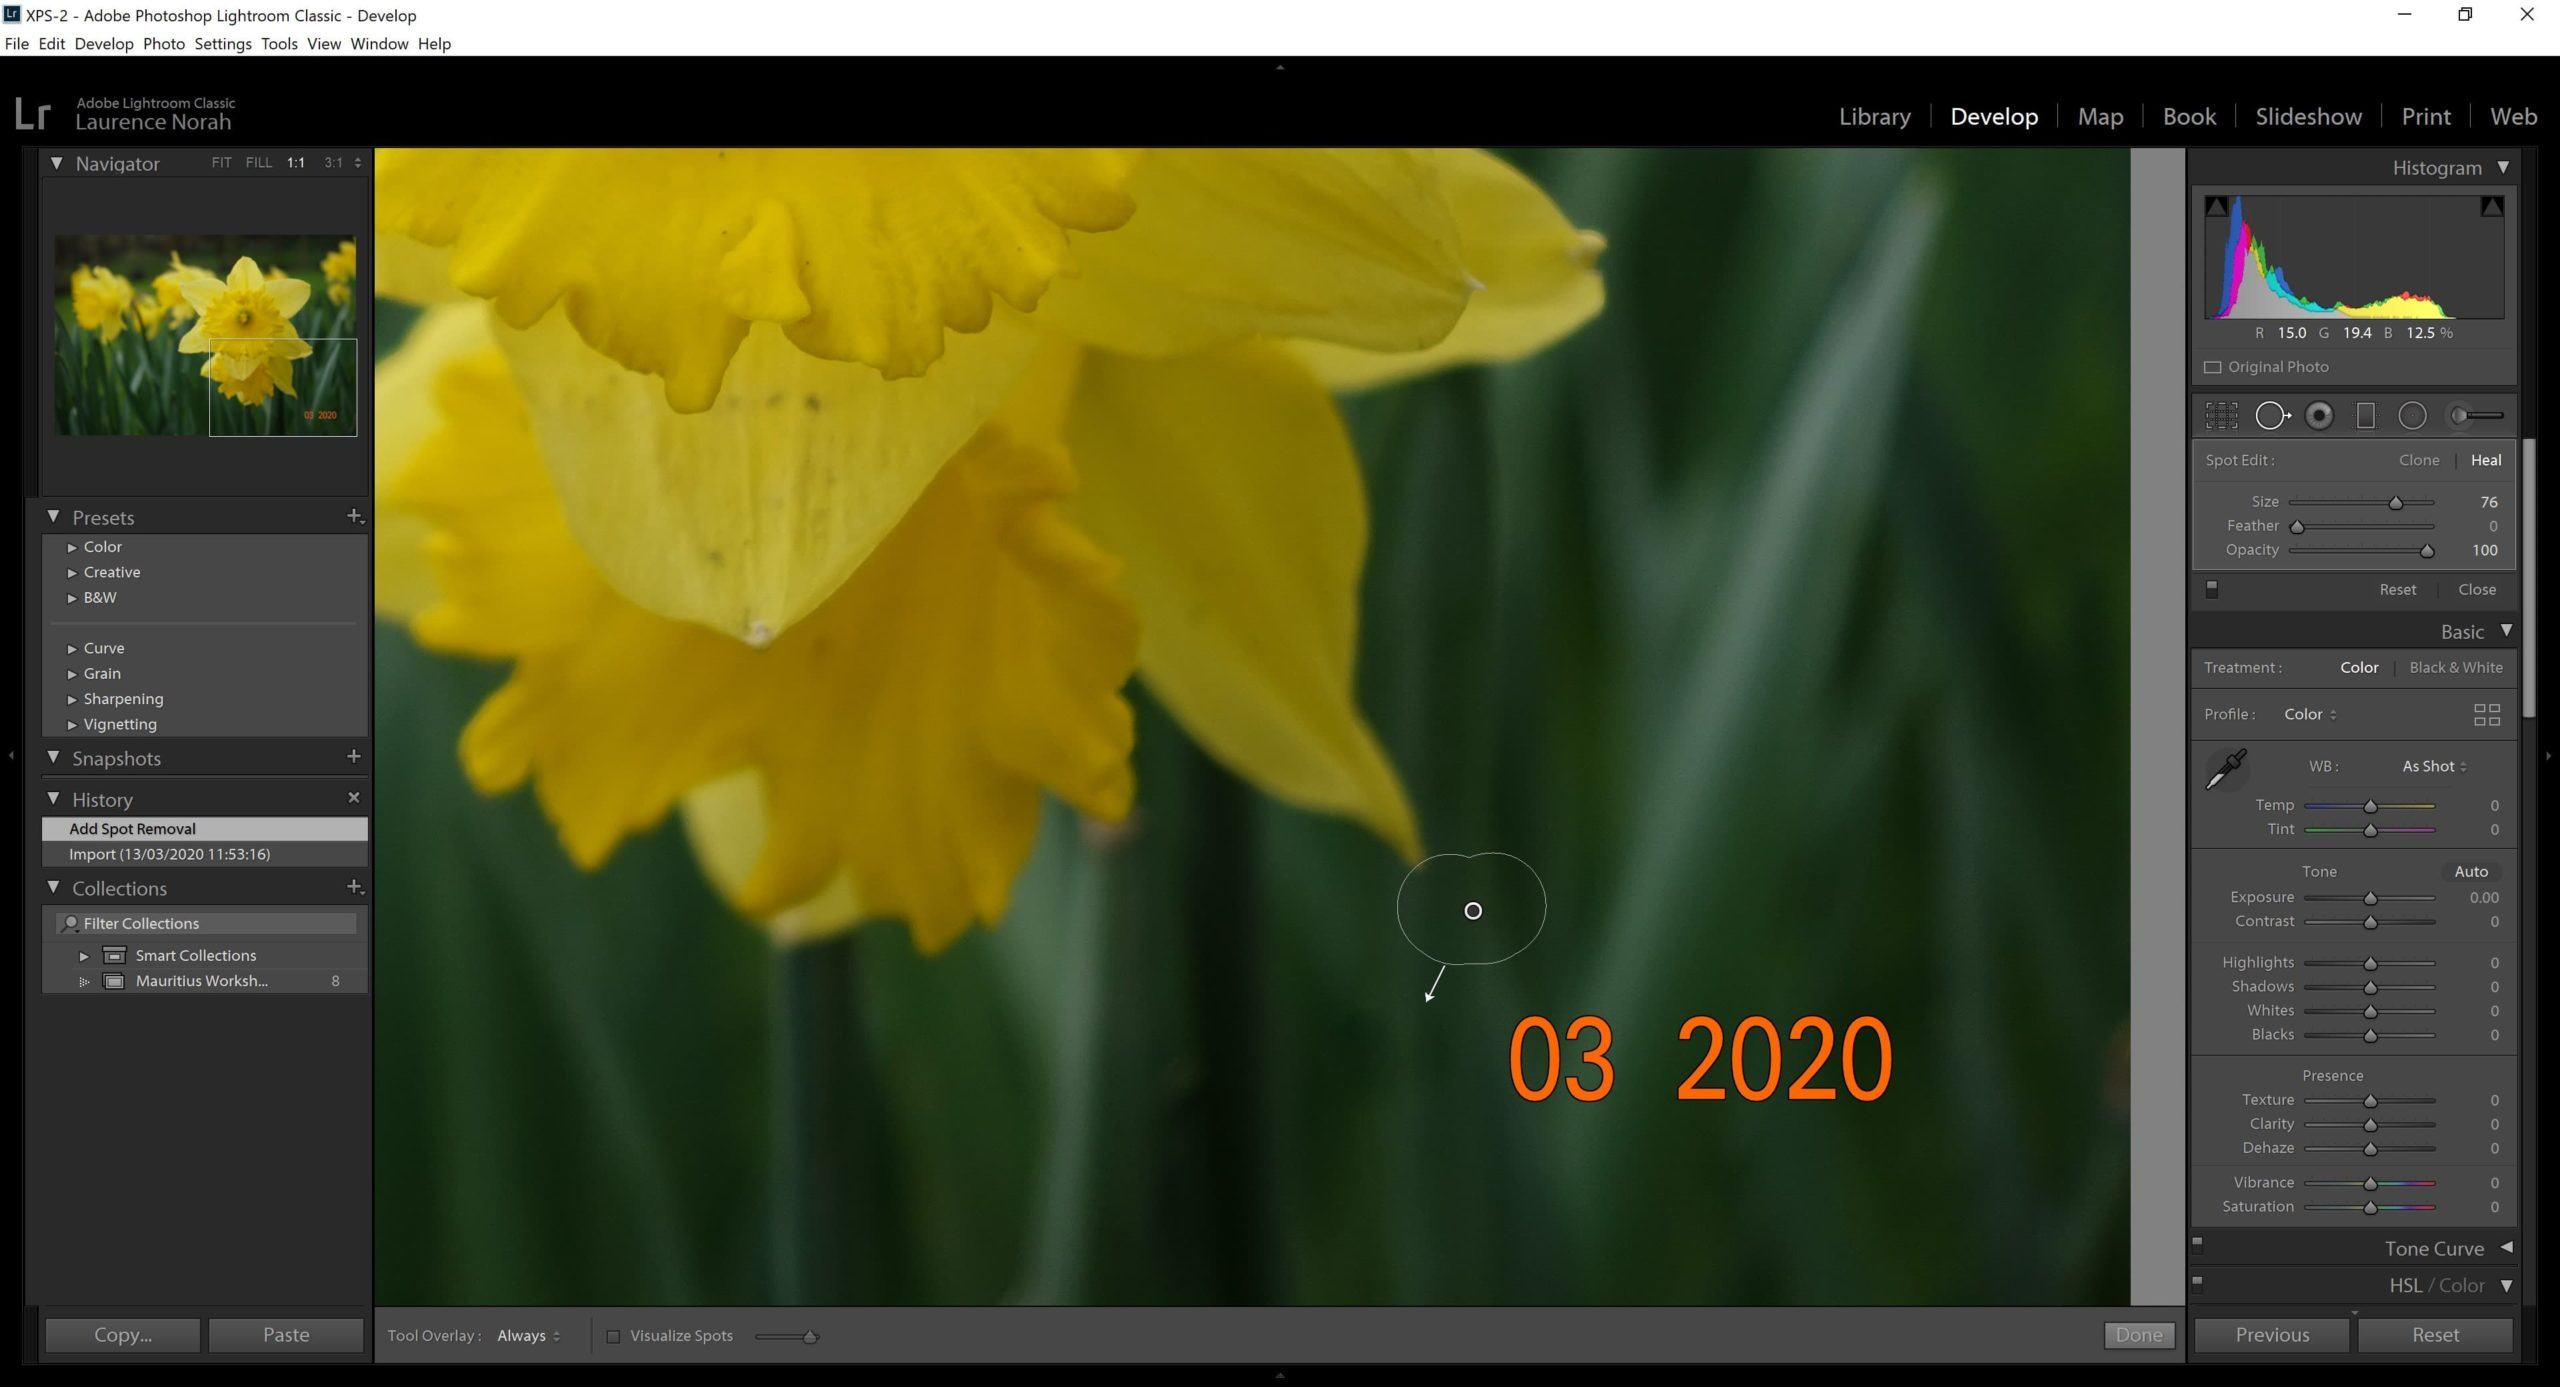
Move the patch around until the replacement area blends into the background.
I recommend making separate retouches for each series of numbers rather than doing them all at once. In the case of my image, that would be three retouches, one for “07”, one for “03” and one for “2020”.
To create a new patch, just paint over a new area of the image. Note you can’t start a new patch in the same place as an existing patch.
Here’s what my image looks like with the three patches applied.
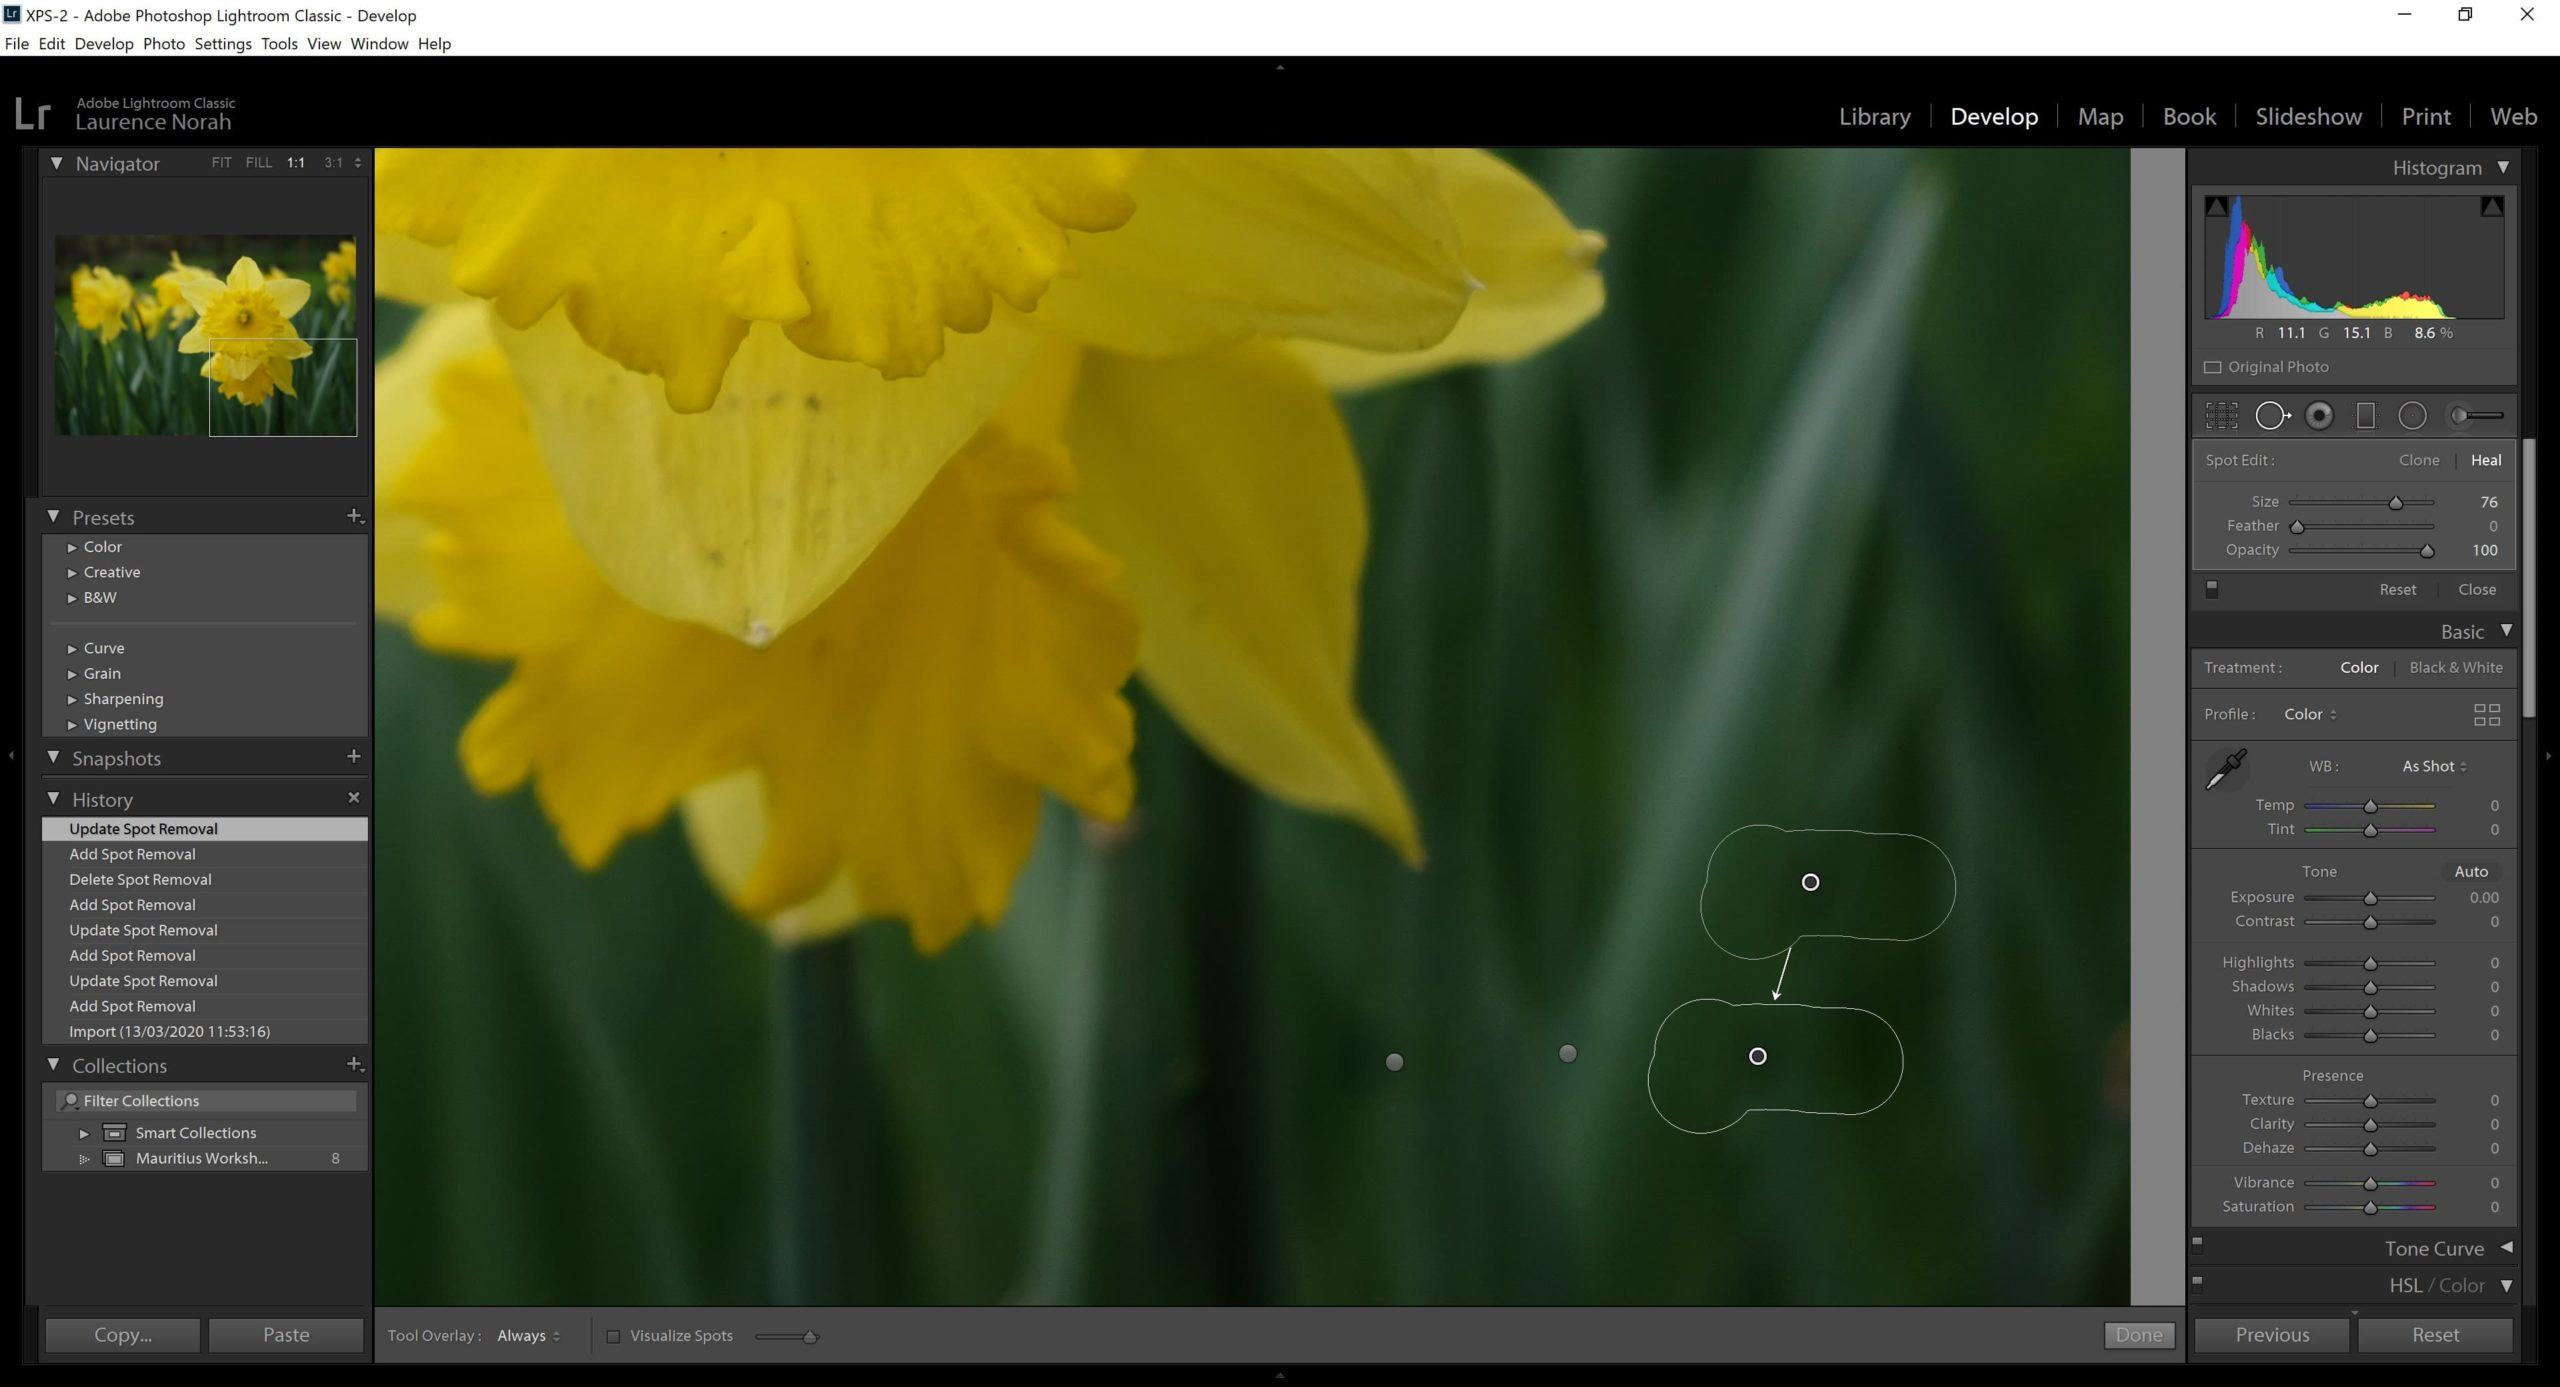
Once you have finished adjusting the patches, press done at the bottom right of the image. This is how the final image looks, compared to the original.
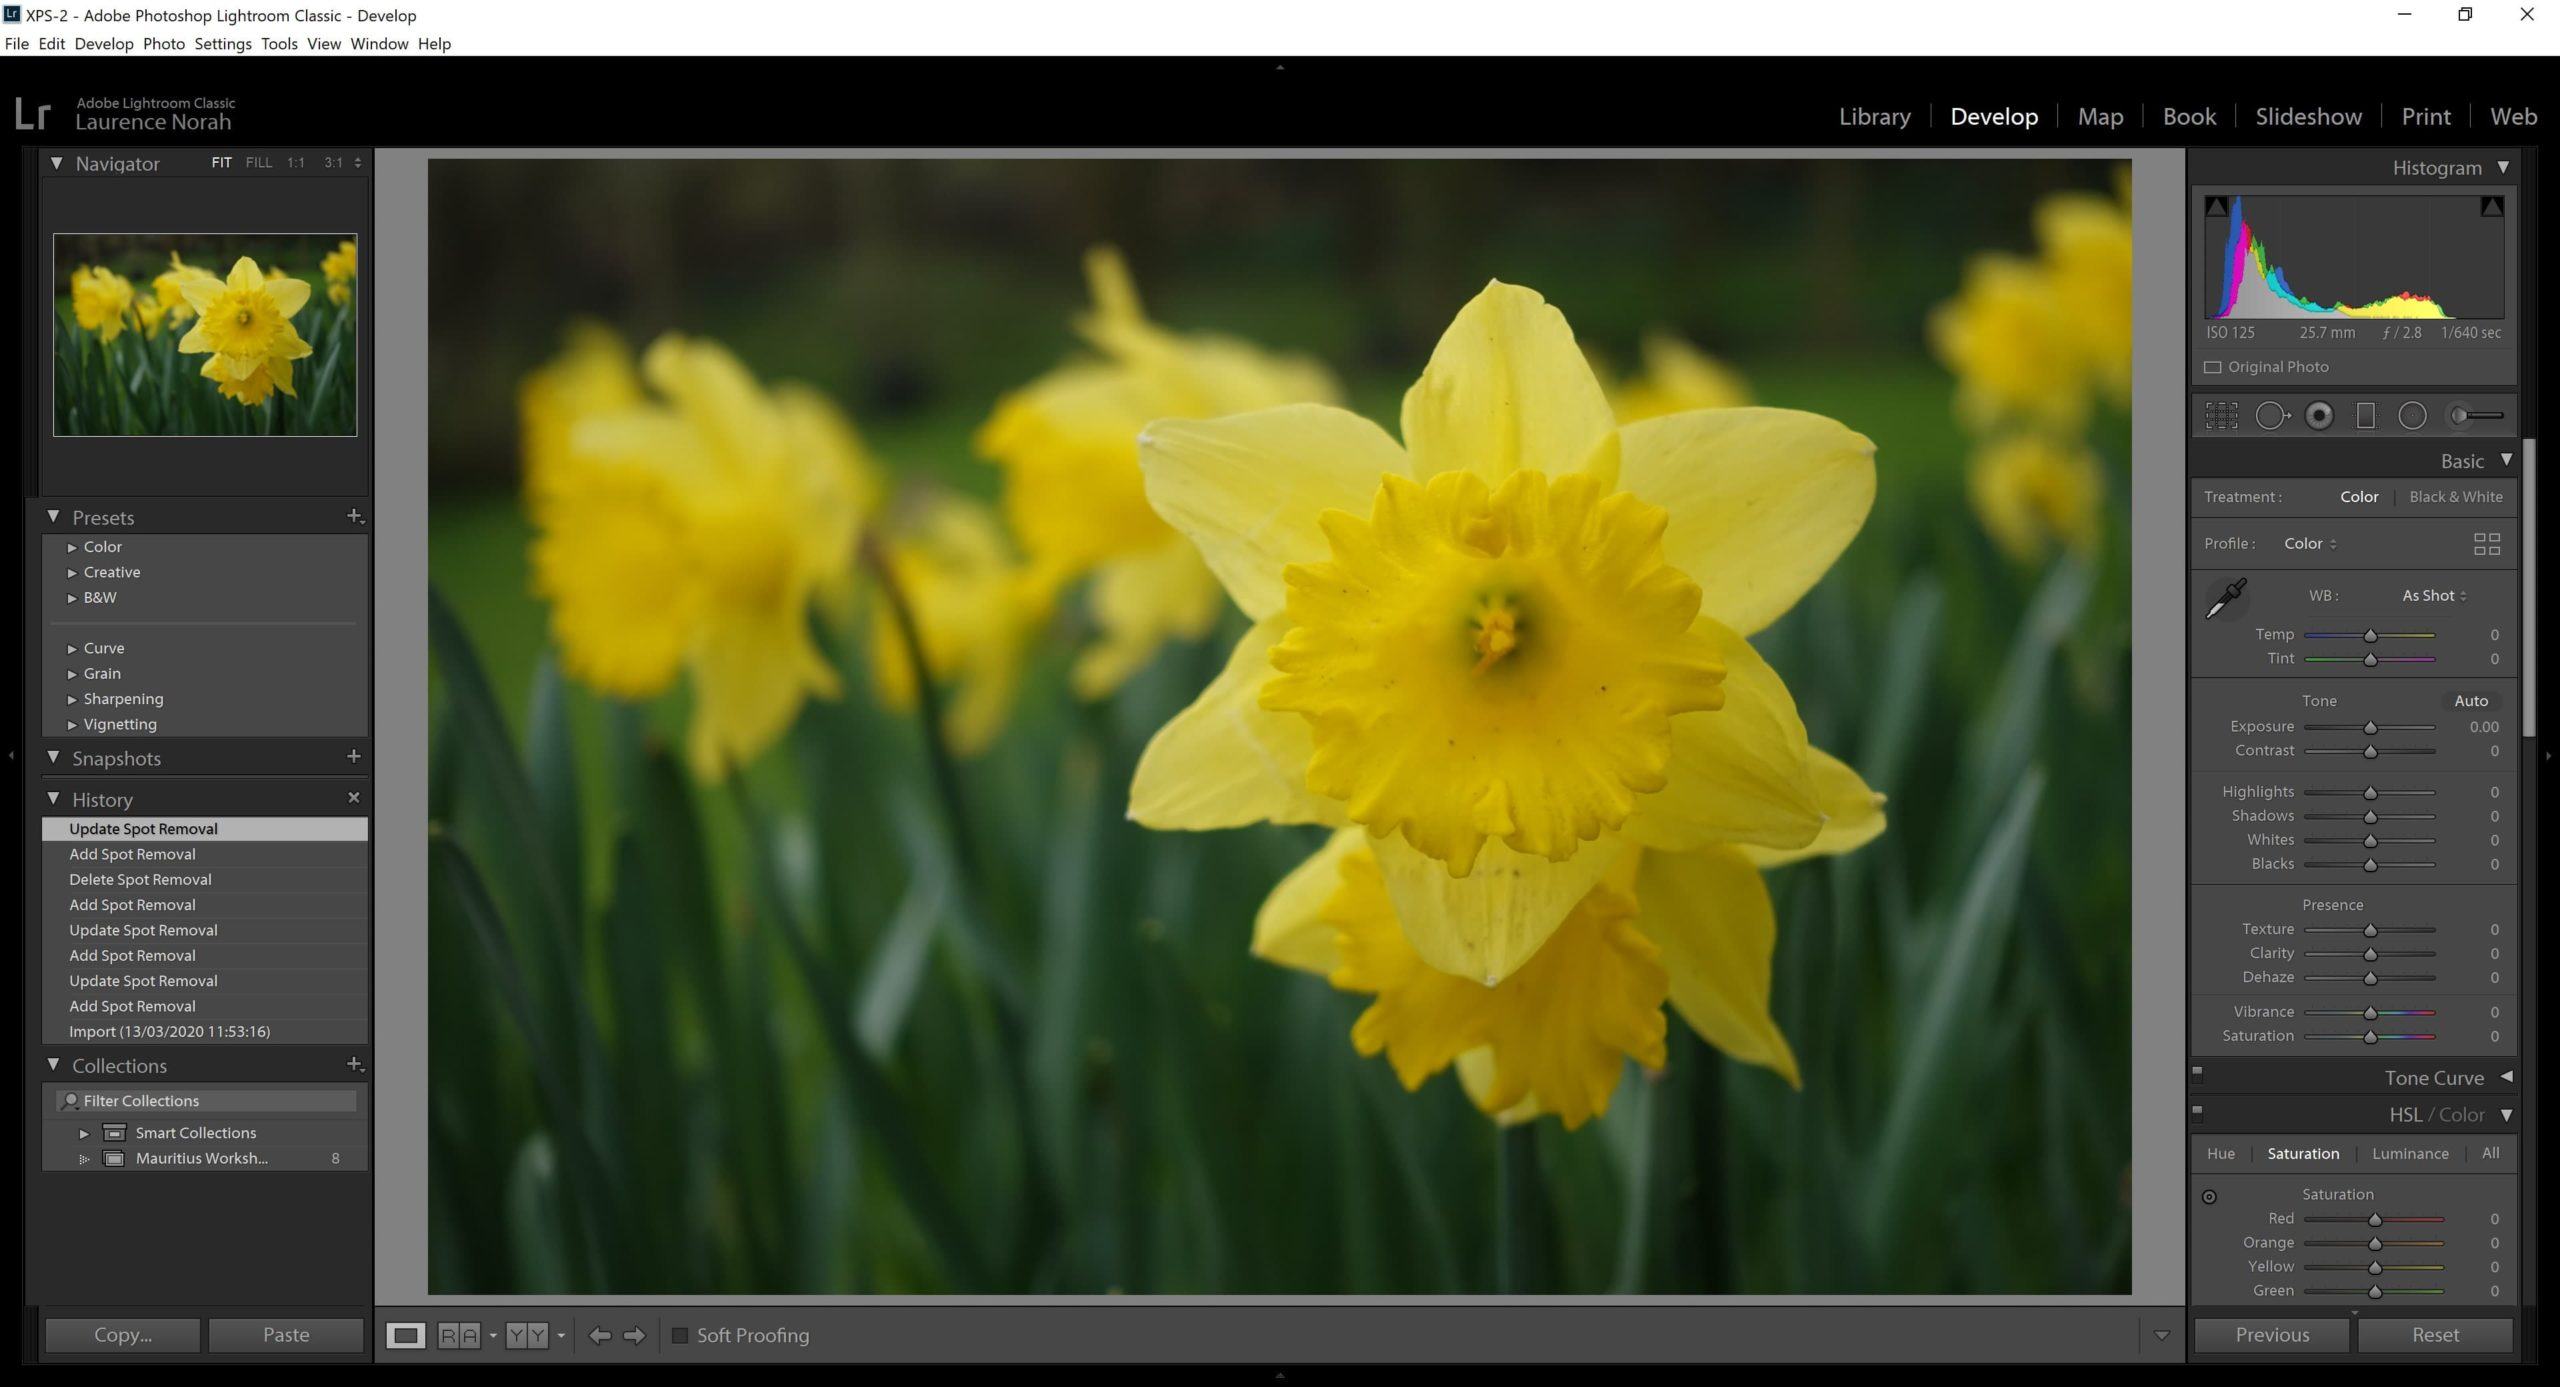

Hopefully you will agree that you can’t tell the date stamp existed at all!
Further Reading
Hopefully this guide answered all the questions you have about adding dates to your photos!
Before you go though, I did want to share some more guides we’ve written on the subject of photography which I think will help you on your photography journey.
Whether you’re a beginner or intermediate photographer, I’m sure you’ll find something in these guides that will help you.
- We have a guide to how to use a compact camera, how to use a DSLR camera, and how to use a mirrorless camera, which you might find interesting too. We also have a guide to how a DSLR works
- Knowing how to compose a great photo is a key photography skill. See our guide to composition in photography for lots of tips on this subject
- Once you’ve mastered aperture, you can control depth of field. Read more about what depth of field is and when you would want to use it.
- We are big fans of getting the most out of your digital photo files, and do to that you will need to shoot in RAW. See our guide to RAW in photography to understand what RAW is, and why you should switch to RAW as soon as you can if your camera supports it.
- You’re going to need some way of editing your photos. See our guide to the best photo editing software, as well our our guide to the best laptops for photo editing. We also have a guide to getting the best performance out of Adobe Lightroom, our preferred editing software.
- If you’re looking for advice on specific tips for different scenarios, we also have you covered. See our guide to Northern Lights photography, long exposure photography, fireworks photography,
- tips for taking photos of stars, and cold weather photography.
- If you’re looking for a great gift for a photography loving friend or family member (or yourself!), take a look at our photography gift guide,
- If you’re in the market for a new camera, we have a detailed guide to the best travel cameras, as well as specific guides for the best cameras for hiking and backpacking, the best compact camera, best mirrorless camera and best DSLR camera. We also have a guide to the best camera lenses.
- If you want a camera or lens, but the prices are a bit high, see our guide to where to buy used cameras and camera gear for some budget savings options.
- We have a guide to why you need a tripod, and a guide to choosing a travel tripod
- Ever wondered how to easily replace the sky in an image? Check out our guide to sky replacement in photography for an easy process anyone can do.
Looking to Improve Your Photography?
If you found this post helpful, and you want to improve your photography overall, you might want to check out my online travel photography course.
Since launching the course in 2016, I’ve already helped over 2,000+ students learn how to take better photos. The course covers pretty much everything you need to know, from the basics of how a camera works, through to composition, light, and photo editing.
It also covers more advanced topics, including astrophotography, long exposure photography, flash photography and HDR photography.
You get feedback from me as you progress, access to webinars, interviews and videos, as well as exclusive membership of a Facebook group where you can get feedback on your work and take part in regular challenges.
It’s available for an amazing one-off price for lifetime access, and I think you should check it out. Which you can do by clicking here.
And that’s it for our detailed guide to adding or removing a date stamp to your photos. As always, we’re happy to take feedback and answer your questions – just pop them in the comments below and we’ll get back to you as soon as we can.
Hae-Won says
Hi Lawrence, thanks for this wonderful free resource! I am wondering what your recommended options would be for getting a new (or not too old) mirrorless camera that has the capacity to add a time stamp and date stamp within the camera? Needs to be available to buy in person or online from South Korea (home country) or London (current work) for me. thank you much!
Laurence Norah says
Hi Hae-Won
That is a great question. So this is definitely not a common feature. I don’t believe recent Canon or Nikon mirrorless cameras have it. Some Fuji cameras do have it, for example the X-A7. Whilst it was released in 2019, it’s still the most recent of that particular model. The X-T200 from 2020 also has it. I appreciate these are not the most recent cameras but unfortunately this isn’t a feature that is as common these days so it is harder to find models offering it. There might be other cameras with the date stamp feature if you search, but I couldn’t personally find any. If you want to check, the easiest option is to look up a camera you are interested in and search through the owners manual online for “date stamp”.
Sorry not to be of more help!
Laurence
Marcel Wulffraat says
Thank you very much indeed, specificially for the section “How to Add a Date Stamp or Watermark to a Photo for Free..”
This I was looking for, for quite a long time.
Again THANKS!
Laurence Norah says
My pleasure Marcel, glad to be able to help 🙂
Chris says
Thank you so much for this tip! I have a corporate client who needs images with timestamps on them now and LR still doesn’t offer this, but because of you I now have Faststone and it works great!
I really appreciate your post, thank you.
Laurence Norah says
My pleasure Chris, glad to be of help!
Cece says
is a camera set time date stamp considered a watermark?
Laurence Norah says
Hi Cece,
So technically a watermark is something which is added to paper which can only be seen when held up to the light, such as you would find on a bank note.
However, in photography the term is commonly referred to these days to mean text which is added to an image, such as an authors name, to help protect the image. If the camera adds the date to the image as text, then you might consider that a watermark. However as it doesn’t identify the author or really protect the image, I’d say it’s not really a watermark as the term is normally used in photography.
I hope this helps, if you have further questions or wanted to clarify feel free to follow up!
Laurence
Cece says
thanks. I don’t consider a time date stamp as a watermark. I’m having a disagreement with a professional real estate organization about it and have not found anything that says that it is any kind of identifier as a watermark.
James says
I learnt something new. Thanks for sharing your informative post!
Laurence Norah says
My pleasure James 😀
MahrsMusic says
Great article! Thank you so much!
Laurence Norah says
My pleasure – I’m pleased you found it useful!
Laurence
Michael Lim says
Thank you for the tips. It is a very detailed and helpful article
Laurence Norah says
My pleasure Michael – thanks for taking the time to comment and let me know that you found the post helpful. Do let me know if you have any questions 🙂
aryne says
Thank you, it is very helpful article.
Laurence Norah says
My pleasure Aryne 🙂
Jason Reynolds says
Hi Laurence & Jessica, I am looking for a new travel camera and would love to have this feature. Do you know if the date stamp is available in camera for any of the mirrorless cameras you recommend? If so if you could send along a few to consider. That would be very helpful!!!
Thanks, Jason
Laurence Norah says
Hi Jason,
This is a great question. Many more advanced cameras don’t include this feature any more, and even if they do it’s usually not well advertised – you have to dive into the manual and figure out if the feature exists! To save you the trouble, I went through our list of recommended mirrorless cameras and came up with a list of mirrorless cameras that include a date stamp feature. This might not be entirely comprehensive as it is hard to find out, but should help guide you a little. In addition, in our experience, if a manufacturer includes it on one of their mirrorless models, it will likely be on their other models, although you definitely need to check the manual to figure it out for sure.
In addition, most cameras on the market support something called DPOF, which is a feature where you can print images from a camera, or prepare them for printing at a print shop. This usually lets you specify if you want the date stamp added, but isn’t the same as adding the date stamp to every image by default.
Here’s a list based on our recommended mirrorless camera guide.
Canon EOS M100 – not that we can tell
Sony A6000 – not that we can tell
Fuji X-A5 – yes
Panasonic GX800 – yes, text stamp feature allows you to put a range of text on an image including the date
Olympus OM-D E-M10 Mark III – not that we can tell
Panasonic Lumix GX9 – – yes, text stamp feature allows you to put a range of text on an image including the date
Fujifilm X-T30 – not that we can tell
Sony Alpha a7 II – This camera does not have a function to insert the date on an image. You can insert
the date and save or print the image by using PlayMemories Home software
Canon EOS RP – not that we can tell
Fujifulm X-H1 – not that we can tell
Nikon Z6 – not that we can tell
Sony Alpha a7 III – This camera does not have a function to insert the date on an image. You can insert
the date and save or print the image by using PlayMemories Home software
Hopefully this helps! I’d suggest looking at our guide which is ordered approximately by budget from low to high to find the right camera for you, and we’re happy to offer further advice of course 🙂
Laurence