So you’re the proud owner of a new mirrorless camera. Awesome! Mirrorless cameras are a wonderful bit of photography kit, with a number of advantages over other types of camera. They’re also one of the best cameras with which to learn photography on, because you can see the changes you make to various settings in real time.
But a mirrorless camera is a complicated piece of equipment. There are a lot of buttons, dials, and menus, and if you’ve never used one before, it can feel a bit like being handed the controls of a small aircraft.
Which is where I come in. I’ve been taking photos for over thirty years with a wide range of cameras, from a film SLR through to compact, mirrorless, and DSLR cameras. I also teach an online photography course, lead photo workshops, and give talks on photography around the world. So those are my qualifications.
Today, I’m going to share with you everything you need to know to get the most out of your new mirrorless camera. I’ll cover what a mirrorless camera actually is, walk you through the controls and settings, explain how to start getting better photos right away, and then go over some tips for looking after your new investment.
This guide is written on the assumption that you have no previous photography experience, so we’ll start with the basics and work forward. Of course, if you do have experience, refreshing yourself on the basics never hurts in my opinion.
I should also say upfront that photography is not a simple subject. It can take time to grasp many of the concepts, and practice with your gear is the best way to get a handle on it. Reading a guide like this is a great starting point, but I urge you to get out there and take photos as much as you can.
Digital film doesn’t cost anything, and as you use your camera more and more the various settings and features will all start to make more sense. Please don’t get too frustrated if you feel overwhelmed. Photography is complicated, and like any skill, it takes time to master. Perseverance and patience are key!
Feel free to bookmark this page and come back to it for reference as your photography journey progresses. Now, let’s crack on.
Table of Contents:
What is a Mirrorless Camera?
A mirrorless camera is a type of digital camera. There are a number of types of digital cameras on the market, such as DSLR cameras, compact cameras, and even smartphone cameras.
These cameras have more in common with each other than differences. At its core, a camera is just a device which records light information to create an output we call a photograph. The medium for recording light was initially a chemically photosensitive piece of film, but that has been replaced by a digital sensor in most modern cameras.
All types of digital cameras take light from a scene, focus it through a lens, and record it onto a sensor. The differences between them are largely around the components that make up the camera, including the size of the sensor, the size of the aperture inside the lens, the level of manual control you have, and whether it supports different lenses.
A mirrorless camera, as the name suggests, does not have a mirror inside it. In a DSLR, a mirror is used to redirect the light passing through the lens to an optical viewfinder. A mirrorless camera skips this step. Instead, the image is displayed on the screen on the back of the camera, or in an electronic viewfinder (EVF), and in both cases what you see is the actual output of the camera sensor.
This is actually the same way smartphones and most compact cameras work. But because the mirrorless camera arose as a direct competitor to the DSLR, and the key difference was the lack of mirror, the name stuck.
Why does this matter for you as a beginner? Because a mirrorless camera’s biggest advantage is this: what you see on the screen is exactly the image you’ll get when you press the shutter button. Change a setting, and you see the effect immediately. That makes learning so much faster than it was on a DSLR, where you had to take the shot, check the result, and adjust. The histogram overlay on that same screen is worth learning early: it’s a more reliable read of your exposure than the preview image, and I’ve put together a full guide to reading a histogram properly. And its light years ahead of the film cameras I grew up with, where you had to wait days for your film to be developed!
In 2026, mirrorless cameras are the default choice for anyone buying a new camera. Canon, Nikon, and Sony have all shifted their development focus to mirrorless systems, and the selection of native lenses is now excellent across all the major brands. If you’re interested in how mirrorless and DSLRs compare in more detail, I have a guide to using a DSLR and a guide to how a DSLR works which cover those differences.
What Mirrorless Camera Should I Buy?
Before we get into the controls and settings, I know many of you reading this may not have bought your camera yet, or might be weighing up options. So here are a few recommendations at different price points, based on years of testing cameras and teaching students.
We also have a more detailed guide to the best mirrorless cameras and the best travel cameras which I recommend you check out. But here are four options that would make a great starter mirrorless camera.
Absolute Budget: Canon EOS R100
I’ve been a Canon user since I was 13 years old, and I think they produce an incredible range of cameras. If you want the cheapest way into the Canon mirrorless system, the EOS R100 is it. It’s also one of the cheapest new mirrorless cameras you can buy from any of the major brands, though as I’ll get into below, that low price comes with real trade-offs.

For your money you get an 18-45mm kit lens, a 24.1MP APS-C sensor (the same type you’d find in more expensive Canon cameras), WiFi and Bluetooth, and a nice electronic viewfinder. It supports 4K video. What you don’t get is a touchscreen, in-body image stabilisation, or Canon’s newer subject detection autofocus (it’s stuck with face and eye detection only, because it uses an older processor). It also has a fixed rear screen rather than one that flips out.
These are real compromises, and they’re why I’d push most people towards the R10 below if you can possibly stretch to it. But if your budget genuinely tops out at around the R100’s price point, it’s a capable little camera that will let you learn the fundamentals and access the full range of Canon RF lenses as you grow.
You can see the latest prices and buy it online on Amazon here and on B&H here.
My Top Pick for Beginners: Canon EOS R10
If you’re asking me what I’d actually buy for someone starting out in photography, this is the answer. The R10 is the camera I recommend more than any other to new photographers, because it hits a sweet spot between capability and price that nothing else in Canon’s lineup quite matches.

You get a 24.2MP APS-C sensor, a flip-out touchscreen (which makes a huge difference when you’re learning, trust me), and Canon’s proper subject detection autofocus system. The same one, in fact, that’s in Canon’s flagship professional bodies. It can track people, animals, and vehicles automatically, and the eye detection for portraits is excellent.
It shoots at up to 15 frames per second with the mechanical shutter, or 23 fps with the electronic shutter, which is more than enough for action or wildlife. Video is 4K at up to 60p. Build quality feels a proper step up from the R100, and there are more physical controls to grow into as your skills develop.
What it doesn’t have is in-body image stabilisation, so you’ll want to use stabilised lenses (most Canon kit lenses are) or a tripod for low light handheld work. It’s also got the same smaller LP-E17 battery as the R100, so I’d pick up a spare straight away.
For most beginners, this is the camera I’d point you towards. The R100 saves you a bit of money but gives up a lot. The a6700 below is technically better but costs significantly more. The R10 is the practical sweet spot.
You can see the latest prices and buy the Canon EOS R10 on Amazon here.
Best Value Step-Up: Sony a6700
If you’ve decided you want to go with Sony, or you specifically want features the R10 doesn’t have, the a6700 is the camera I’d recommend. It’s a step up from the R10 in several meaningful ways, though it costs meaningfully more too.
You get a 26MP APS-C sensor, in-body image stabilisation (a big deal for handheld shooting in low light), a flip-out touchscreen, very fast autofocus with eye tracking, and weather sealing. It shoots 4K video beautifully and can burst at up to 11 frames per second.
If I had to find fault, I’d say the Sony menu system takes some getting used to, but that might be because I’m so used to the Canon interface. You can see the latest prices and buy it online on Amazon here and on B&H here.
If Budget Allows: Canon EOS R6 III
If you want a camera you won’t outgrow for a very long time, the R6 III is a full-frame powerhouse. This is a serious bit of kit.
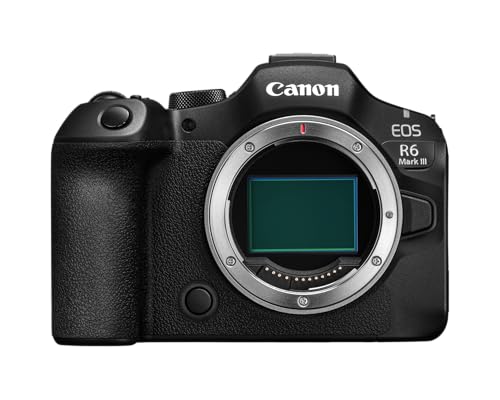
You get a 32.5MP full-frame sensor, 8.5 stops of in-body image stabilisation, 40 frames per second burst shooting, and arguably the best autofocus system in the Canon lineup. It shoots 7K video. It is, I should warn you, not cheap.
I shoot on the Canon EOS R5, which is in the same family, and the R6 III shares many of its best features at a lower price. You can see the latest prices on B&H here.
You can see the latest prices and buy the Canon EOS R6 III on Amazon here.
A Quick Note on Sensor Sizes
You’ll notice I mentioned “APS-C” and “full-frame” sensors above. This is one of the most important things to understand when choosing a mirrorless camera, and it’s the main reason cameras at different price points produce different results.
A full-frame sensor is the larger of the two (roughly the size of a frame of 35mm film, if that means anything to you). It captures more light, produces better images in low light, and gives you the option to capture more depth of field (that nice blurry background in portraits). The easiest way to control that depth of field is by shooting in aperture priority. Full-frame cameras and their lenses tend to be larger and more expensive.
An APS-C sensor is smaller (roughly 40% of the area of a full-frame sensor). APS-C cameras are more compact and affordable, and their lenses tend to be smaller too. The image quality is still excellent, and for most beginners and even many professionals, APS-C is more than enough. I’ve sold many photos taken with an APS-C sized sensor!
There’s also a third option called Micro Four Thirds, used by brands like OM System (formerly Olympus) and Panasonic. The sensor is smaller again, which makes for very compact cameras and lenses, though with some trade-offs in low light performance.
For most people starting out, an APS-C camera like the Canon R10 or Sony a6700 is the sweet spot. You get great image quality without the weight, size, or cost of a full-frame system.
Mirrorless Camera Controls: A Guide to the Buttons and Dials
When you take a mirrorless camera out of the box, you’ll probably notice it has a lot of buttons and controls, with a range of obscure labels and markings.
This can be a bit overwhelming, and you might be tempted to leave it in auto mode as a result. I get it. But to get the most out of your camera, it’s worth learning what at least some of the buttons do. The good news is that once you’ve done this with one camera, you can transfer your knowledge to others, which are all fairly similar.
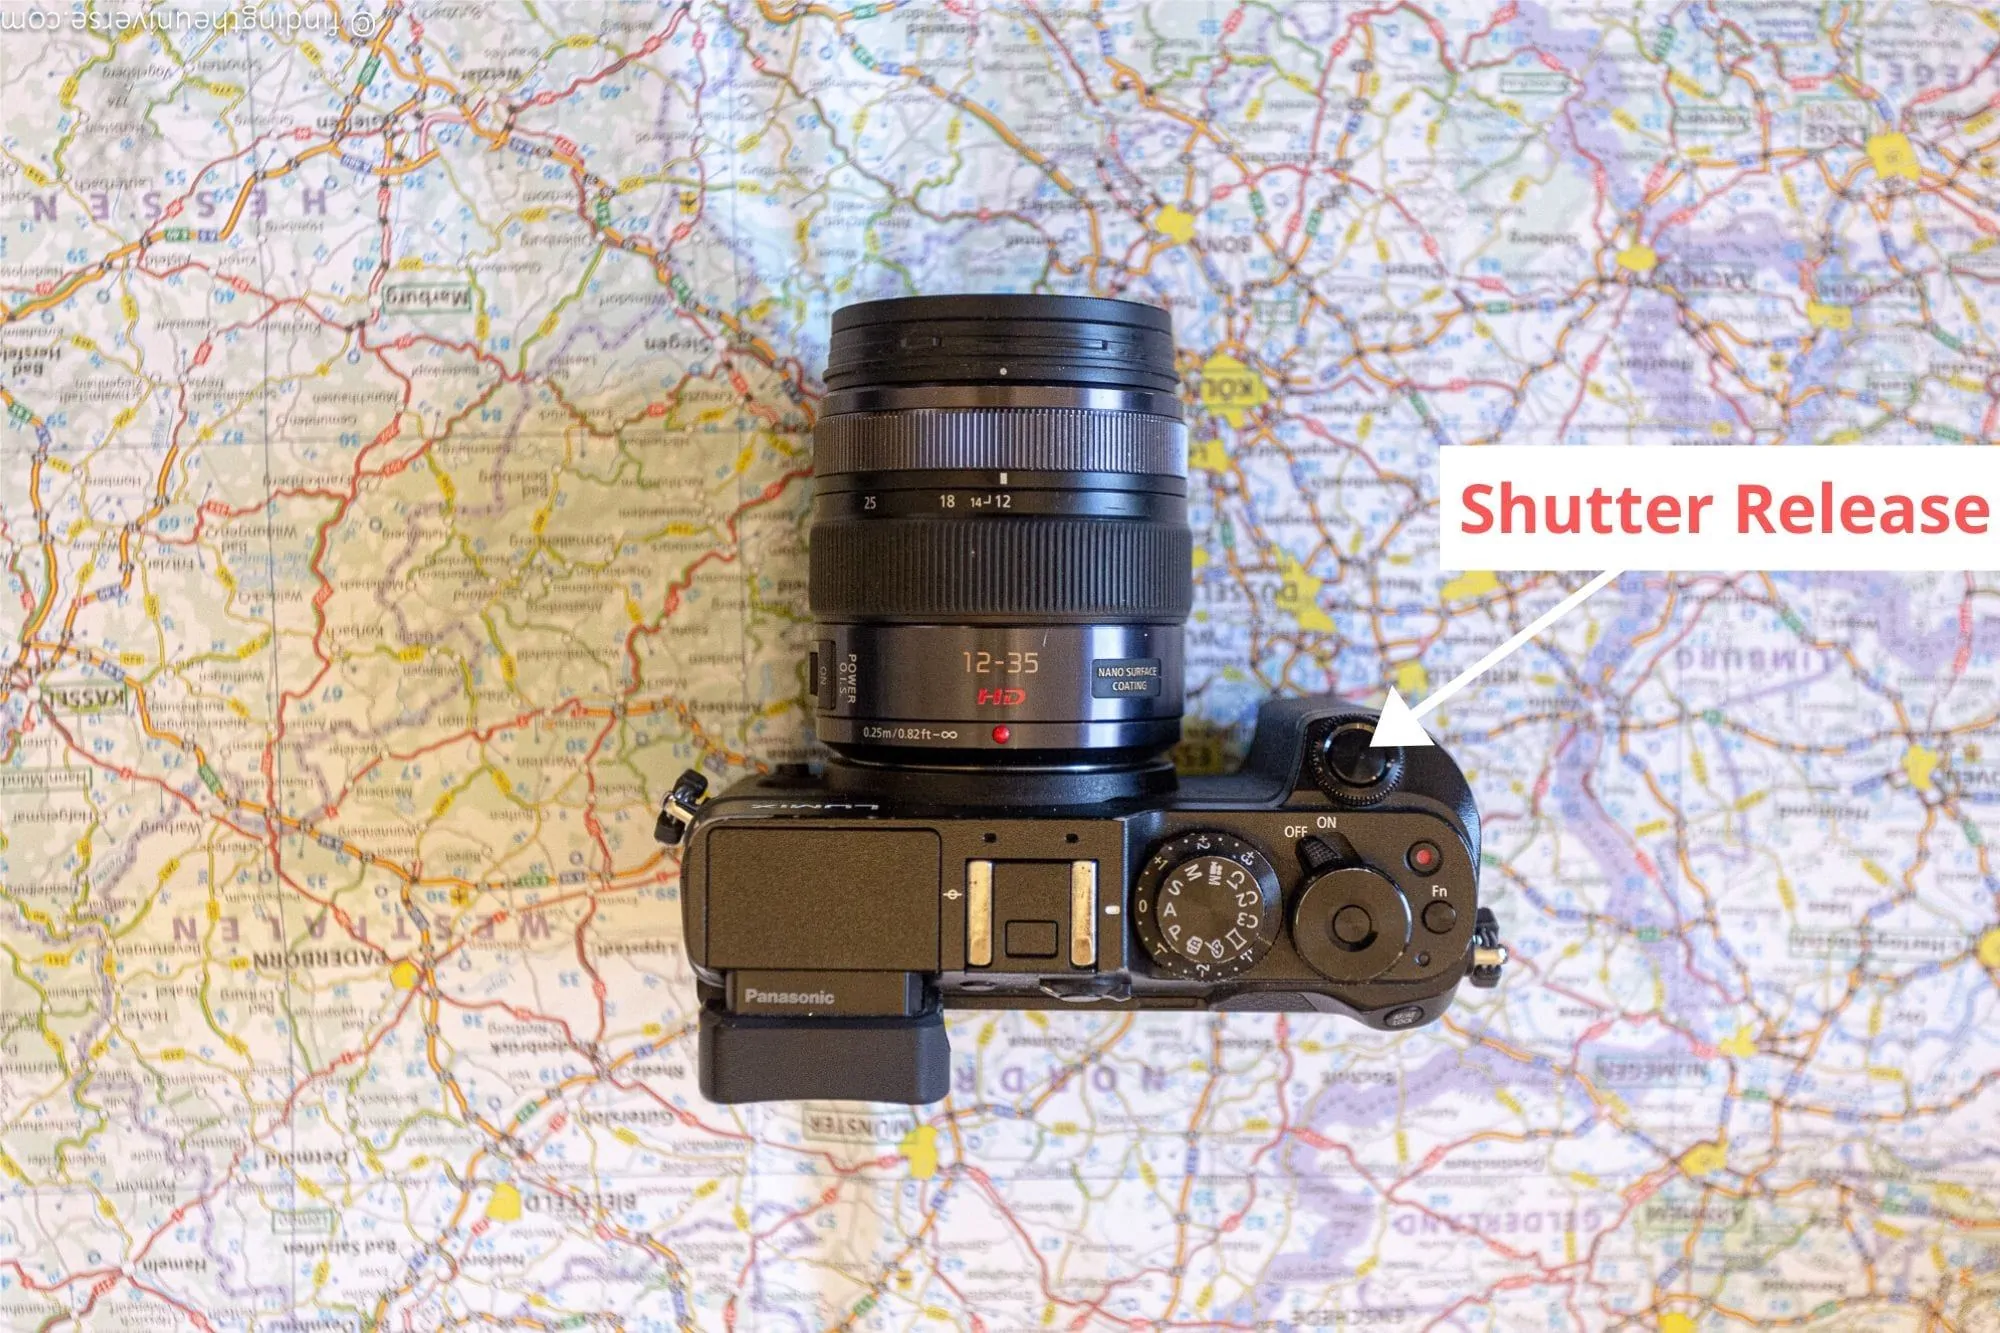
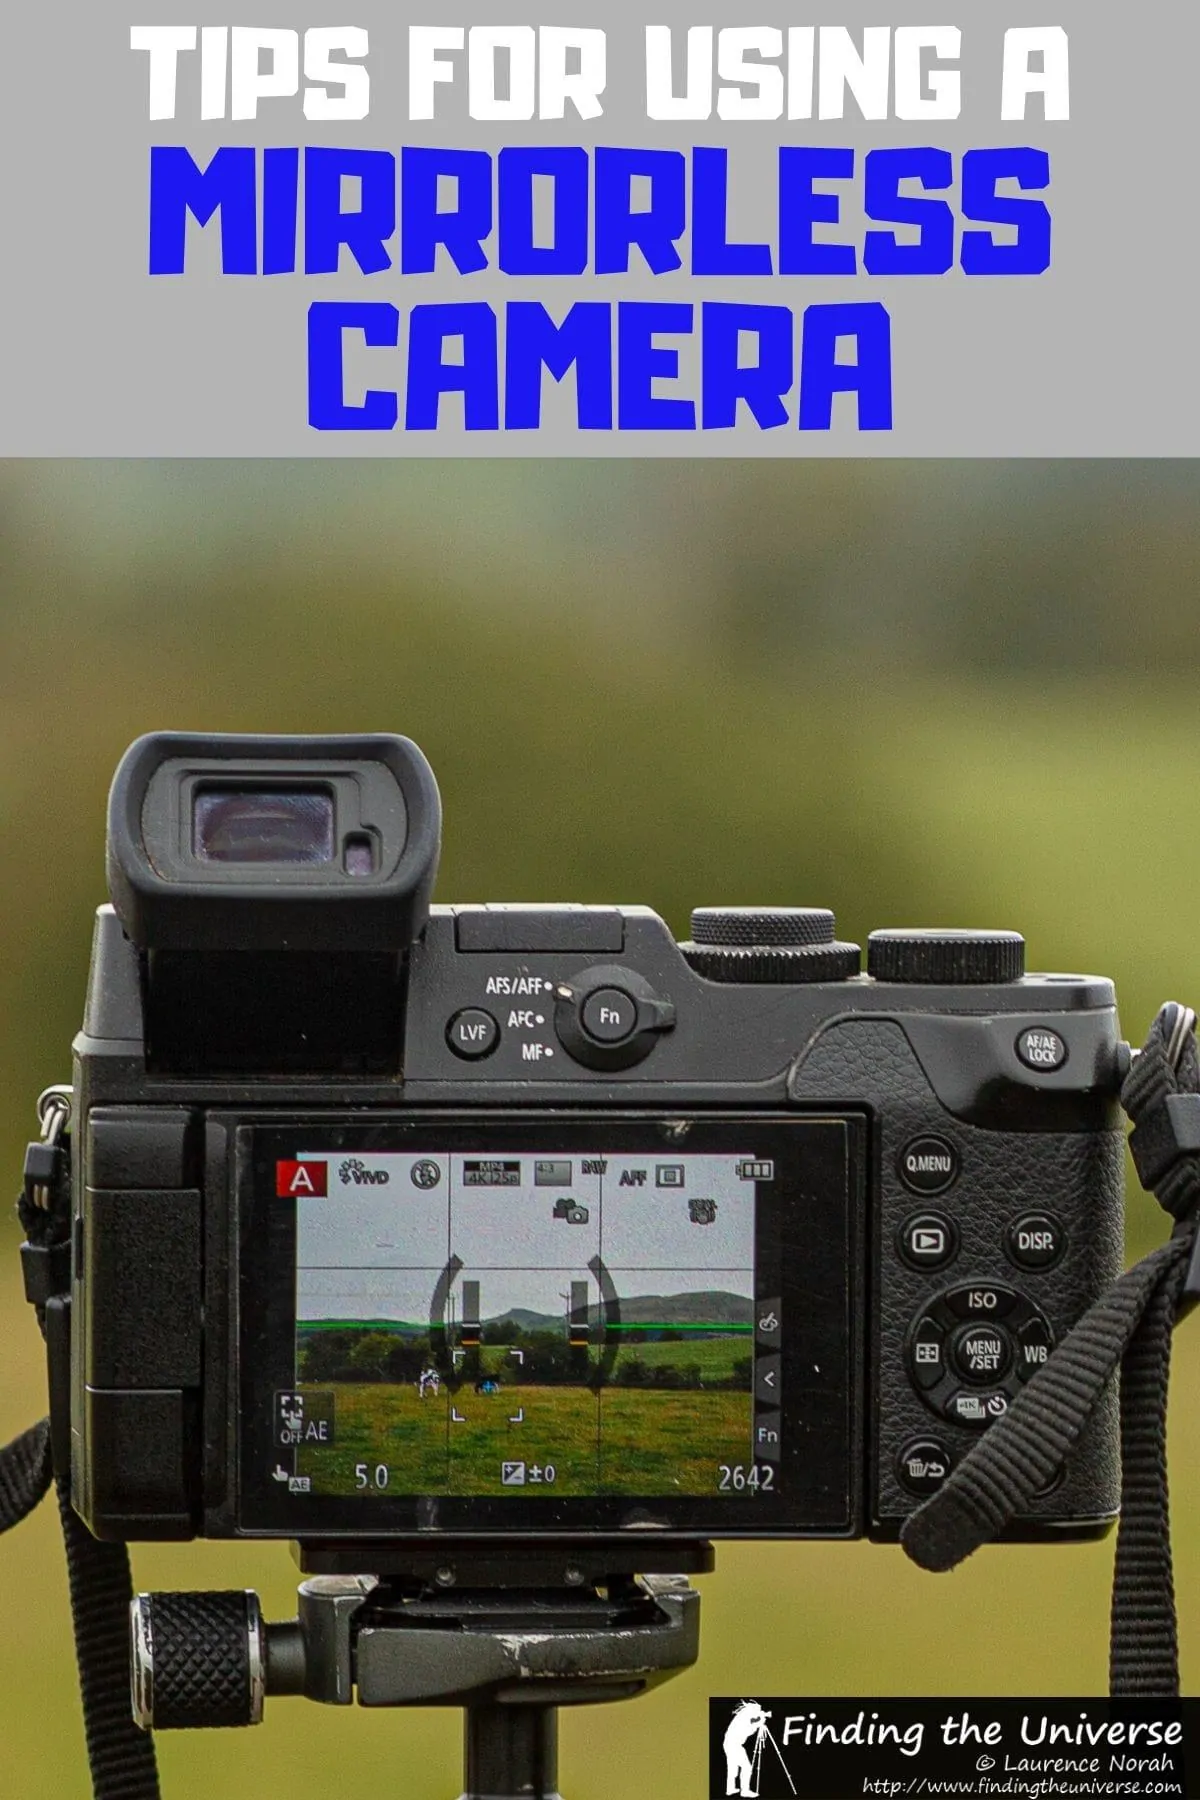
I’m going to go through the major controls, features, and buttons that most mirrorless cameras have. The exact controls and naming conventions might vary from camera to camera, but this should cover the key elements you should be looking to master on your new camera. The images in this section are from one of my mirrorless cameras.
Note, this section has a lot of information. Don’t worry about absorbing everything on your first run through. A mirrorless camera is a complicated bit of equipment. The key thing is to try different things, practice a bit, and come back to learn some more.
Shutter Release
Probably the most obvious button on your camera, the shutter release is the button you press to take a photo. It’ll usually be at the top right, to be operated by the index finger on your right hand.
Left-handed photographers are out of luck. As far as I know there has never been a left-handed camera design with the shutter button placed for left-handed use. Sorry about that.
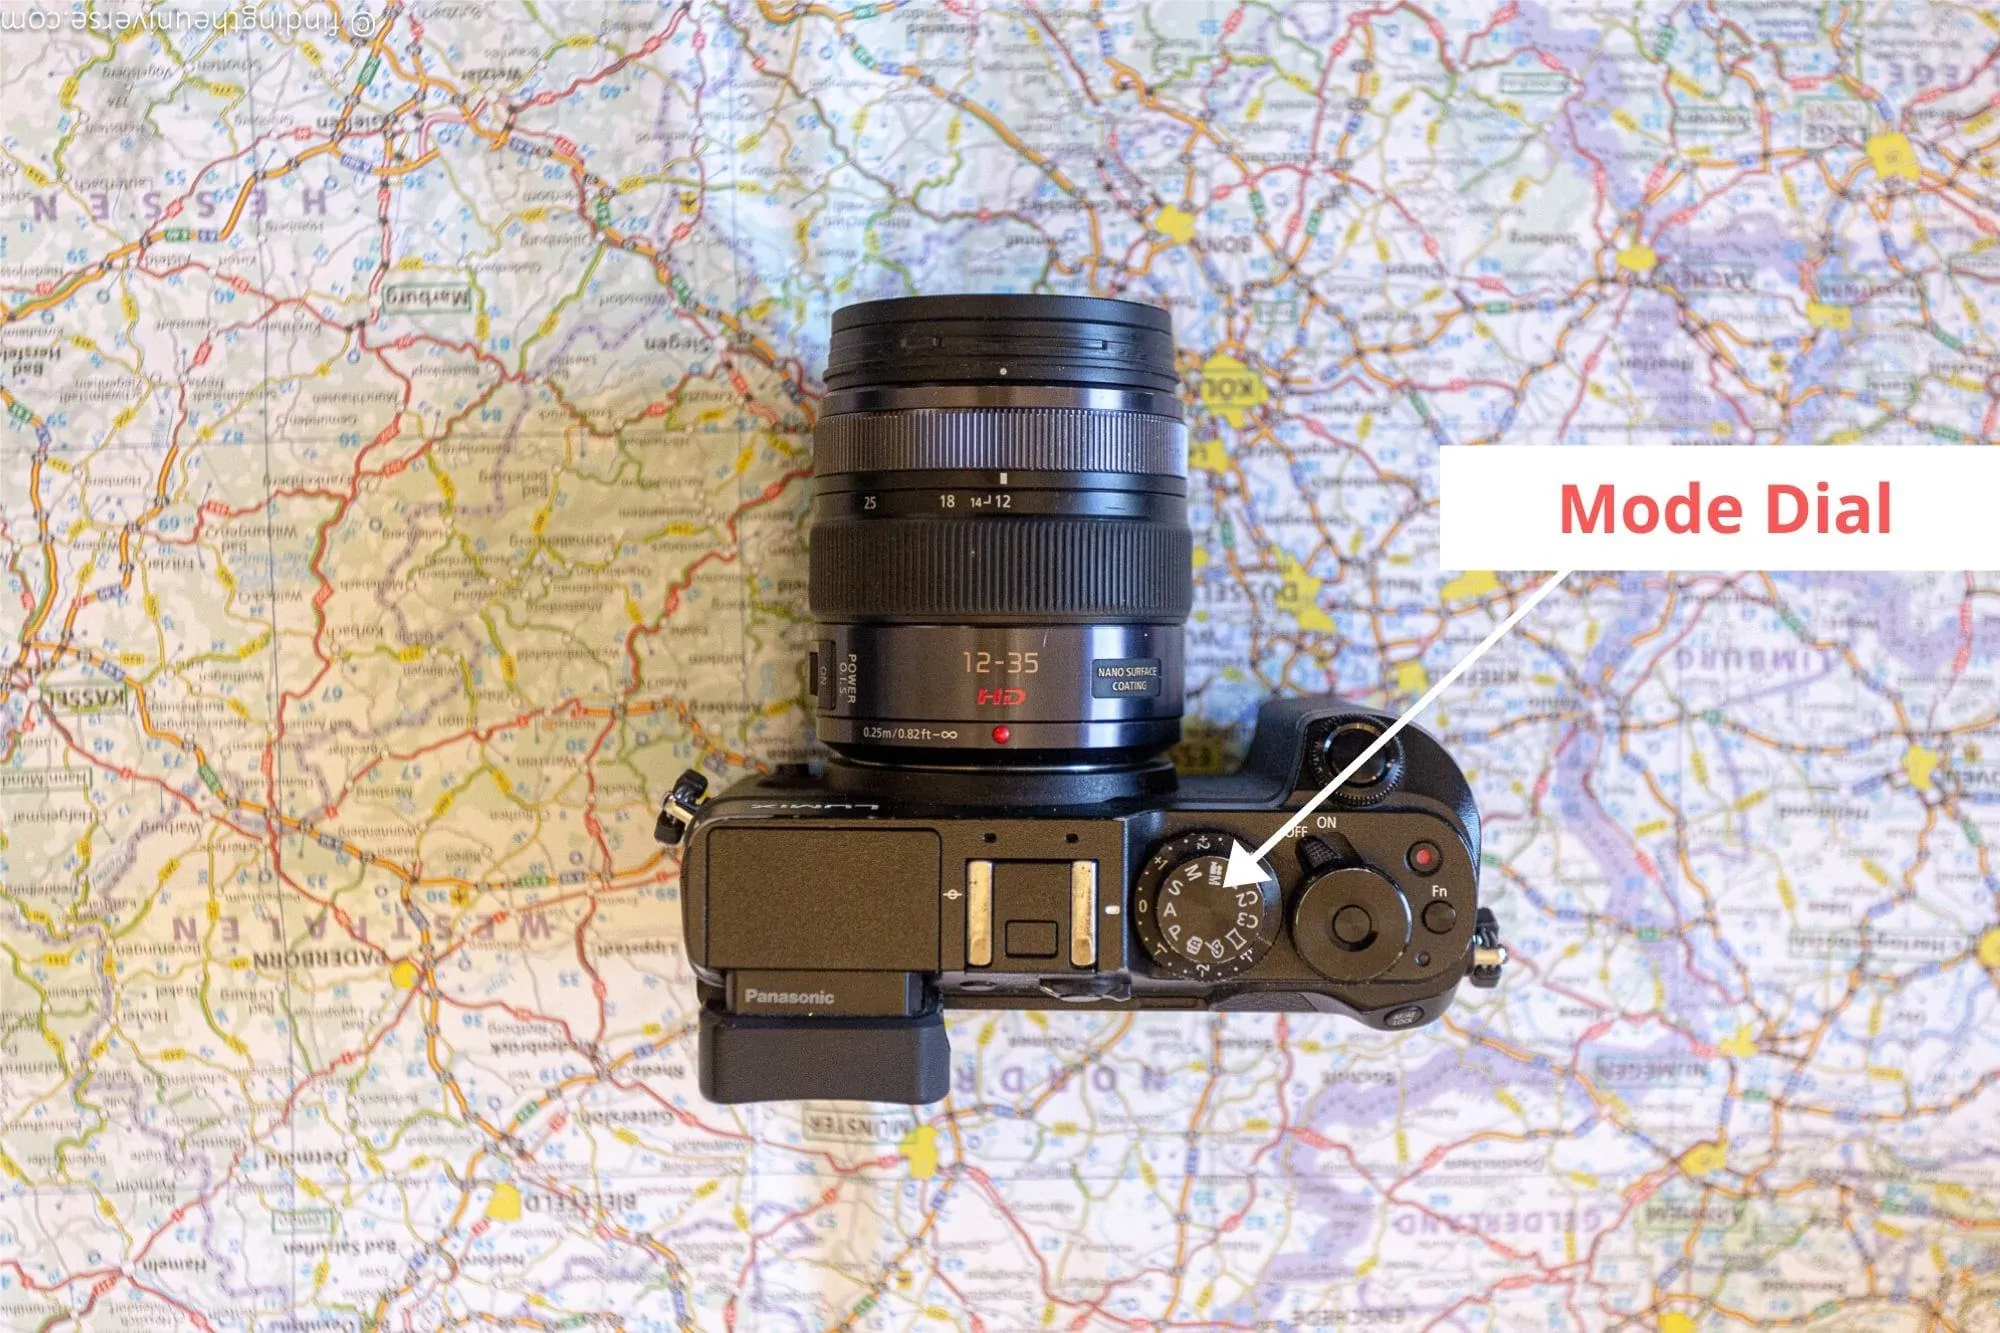
Mode Dial
Like DSLRs and some advanced compact cameras, a mirrorless camera has a range of modes that define how much manual control you have. To change the mode, you rotate the mode dial, and the new mode takes effect immediately.
The exact modes will vary by camera, but should be similar to these:
- Auto. The default mode most cameras come set to. The camera handles everything, including shutter speed, aperture, and ISO. It may also pick the focus point and fire the flash. You just point and press the shutter button.
- Scene modes. Additional auto modes tuned for specific situations, like landscape, portrait, night, or macro. These give the camera a clue about what you’re shooting so it can adjust settings for you.
- P mode (Program Auto). A slightly more advanced version of auto that lets you tweak things like exposure compensation, ISO, and white balance. It’s a stepping stone, but I’d suggest skipping it and moving to aperture or shutter priority instead.
- “A” or “Av” mode (Aperture Priority). This lets you set the aperture, and the camera figures out the shutter speed. You can also adjust ISO and exposure compensation. Aperture controls depth of field, so this mode works well for both portraits and landscapes. This is the mode I use most often.
- “S”, “T”, or “Tv” mode (Shutter Priority). The opposite of aperture priority. You set the shutter speed, and the camera works out the aperture. Great for controlling motion in a shot, like freezing a fast-moving subject or creating intentional blur.
- “M” (Manual). Full control over aperture, shutter speed, and ISO. The camera’s exposure meter will tell you if you’re over or under exposing, but it won’t stop you from doing either. No exposure compensation in this mode because you already control everything.
Although out of the box you may want to start in Auto to get a feel for the camera, I’d recommend working towards aperture priority, shutter priority, or manual. These give you the most control over the final look of the image.
Aperture priority lets you control the aperture, which adjusts the depth of field of the shot. This works well for portraits and landscapes, or any shot where the depth of field is a key part of the composition.
Shutter priority, for me, is all about controlling how motion appears in your shot. If you want to show some motion blur (think silky waterfalls or light trails), you’d use a slow shutter speed. If you want to freeze the action of a fast-moving subject, you’d use a fast shutter speed.
The truth is, I work in aperture priority or shutter priority about 90% of the time. Manual mode is useful for specific situations like long exposure photography or astrophotography, but for day-to-day shooting, the semi-automatic modes let me control what matters without having to worry about missing the shot whilst fiddling with every setting.
Don’t worry too much about jumping straight to manual mode either. It’s a useful tool when you need it, but it’s not a badge of honour. Aperture or shutter priority will cover 90% of your shooting needs.
How aperture, shutter speed, and ISO work together to create a correctly exposed image is a concept known as the exposure triangle. It’s a bit beyond the scope of this post, but I’ve written a detailed guide to the exposure triangle which I think you’ll find useful.
Control Wheel
Depending on your camera, you’ll have one or more control wheels. A common location is near the shutter button, where your index finger can reach it easily. There may also be one on the back or top of the camera.
What the control wheel changes depends on the mode you’re in. In aperture priority, it’ll usually adjust the aperture. In shutter priority, the shutter speed. If you have two control wheels in manual mode, one will handle aperture and the other shutter speed.
Depending on your camera, you may be able to reassign what each wheel controls. The defaults are usually fine, but as you get more comfortable you might want to customise these to suit how you shoot.

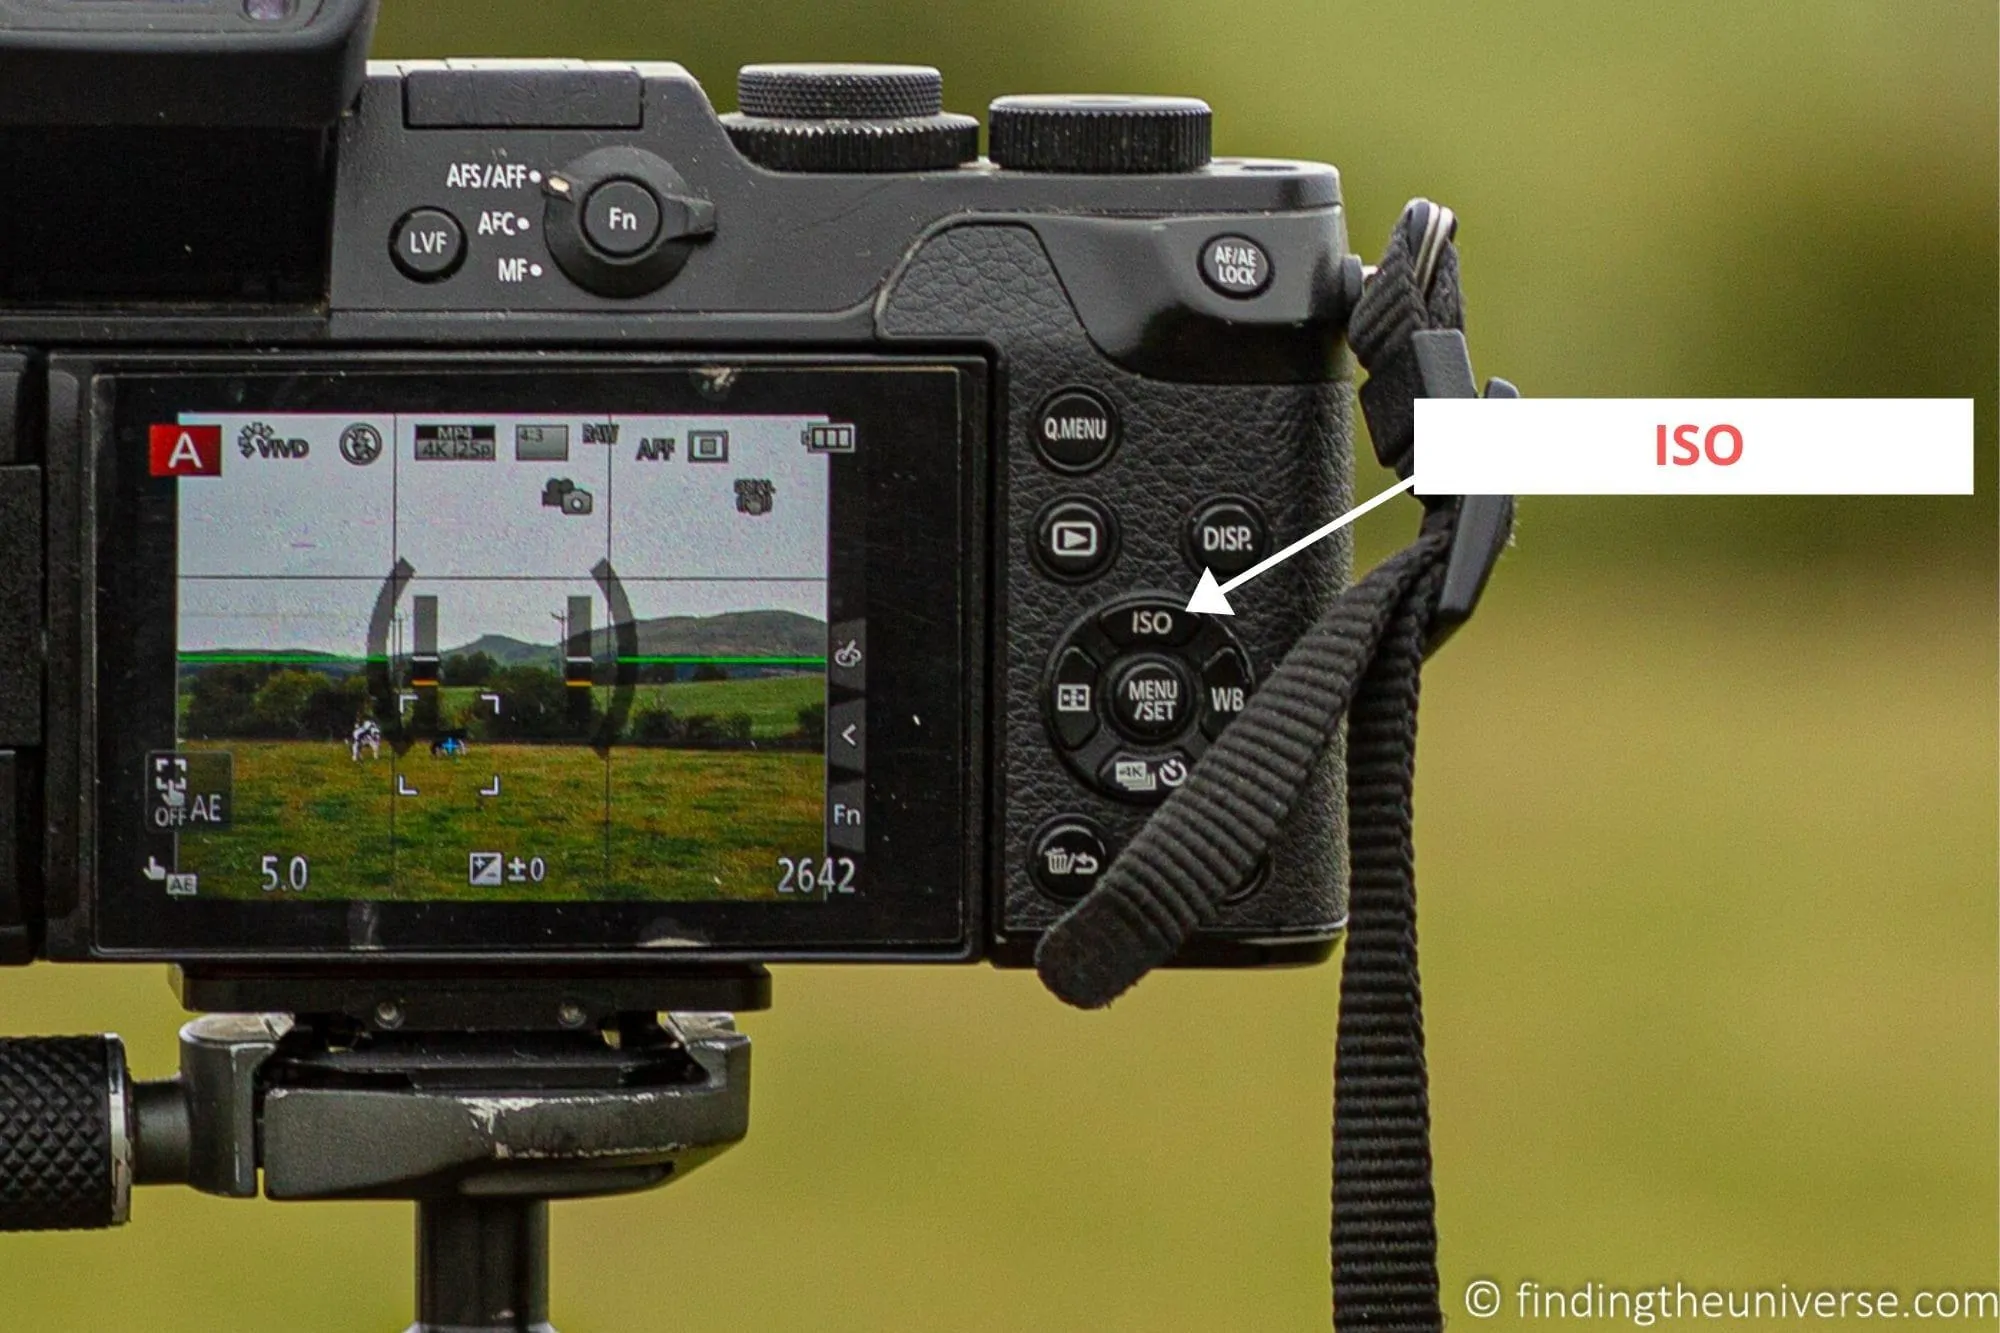
ISO Button
Nearly every mirrorless camera has a dedicated ISO button, usually on the back or top. Pressing it takes you directly to the ISO settings, and the control wheel will then adjust the ISO value.
ISO is one of the three sides of the exposure triangle. If you put the camera in manual mode and leave the aperture and shutter speed as they are, increasing the ISO makes the image brighter. Decreasing it makes it darker.
The catch is that increasing ISO also makes your images noisier. Noise appears as blotchy grain or colour on your images. It can be hard to see on the camera’s screen, but when you look at your photos on a computer at 100%, it’ll be obvious.
Most modern mirrorless cameras perform well in the ISO 100-800 range (I try to stay between 100 and 400 for daily use). Noise starts to creep in above ISO 1600, though newer cameras keep getting better at handling higher ISOs.
Because of the noise issue, ISO is usually the last control you want to change. Ideally, you’ll get the correct exposure by adjusting aperture and shutter speed, and keeping ISO nice and low. Of course, that’s not always possible, especially in low light. But do remember to bring it back down to 100-400 once you’re done. I’ve spoken with plenty of photography students who accidentally left their ISO cranked up from a low-light session and then couldn’t figure out why all their sunny holiday photos looked grainy.
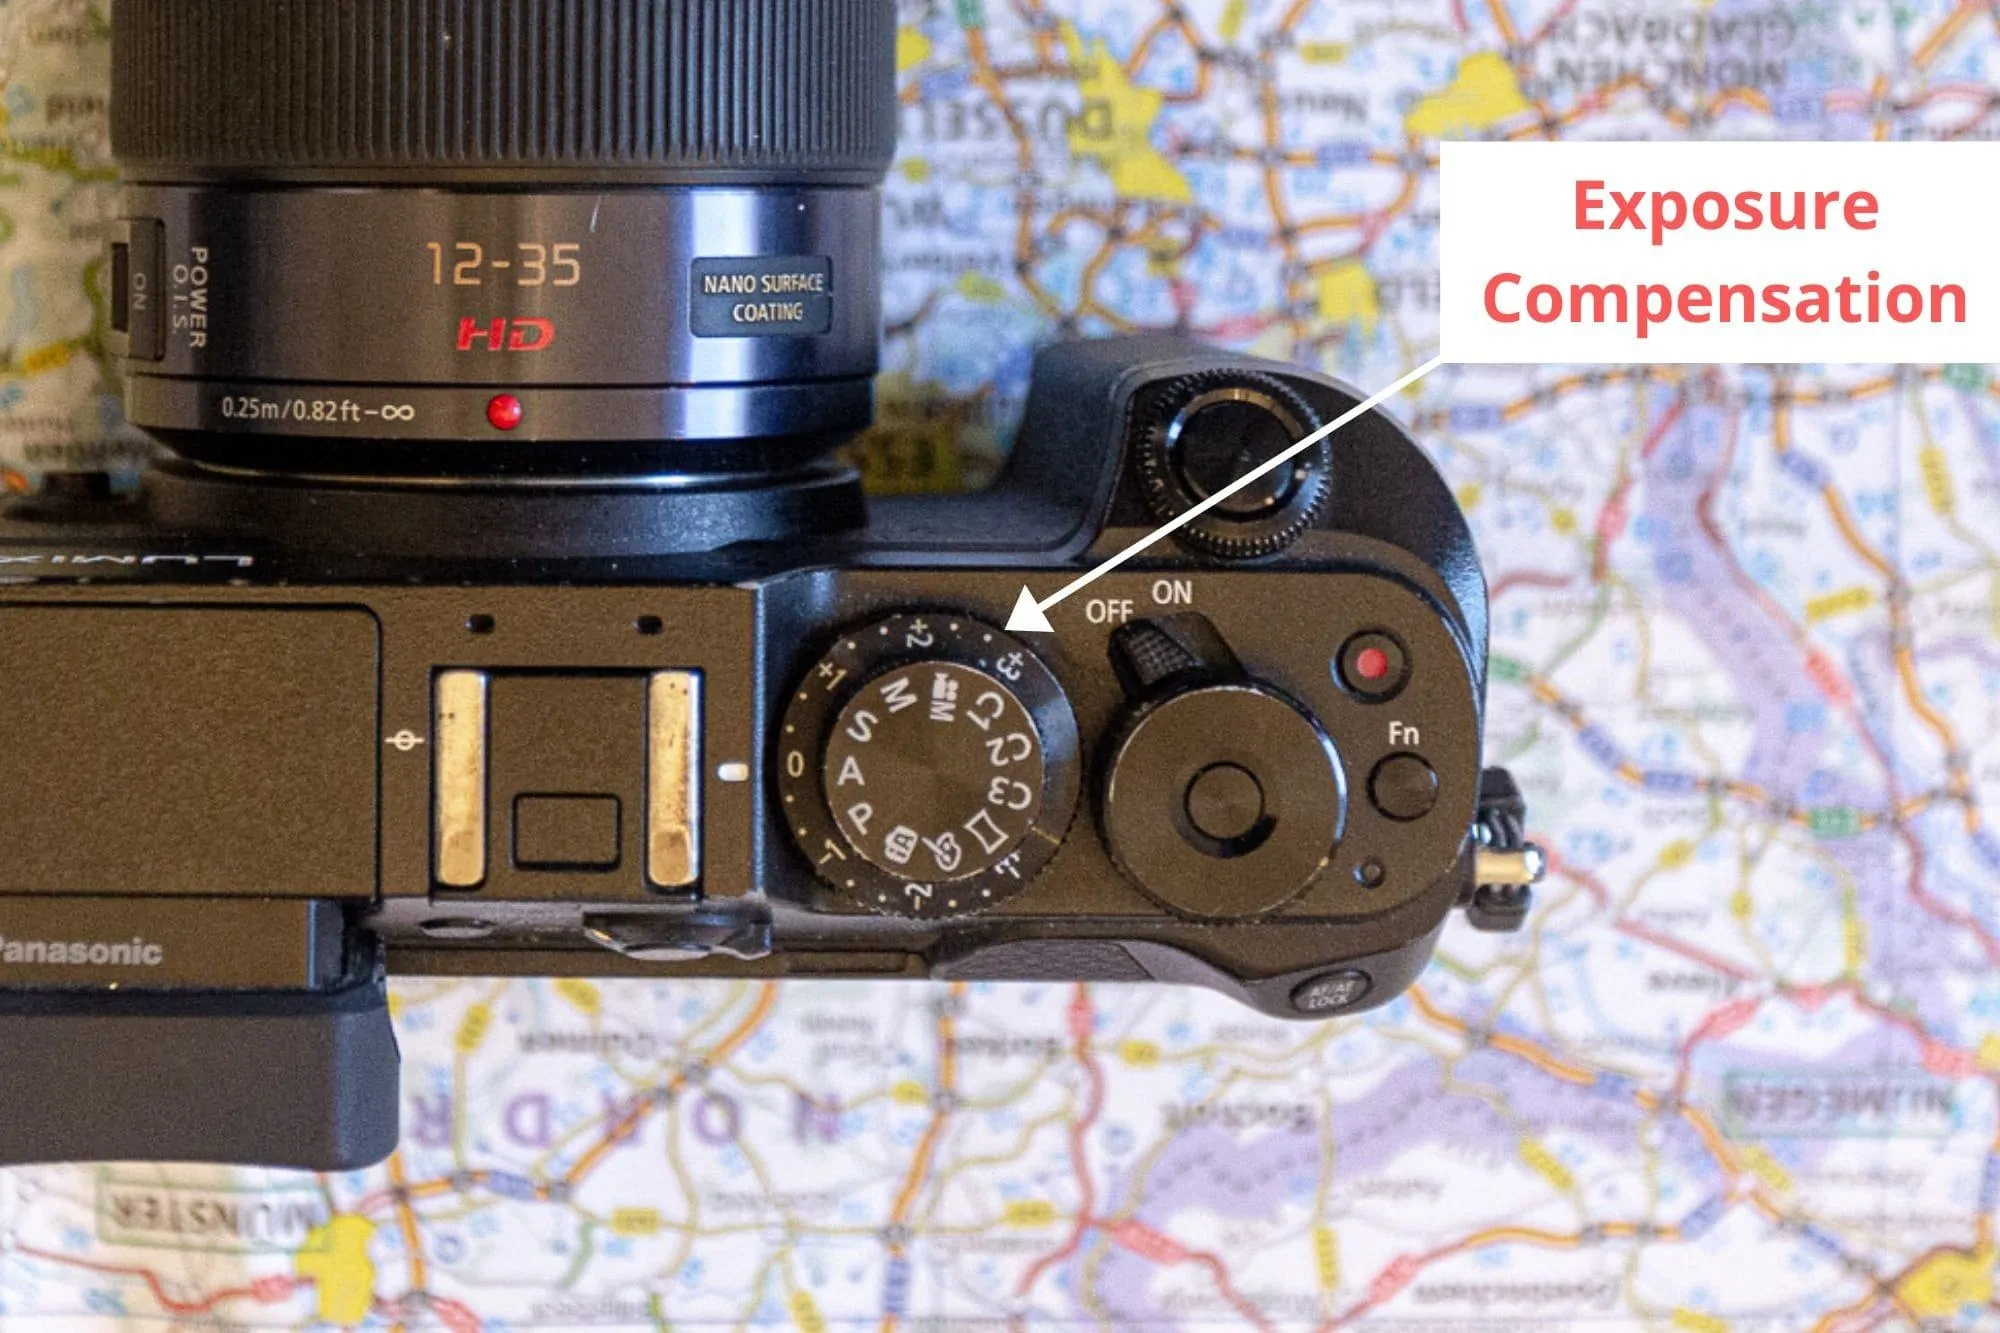
Exposure Compensation (+/-)
Exposure compensation is one of the most useful controls on any camera. It’s basically a quick override that lets you brighten or darken the image without messing with individual settings.
Cameras do a pretty good job of calculating the correct exposure, but they don’t always get it right. A bright snow scene, for example, will often fool the camera into underexposing. Exposure compensation lets you quickly tell the camera “make it a bit brighter” or “make it a bit darker.”
Usually this will be a button marked with +/-, or on some cameras a dedicated dial. When you adjust it, you’ll see the camera changing the aperture, shutter speed, or ISO to achieve the brightness you’ve asked for.
On a mirrorless camera, the effect is immediately visible on screen, which makes it really easy to get the brightness where you want it.
As with ISO, it’s important to remember to set exposure compensation back to zero when you’re done. I’ve spoken with plenty of students who left it at +2 and couldn’t figure out why every photo was washed out. It’s one of the most common photography mistakes, and I’ve done it myself more times than I’d like to admit.
Flash Button
Many mirrorless cameras feature some sort of built-in flash. We’ve written guides to how to turn off flash and reasons to turn off flash, and suffice to say, we aren’t huge fans of the built-in flash on most cameras. The results are usually not great, and many locations don’t allow flash photography.
Still, flash does come in handy at times. Most cameras with a built-in flash have a dedicated button (usually the little lightning bolt icon) that takes you to the flash settings menu, where you can enable or disable auto flash. I’d recommend disabling it for most situations unless you specifically want it.

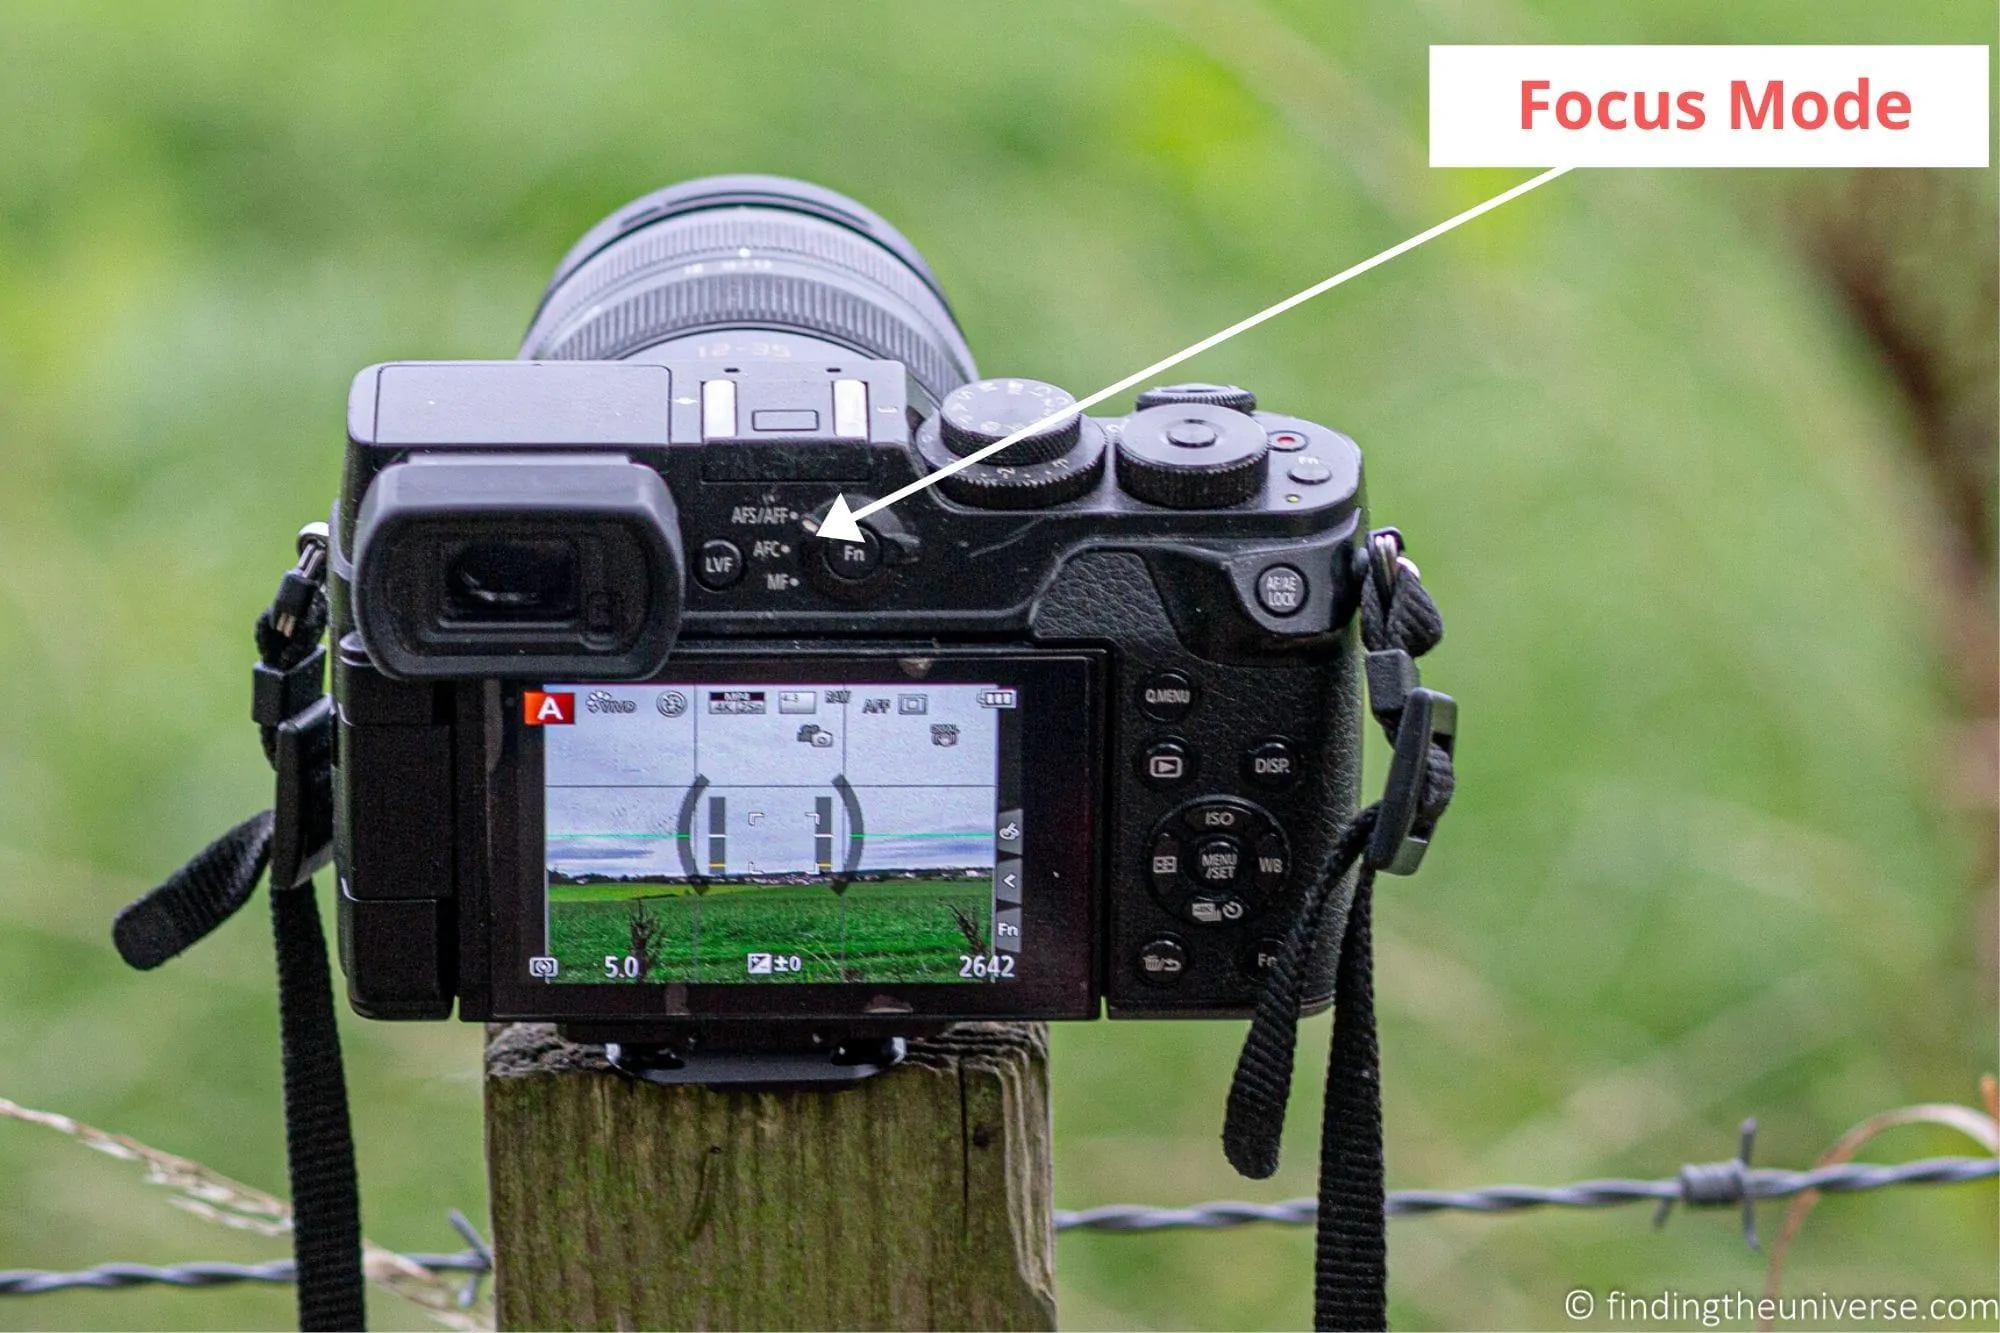
Focus Mode
When we take a picture, we want our subject to be sharp. This sharpness is achieved by adjusting the focus. An in-focus image will be sharp, whilst an out-of-focus image will be blurry.
Most mirrorless cameras ship with a variety of focus modes. The focus mode button (usually labelled “AF” for autofocus) or a dial lets you quickly switch between them. If you can’t find a button, check your camera’s settings menu under “focus mode.”
There are usually at least three modes:
Auto Focus Single (AF-S or One Shot). The camera focuses on your subject and locks the focus. Best for subjects that aren’t moving, like landscapes, buildings, or posed portraits.
Auto Focus Continuous (AF-C or AI Servo). The camera continuously tracks focus on your subject, even if it’s moving. This is what you want for anything in motion: wildlife, sports, kids running around, your dog refusing to sit still.
Manual Focus. You control the focus entirely, usually by twisting a ring on the lens. Useful in very specific situations like macro photography or low light where the autofocus might hunt.
Many modern mirrorless cameras also offer face and eye detection, where the camera automatically finds and tracks focus on a person’s face or eye. This works brilliantly for portraits and is one of the areas where mirrorless cameras have pulled well ahead of older DSLRs.
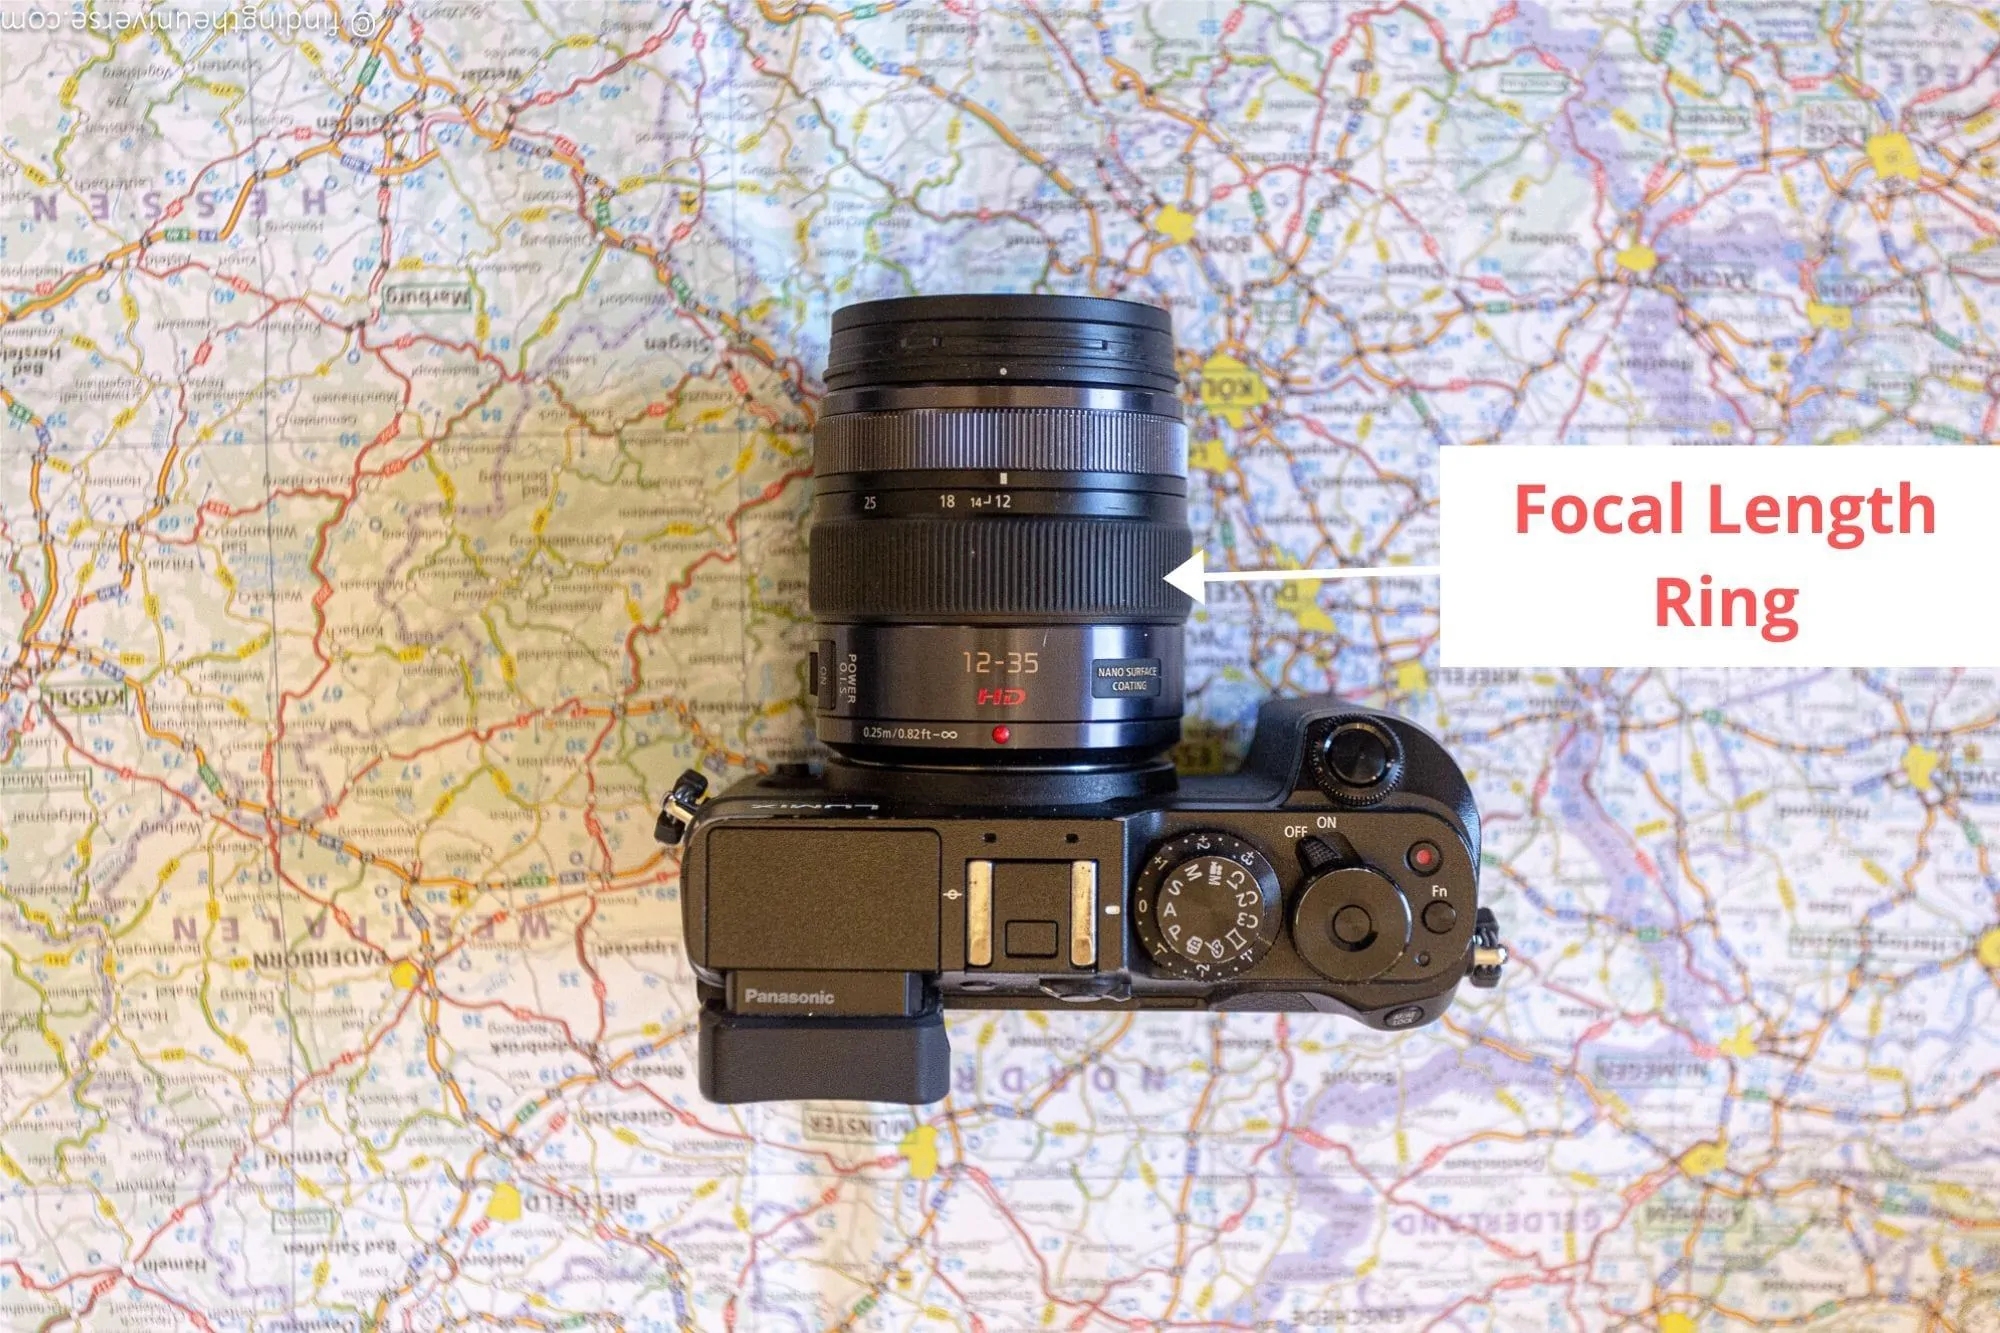
Zoom / Focal Length Ring
A mirrorless camera lets you change the lens depending on what you’re shooting. There are two types: “prime” lenses, where there is no zoom, and “zoom” lenses, where you can zoom in and out.
In photography terms, this zoom is known as focal length, measured in millimetres. The smaller the number, the wider the shot and the more of the scene you can see. The larger the number, the more zoomed in you are.
Most zoom lenses have a dedicated ring on the lens itself which you twist to zoom in and out. If you want to understand more about how focal length affects your images, I’ve written a guide to lens compression in photography which explains this in detail.
Metering Mode
Before you take a photo, your camera measures the amount of light in the scene so it can calculate the correct settings. This process is called metering.
By default, most cameras evaluate the whole scene to create a balanced exposure. This works well most of the time, but in scenes with strong contrast between dark and bright areas (a person standing against a bright window, for example), it can get confused.
For those situations, you can change the metering mode. Most cameras offer a spot metering mode, which only uses the light information from a very small area (usually the centre of the image or around your focus point). This lets you tell the camera “expose for this bit, and don’t worry about the rest.”
You might find a metering mode button on the back of your camera, or you may need to access it through the menu system. For most beginners, the default metering mode will work fine the vast majority of the time. Once you start shooting in trickier lighting conditions, that’s when metering modes become more useful.
Shooting Mode (Single, Continuous, Timer)
The shooting mode tells the camera how to take the picture when you press the shutter button.
Single shot takes one photo per press. To take another, lift your finger and press again.
Continuous shooting (also called burst mode) keeps taking photos for as long as you hold the shutter button down. This is great for action shots. You’ll want to pair it with continuous autofocus to keep your subjects sharp.
Timer mode gives you a delay (usually 2 or 10 seconds) after pressing the shutter before the camera takes the photo. Very useful for taking pictures of yourself or group shots.

White Balance
Different light sources have different colour temperatures. Sunlight is relatively neutral, but indoor lighting can be quite warm (yellowish), and shade or overcast skies can be cool (bluish). Your eyes adjust for this automatically, but your camera needs to be told.
White balance is the setting that handles this. Most cameras default to Auto White Balance (AWB), which does a decent job most of the time. But if you find your indoor photos looking unnaturally orange, or your shade photos looking blue, you can switch to a preset (Daylight, Cloudy, Tungsten, Fluorescent, etc.) or set a custom value.
As a beginner, leaving white balance on Auto is perfectly fine. It’s one of the settings you can learn to adjust later as you get more comfortable, and if you’re shooting in RAW format (see below), you can correct the white balance in editing anyway.
Image Stabilisation
Image stabilisation (IS, IBIS, or VR depending on the brand) compensates for the small hand movements that happen when you’re holding a camera. Without it, these movements can cause blur, especially in low light or when zoomed in.
Some mirrorless cameras have in-body image stabilisation (IBIS), where the sensor physically moves to counteract shake. Others rely on stabilisation built into the lens. Some have both, working together.
If your camera or lens has image stabilisation, make sure it’s turned on for handheld shooting. It makes a noticeable difference, especially with longer focal lengths. You’ll usually find the setting in your camera’s menu, or as a switch on the lens barrel.
One note: if you’re using a tripod, it’s generally best to turn stabilisation off. The system can sometimes fight itself on a tripod and actually introduce blur. A bit counterintuitive, I know.
Electronic vs Mechanical Shutter
Most mirrorless cameras offer two types of shutter: a mechanical shutter (which makes the traditional clunk-click sound when you press the button) and an electronic shutter (which is completely silent).
The electronic shutter is one of the nice perks of a mirrorless camera. No more worrying about startling sleeping babies, wildlife, or the person next to you at a string quartet concert. If you’ve set your camera to electronic or “silent” shutter and it’s not making any noise when you press the button, don’t panic. It is taking the photo. You’ll see the preview appear on screen. The silence is the feature.
There are some trade-offs to know about. Electronic shutters can produce an effect called “rolling shutter” on fast-moving subjects, where a propeller might look bent or a golf swing might look slightly warped. This is because the sensor reads the image line by line rather than all at once. For most everyday shooting this isn’t a problem, but for fast action, the mechanical shutter is usually the safer choice.
Electronic shutters can also struggle under certain types of artificial lighting (fluorescent or LED lights), producing banding across the image. Again, mechanical shutter solves this.
As a general rule, I use the mechanical shutter as my default, and switch to electronic when I specifically need silence or when I need burst rates faster than the mechanical shutter allows. Many cameras also offer an “electronic first curtain” option which is a hybrid of the two and a good all-rounder.
Video
This guide is primarily about photography rather than video, but all mirrorless cameras on the market today can shoot video as well. There will usually be a dedicated button to toggle between photo and video mode, and often a separate button to start and stop recording.
When in video mode, most of the other controls work in a similar way. It’s worth checking your camera’s manual for any differences if you plan to use your mirrorless camera for video.
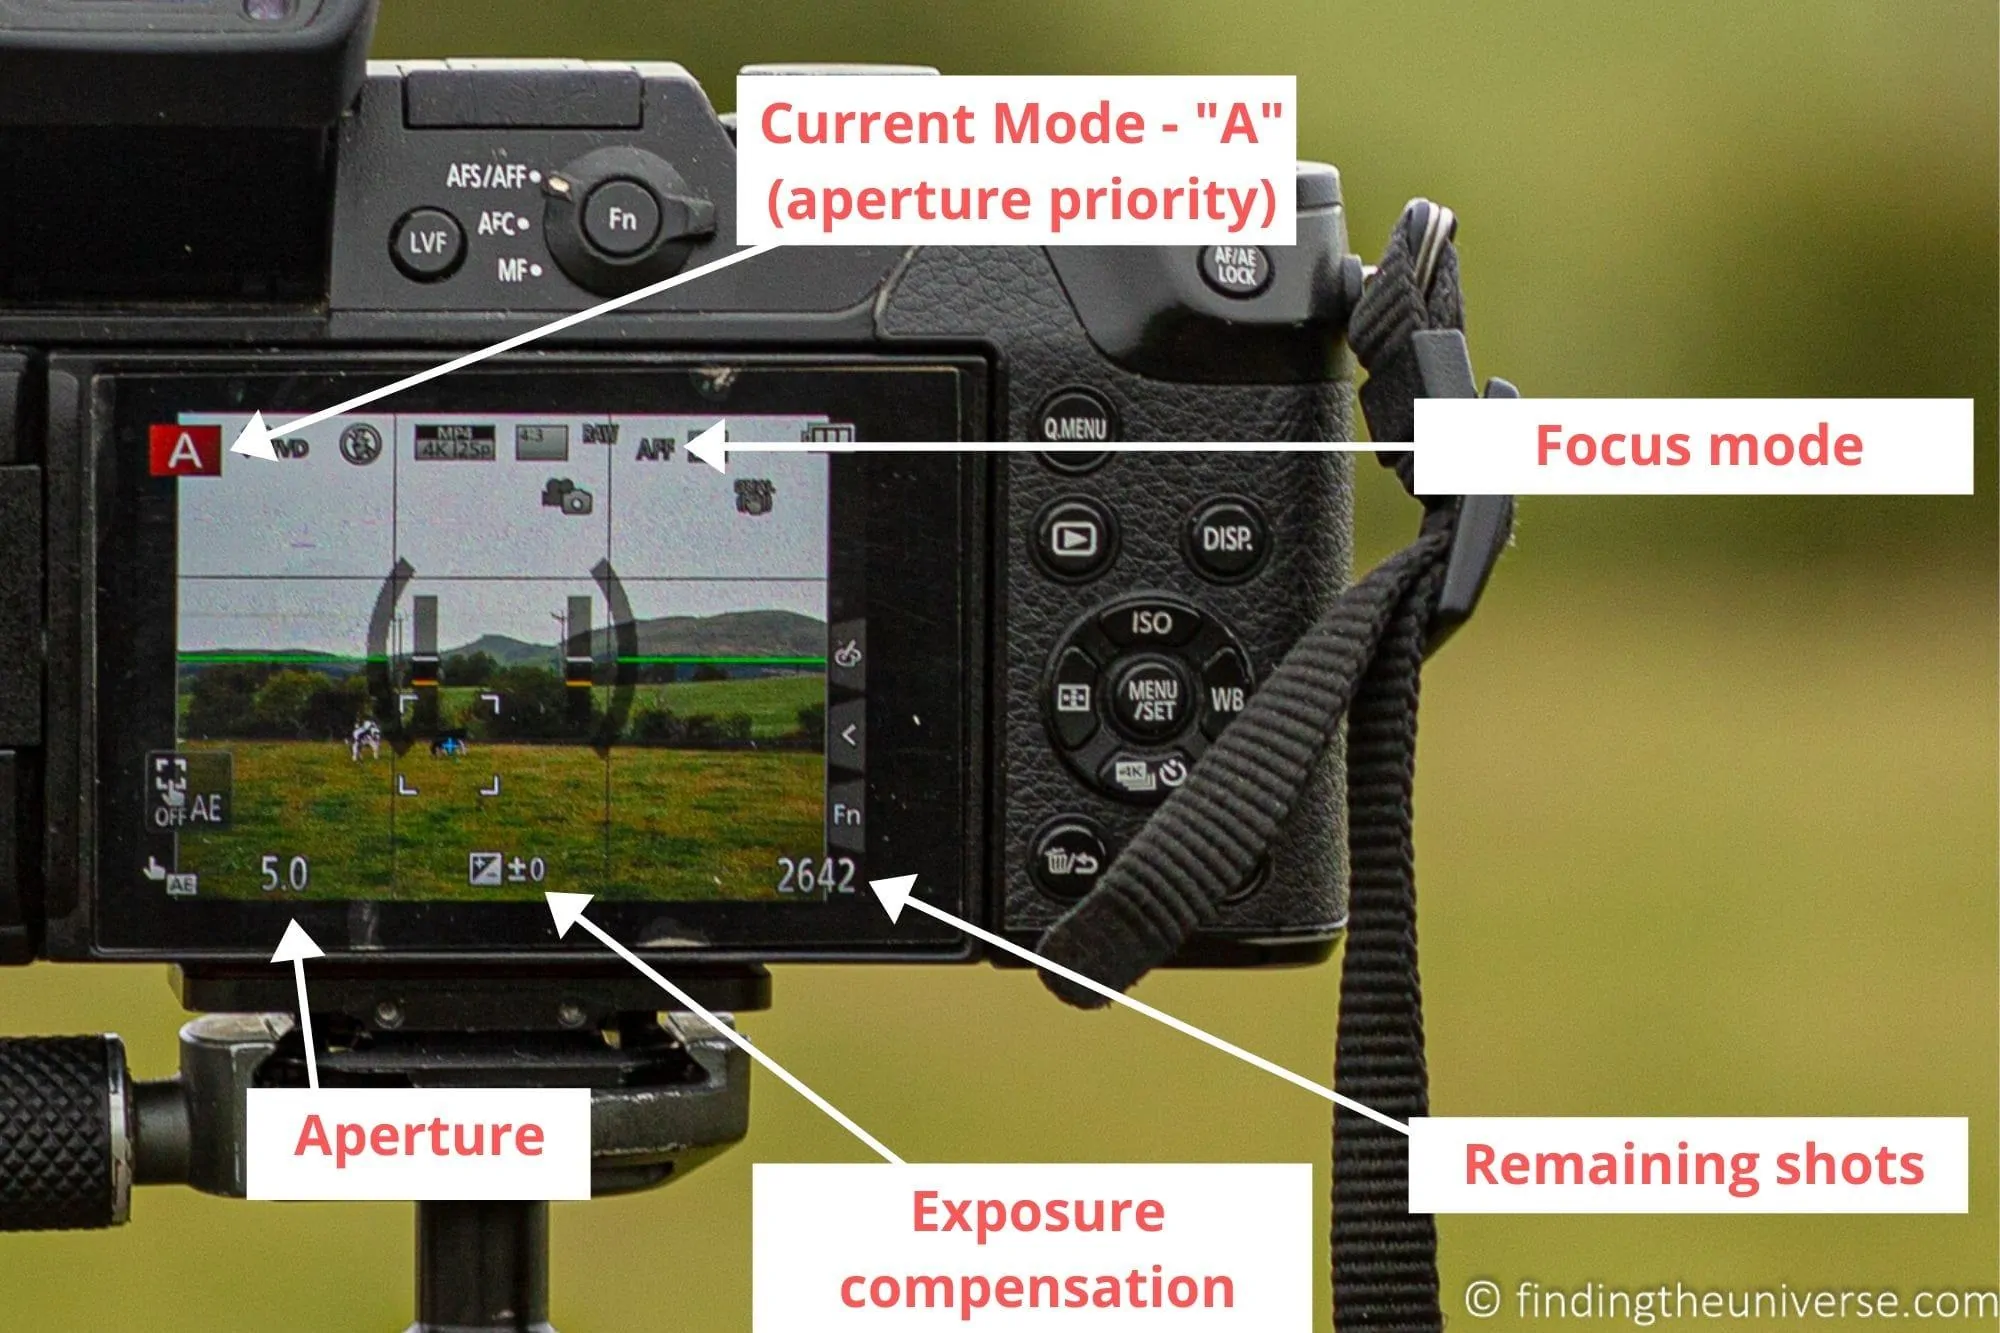
What The On-Screen Display Tells You
Your mirrorless camera’s screen (and the electronic viewfinder, if it has one) overlays a lot of information on the image. Exactly what’s displayed depends on your camera and your settings. There’s usually a “display” or “disp.” button to toggle different levels of information.
Here are the key pieces of information you’ll typically find:
- Current mode (Auto, A, S, M, etc.)
- Aperture
- Shutter speed
- ISO
- Remaining battery
- Remaining images
- Focus mode
- Flash status
- Whether you’re shooting in RAW, JPG, or RAW+JPG
- Exposure compensation
- WiFi / Bluetooth / GPS status
- Current focus point
- White balance
- Whether image stabilisation is active
Of all of these, the most important to keep an eye on are the current ISO, aperture, and shutter speed.
Many cameras can also overlay a histogram (a graph showing the brightness distribution of your image, which I’ll talk about shortly), a horizon levelling tool, and a composition grid like the rule of thirds. You can see a couple of these features enabled in the image below.
How to Get Better Photos With a Mirrorless Camera
Now that you know your way around the buttons, let’s talk about actually taking better photos. Some of this is about your camera settings, and some of it is about photography more generally, but all of it will help you get better results right away.
Hold Your Mirrorless Camera Properly
The first thing to learn is how to hold your camera. Holding it properly makes it more stable and results in fewer blurry photos caused by camera movement.
Your right hand should grip the camera around the right side, with your index finger over the shutter button. Most mirrorless cameras have a grip here that makes positioning easy.
A common mistake is shooting one-handed. Don’t do this. Holding the camera with both hands hugely increases stability, and this matters a lot when shooting indoors or in any situation with limited light.
Your left hand should be supporting the camera lens, usually palm-up underneath it. You might rotate your hand to adjust focus or zoom, but when you’re ready to shoot, return to the palm-up position.
For maximum stability, tuck your elbows tight to your body. This reduces how much your arms can move during the shot.
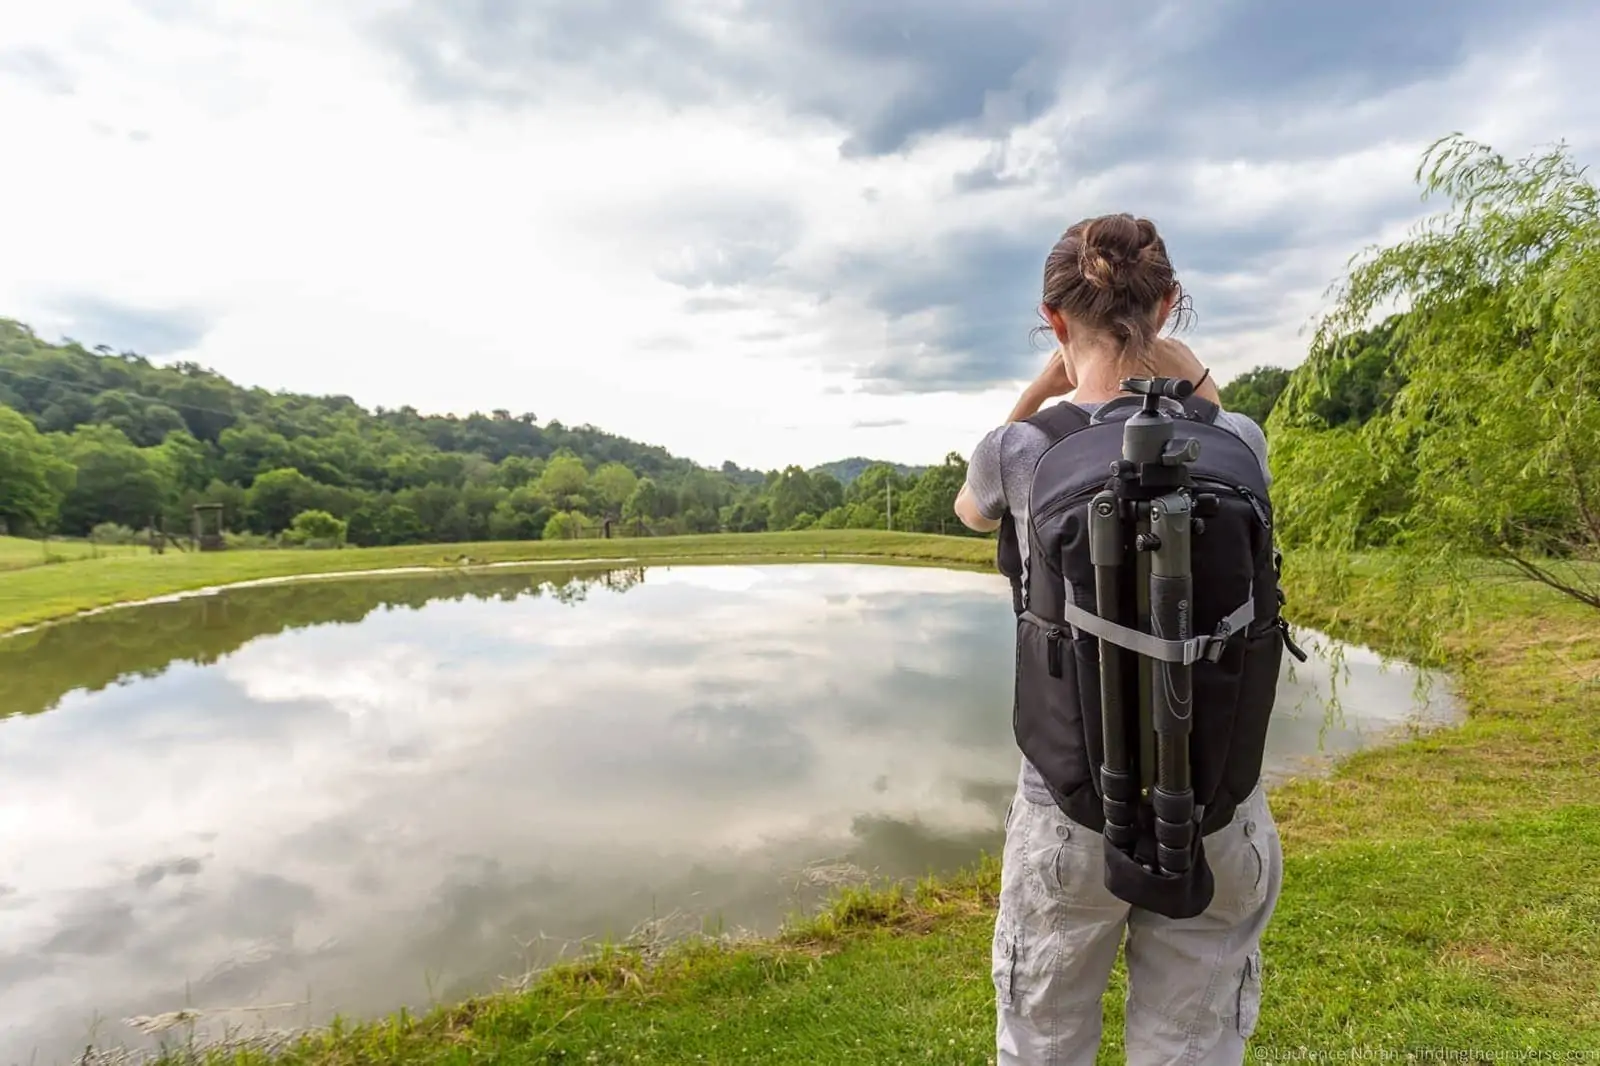
If you’re still struggling with camera shake even following these steps, a travel tripod will keep your camera totally still. I have a guide to why you need a tripod if you want to explore that further.
Spend Some Time in the Menu
Before you take your camera out for its first proper shoot, I’d suggest spending half an hour sitting on the sofa with it and going through the menus. Every mirrorless camera is different, and the menu systems can be vast, but there are a handful of settings I’d recommend checking and adjusting on any new camera.
Date, time, and time zone. If you don’t set these, your photo file dates will be wrong, which becomes a nightmare when you try to organise them later.
Image quality. Set this to RAW+JPG if you want the flexibility I mentioned earlier, or at least to the highest-quality JPG option. Cameras often ship with a lower default to save card space, and there’s no good reason to accept that.
Auto power-off / sleep timer. Too short and your camera will keep switching off just as you raise it to your eye. Too long and your battery will drain fast. Somewhere between 30 seconds and 2 minutes is usually sensible.
Beep / electronic sounds. Most cameras ship with a beep that sounds every time focus locks. Some people love this. I find it deeply annoying and turn it off immediately, but that’s your call.
Review time. How long the photo you just took stays on screen after you press the shutter. Too short and you can’t check it properly. Too long and you’ll miss the next shot whilst the preview is still up. Two seconds is a good starting point.
Grid and level overlays. I’d recommend enabling the rule-of-thirds grid and the electronic level (if your camera has one). These help with composition and keeping horizons straight, and they cost you nothing.
Format your memory card. When you put a fresh card in the camera, format it using the camera’s menu rather than on your computer. This ensures the card is set up correctly for your specific camera.
It’s also worth spending a bit of time just physically handling the camera. Find the menu button, the playback button, the delete button. Learn how to zoom in on a photo you’ve taken to check focus. Practice adjusting the aperture or shutter speed with the control wheel so the muscle memory is there before you actually need it. Far better to figure out “how do I delete this accidentally-taken photo of my foot” whilst sat at home than to fumble for it at the top of Arthur’s Seat.
And do read the manual. I know, I know. Nobody reads the manual. But each camera is a bit different, and the manual will cover specifics that no generic guide (including this one) can. Most manufacturers now provide the full manual as a PDF download on their website if you’ve lost the paper version.
Learn the Exposure Triangle
One of the most important photography concepts to understand is the exposure triangle. I’ve touched on it already above, and I’ve written a detailed guide to the exposure triangle which is worth reading.
As a summary: the exposure triangle refers to the three controls that let you adjust the brightness of your image. These are aperture, shutter speed, and ISO. They’re called a triangle because there are three of them, and changing any one affects the others.
Changing the shutter speed changes how motion appears. A fast shutter speed (like 1/2000th of a second) can freeze a race car mid-corner. A slow shutter speed lets more light in, but can result in motion blur.
Changing the aperture changes the depth of field. A wide aperture (small number like f/2.8) gives you that blurry background. A narrow aperture (bigger number like f/11) keeps more of the scene sharp.
Changing the ISO changes the sensor’s sensitivity to light. A higher ISO means a brighter image, but also more noise.
As a general rule, ISO is the last one I change. If I can get what I want by adjusting the shutter speed or aperture, that’s always my preference. But when the light drops, being able to bump the ISO up is very handy.
Understand the Histogram
The histogram is one of those things that looks intimidating but is actually a really useful tool once you understand it. It’s a graph that shows the brightness distribution of your image, from pure black on the left to pure white on the right.
On a mirrorless camera, you can usually enable a live histogram on the screen, which updates in real time as you change settings. Most cameras let you toggle this on via the “disp.” button.
A well-exposed image will generally have data spread across most of the histogram, without big spikes against the left edge (too dark, losing shadow detail) or the right edge (too bright, losing highlight detail). If the graph is bunched up on the left, your image is probably too dark. Bunched on the right, too bright.
I didn’t really start using the histogram until a few years into my photography, and I wish I’d started earlier. It’s one of the biggest advantages mirrorless cameras have over DSLRs, where you could only see the histogram after taking the shot. Being able to see it live and adjust in real time is one of the best things about shooting mirrorless.
Shoot in RAW
Your camera can save images in two main formats: JPG and RAW. JPG is the format you’re probably familiar with from smartphones and the internet. RAW is an unprocessed file that contains all the data your camera’s sensor captured.
Why does this matter? Because a RAW file gives you much more flexibility when editing your photos. If you slightly over or underexposed a shot, you can recover far more detail from a RAW file than from a JPG. The same goes for white balance, colour correction, and other adjustments.
The trade-off is that RAW files are larger (so you’ll need a bigger memory card), and they require editing software to process. But if you’re at all interested in improving your photography, shooting in RAW is one of the single best things you can do.
Most cameras let you shoot in RAW+JPG, which gives you both. That way you have a ready-to-share JPG and the RAW file for when you want to do more serious editing.
I’ve written a much more detailed guide to RAW in photography which explains all of this in depth.
Get the Right Memory Card
Your mirrorless camera will need a memory card to store your photos. Most modern mirrorless cameras use SD cards (specifically UHS-II SD cards for the best performance), though some higher-end models use CFexpress cards.
The two things to look for are capacity and speed. For capacity, I’d suggest at least a 64GB card, which will hold hundreds of JPG images or a good number of RAW files. If you shoot video, you’ll want even more. For speed, look for a card rated at UHS-II with a V30 or V60 speed class. A fast card means your camera won’t slow down when shooting in burst mode or recording high-resolution video.
Don’t skimp on memory cards. A cheap, slow card can mean missed shots while the camera waits to write data, and there’s nothing quite as frustrating as a “buffer full” message when the perfect moment is happening in front of you.
Master Depth of Field
Getting to grips with depth of field is one of the fastest ways to take better-looking photos. You’ve no doubt seen it: a portrait where the person is sharply in focus and the background is a pleasing blur. Modern smartphones can simulate this with “portrait mode,” but on a mirrorless camera, you can do it for real by adjusting the aperture.
Set an aperture of between f/1.4 and f/4, and you’ll get a shallow depth of field. Only your subject will be in focus, and everything in front of and behind them will be soft and blurry. This works well for portraits or any situation where you want to isolate your subject.
Set the aperture to a higher number (f/8 to f/16), and much more of the scene will be in focus. This is what you’d typically use for landscape shots.
To practice, put your camera in aperture priority mode and shoot the same scene at different aperture settings. You’ll see the difference immediately on the mirrorless camera’s screen, which is a huge advantage for learning.
I have a complete guide to depth of field in photography for more tips on this.
Learn the Basics of Composition
This post has largely been about the technical side of photography, but of course photography is about much more than understanding your camera. I think there are three main components to becoming a better photographer: understanding how your camera works, learning what makes a great photo, and mastering photo editing.
Composition is about the second of those. In short, you need to think about where your subject is placed relative to other elements in the shot, get to grips with concepts like the rule of thirds, understand how colours work together, and learn how the eye searches out patterns like leading lines and symmetrical subjects.
There’s a lot to cover, and I’ve put together a detailed guide to composition in photography which will give you a solid foundation.
Understand Light
Light is the raw material of photography. All a camera does is record it, and different lighting conditions produce very different results.
There are different sources of light out there. The sun is the first one most of us think of, but there are plenty of others, from indoor lights to stadium lights to camera flashes. Even at night, the moon and stars, or even the Northern Lights, can be a light source.
Different light sources have different qualities, which affects how your images look. This might be due to their relative strength or weakness, the colour of light they emit, or simply the angle you’re shooting at. Our primary light source, the sun, gives very different results at different times of day and in different weather conditions, as the light is affected by the earth’s atmosphere.
I’m not expecting you to become a meteorologist, of course. But there are some simple rules of thumb around light that can help you get better photos immediately:
- Shooting with the sun somewhere behind your shoulder (rather than pointing the camera towards it) usually gives better results
- On a partly cloudy day, waiting for the sun to come out will give you more colour and contrast
- The sun directly overhead produces flat, harsh images, so try to avoid midday shooting if you can
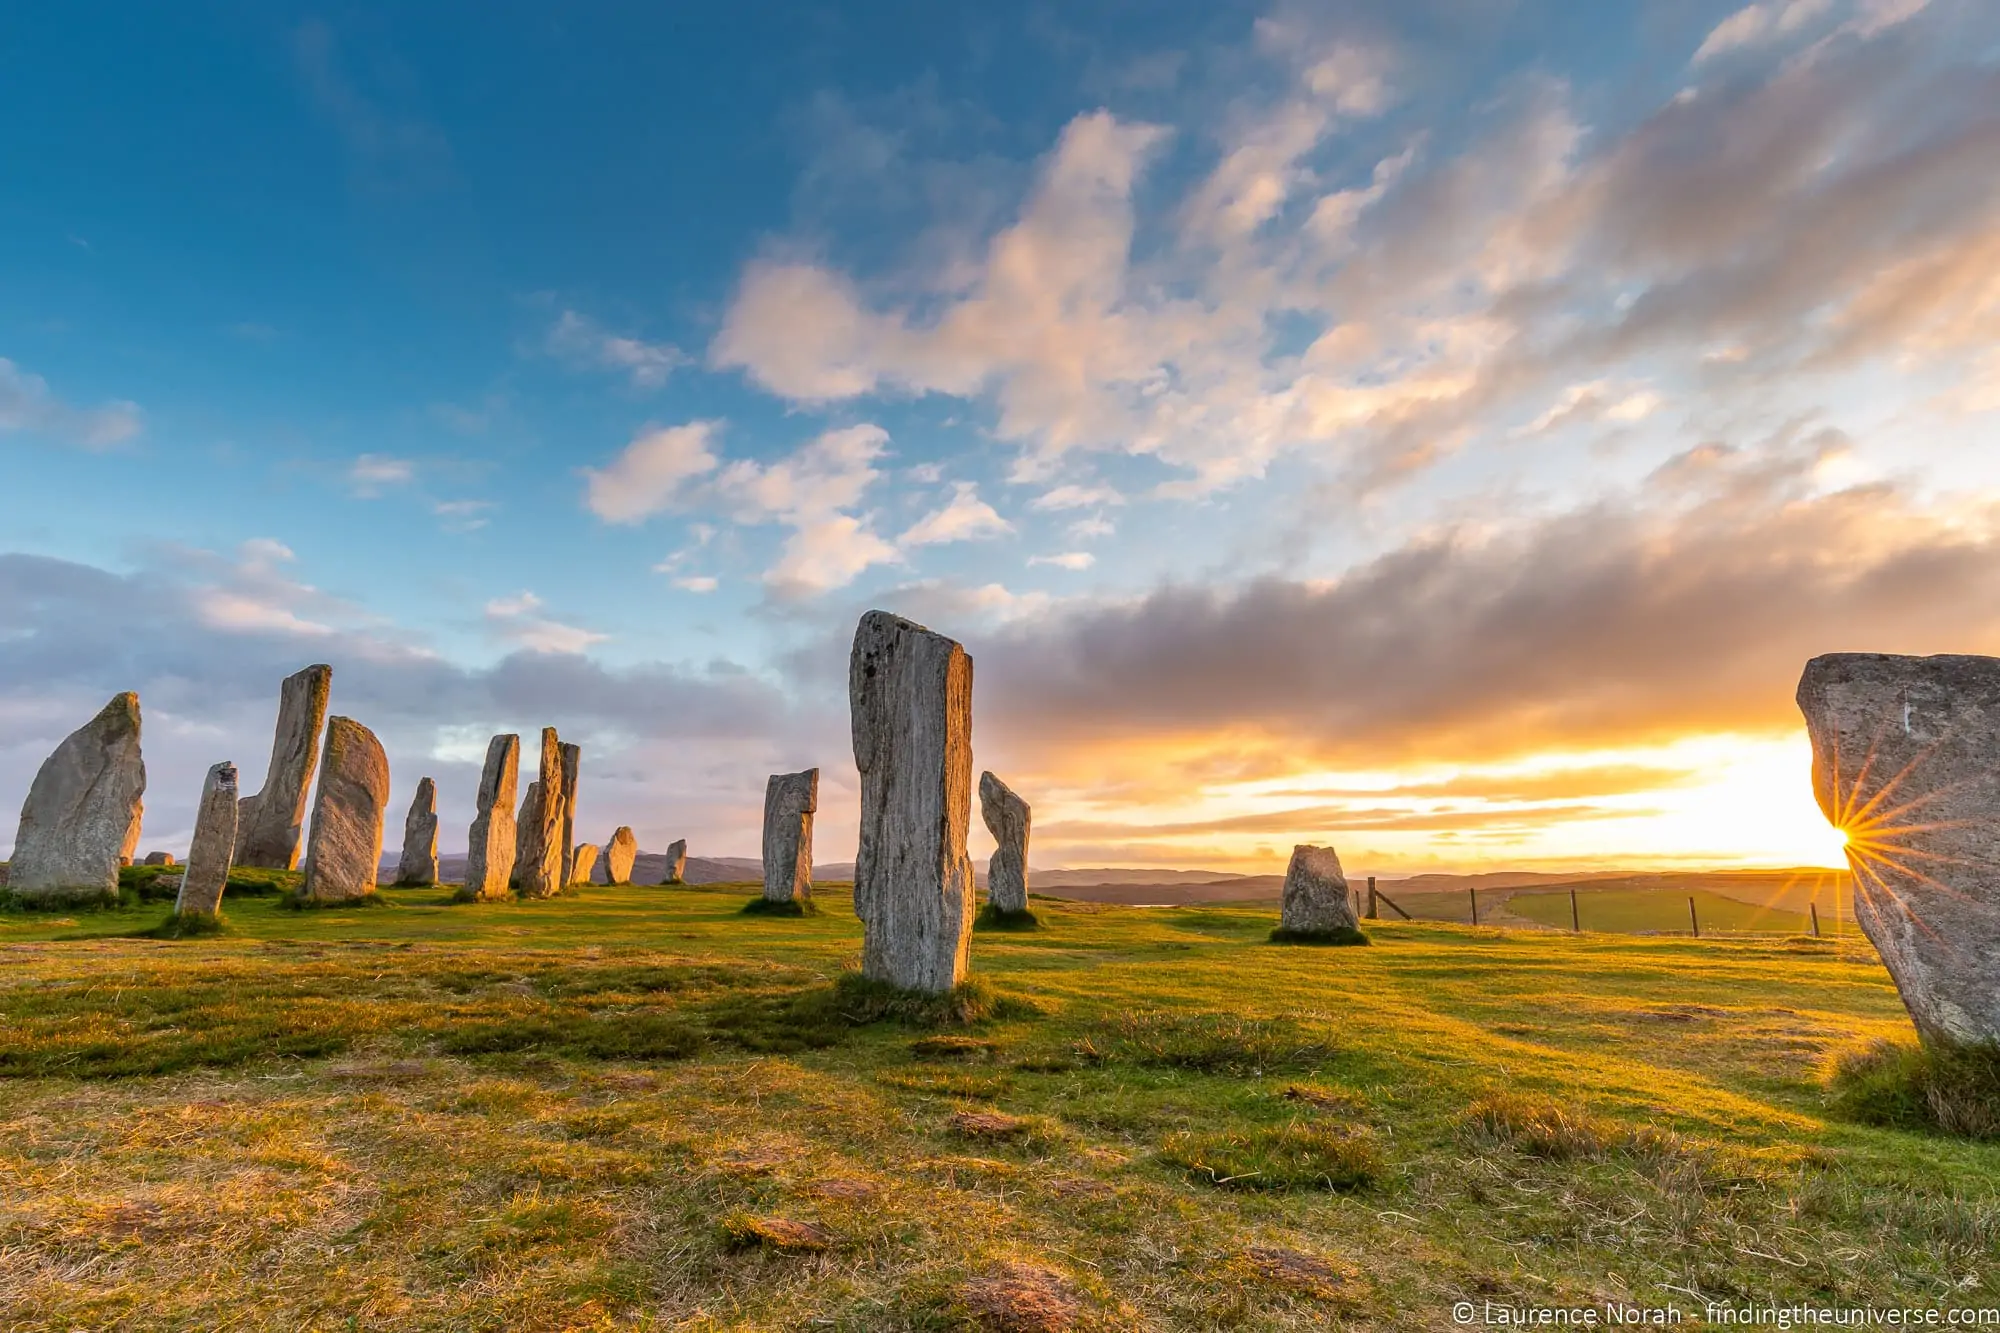
- Sunset and sunrise produce the warmest, most golden light. Photographers call this “golden hour,” and it’s when many of the best landscape and portrait photos are taken
Manage Your Batteries
One area where mirrorless cameras do lag behind DSLRs is battery life. Because the screen or electronic viewfinder is always on, mirrorless cameras use more power. A typical mirrorless camera will get somewhere between 300 and 500 shots on a charge, compared to over 1,000 on some DSLRs.
Some practical tips: carry at least one spare battery (two if you’re out all day), turn off WiFi and Bluetooth when you don’t need them, and use the camera’s power-saving or auto-off settings. If your camera has both an electronic viewfinder and a rear screen, the EVF typically uses less power.
I also recommend buying genuine manufacturer batteries or well-reviewed third-party alternatives rather than the cheapest options you can find. Cheap batteries can have inconsistent capacity and in rare cases can cause issues with your camera.
Take a Course or Workshop
Another great way to improve is to take part in some form of structured learning. There are in-person workshops, photo walks, local seminars, and university or college courses available in many areas.
If you’ve found this post useful and my style of explaining things works for you, you might be interested in my online photography course. I’ve taught over 2,500 students how to improve their photography, and I’d be glad to help you as well. I think for what it includes, it’s also incredible value.
You can read all about it and sign up here.
Take Lots of Photos!
Last but not least: practice. One of the joys of digital cameras is that once you’ve invested in the equipment, you don’t have to worry about the cost of getting film developed. You can take as many photos as you want, try different settings, and see how they change the look of a shot.
A mirrorless camera is particularly brilliant for learning because as you change settings, you see the results in real time on the screen or through the electronic viewfinder. You can tell immediately if something is in or out of focus, too bright or too dark.
If you’re struggling to find subjects, try setting yourself challenges around different themes: wildlife, portraits, moving objects, landscapes, food, architecture. Getting used to taking your camera with you everywhere is the fastest way to improve.
How to Care For and Protect Your Mirrorless Camera
A mirrorless camera is a serious investment, so you’ll want to keep it in good condition. Based on years of international travel with a whole assortment of photography gear, here are some tips for looking after it.
Protecting Your Camera
Two products I use on all my cameras are a lens hood and a UV filter. Both are inexpensive, and together they do a great job of protecting your lens.
A lens hood sits over the end of your lens and is primarily designed to reduce lens flare from the sun. But in my experience, it’s also really good at protecting the lens from bumps and scrapes when you have the camera slung over your shoulder. I never go anywhere without my lens hood on.
A UV filter screws directly onto the front of your lens. On a digital camera, its only real function is to protect the glass element on the front of your lens. Given that lenses can be expensive to replace and UV filters cost a fraction of the price, it’s a sensible investment.
I have literally dropped a camera from a few feet onto concrete, and shattered both the lens hood and UV filter. The camera and lens were fine, because the impact was absorbed by those two components. I’m not saying a UV filter and lens hood mean you can go around dropping your camera onto concrete, but they’re a worthwhile insurance policy.
A camera strap is another must-have. Whilst most cameras come with the manufacturer’s strap, I think a third party strap is often more comfortable and functional. I’ve used Peak Design straps exclusively since 2015, and I own three of their Slide sling straps as well as a Clutch hand strap. I have a full review of Peak Design camera straps if you want to read more.
Jess likes personalised straps such as those available on Etsy and the colourful camera straps by iMo.
Cleaning Your Camera
I’ll be honest, I don’t do much cleaning beyond keeping the lens clean and trying to ensure there’s not too much dirt on the outside. For that, I use an air blower and microfibre cloths.
Mirrorless camera sensors are particularly prone to collecting dust (because the sensor is exposed whenever you change lenses). Sometimes the air blower will dislodge it, but for more thorough cleaning I use a professional service. See the section below on servicing for more on that. Your camera manual will also have advice on any cleaning steps specific to your model.
Travelling with a Mirrorless Camera
For many people, a camera sees the most use when travelling, and as travel bloggers, this is definitely true for us as well.
If you’re planning on taking your camera travelling, I’d recommend a proper camera bag. Unlike a normal bag, a camera bag has padded compartments to keep your gear safe from the bumps and knocks that are inevitable on the road.
Personally, I use a few different bags depending on the trip. For heavy gear loads, road trips, or hikes with a tripod, I use the Vanguard Alta Sky 51D backpack. It’s not going to win any fashion awards, but it fits everything and protects it well.
For travel, my main bag is the Peak Design Travel Backpack 45L, which doubles as a camera bag when I add their Camera Cubes. And for lighter city days where I’m only carrying one lens, I’ll often grab an Osprey daypack with a Peak Design Camera Cube inside it. Less obviously a “camera bag,” which is sometimes the point.
For a smaller, sleeker option, there’s also the Vanguard shoulder bag or their compact camera bag for a single body and lens.
If you’re flying, check the airline regulations for cabin luggage weight limits. Photography gear is heavier than you’d think (I learn this lesson repeatedly). Most airlines will let you carry tripods as hand luggage, though some may require them to be checked. And be aware that spare camera batteries must be carried in your hand luggage, not checked.
I’d also make sure your insurance covers your camera equipment. Many travel insurance policies have low single-item limits, so you might not get the full value back for loss, damage, or theft. We actually cover our camera equipment through our home insurance policy, which can be upgraded to include expensive items away from the home. It’s worth checking.
Should You Service Your Mirrorless Camera?
If you want to keep your camera in great condition for a long time, I’d recommend getting it serviced from time to time, perhaps every couple of years.
In particular, you’ll want to get the sensor professionally cleaned. This shouldn’t cost too much, and will ensure your images are free of any dust spots.
I try to get my cameras cleaned by a professional at least once a year since they’re used so regularly and endure quite a lot with all our travelling. You should be able to find a service either online or with your local camera shop.
Frequently Asked Questions About Mirrorless Cameras
What is the best mirrorless camera for beginners?
For most beginners, I’d recommend the Canon EOS R100 if you’re on a budget, or the Sony a6700 if you can spend a bit more. The R100 gives you everything you need to learn on at a great price, whilst the a6700 adds in-body image stabilisation, a touchscreen, and faster autofocus. Both have APS-C sensors, which is a great balance of image quality, size, and cost.
If budget isn’t a concern and you want a camera you won’t outgrow, the Canon EOS R6 III with its full-frame sensor is a serious step up, though it’s considerably more expensive.
What mode should I use on my mirrorless camera as a beginner?
Start in Auto to get a feel for the camera, then move to Aperture Priority (A or Av on your mode dial) as soon as you feel comfortable. Aperture Priority lets you control the depth of field (how much of the image is in focus) while the camera handles the shutter speed. I’ve been shooting professionally for over 15 years and I still use Aperture Priority about 90% of the time.
Shutter Priority is great when you need to control motion, like freezing fast action or creating intentional blur. Manual mode is useful for specific situations like long exposures or astrophotography, but it’s not something you need to rush towards.
Is a mirrorless camera better than a DSLR for beginners?
In 2026, yes. Mirrorless cameras are lighter, show you the exposure in real time (so you can see the effect of changing settings before you take the shot), and have faster and more advanced autofocus systems. Canon, Nikon, and Sony have all shifted their development to mirrorless, so that’s where all the newest technology and lenses are going.
There’s nothing wrong with DSLRs, and you can get some great ones on the used market at good prices. But if you’re buying new, mirrorless is the way to go. If you can time it, the big Amazon sales are usually when entry-level mirrorless bodies hit their best prices. I list the photography deals worth buying whenever the sales are on.
Do I need a full-frame mirrorless camera?
Not at all. APS-C cameras like the Canon R100 and Sony a6700 produce excellent images and are lighter, smaller, and more affordable than full-frame equivalents. Full-frame cameras have advantages in low light and depth of field control, but for most beginners (and plenty of professionals), APS-C is more than enough.
I’d recommend starting with APS-C and upgrading to full-frame later if you find yourself needing what it offers. The money you save on the camera body can go towards a good lens, which often makes more of a difference to image quality than the sensor size.
What settings should I use for everyday photography with a mirrorless camera?
For general everyday shooting, I’d suggest Aperture Priority mode, ISO 100-400, and let the camera handle the shutter speed. Set your aperture based on what you’re shooting: around f/4 to f/5.6 for general scenes, wider (f/2.8 or lower) for portraits with blurry backgrounds, and narrower (f/8 to f/11) for landscapes where you want everything sharp.
Turn on Auto White Balance, use single-shot autofocus for still subjects and continuous autofocus for anything moving, and shoot in RAW+JPG so you have flexibility in editing. Those settings will cover the vast majority of situations.
How do I take sharp photos with a mirrorless camera?
Three things cause unsharp photos: camera shake, missed focus, and shutter speed that’s too slow. To fix camera shake, hold the camera properly with both hands, tuck your elbows in, and use a tripod when you can. For focus, make sure you’re using the right autofocus mode and that the camera is focusing on your actual subject (eye detection is brilliant for this). For shutter speed, a general rule is to keep it at least 1/focal length, so if you’re shooting at 100mm, your shutter speed should be at least 1/100th of a second.
Image stabilisation helps a lot with camera shake if your camera or lens has it. And don’t forget to check that your ISO isn’t accidentally set too high, which can make images look soft and grainy.
Why is my mirrorless camera not making any noise when I take a photo?
Your camera is set to electronic (silent) shutter mode. This is a feature, not a fault. Mirrorless cameras can take photos completely silently because they don’t have a mechanical shutter mechanism that has to physically move. You’ll still see the preview appear on screen when the photo is taken.
If you prefer the traditional clunk-click sound, you can switch back to mechanical shutter in your camera’s menu (usually under “Shutter Mode” or similar). Silent shutter is brilliant for weddings, wildlife, sleeping children, or any situation where noise would be disruptive, but mechanical shutter is usually better for fast action due to something called rolling shutter.
What settings should I change first on a new mirrorless camera?
Before your first proper shoot, check these settings in your camera’s menu: date and time (so your photo files have correct dates), image quality (set to RAW+JPG or highest-quality JPG), auto power-off timer (30 seconds to 2 minutes is sensible), and the beep or electronic sounds (annoying to most people, easy to disable).
I’d also recommend enabling the rule-of-thirds grid overlay and the electronic level if your camera has one, as these help with composition and straight horizons. And always format a new memory card in the camera itself, not on your computer.
Further Reading
That was quite a lot on the topic of mirrorless cameras! Before you go, I did want to share some more guides we’ve written on photography. If you’re a beginner or intermediate photographer, I’m sure you’ll find something useful.
- We have a similar guide for how to use a DSLR and how to use a compact camera. We also have a guide to how a DSLR works.
- Knowing how to compose a great photo is a key skill. See our guide to composition in photography for lots of tips.
- Once you’ve mastered aperture, you can control depth of field. Read more about depth of field and when you’d want to use it.
- If you have a zoom lens, you can take advantage of lens compression to make objects seem closer together than they are.
- We’re big fans of shooting in RAW. See our guide to RAW in photography to understand what it is and why you should switch as soon as you can.
- You’ll need some way of editing your photos. See our guide to the best photo editing software, our guide to the best laptops for photo editing, and our guide to the best desktops for photo editing. We also have a guide to the best monitors for photo editing and a guide to getting the best performance out of Adobe Lightroom, our preferred editing software.
- For specific photography scenarios, see our guides to Northern Lights photography, long exposure photography, fireworks photography, tips for photographing the stars, and cold weather photography.
- Want to understand back button focus? See our guide to back button focus.
- Looking to make money from your photos? See our guide to how to make money from photography.
- For landscape photography, you might need filters. See our guide to ND filters.
- Looking for a gift for a photographer? Check out our photography gift guide.
- If you’re in the market for a new camera, we have a detailed guide to the best travel cameras, plus specific guides for the best cameras for hiking and backpacking, the best action cameras, the best bridge cameras, the best compact cameras, the best mirrorless cameras, and the best DSLRs. We also have a guide to the best camera lenses.
- If you want a camera or lens but the prices are a bit steep, see our guide to where to buy used cameras and camera gear for some budget-friendly options.
- We have a guide to why you need a tripod and a guide to choosing a travel tripod.
- Want to easily replace the sky in an image? Check out our guide to sky replacement in photography.
- For a full review of the camera I use professionally, see my Canon EOS R5 review.
- If you want to improve your photography overall, you can join over 2,500 students on my travel photography course. I’ve been running this since 2016, and it’s helped lots of people take their photography to the next level.
And that’s it for our guide to getting the most out of your new mirrorless camera. As always, we’re happy to take your questions. Pop them in the comments below and we’ll get back to you as soon as we can.
RAVI Meladyravi says
your writing is very nice !
Can you explain about Sony RX10 II
Laurence Norah says
Hi Ravi,
Thanks very much. So the RX10 II is similar to a mirrorless camera, but you can’t change the lens. Other than that, most of the principles remain the same, so this guide should mostly still apply. Was there something specific you were trying to learn?
Laurence
Susan Gelber says
Laurence,
My late husband was a universally beloved disability rights advocate/attorney and, privately, an amateur photographer. Photography brought us together 35 years ago. He knew the whole gamut, beginning with darkrooms, eventually accepting and learning (and appreciating) digital.
Down to “death cleaning” his heartfelt possessions, I remembered seeing a YouTube of people with disabilities who learned photography. So, I was in the process of searching for an organization to which to possibly donate my late husband’s new mirrorless camera and accessories, when your gorgeous, perfect website found me (even its name resonates).
You’ve re-awakened my Inner Photographer, who learned on a Pentax K1000 when I was a teenager, yet never felt smart enough to graduate beyond Auto (I could, though, use the exposures recommended on the film box; those photos were better). I thought my days of photography were over, so my husband offered to sell my equipment for me (prior to his cancer). I had defaulted to the convenience of iPhone photos anyway, giving up on my desire to manually learn photography. While smartphone quality is good, my Pentax camera provided a holistic, grounded experience, as well as a unique confidence, I’ve not since felt. I’ve had other DSLRs, even taking live courses, yet always used Auto.
Your introductory article on mirrorless cameras for beginners has inspired me to keep Eric’s camera. I’m going to take your course, too. Finding the Universe has facilitated locating myself in it again, and also provided a very much needed new horizon. So, thank you, to both you and your lovely wife. This is the first time I’ve felt like myself again, since losing my husband. Health, Happiness and Strength to you both and your business.
Laurence Norah says
Hello Susan,
It is lovely to hear from you, and I am sorry to hear of the loss of your husband who sounds like a wonderful man. I am delighted to have been able, even in a small way, to help with your process and also to ensure your late husband’s camera equipment will be able to provide you with joy.
I look forward to helping you on that journey! Course access comes with all the e-mail access to me that you want, so do feel free to reach out anytime as you learn. I’m always happy to help 🙂
Happy photographing, and thank you so much for such a lovely heartfelt comment.
Laurence
Kris Filon says
Thanks for the beginner mirrorless article. I have recently bought a Nikon Z6. I’m just getting my feet wet with this wonderful camera. I have limited still photography experience but with a spouse who is a great teacher. The problem is neither of us have much video experience at all. I am trying to find beginner resources for video that will help me build basic video skills. ANY SUGGESTIONS?
Thanks,
Kris
Laurence Norah says
Hey Kris,
This is a great question. Unfortunately, I’m not really an expert in video and I’ve never found the time to master it. Certainly I know that some of the skills are transferable, but there also a lot of new stuff to think about! My suggestion would probably be to find a group of video creators, such as this facebook group, and ask there. Sorry not to be more help. Some friends of mine used to run a video course but they stopped so I’m not able to recommend it any more!
Best
Laurence
Debora Stacker says
This is the best article and summary I have found on getting started. Thanks for breaking it down in simple terms helping me to understand my camera and the features better. Thank you! I will definitely be checking out some of your other guides.
Laurence Norah says
THanks very much Debora. I hope you enjoy learning how to get the most from your camera – let me know if you have any questions!
Laurence