
Quick take: A compact camera is still worth carrying in 2026 when you want a real optical zoom, all-day battery life, and a dedicated camera that slips into a pocket, the things a phone still can’t quite match. To get noticeably better photos than your phone manages, three things matter most: hold the camera steady with both hands, learn what the main controls actually do, and shoot when the light is good. This guide covers all of it, button by button.
Phones have become very good cameras, so the real question behind “how do I use a compact camera” is usually whether a separate camera still earns its place in your bag. After a long time doing this for a living, my answer is yes, with conditions. A compact gives you a real optical zoom (your phone fakes it by cropping), a lens and sensor built only for stills, controls you can learn by feel, and a battery that lasts the day. If none of that matters for the way you shoot, your phone is fine. If it does, a compact is a rewarding camera to learn.
My own first digital camera, back when I was first learning photography, was a point and shoot. It was an early Canon model I bought in 2002, and I was thrilled to take endless photos without buying or developing a roll of film. Compacts have improved beyond recognition since then, and they haven’t faded away the way people kept predicting. If anything the opposite is happening: camera shipments have risen for two years running, with compacts up roughly 30% in 2025 alone after bottoming out around 2022. They’re a long way from their mid-2000s peak, but the compact is firmly back as a camera people actively choose.
Worth getting straight early: “compact camera” covers a lot of ground. At one end are pocket superzooms for not much over $100; at the other, enthusiast compacts north of $1,000 with bigger sensors and faster lenses. They handle differently, but the core skills (holding the camera, reading the screen, working the exposure) are the same across all of them, and that is what this guide teaches. It’s not a buying guide. If you’re still choosing, see our guide to the best travel cameras.
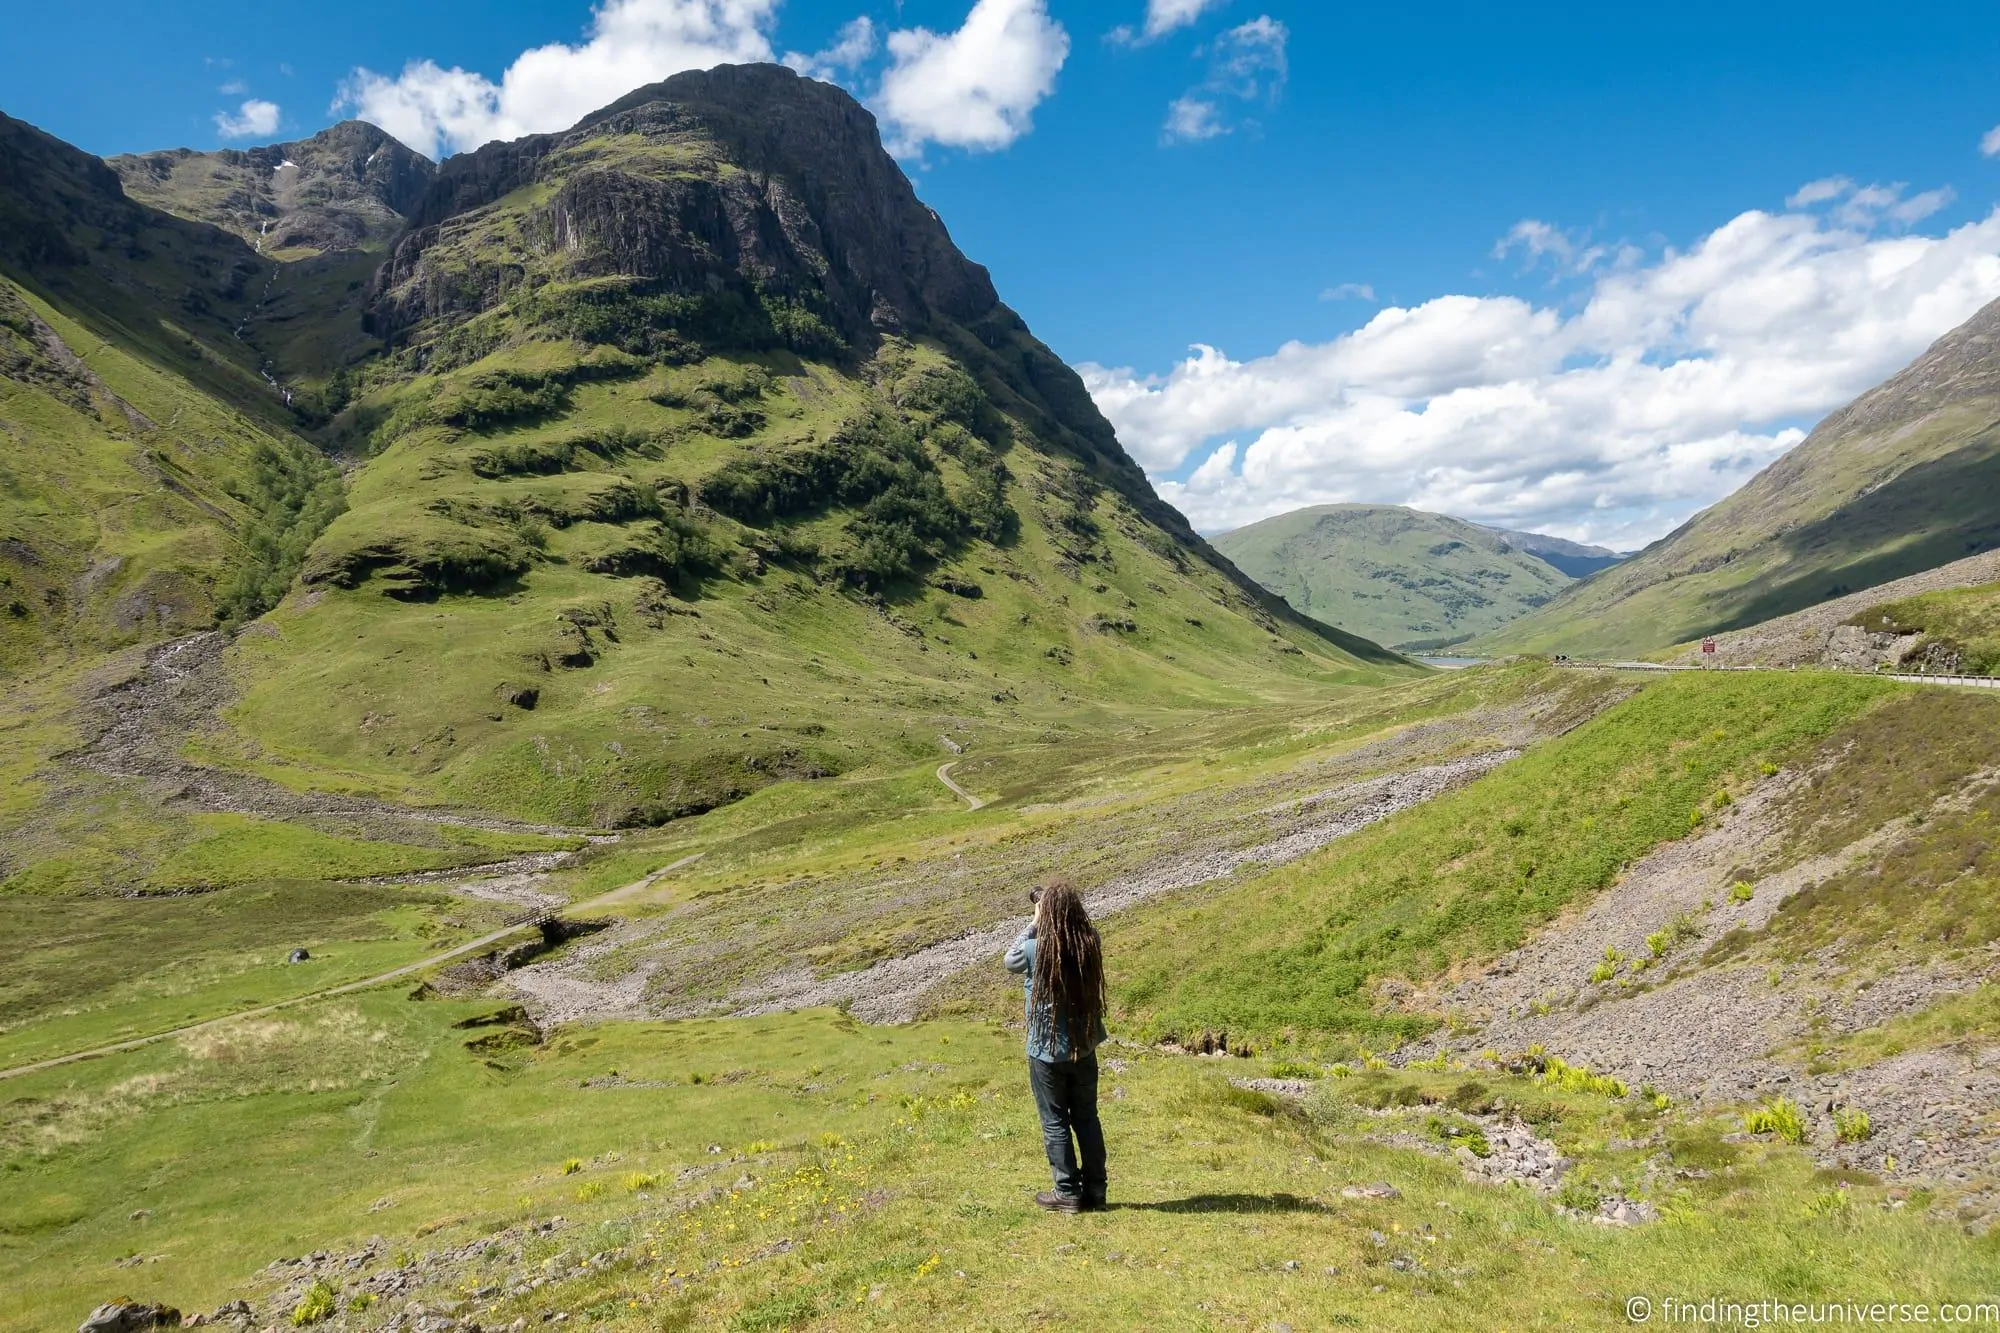
Jess and I have travelled with a compact for years, alongside our bigger kit, for the days you don’t want to carry anything heavier. Below I walk through every common control on a compact, then the techniques that make the biggest difference, the mistakes worth sidestepping, and how to keep the camera in good shape. Let’s get started.
Table of Contents:
What is a Point and Shoot Camera?
A compact camera, also often referred to as a point and shoot camera, is a small camera that is designed to be both easy to use and very portable.
Unlike more advanced cameras, such as mirrorless or DSLR camera systems, a point and shoot camera doesn’t have interchangeable lenses. However, they do usually feature a good zoom, which gives them an advantage over smartphones.
Generally, the idea with a compact camera is that the camera is able to easily fit into a pocket, purse, or day bag, so you never feel you are carrying around something large and obvious. This makes them ideal travel cameras.
They also make great starter cameras for those starting off in photography, and we often recommend them to families who are wanting to get a camera for their kids/teens who want to start taking photos with something a bit more serious than a smartphone.
Compact cameras are also usually designed to get good photos with minimal effort from the user – you should just be able to turn it on, point it at your subject, and press the shutter button. This is where the name “point and shoot” comes from.
Of course, photography isn’t quite this simple! Regardless of what kind of camera you are using and how clever the technology inside it is, the skill of the photographer in composing the image is key to getting good results.
In this post I’ll share some tips on how to get great photos with a compact camera to help you out. First though, let’s go through some common controls you’re likely to find on a point and shoot camera.
Compact Camera Controls: A Guide to Using Your Point and Shoot Camera
Before going into detail regarding all the buttons and options on your compact camera, a quick preface to set the scene.
As you probably know, there’s a wide range of compact cameras on the market. These range from budget-oriented options priced around $100 to premium models costing over $1,000.
This range of options from a number of different manufacturers means that there’s quite a difference in both the capabilities of these cameras, as well as the features and interfaces they offer.
For example, almost all compact cameras will offer a zoom, flash, and the option to set different scene types. However, only the more advanced (and expensive) compact cameras will offer manual modes and features such as the ability to shoot in RAW and WiFi capability.
In this section of the guide, I will cover the majority of the most common buttons and features you should find on your compact camera. However, this won’t exactly match for every camera type, and if you can’t figure out what a specific button or option does, it’s best to check your camera manual.
For the photos in this guide I’m using a Sony RX100 V. This is quite an advanced compact camera with a lot of features, but there is still plenty of similarity between it and other models on the market.
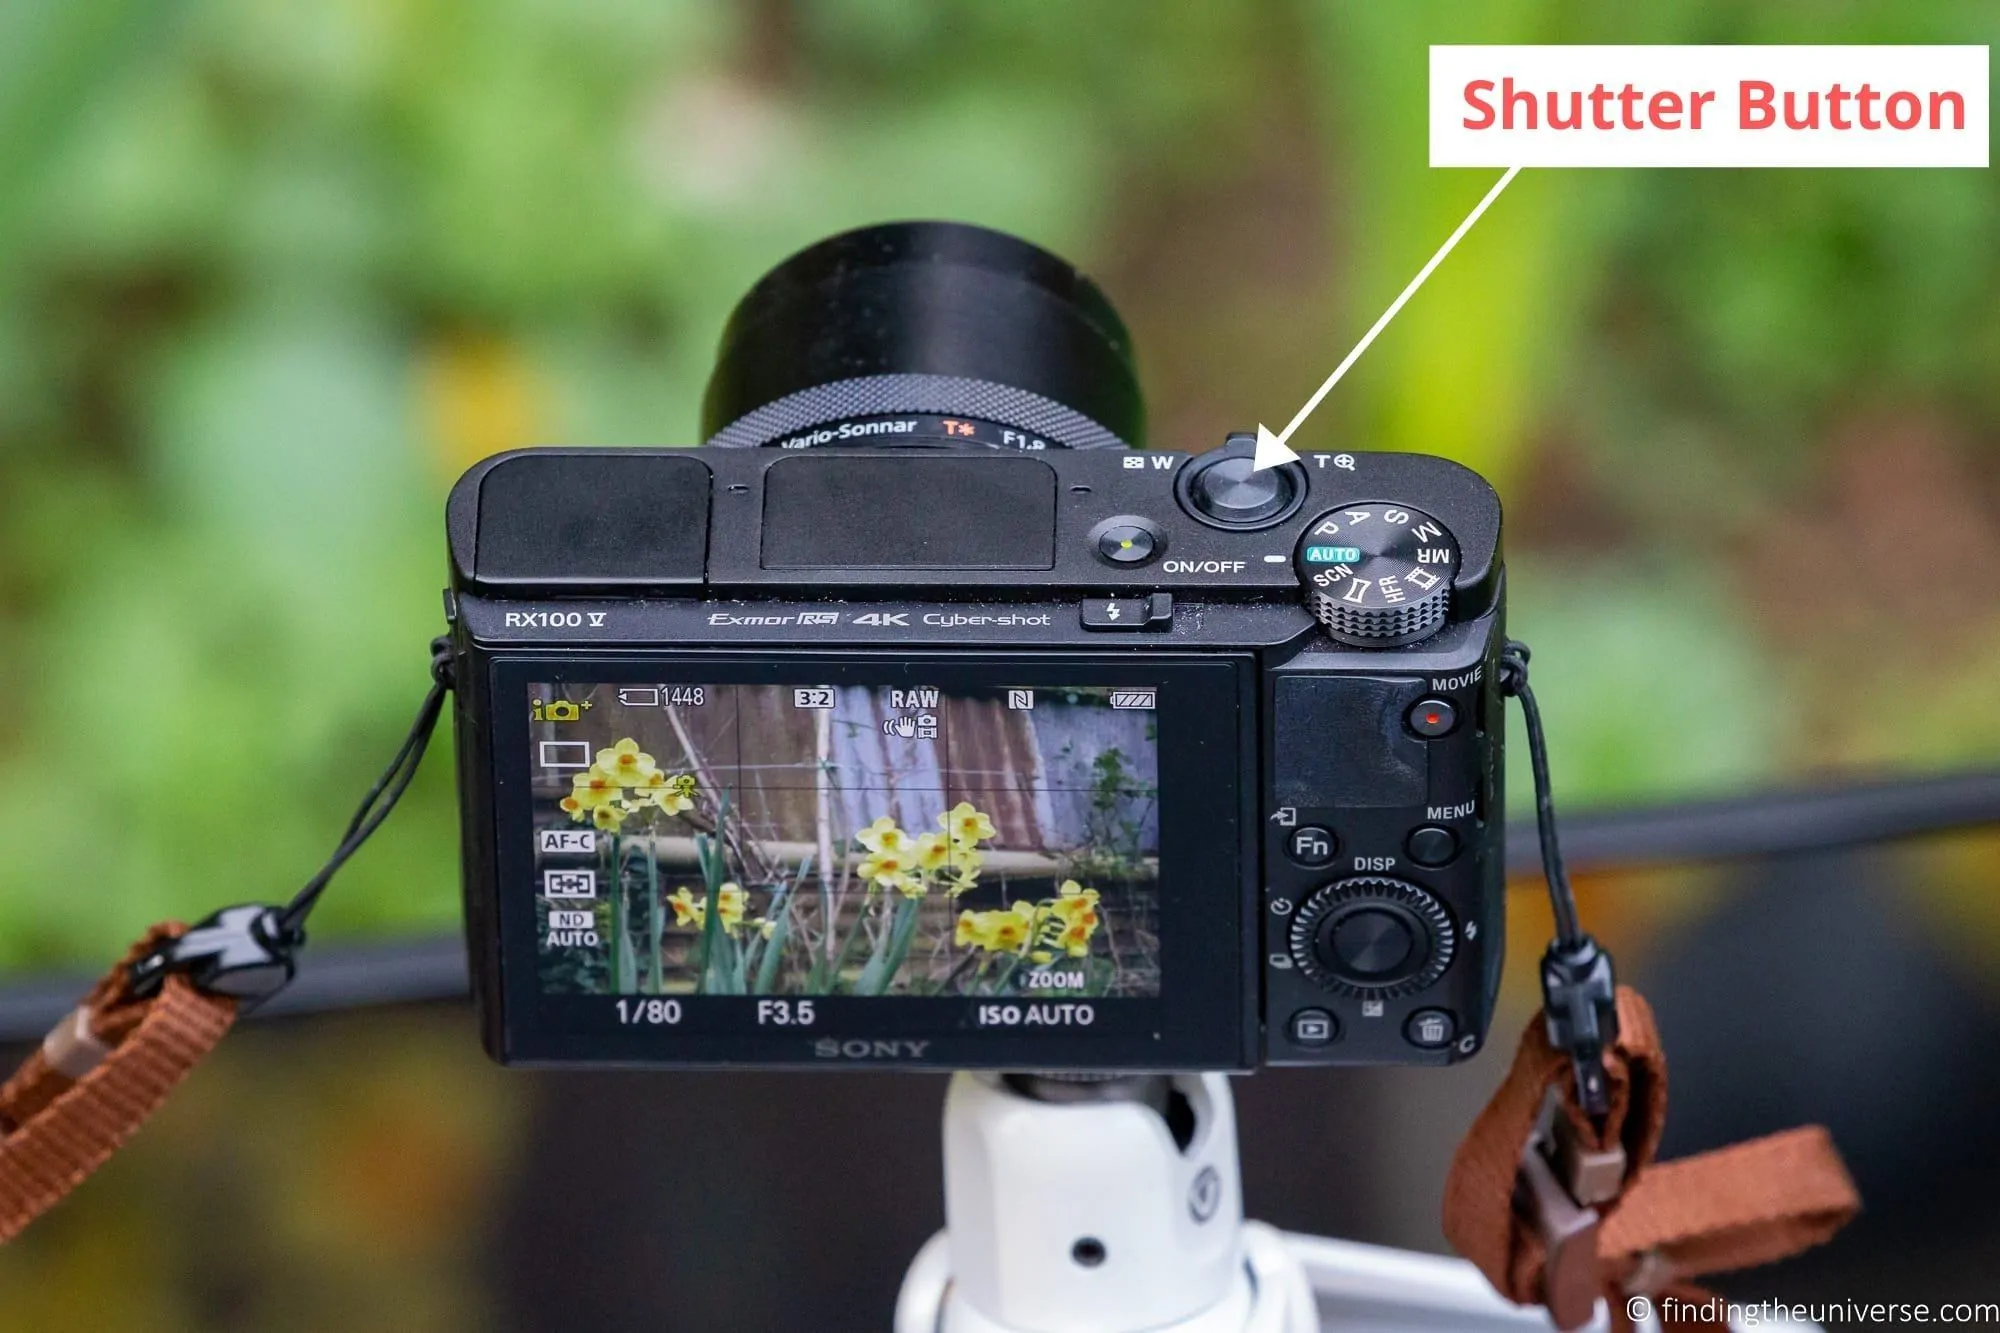
Shutter Button
Probably the most important button on any camera is the shutter button. Usually found at the top left of the camera, this is the button you press to take a photo.
Most shutter buttons have two stages that they go through in order for you to take a photo. Half depressing the shutter button will cause the camera to evaluate the scene, focus on a subject, and essentially dial all the settings in so it is ready to take the shot.
Fully depressing the shutter button will actually take the image and record it to the camera’s memory card. You can do both in one go, from not pressing the button to fully depressed. However, I usually recommend pausing at the half way point, as the camera will usually show you on the screen the various settings it has chosen, as well as the focal point.
If you aren’t happy about the settings, and in particular what the camera has chosen to focus on, then you will just waste memory by taking the photo. It’s best to try again by lifting and half depressing, or changing the settings on the camera so it gets a better result.
Zoom Buttons
One of the major advantages that compact cameras have over smartphones is that they are large enough to include a proper optical zoom. This means that you can zoom in on subjects that are further away, and still get nice photos.
The optical zoom on the camera will vary depending on the model, and will range from 3x up to around 40x. If you’re looking for a compact camera, I’d suggest a zoom of at least 8x as a starting point.
As you would imagine, a compact camera needs a way for you to control the zoom. This is usually done with a zoom toggle that you push one way to zoom in, and the other way to zoom out.
As this is a regularly used button, it’s normally easy to access, and is often found close to the shutter button on the top of the camera.

Mode Dial
Depending on your compact camera, it might have a mode dial. If it doesn’t have a specific dial, then it will likely have a button on the back that gets you into a quick settings menu where you can adjust common settings.
Most commonly on a compact camera, the settings you can quickly access will be related to the type of scene that you are shooting. Compact cameras are quite clever, and can often evaluate a scene and pick the settings correctly, but they also usually have specific scene modes so you can help the camera out.
For example, you might be able to set the camera to a “landscape” mode to take pictures of scenic views, a “portrait” mode to take images of people, or a “macro” mode to take images of close up. There are often lots more scenes to choose from, including pets, fireworks, snow, sports, night time and so on.
If you have a more advanced camera that offers manual settings, like the Sony RX100 line we are using, the mode dial will also usually have dedicated modes for advanced shooting modes like aperture priority, shutter priority, and manual modes.


Flash Button
The majority of compact cameras have some kind of built-in flash, which can be useful in certain situations to help you get a photo you might otherwise not be able to get. This can be helpful at night and in really dark settings.
In many other situations, the flash will do more harm than good. You can read about why to disable your camera’s flash here.
Being able to control when your flash goes off is really important, which is why most compact cameras have a dedicated button just for this purpose on the back of the camera. When you press the flash button (which looks like a little bolt of lightning), you will get a menu with a few options, which will vary from the flash being always on, to always off, to automatic.
You can find out more about how to turn off your camera’s flash here.

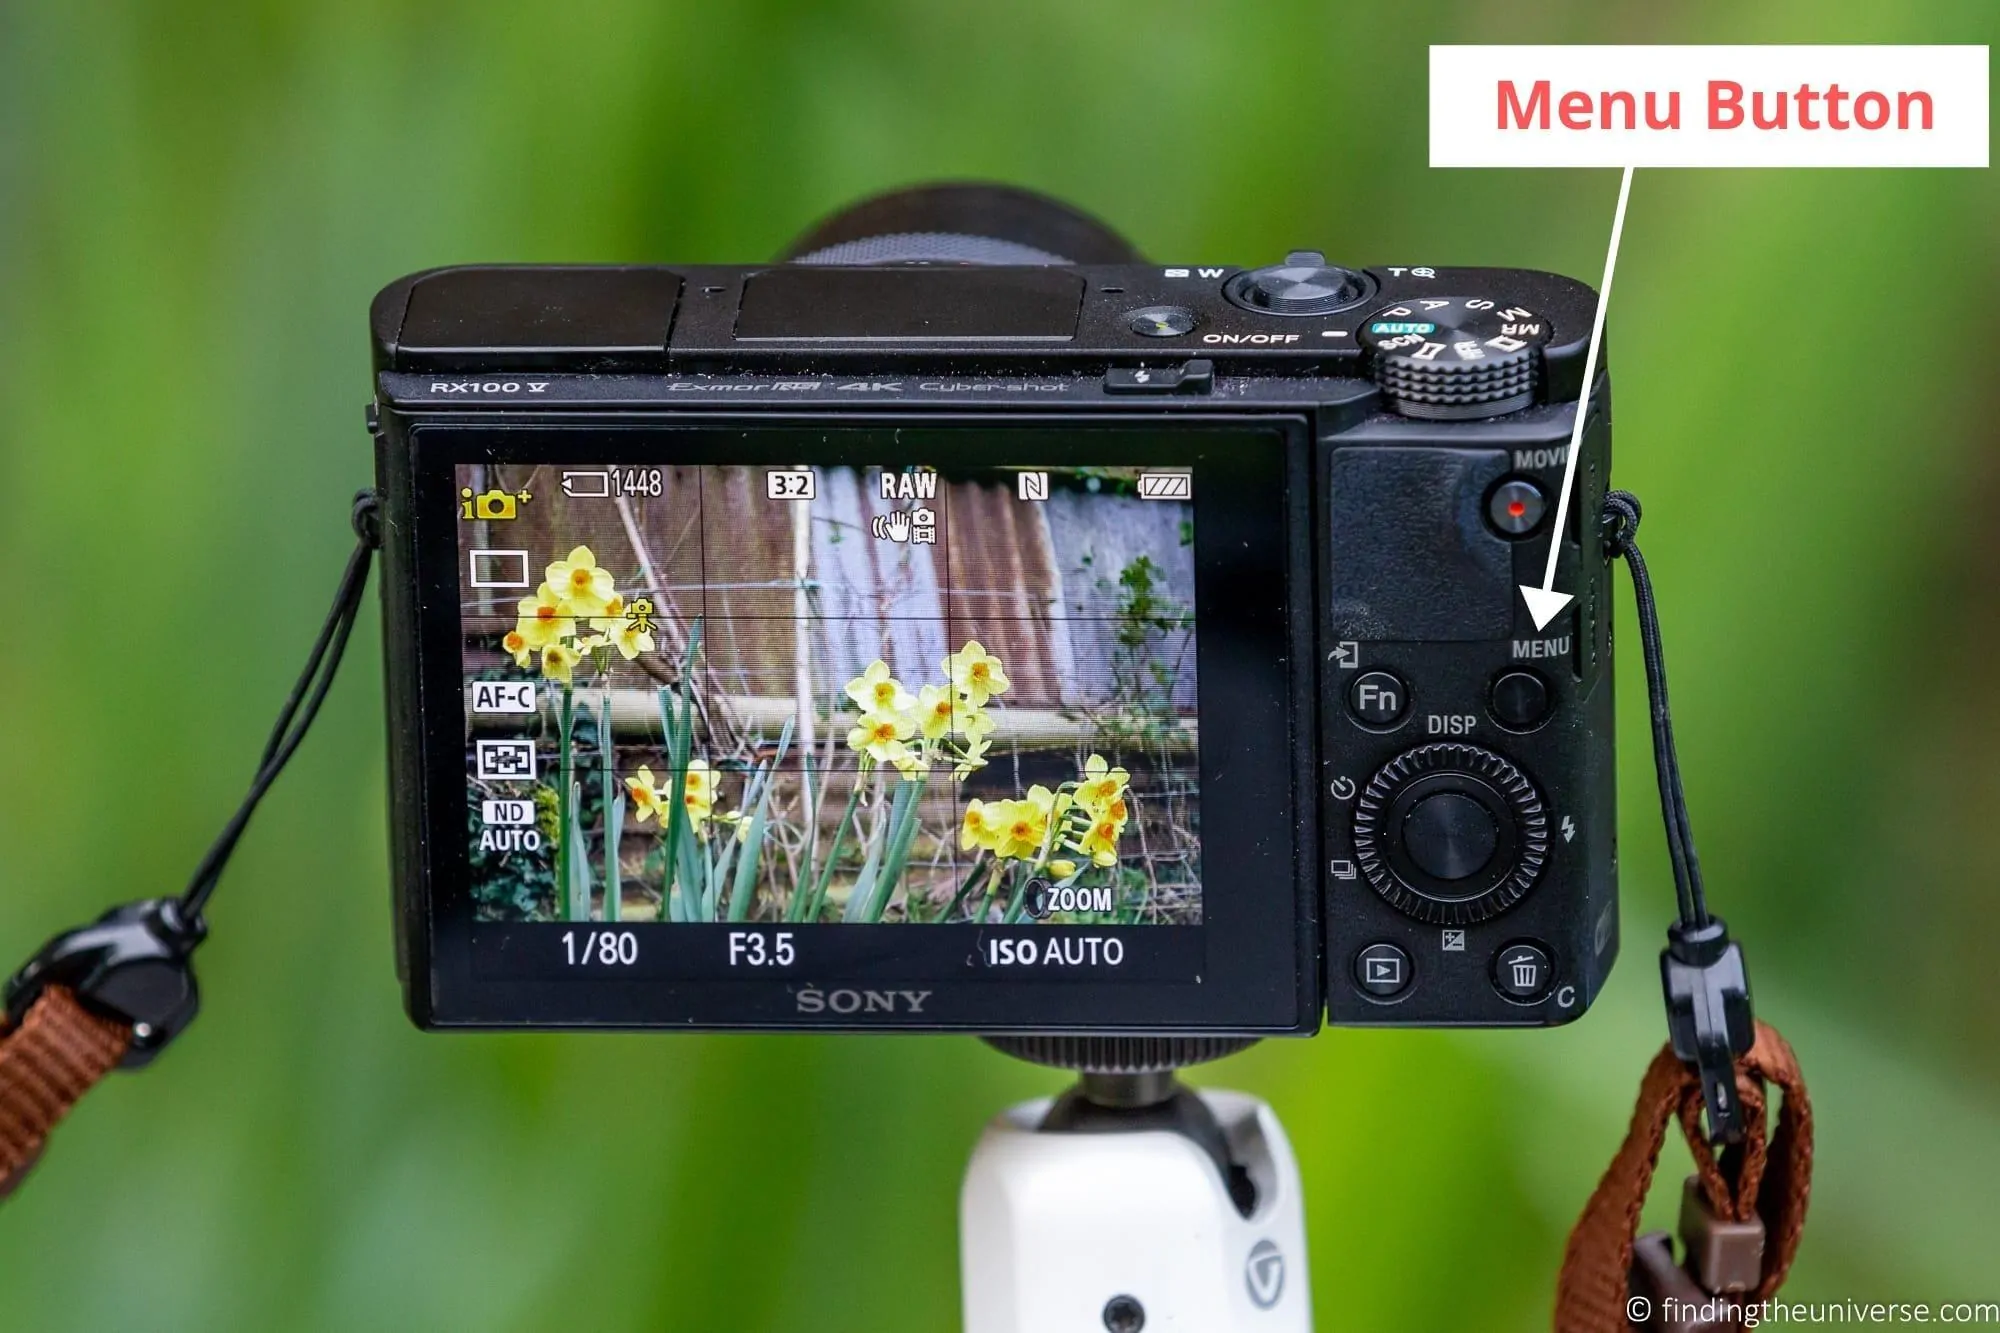
Menu Button
Whilst there are a lot of settings you can access on a compact camera via the buttons and dials on the camera itself, there will be many more configuration options available.
These will include all sorts of things, like setting the time and date of the camera, setting the file size of your images, and adjusting image controls like sharpness and saturation.
Obviously it’s not possible to put individual buttons for all these options on your camera, nor would you want them all there. Instead, they will all be accessed via a menu system. To get to the menu system, most compact cameras have a dedicated “menu” button.
Pressing this will take you to the menu, at which point you will either be able to move through the menu using the other buttons on the back of the camera, or via touchscreen interface if your camera has a touchscreen.

Video Button
Digital cameras are powerful devices, and one thing they can do that film cameras couldn’t, is shoot video.
Even the smallest compact cameras will usually have the option to record video, and most of them will have a dedicated video button.
This button might work in a variety of different ways. It might be an instant record button, so pressing it will start the camera recording video straight away. Alternatively, it might just toggle the camera into video mode, in which case you will likely use the shutter button to start recording video.
We don’t shoot a lot of video, but we do appreciate being able to quickly access the video mode on our compact camera. It can really save you missing a moment you really want to capture in motion!
If you do like to take video, be aware that they use up a lot of memory and can be quite a drain on battery life. So be sure to have spare memory cards and a spare battery or two to hand.

Playback Button
It’s all very well taking a lot of photos, but sometimes you are going to want to review the images you’ve taken on your camera.
To help make this easy, the majority of compact cameras on the market include a playback button. This will usually look like the “play” button you might find on a music player, i.e. a green triangle pointing to the right.
Pressing the playback button will usually bring up an interface from where you can review all your images, as well as delete them. This can be handy for discarding those images that didn’t turn out as planned, especially if you are running low on memory card space.

ISO Button
ISO is one part of the exposure triangle, the other parts being shutter speed and aperture. On more advanced compact cameras with manual controls, you can usually adjust all three of these options, and some compact cameras may include a dedicated ISO button to let you do this.
On more budget focused compact cameras, you usually can’t adjust the aperture and shutter speed. However, you can usually adjust the ISO setting.
Changing the ISO changes the exposure of the image. If you increase the ISO, you increase the brightness of the image, at the expense of creating a noisier image. Decreasing the ISO decreases the brightness of the image, and also gives you a cleaner image.
For the majority of outdoor, daytime photography, an ISO of 100-400 will usually work well, giving you well exposed images with minimal noise.
When you use your camera in lower light situations, such as indoors or at night, you will often need to compensate for the lack of light by increasing the ISO.
Usually, an ISO of 800 – 1600 will be usable for a compact camera. Much higher than this will often result in quite grainy images, which might not be so pleasing.
Most compact cameras will automatically adjust the ISO for you, however they will also often have a dedicated ISO button so you can override the camera setting. It will either let you set the number directly, or set it to something like “High ISO”. This will tell the camera it is ok to increase the ISO to a higher number, and you don’t mind the noisier image that will result.
If you do decide to set the ISO manually, don’t forget to set it back afterwards! You don’t want to pick a high ISO number for some night photos, and then forget to set it back to a more standard number for outdoor photos, as you’ll end up with noisy images for no reason. This has happened to many friends of mine, and is definitely a frustrating experience.
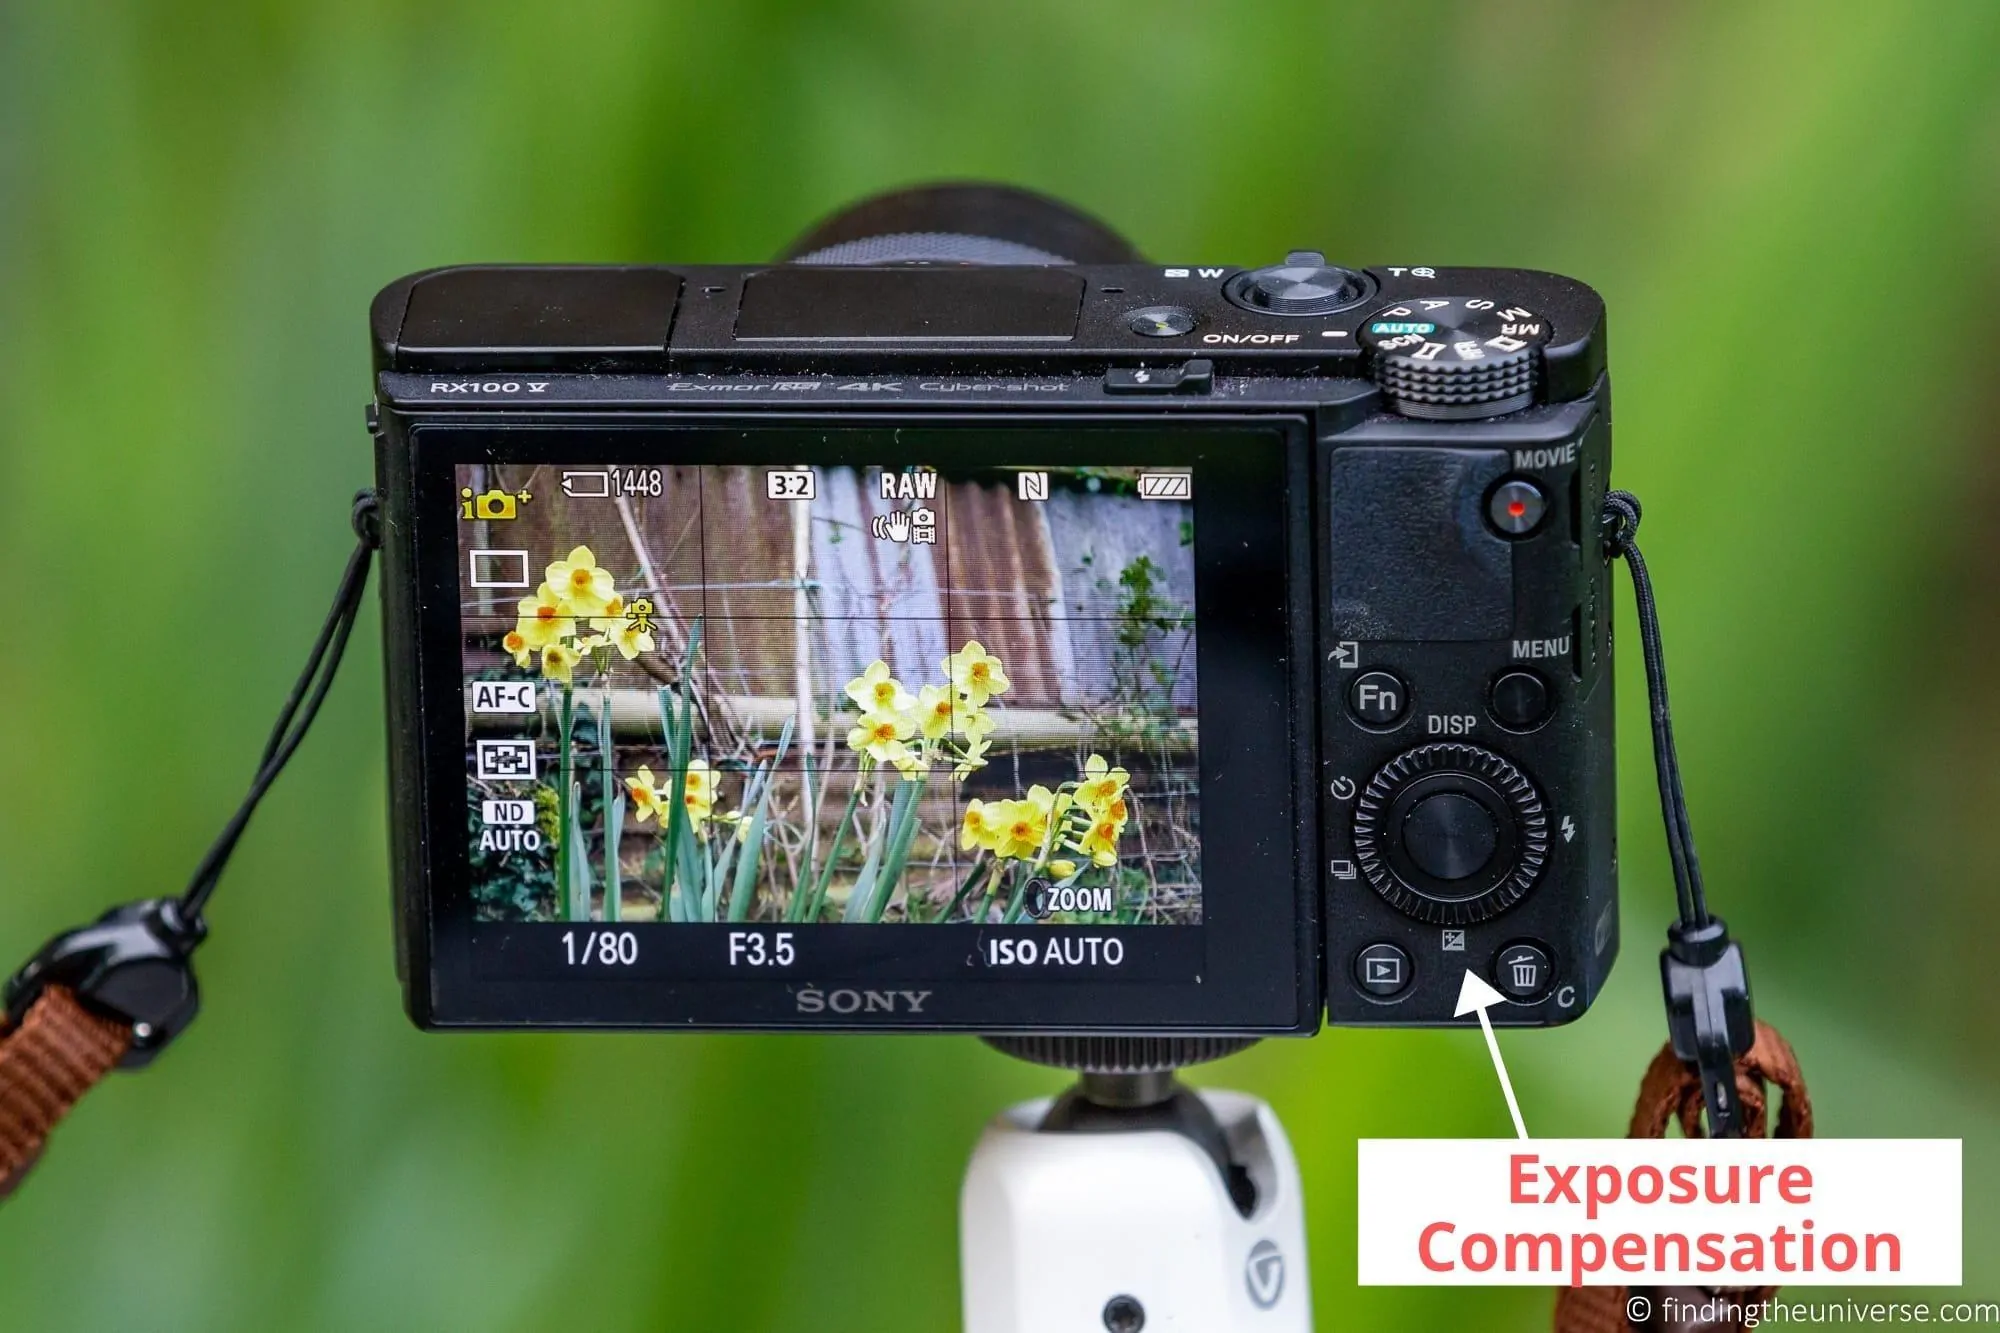
Exposure Compensation Button
Most compact cameras will have an exposure compensation button, which is a very handy way of adjusting the exposure, or brightness of the image.
The exposure compensation button usually looks like this: +/-. Basically, it’s a quick way of adjusting the brightness of the image you are trying to capture. When you press the button, you will be able to either increase or decrease the brightness of your photo, which in photography terms is known as increasing or decreasing the exposure.
This is helpful because sometimes the camera will not get the exposure quite right, depending on the lighting conditions. In a more advanced camera with manual controls, this is easy enough to resolve by changing the more advanced manual settings, like aperture, shutter and ISO.
In more basic compact cameras, you usually can’t adjust these settings. However, you can increase and decrease the brightness using the exposure compensation feature, which will achieve the same goal of a correctly exposed image.
If there is no exposure compensation button on the back of the camera, do check the menu system as well as your camera manual to see if the feature is accessible in another way.
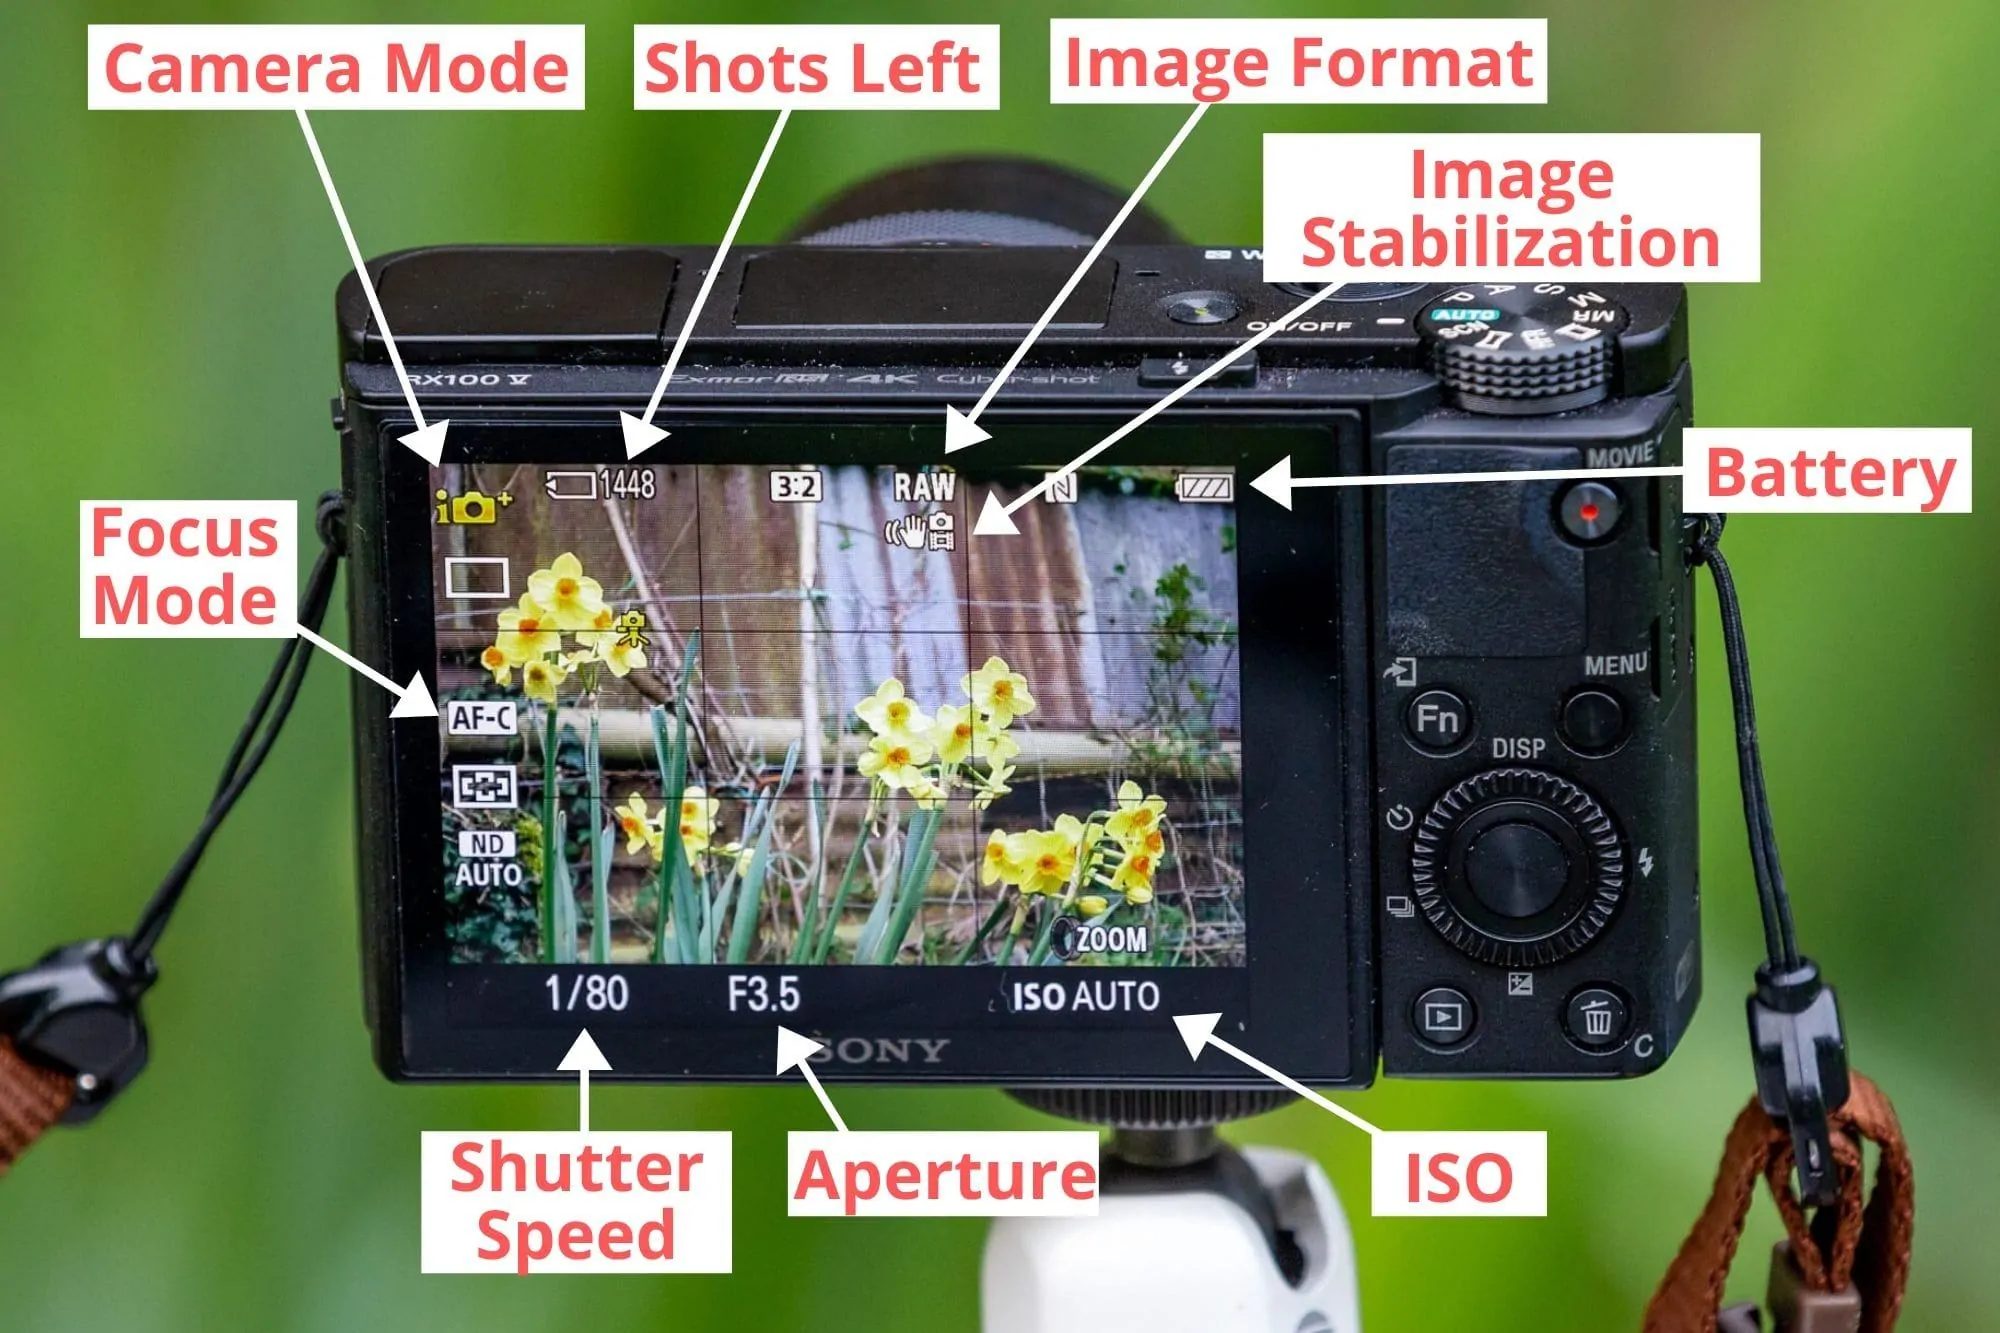
On Screen Display Information
Every compact camera now comes with a screen on the back, which is usually how you will compose your photos. Some more expensive compact cameras may also have an electronic viewfinder, which you can hold up to your eye.
Both of these screens can be used to compose your photos, however they also display a lot of pertinent information about how the camera is set up.
This information will vary depending on your camera. It can also be adjusted. On the back of your camera there will likely be a “display” or “disp.” button, which will toggle the information displayed.
Usually, you will be able to show the following information on the display.
- The current mode the camera is in
- Remaining battery
- Remaining images
- Focus mode
- Flash status
- Picture Style / Scene
- Exposure compensation
- Current focus point
- White balance
- If image stabilisation is active
- ISO setting
In addition, more advanced compact cameras may also show:
- Whether you are shooting in RAW, JPG, or RAW+JPG
- Aperture setting
- Shutter speed setting
- Horizon level indicator
- WiFi / Bluetooth / GPS status
Usually not all the above information will be displayed at once (otherwise the screen would be quite cluttered!), but it is worth taking the time to learn what all the readings on the display mean so you can quickly see how the camera is set up before you take your photo.
How to Get Better Photos With Your Compact Camera
You definitely don’t need to invest in an expensive high-end camera to capture great images. In the right hands, a compact camera can take spectacular images. To help you get better photos with your compact camera, I wanted to share some tips you should find helpful.
Many of these tips will apply regardless of the type of camera you are using, from a smartphone to a DSLR, but they are focused on point and shoot cameras.
How to Hold A Point and Shoot Camera
Let’s deal with the basics first. Many people hold a compact camera with one hand, which is a mistake. You should really not try to hold any camera, no matter how small, with just one hand.
This is because it’s very hard to hold a camera stable with only one hand. And if your camera isn’t steady, then there’s a good chance your images will turn out blurry – especially when you are shooting in environments with limited light.
To correctly hold your point and shoot camera, you should use both hands. Your right hand will grip the right-hand side of the camera, with your index finger over the shutter button.
Your left hand will cup the camera, with your thumb gripping the left side of the camera, and the palm of your hand underneath the camera to support it.
The next question is where to hold the camera relative to you. A common mistake is to hold the camera at arm’s length. Unfortunately, the further away from your body your arms are, the less stable they will become.
Instead, try to tuck your elbows against your body. This may feel a little awkward, but it will be a lot more stable than holding your arms out. Then position the camera and your forearms so you can see the screen to compose your photos, or hold it to your face if you are using the viewfinder.
Finally, press the shutter button gently. A sharp jab will move the camera, undoing all the work you’ve just done to hold it steady.
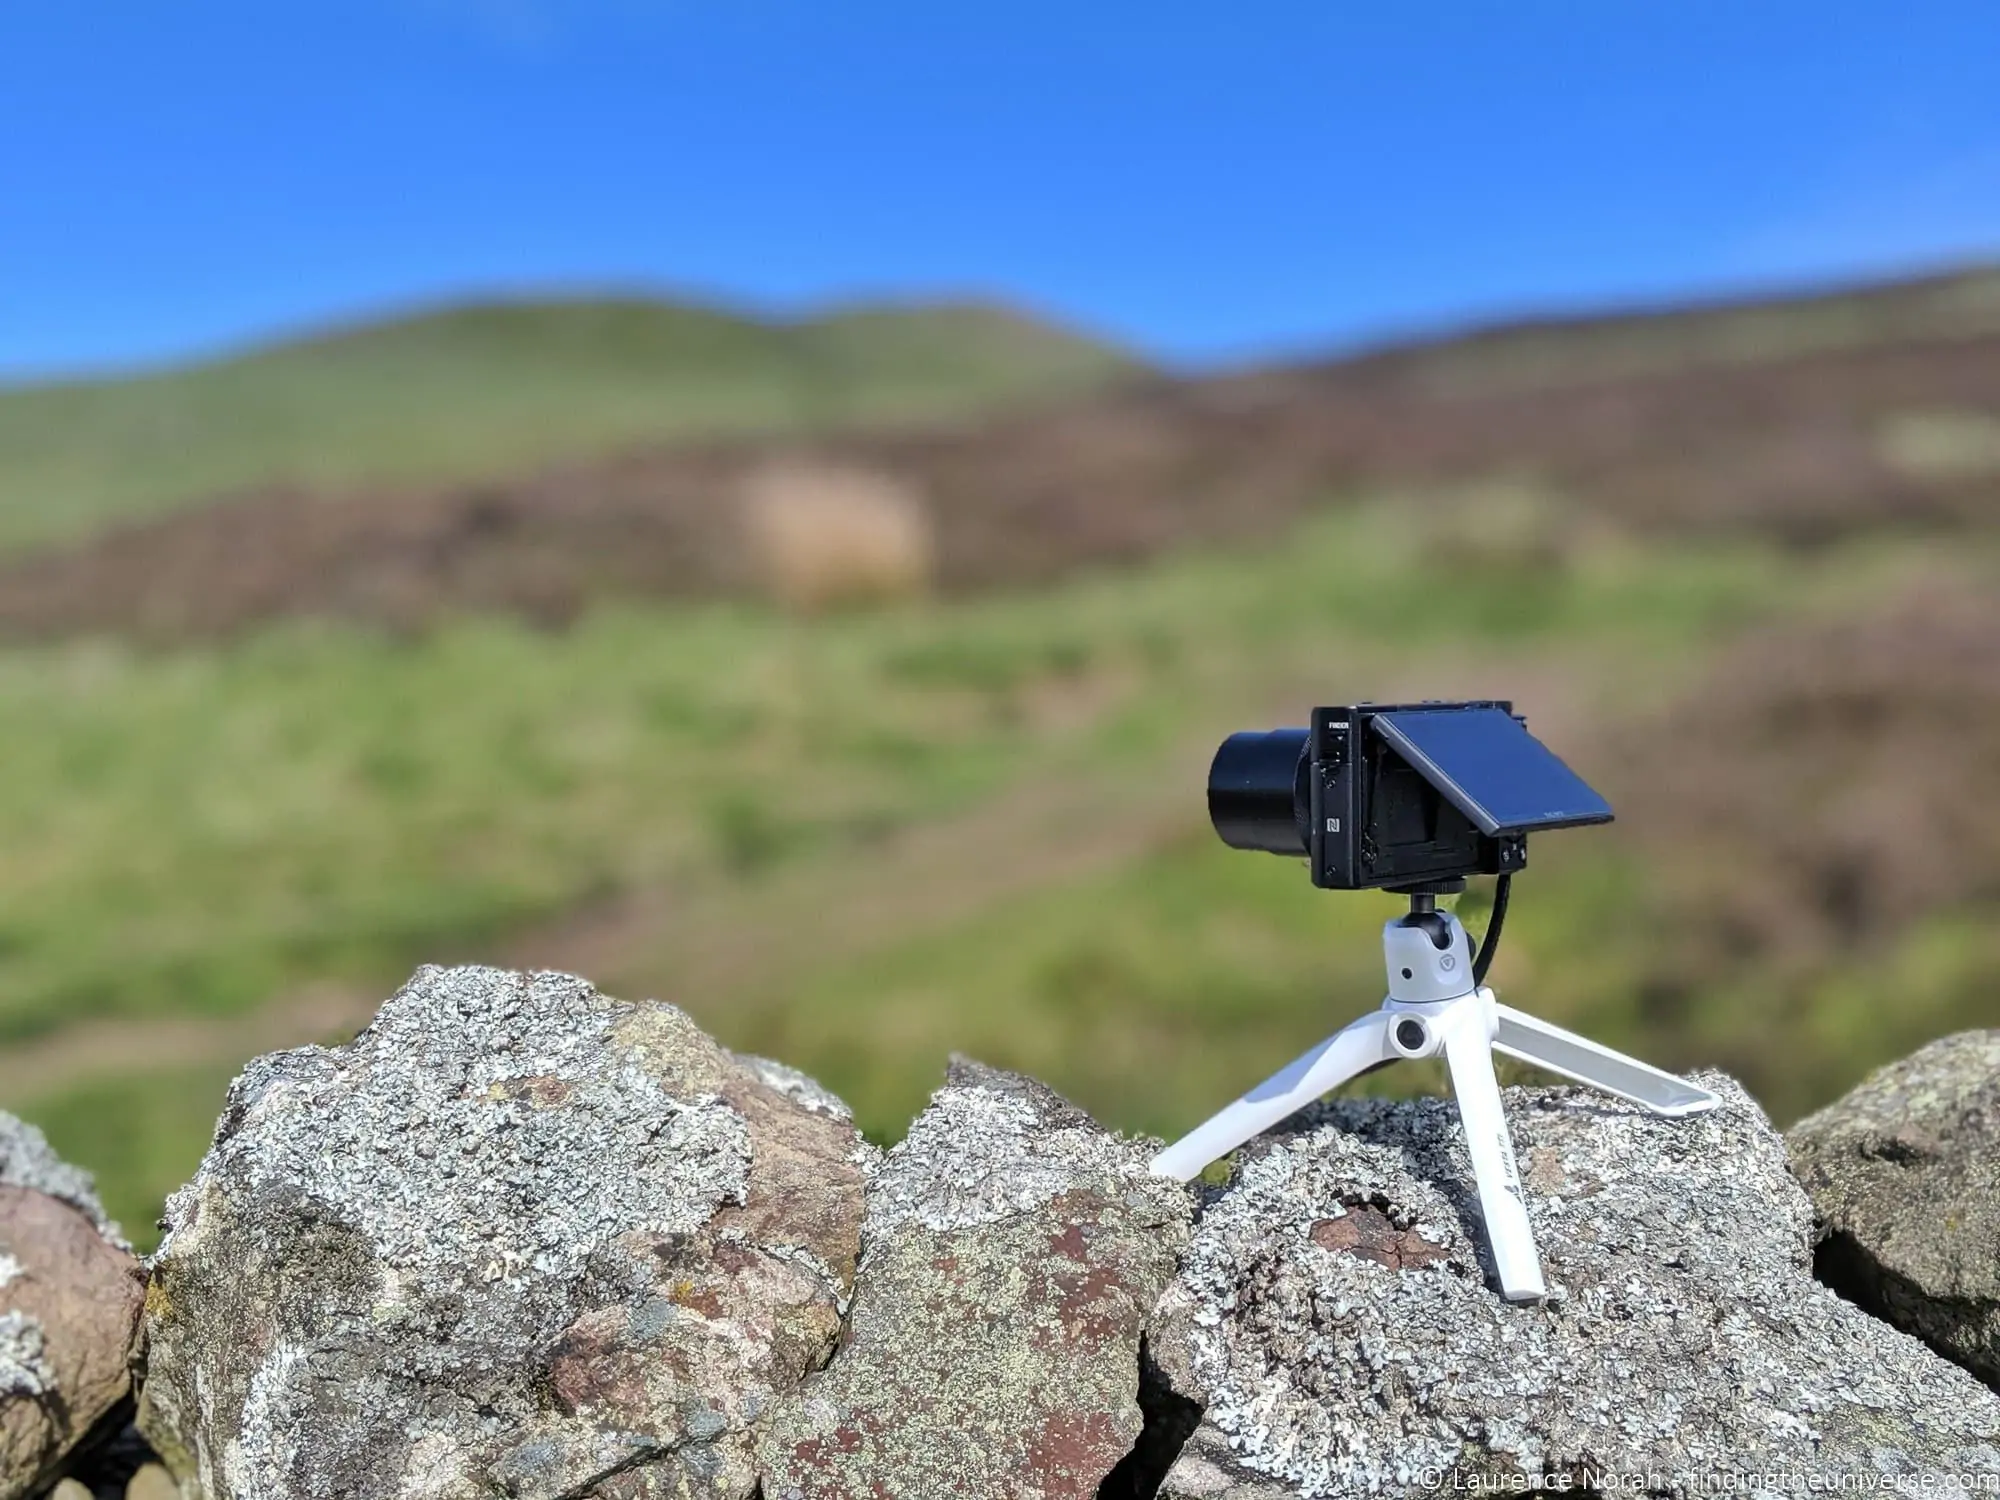
If you have a hard time holding your hands still or are often shooting in low light situations, you may want to get a tripod. You can get a regular travel tripod that will work for a compact camera (like this one) or a minipod like this.


Understand Your Compact Camera Settings and Modes
A camera is a fairly complicated piece of equipment, which has the challenging task of making split second evaluations of a scene, and then recording that scene for all time.
A point and shoot camera is designed to make the process of photography as simple as possible. However, there are a huge number of variations of the type of scene you can photograph with your camera, and as such, most compact cameras have a variety of adjustable settings.
These settings do a variety of different things. Some of them are very specific, like turning the flash on and off, or setting a focus point. Others are more like hints for the camera, such as setting it into portrait mode or landscape mode, so the camera knows what sort of image you are trying to capture.
The key thing is understanding the settings and modes that your camera has available to you. Reading this post is a great starting point, but unfortunately we can’t cover the specifics of every camera on the market. The best option is to check out the camera manual and see what options are available on your camera.
This way you’ll be able to really master the various options your camera has, and start taking great photos sooner.
Learn About Exposure
When your camera takes a photo, the technical term for it is an exposure. This is because you have “exposed” your camera’s sensor to the light, allowing it to capture the image.
At their most basic, all camera’s essentially work in the same way. A lens captures and focuses the light, a shutter opens to let the light pass onto the sensor, and the sensor records the light. This is the same principle for all cameras, from smartphones to DSLRs.
To ensure the image is correctly exposed (not too bright or too dark), the camera has three controls. These are the aperture, the shutter speed, and the ISO.
Together, these three controls make up what is known as the exposure triangle. This is a photography concept which just indicates there are three controls, all of which can be used to control the exposure. You can read more about the exposure triangle in photography here.
Depending on your compact camera model, you will have different levels of access to these controls. More basic cameras have limited control, whilst advanced compact cameras will give you full manual control. Manual control means you set the aperture, shutter speed and ISO yourself.
On a basic camera though, you should still be able to use an exposure compensation feature to make the image darker or brighter. All this does is tell the camera to let more or less light in, which it actually achieves by adjusting ISO, aperture, or shutter.
Having an understanding of the exposure triangle and how aperture, shutter speed and ISO work together to create an image will help you avoid images that are too dark or too bright, as well as blurry images that come about when there’s limited light available.
Understand How to Compose an Image
One of the most important aspects of photography is the art of composing an image. Composition is all about how you place the various subjects in your image in order to create the final shot.
Often, you will hear people talking about someone having a good “eye” for photography. This usually means that they are good at composing an image so it is visually pleasing.
Whilst this is often thought of as an innate ability, it is entirely possible to learn how to compose a great photo too. You can do this by learning about and then applying what are commonly referred to as the rules of composition.
These “rules”, which are more like suggested guidelines, are basically tips that you can use to improve your photos. For example, the rule of thirds helps you place subjects in the image, leading lines is a way of having directing your viewers eyes, and colour can be used to highlight your subject.
There are more compositional guidelines, which have been used by photographers and artists for centuries in order to create more pleasing images. You can read about them in my full guide to the rules of composition here.
Think About the Story
An important thing to think about when taking a picture is the story you are trying to tell with your image. It’s often said that a picture is worth a thousand words. This is because it’s easy to convey a lot of information very quickly with an image. Our brains process visual information very quickly.
As such, you want to make sure that you compose the image correctly to give your viewer the information you want to give them. Think about all the different elements that you are including in the shot. Do they all add to the story, or are some of them distracting? Is the subject clear? Is there anything you can do to help your viewer understand what is going on?
If not, think about how you might recompose the shot to make it better. Maybe you need to zoom in or out. Maybe you need to reposition yourself entirely. Perhaps you need to wait for a part of the scene to change (a car to drive away or a person to move) to improve the shot.

The Best Times of Day for Photography
Photography is all about light. Light comes from many different sources, but by far the most common light source (and most preferred) used in photography is the sun.
Through the day, as the sun moves across the sky, the light that hits the earth interacts with the atmosphere differently depending on the angle the sun has in the sky. The different angles of the sun also create different types of shadow, which can dramatically change a photograph.
In the middle of the day in summertime for example, the sun is generally directly overhead. An overhead light results in a flat looking image, as there are no shadows to create depth and perspective.
When the sun is closer to sunrise and sunset, the lower angles create more pleasing images, with a clearer sense of depth and perspective. In addition, the light at these times is usually a warmer, more yellow tone. This soft warm light also helps to create more pleasing images, which is why photographers refer to the time around sunset and sunrise as golden hour.
In practice, the 30 minutes or so either side of sunrise and sunset is the sweet spot, though the exact window shifts with the season and how far north you are.
Don’t forget to also account for clouds. If it’s a partly overcast day, you will usually get better results if you wait for the sun to come out from behind the clouds. Sunlight will create more pleasing shadows and brighter colours compared to the results you will get shooting when the sun is behind a cloud.
If you can, try to take more of your photos at times of day when the light is better for photography, and you will get better results.
Take a Course
I firmly believe that photography is something anyone can learn. It takes time of course, and work, but it’s definitely possible to master the art of taking a great photo.
There is, however, quite a bit to get to grips with. From composing a photo through to understanding exactly how a camera works, through to editing – there’s a lot to grips with. And that’s not even including more advanced concepts like getting good at long exposure photography or astrophotography.
To help out, in 2016 I launched a comprehensive online photography course. I wanted to put down in one place everything I know about photography, to help folks start getting better photos – whatever camera or level or photography understanding they might have.
I’m delighted to say that since launching the course I’ve helped over 2,000 people improve their photography. Through the online content, homework assignments, webinars, and access to a course exclusive Facebook group, so many people have started taking better photos. Which I think is brilliant.
If you’d like a hand with your photography, you can find out all about my online travel photography course by clicking here. The course has a 30-day money back guarantee so you have nothing to lose!
Practice!
Last but not least, like any skill, photography is something that you will get better at the more you practice it. Even 10 minutes a day with the camera in your hands will do more for you than one long session a month.
It’s important to try to remember to take your camera with you wherever you go. You never know when a photography opportunity might strike, and just using your camera will get you more familiar with its various settings.
If you are struggling to find things to photograph on a regular basis, a good idea is to take part in regular challenges. Often local newspapers or websites will host photography competitions along a certain theme, which can be a good motivation for looking for shots. There are also websites and forums with suggested subjects which can help give you ideas for what to shoot.
Common Mistakes With Compact Cameras (And How to Fix Them)
Over the years, between my own photography and helping people through my course, the same few habits come up again and again. None of them are hard to fix, and sorting them out is the fastest route to better photos. Here are the ones worth knowing about.
The first is digital zoom. Optical zoom, where the lens physically moves, keeps your image sharp. Digital zoom just crops into the image and enlarges it, and the result goes soft and mushy fast. Most compacts will happily let you zoom past the optical limit, often without making it obvious where that limit is. The fix is simple: find out where your optical zoom ends (the manual will tell you, or watch for the point where the zoom indicator changes) and treat that as your hard stop. If you need to get closer than that, move your feet or crop the photo later on a bigger screen.
The second is never leaving full Auto. Auto mode is a fine place to start, and on a budget compact it might be most of what you have. But if your camera offers Program mode or scene modes, it’s worth using them. Program mode still does the heavy lifting but lets you nudge things like exposure and ISO. Scene modes (landscape, portrait, macro and so on) tell the camera what kind of shot you’re after so it can make better choices. You don’t have to jump straight to full manual. Just take one step past Auto and see what changes.
Third, if your camera can shoot in RAW, and many enthusiast compacts like the Lumix and Sony models below can, it’s worth switching it on. A RAW file holds far more detail in the bright and dark parts of the scene than a JPEG, which gives you much more room to rescue and improve a photo afterwards. Budget compacts are usually JPEG only, so this one doesn’t apply to every camera. But if you’ve got the option, use it. Our guide to RAW in photography explains why in more depth.
Fourth, and this one is almost too obvious: a smudged lens. Compact cameras live in pockets and bags, and the front element picks up fingerprints and dust without you noticing. A smeared lens quietly softens every single photo you take. A five second wipe with a microfibre cloth before you start shooting fixes it, and it’s the cheapest image-quality upgrade there is.
Last, be careful about deleting photos on the camera’s screen. That little screen makes it hard to judge a photo. A shot that looks soft or badly exposed on the back of the camera can look perfectly fine on a computer, and once you’ve deleted it, it’s gone. Unless you’re actually out of memory card space, leave the culling until you can see your photos on a bigger screen.
Get those five sorted and you’ve already closed most of the gap between an average compact-camera photo and a good one.
Caring For your Point and Shoot Camera
A point and shoot camera is an investment, even at the budget end of the scale. As such, you want to take care of it and make sure it lasts for many years.
I wanted to share some tips to help keep your camera in great condition, based on my years experience travelling the world with a wide variety of cameras and camera gear.
How to Protect your Point and Shoot Camera
I would say that the most important accessory for your compact camera is a case. This will protect it from bumps and mishaps when you aren’t using it, and will keep it protected when you pack it away into your travel bag or daypack.
There are a variety of cases on the market. Often, the camera manufacturer will make an official case, however these are often fairly expensive compared to third-party options.
When buying a case, the main thing is to make sure your camera fits snugly inside it. In addition, some cases come with additional pockets. I would suggest a pocket for a spare battery and memory card would be worth getting.
The specifications of the case should tell you what size camera it will fit. Be sure to check the internal dimensions, as these are what really matters. You can also often read the comments and reviews from other buyers, as other folks with your camera might have already bought the case and tried it out with your camera model.
If you have camera strap, then you want to make sure it will fit inside as well.
I would also say to try not to get a case that is much bigger than the camera itself. The camera needs to fit neatly inside the case to get the maximum protection. Also, one of the main reasons to buy a compact camera is for portability, so you don’t want to undo that by buying a huge case!
We use this case (the large version) for our own compact camera. It fits our Sony RX100 V and camera strap snugly, with room for a spare memory card and battery in the side pocket. It’s inexpensive and well suited to travel.

How to Clean your Point and Shoot Camera
One great benefit of a point and shoot camera is how easy it is to maintain and keep clean. Mirrorless cameras and DSLR cameras let you change lenses, but when you do so, there’s always the risk of dust getting inside the camera. They generally require periodic professional cleaning.
Compact cameras don’t have this issue. In addition, they usually have a built in lens cover, so when the camera is powered off, the lens is protected. Larger cameras usually require you to buy lens caps, which, if you’re like me, you inevitably forget to use or lose entirely.
All that said, you should still make sure your camera is in good condition. Dust and small particles can definitely work their way inside your camera, so keeping it clean can help prevent that from happening. In addition, keeping the lens clean will ensure your images stay sharp and clean.
The best accessory for cleaning your compact camera is going to be a microfibre cloth like this. These are super soft, and especially designed for delicate surfaces like your camera lens, screen or viewfinder.
Keeping your Compact Camera Safe when Travelling
We travel a lot with our camera equipment. We love travelling with our compact camera especially as it’s so easy to pack, light to carry around, and unobtrusive.
Of course, this isn’t to say we are careless with our compact camera. We use a relatively expensive high end compact camera, which we are keen to keep safe, but keeping your camera equipment safe is important regardless of how much it cost. The real value is often the pictures you have taken with your camera, and losing those memories is usually much worse than losing a camera, which can be insured and replaced.
For a compact camera, the best thing is to keep it out of sight when you’re not using. It’s small and discreet, so it should fit nicely in your pocket. Alternatively, a good strap (we use one from the iMo Shop) will keep the camera securely around your neck.
Petty crime is often the main risk for travellers with any valuable items. The main thing is to reduce the opportunities for theft. So keeping your camera in a bag, rather than leaving it sitting on a cafe table for example, is one way to keep it safe. This applies to all your valuables of course.
We’d also suggest ensuring you have some sort of insurance policy for your equipment, especially if you’ve invested a bit of money into it. This can be through your travel insurance provider, just be aware that many policies have single item limits that may be below the value of your camera. For this reason, we have our camera equipment insured on our home contents insurance, with all our valuable items listed out and covered for loss outside the home.
Best Compact Camera for Beginners
If you’re reading this in preparation for buying a compact camera, here are three models worth a look, across a range of budgets. They’re the same picks Jess and I keep coming back to. For a wider selection, Jess has a full guide to the best compact cameras over on Independent Travel Cats.
| Camera | Optical zoom | Manual controls | RAW | Best for |
|---|---|---|---|---|
| Canon PowerShot ELPH 360 HS | 12x (25-300mm) | No (auto & program) | No | Budget, simple point-and-shoot |
| Panasonic Lumix ZS99 | 30x (24-720mm) | Yes | Yes | Big zoom with room to grow into manual |
| Sony RX100 line | 3x-8x (24-200mm, later models) | Yes | Yes | Best low-light in a pocketable body |
Canon Powershot Elph 360 HS A
If you’re looking for something at the budget end of the spectrum, this little Canon should fit the bill nicely. Jess and I both started our digital camera journeys with a version of the Elph line, and we’ve always found them to be reliable shooters that just get the job done.

Despite the relatively budget price tag, you still get a number of useful features. These include optical image stabilisation, a 12x optical zoom (a handy 25-300mm equivalent range), and a variety of creative shooting modes.
You don’t get aperture or shutter priority, or full manual control, here. It’s Auto and Program modes only, so it’s a camera that makes most of the decisions for you. But it’s very light, and if a good-value point and shoot is what you’re after, it’s our favourite at the budget end.
One thing to flag: Canon has thinned out its compact range a lot in recent years, and the Elph 360 has been in and out of stock through 2025 and into 2026. It tends to sell for around $379 when it’s available, so do check current stock before you set your heart on it.
Check prices on Amazon here and at B&H here.
Panasonic Lumix ZS99
Moving up a bit in price now to the Lumix ZS99. I’ve also owned a number of Panasonic cameras over the years, including compact and mirrorless models.

The ZS99 offers a lot for the step up in price. It has a huge 30x optical zoom (a 24-720mm equivalent range), optical image stabilisation, full manual controls, and RAW support.
One thing to be aware of: Panasonic dropped the electronic viewfinder that the previous ZS80 had, so on the ZS99 you compose on the rear screen only. For most people that’s no great loss, but if you like holding a camera to your eye, it’s worth knowing before you buy.
All of these features combine to make it a great camera for beginners. I definitely believe that having the option to shoot in some of the manual modes is really important, and as you push further into manual shooting, you will find yourself using those options more and more.
Check prices on Amazon here and B&H here.
Sony RX100 Line
When Sony first launched the RX100 line, it is fair to say they breathed life back into the compact camera market. With the rise of smartphones, many had forecast that compact cameras would fade out.
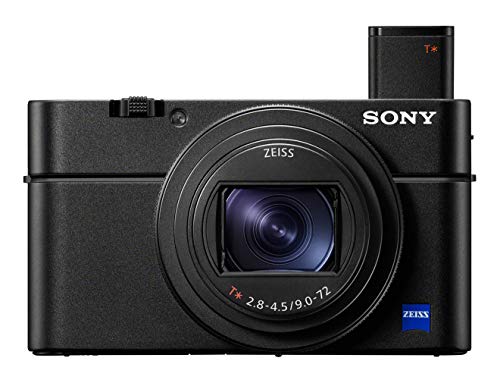
However, Sony saw a different future. The Sony RX100 range features some serious improvements over other compact cameras. To start with, they feature a larger 1-inch sensor. This means the camera works better in lower light conditions than other compact cameras, which have smaller sensors.
Most models in the range pair full manual controls with optical image stabilisation and a pop-up electronic viewfinder. Sony has released seven generations of the RX100 over the years (Wikipedia has a full generation-by-generation breakdown if you want it). The only one Sony still sells new is the latest, the RX100 VII, but the earlier generations are well worth hunting down on the used market, where they’re far more affordable. Earlier models pair a 3x zoom with a fast f/1.8 aperture, whilst later ones move to an 8x zoom (a 24-200mm equivalent) at a slightly slower f/2.8.
As with the Lumix above, we think that one of these cameras would make for a great beginners option, with plenty of scope as you develop your skills to switch to the manual modes.
Check prices on Amazon here and B&H here.
Further Reading
Hopefully you now feel ready to take better photos with your compact camera! Before you go though, I did want to share some more guides we’ve written on the subject of photography which I think will help you on your photography journey.
Beginner or intermediate, there should be something in these guides to help you.
- We have similar guides for how to use a DSLR camera, and how to use a mirrorless camera, which you might find interesting too. We also have a guide to how a DSLR works
- Knowing how to compose a great photo is a key photography skill. See our guide to composition in photography for lots of tips on this subject
- Once you’ve mastered aperture, you can control depth of field. Read more about what depth of field is and when you would want to use it.
- If you have a lens with a zoom feature, you can take advantage of something called lens compression to make objects seem closer together than they are.
- We are big fans of getting the most out of your digital photo files, and to do that you will need to shoot in RAW. See our guide to RAW in photography to understand what RAW is, and why you should switch to RAW as soon as you can if your camera supports it.
- You’re going to need some way of editing your photos. See our guide to the best photo editing software, as well as our guide to the best laptops for photo editing. We also have a guide to getting the best performance out of Adobe Lightroom, our preferred editing software.
- If you’re looking for advice on specific tips for different scenarios, we also have you covered. See our guide to Northern Lights photography, long exposure photography, fireworks photography,
- tips for taking photos of stars, and cold weather photography.
- If you’re looking for a great gift for a photography loving friend or family member (or yourself!), take a look at our photography gift guide,
- If you’re in the market for a new camera, we have a detailed guide to the best travel cameras, as well as specific guides for the best cameras for hiking and backpacking, the best compact camera, best mirrorless camera and best DSLR camera. We also have a guide to the best camera lenses.
- If you want a camera or lens, but the prices are a bit high, see our guide to where to buy used cameras and camera gear for some budget savings options.
- We have a guide to why you need a tripod, and a guide to choosing a travel tripod
Looking to Improve Your Photography?
If you found this post helpful, and you want to improve your photography overall, you might want to check out my online travel photography course.
Since launching the course in 2016, I’ve already helped over 2,000 students learn how to take better photos. The course covers pretty much everything you need to know, from the basics of how a camera works, through to composition, light, and photo editing.
It also covers more advanced topics, including astrophotography, long exposure photography, flash photography and HDR photography.
You get feedback from me as you progress, access to webinars, interviews and videos, as well as exclusive membership of a facebook group where you can get feedback on your work and take part in regular challenges.
It’s available for an amazing one-off price for lifetime access, and I think you should check it out. Which you can do by clicking here.
And that’s it for our detailed guide to getting the most out of your compact camera. As always, we’re happy to take feedback and answer your questions, so just pop them in the comments below and we’ll get back to you as soon as we can.

Ron Wickman says
I have three point & shoot cameras, a Canon 5x PowerShot A1400,. a 3x Fuji Film Fine Pix, and a Canon Power Shot S2 IS with small swivel view screen (“pro style” silver booger). On all three, even with brand new alkaline batteries (Harbor Freight Thunderbolt AA’s) inserted properly, and that sliding compartment properly closed, depressing the power ON button, the lens barrels first extend then immediately retreat and the screen shuts off. (goes blank). Often it warns “change the batteries,” but they are fresh and test full strength.. I must be doing something wrong, but following the printed instructions doesn’t help. These are models from way back, with 2 gig slide in memory cards not near full. The back side control buttons do resemble your SONY. Any suggestions?
Laurence Norah says
Hi Ron,
Unfortunately I’m not sure what the issue here could be. Normally the symptoms you describe are related to the batteries being flat, and as the same issue is occurring with all the camera, this suggests that it is the batteries (the common factor) that are somehow at fault. If you have other batteries you can test I’d recommend trying those instead?
Sorry not to be of more help,
Laurence