In today’s guide I’m going to teach you how to watermark photos. Whatever type of camera or smartphone you have, there’s a way to add a watermark to your photos.
I use watermarks on most of the photos I share on our blogs and on social media, and I have a process I use to add those watermarks easily and quickly to my photos.
I’ll cover everything you need to know about watermarking your photos, including how to remove a watermark from a photo!
First though, let me answer some questions about watermarks in photography.
Table of Contents
What is a Watermark in Photography?
A watermark is an identifying element which is added to a photo. Usually it’s added to a digital photo but it can also be added to a printed photos.
A watermark can be a graphic, like a logo, or it can be a piece of text like a photographer’s name or business name. Watermarks are used for a number of reasons, including:
- to identify the artist who took the photo
- to identify the business who owns the rights to the photos
- to identify the source of a photo
- to protect an image from being used for anything other than preview purposes
- to indicate it is a proof copy and not the final copy of an image
Note that some people may add a watermark to note the date and/or time a photo was taken. However, this is often done as a date stamp instead and is covered in detail in our date stamp guide.
Why You Might Want to Watermark Your Photos
There are a number of reasons you might choose to watermark your photos.
One of the most popular reasons that individual photographers watermark their images is so that viewers can quickly see their name and know who took the image. Adding your name, website address, and/or business logo to an image makes quickly identifying the artist behind an image easy.
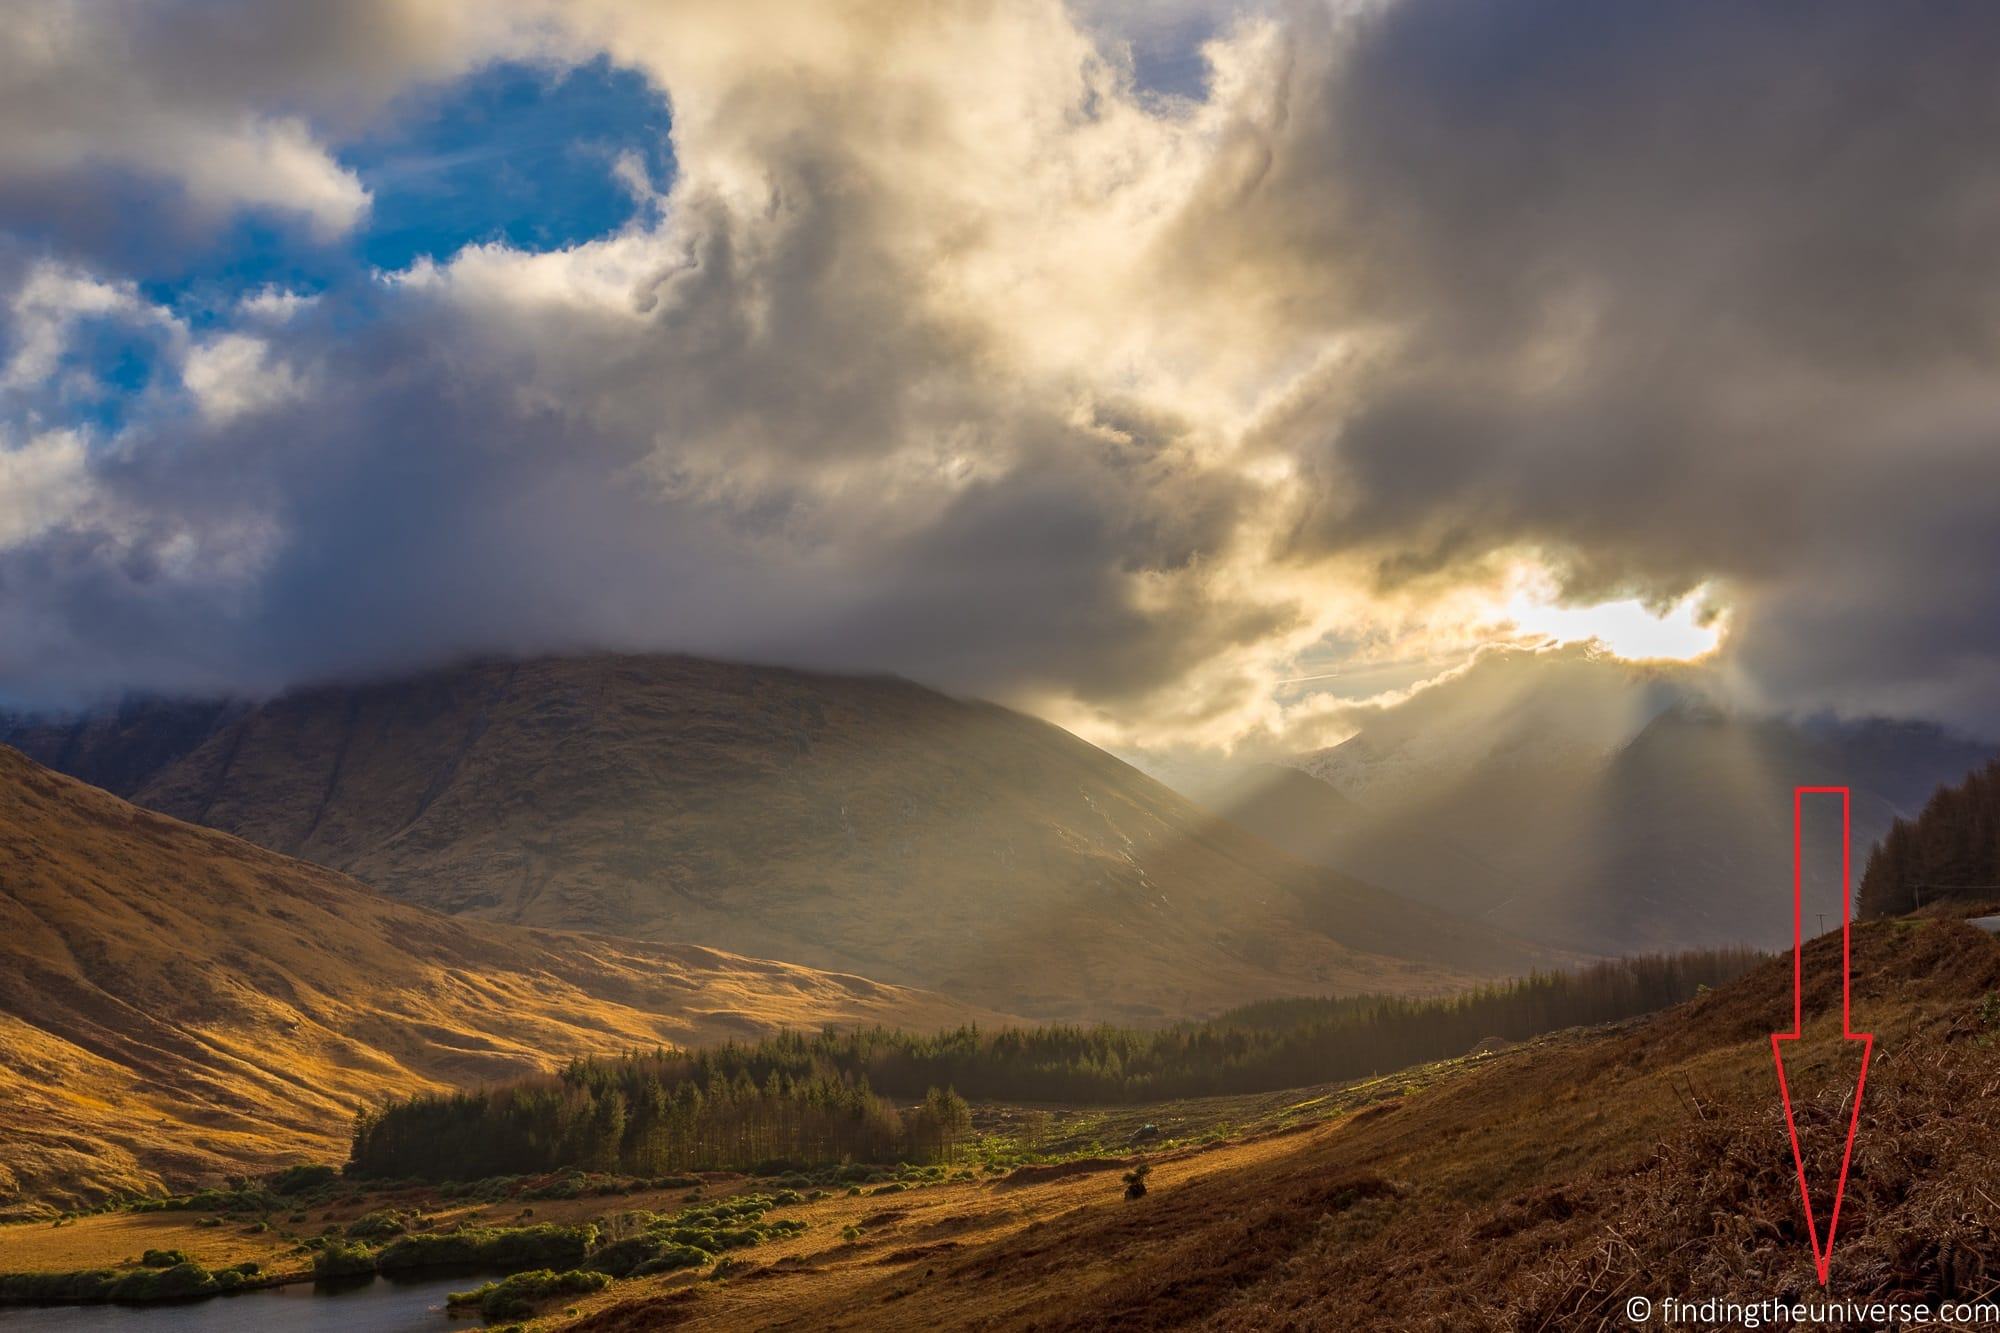
This is why I watermark my images, which I do with small text at the bottom right. I normally just use typed text that says either “Laurence Norah – www.findingtheuniverse.com” or “© findingtheuniverse.com”. You can see an example below, with the red arrow highlighting the watermark.
Another reason watermarks are added to images is to prevent unauthorized use. If an image has a large and identifiable watermark, it is less likely to be stolen, especially for commercial use.
An example is a stock photography website, which may add watermarks to an image so clients can see what they are buying, but aren’t able to download and use the image due to the watermarks. These watermarks are then removed once the client purchases the photo.
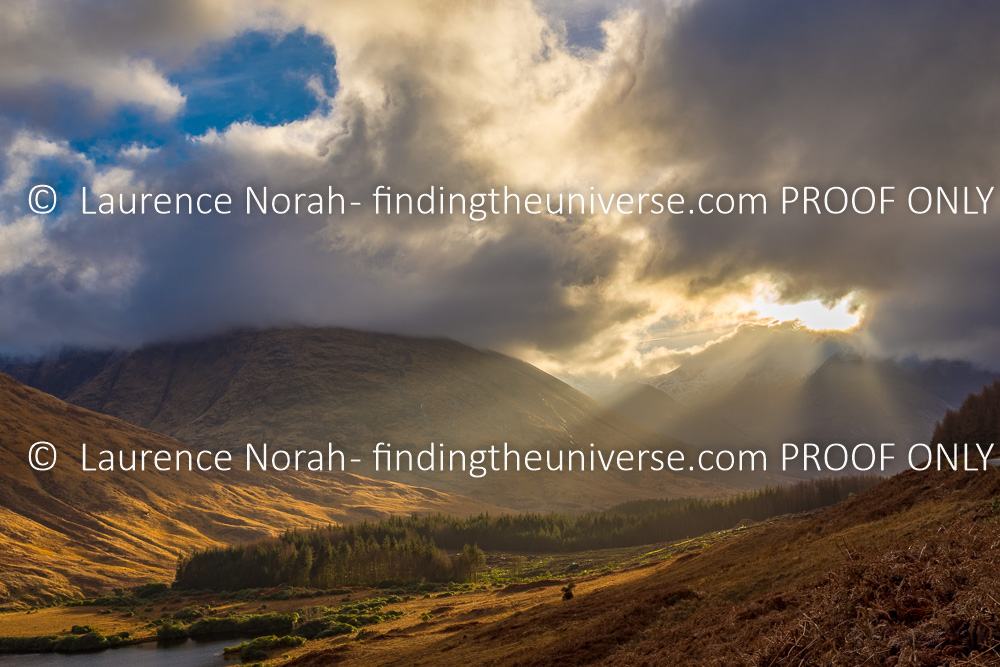
Similarly, a wedding photographer may add watermarks to a preview album, so clients can pick and choose the final images they want to buy, without being able to print them. Here’s how this sort of watermark might look.
Finally, you may want to use a watermark to identify the source or photographer of a photo that you have permission to use but where you are not the photographer. For example, you may be using photos from a stock website or another photographer and need to denote the source. This can be used as an alternative to giving photo credit in a caption.
Why You Might Not Want to Watermark Your Photos
Whilst a watermark has benefits, it also has some disadvantages.
The most obvious is that it negatively affects the look of an image. A large watermark can act as a distraction to the main image. This is particularly true on social media sites like Instagram where photos are already uploaded at a fairly small size. A large watermark can really distract a viewer from fully enjoying the image.
In addition, a poorly designed logo or even badly formatted text can reflect poorly on the photographer.
Watermarks are also not the deterrent many people think they are in preventing people from stealing and using their photos. Image software is fairly advanced these days, and removing or cropping out a watermark is quite easy. This can be the case even for complex and large watermarks.
It took me several minutes when I tried to remove a watermark, but those who are good at it can do it pretty quickly with the right software. So if someone really wants to remove your watermark, they can do so.
I would say in general that watermarking images to stop them from being used without permission will deter some people. But to really deter unwanted use, the watermark needs to be so obtrusive that it seriously detracts from the original image. As such, it should only be considered for this purpose in very specific circumstances.
Should You Watermark Your Photos?
Personally, I feel that the main benefit of a watermark is that if someone sees my photos being used outside of this website, such as on social media, then the viewer can identify me as the photographer easily.
For photographers who make a living from selling their images for publication or commercial use, then adding a clear watermark when sharing these images elsewhere can help protect them.
If your photos are stolen, then there are legal avenues a photographer can take to recoup any losses from the work being used in a commercial environment.
Finally, adding a large watermark to proofs of images can also be useful when sharing them to clients. This is a common approach in the stock photography world, where the image proofs will be overlaid with multiple watermarks prior to the image being purchased.
Other Options for Protecting your Photos Online
If you would prefer not to watermark your photos, perhaps for aesthetic or other reasons, you have some options.
First, for work that you plan on selling, the easiest way to protect it from unauthorized use is not to share it at all. Once an image is on the web, controlling who has access to it and where it is used becomes virtually impossible. Chasing down unauthorizes usage of images is possible with automated tools like Copytrack, but it is still time consuming and not always successful.
You can register your photos for copyright protection in some countries and this may be something that professional photographers may want to consider. For example, you can do so here in the USA.
Of course, many photographers have to share their photos online prior to selling them. This might be to showcase work and spread awareness, or if you sell your photos via an online gallery.
In these cases, the best option is to share the lowest resolution version possible. Instead of uploading a full resolution image that could be printed or used for a range of regions, upload a small version that suits the purpose you are using it for.
In addition, you can usually add copyright and author information into the EXIF data of an image, so people can still find you if they look at this information.
How To Watermark Your Photos
Now I’ve covered some information about what watermarking is and why you might want to watermark your images, I’ll go through how to actually add a watermark your images.
I’ll cover a number of different options you have, including using your camera, editing apps on your phone, and using computer software.
How to Watermark Your Photos in your Camera
Some camera models, such as a number of Panasonic cameras, actually let you add text to images in the camera itself. So you can use this text tool to add a watermark if you wish.
The exact method for doing this varies from camera to camera. With the Panasonic ZS200 for example, you can add text to your images in-camera using the “text stamp” tool. This allows you add specific text to one or more images on your camera at a time.
This approach is suitable for adding text quickly to a small number of images. However, it isn’t an efficient way to add a watermark to all your images. In addition, there is usually limited control over the text placement and text style.
I wouldn’t really recommend this as a standard approach for adding a watermark to a photo. It’s time consuming, fairly inefficient, and sometimes the original photo get saved with the watermark, meaning you have no version without the watermark.
This method of adding a watermark to an image is very camera specific, and so you will need to check your device manual to see if it supports adding a watermark in this way.
How to Watermark your Photos on Android & iPhone
If you are using an Android phone such as the Google Pixel or Samsung Galaxy range, or an Apple iPhone, then you might want to add a watermark to your images before uploading them to social media.
There are a number of free apps available for both Android and iPhone that allow you to easily watermark an image, including Snapseed (iOS here) and the mobile version of Lightroom (iOS here). Another popular option for Android is Add Watermark Free.
Snapseed is great for adding text to an image on a one-off basis, but for watermarking on mobile I think Lightroom mobile is a more suitable long-term option. This is because it has a dedicated watermarking feature which makes achieving a consistent watermark across your image exports on mobile easy. As of October 2020, it also supports graphic watermarks as well as text based watermarks.
If you have an Adobe subscription, you can even synchronize your watermarks across Lightroom on your other devices.
Lightroom is available for mobile for free, and the watermarking feature is enabled in the free version. If you pay for an Adobe Photography plan, such as one which includes Lightroom for Windows and Mac, then you get additional features such as batch editing, RAW support, and image synchronization.
For these examples I’m using the paid version of Lightroom mobile as I have a photography plan, but the watermarking process is exactly the same for the free version of Lightroom mobile. The process is similar for Android and iPhone. The screenshots below are from Android, the iPhone will vary slightly but the steps are very similar.
First, open up an image in Lightroom mobile on Android or iPhone.

Once you have completed any edits and want to save the photo, open the share menu, and choose “Export as…”. You can also do this from the “share to..” menu.

This will bring up the export settings screen.

On the export screen, toggle the “Include Watermark” option. This will reveal a new “Customize” menu option.

The first time you set up a watermark, you will want to customize it. However, after this you can apply the same watermark to any image you want.
Pressing “Customize” will bring up the “Customize Watermark” screen, which looks as follows.
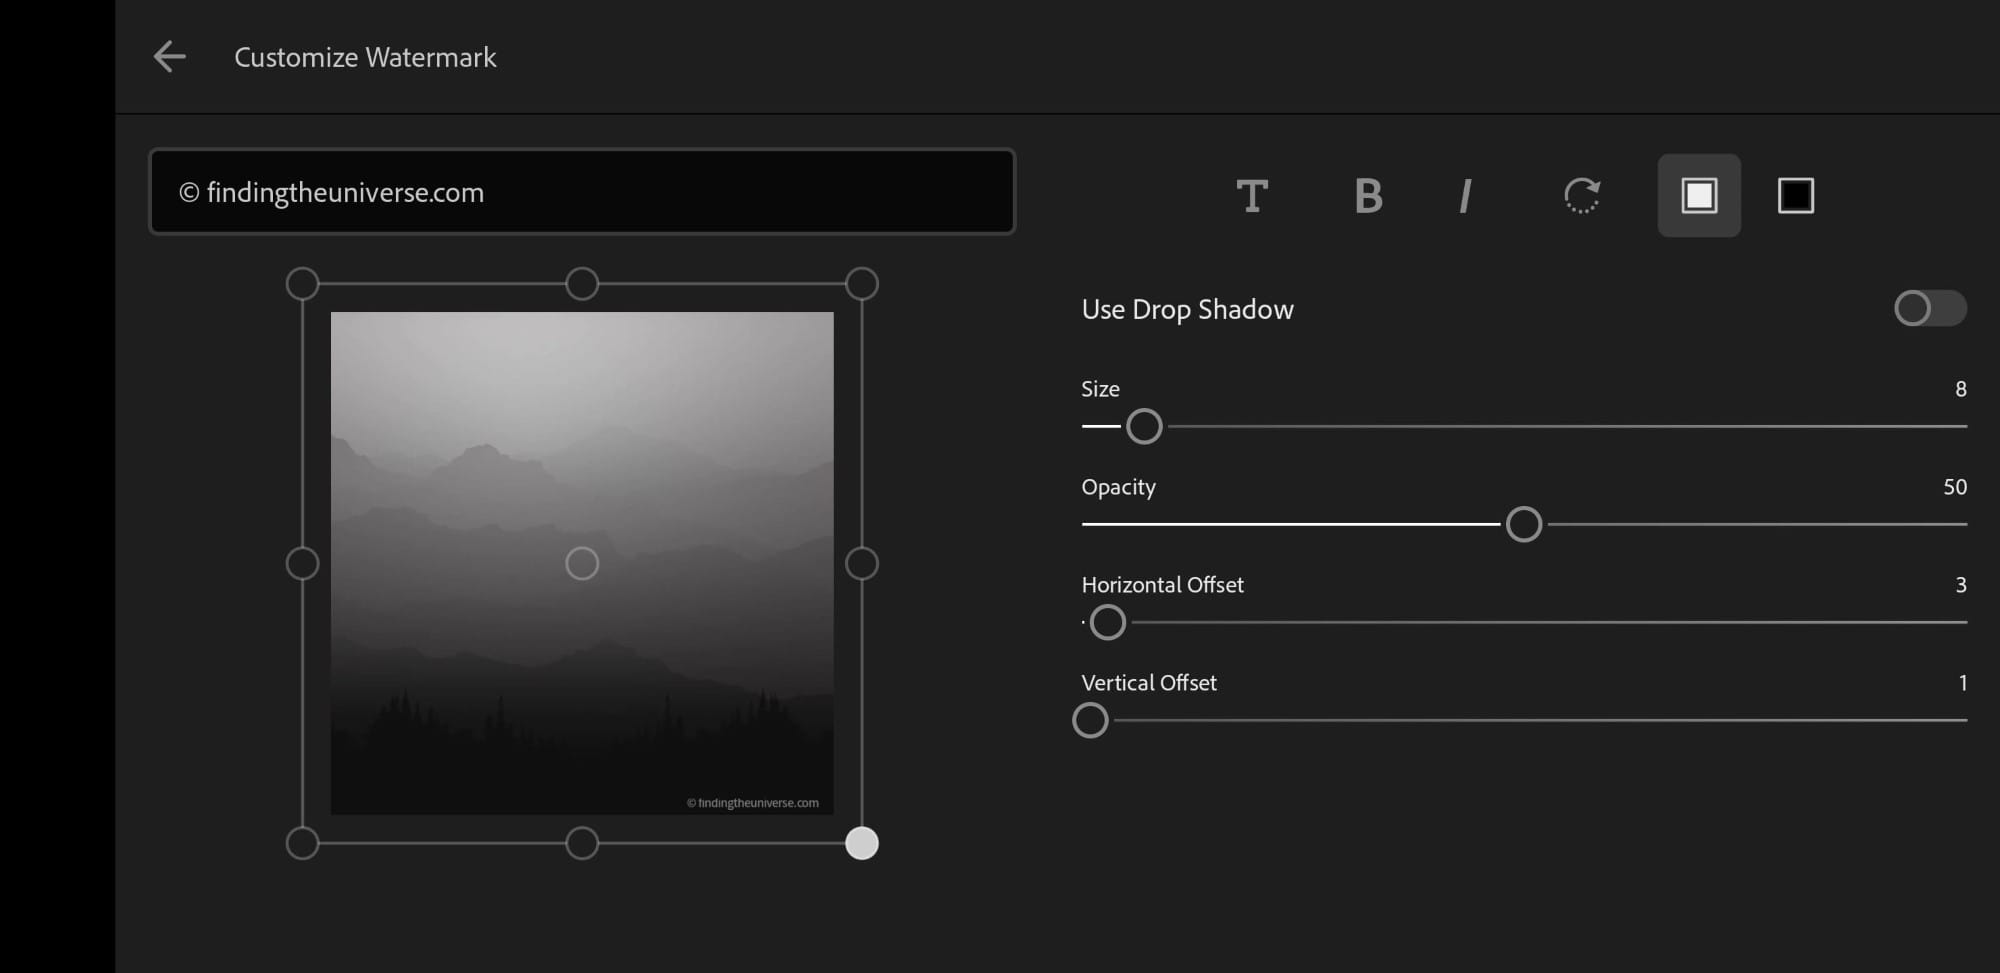
Here, you can edit the text of the watermark, the formatting of the text, as well as the location of the text on the image. Once you are done, press the back button at the top left to return to the export screen.
When you export, the image will be saved to your device with the watermark.

Going forward, you can easily export images with the included watermark. You can also batch export images with the watermark, if you want to do a number of images at the same time. Lightroom creates a new version of the image with the watermark, so your original file isn’t affected.
How to Watermark your Photos on Windows & Apple Computers
I’ll now go over adding a watermark to your images using a computer, either a desktop or laptop. I’ll cover both a free option and a paid option, for both Windows and Apple computers.
Add a Watermark using free software
There are a number of free tools for adding watermarks to images on Windows. For this example I’m going to use FastStone Image Viewer. This is a freeware image viewing tool available for Windows, which also lets you edit EXIF data and batch edit photos.
Whilst there are a lot of free options for Windows, most of the tools available for Mac are paid. However, you can try watermark PRO, which does let you add a watermark to images for free.
I’ll now walk you through adding a watermark to images using FastStone Image Viewer on Windows.
First, open up the image you want to add a watermark to in FastStone.
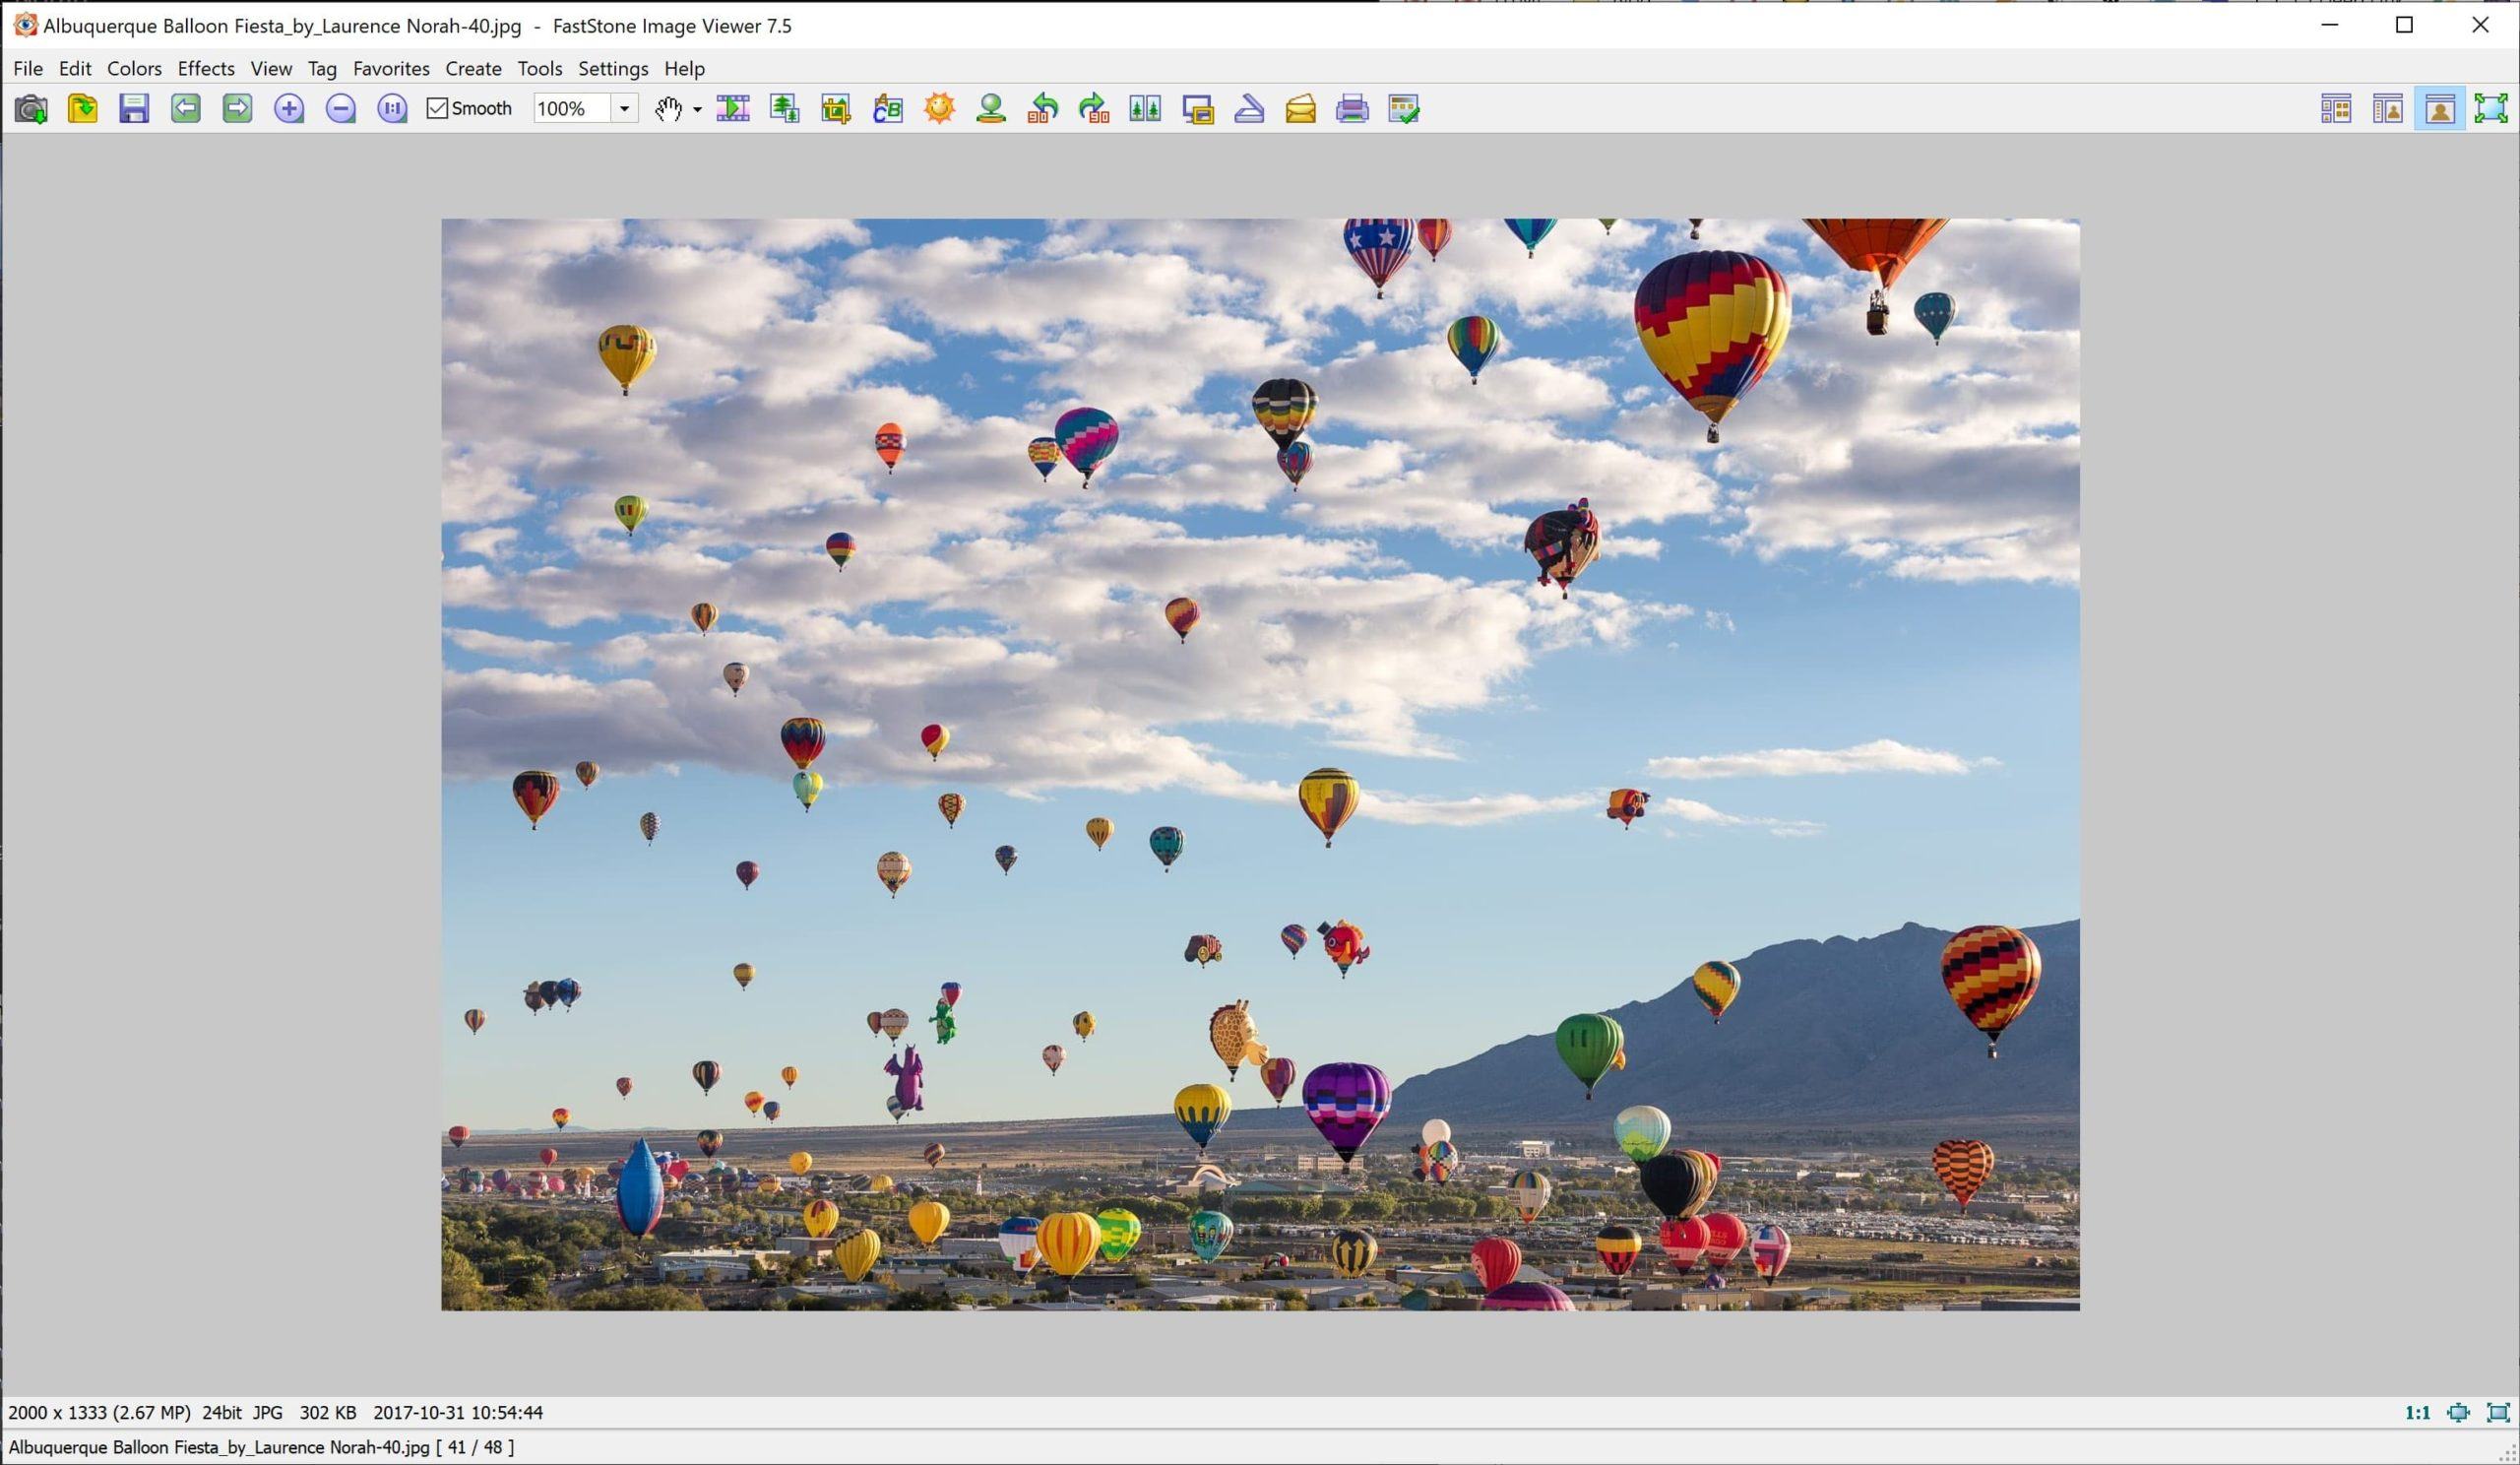
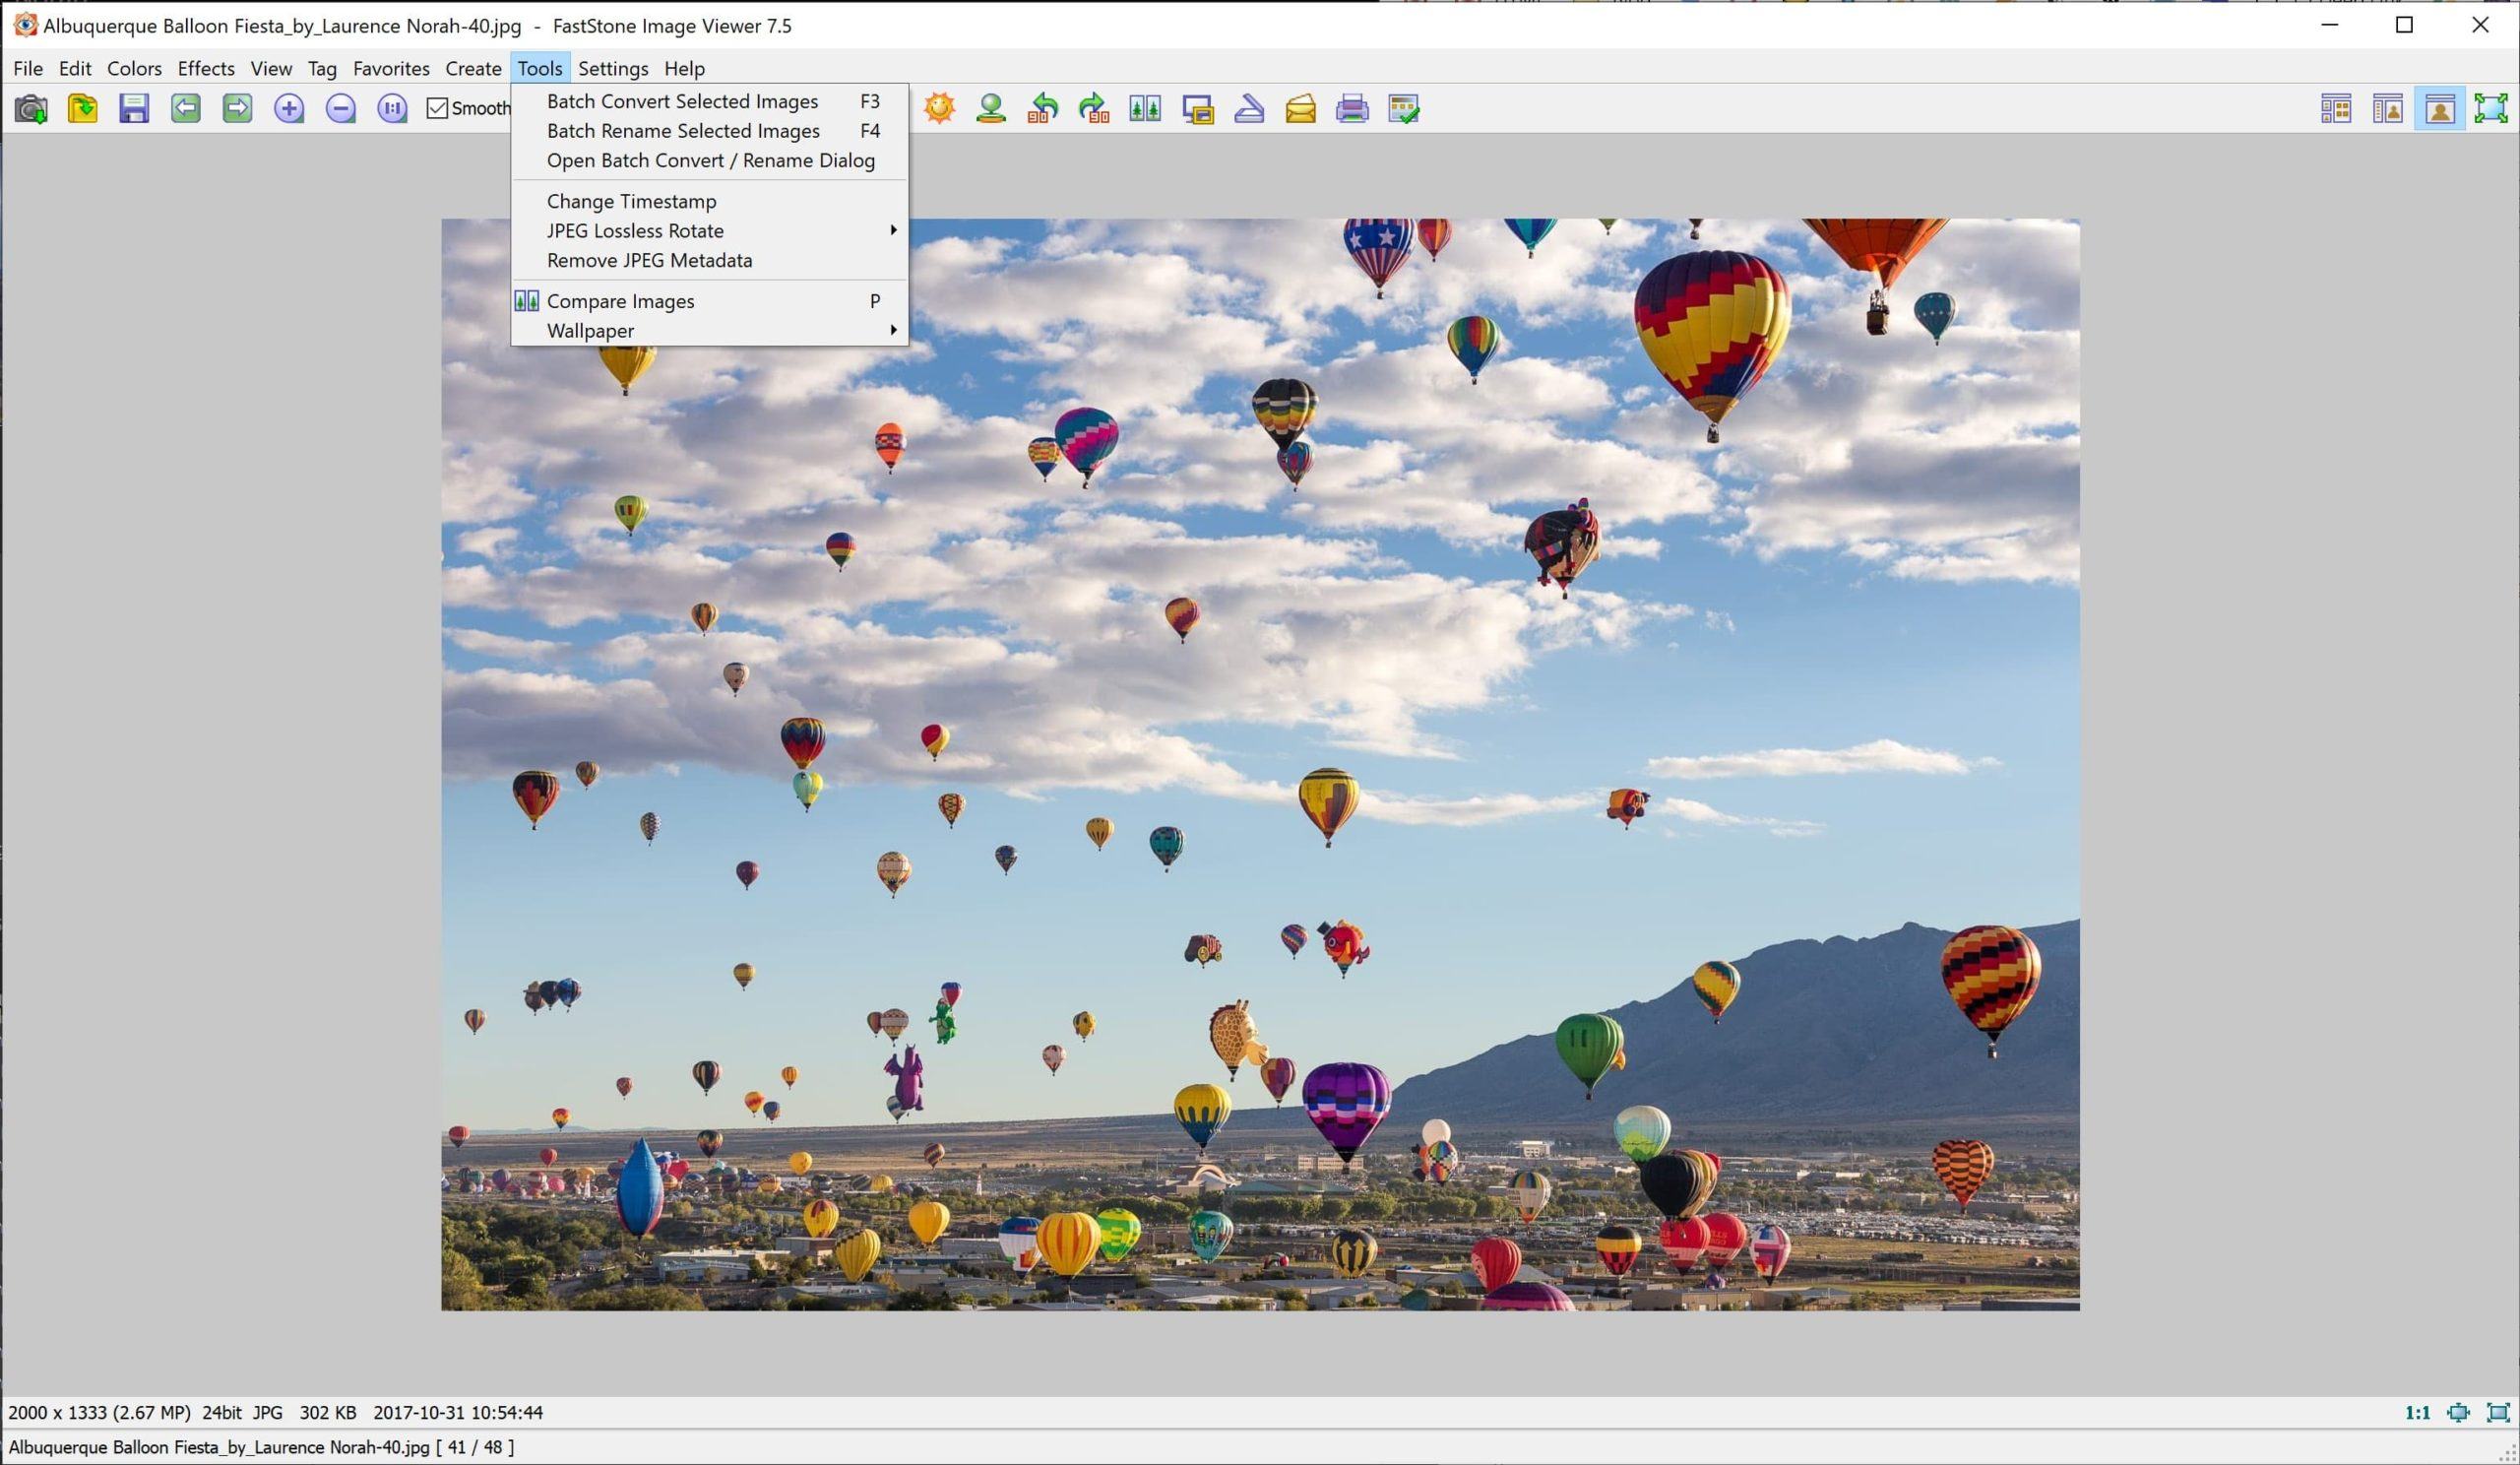
From the menu bar, press the “Tools” option, followed by the “Batch Convert Selected Images” option. You can also just press the F3 key on your keyboard.
From the Batch Image Convert screen, you will want to check the “Use Advanced Options” box, and then press the “Advanced Options” button.

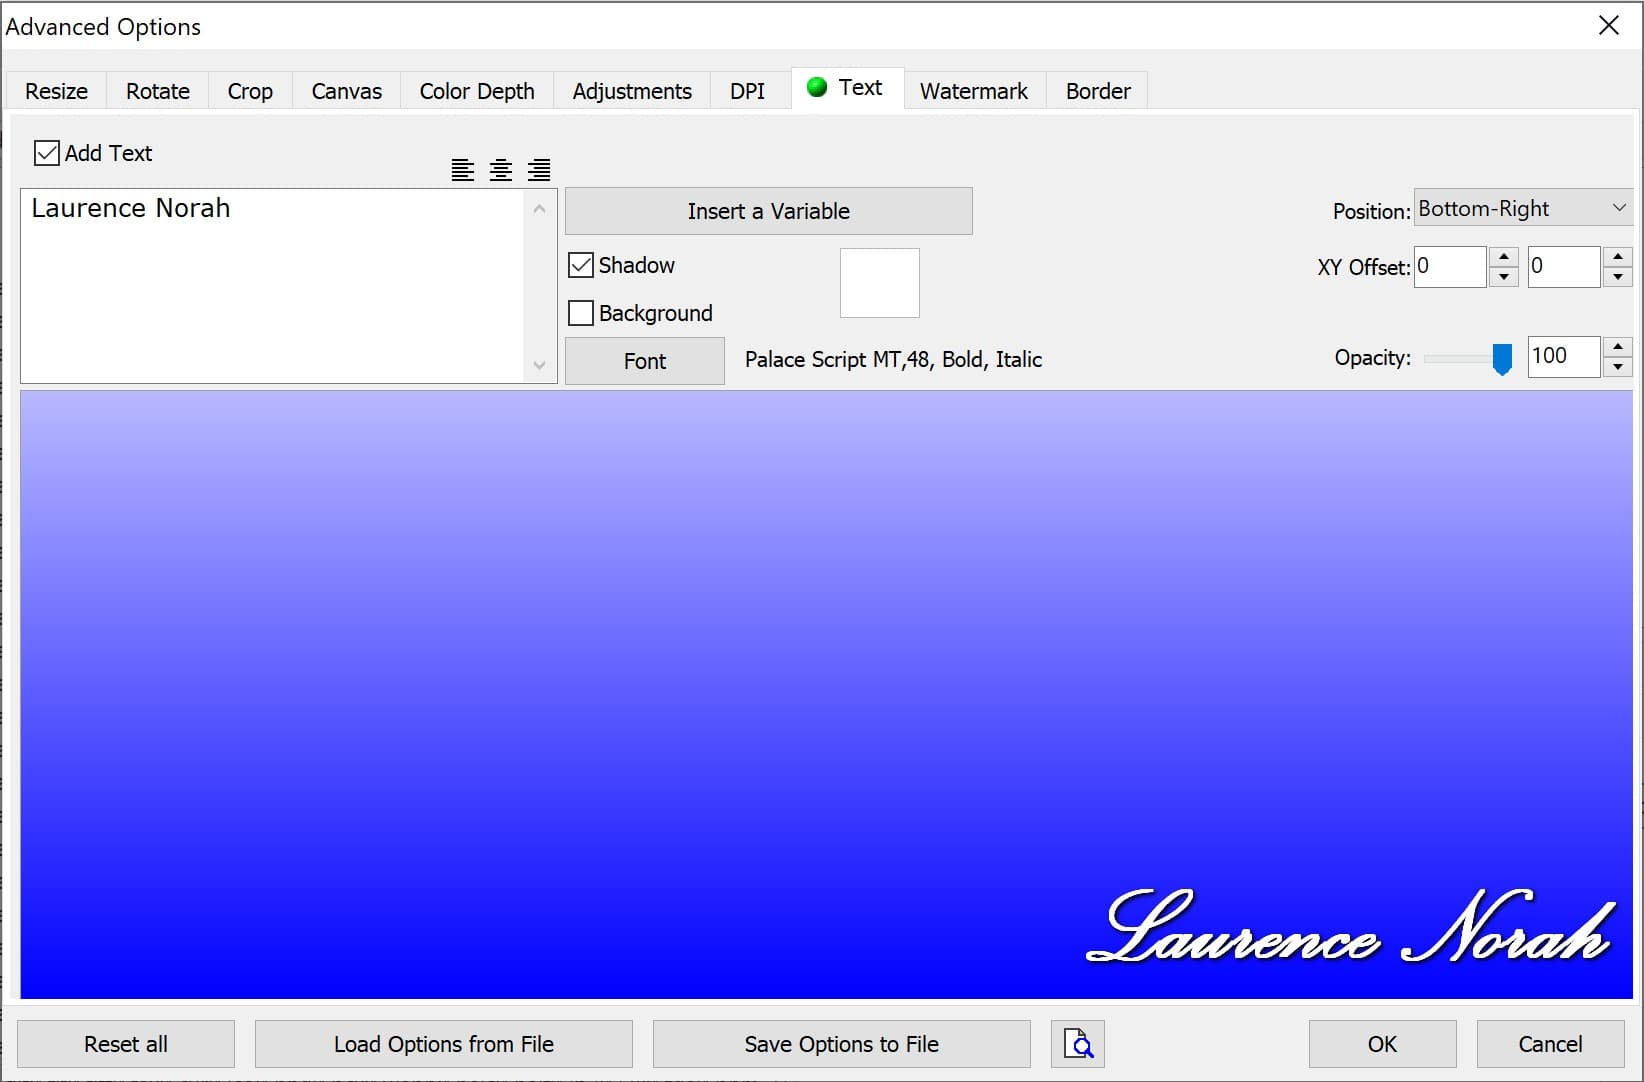
You will now be presented with the advanced options screen. There are two tabs along the top that you could use to add a watermark, these are “Text” and “Watermark”.

The text tab allows you to add a text based watermark such as your name or website onto the image. If you check the “add text” button, you will be presented with a range of text formatting options.
There are a huge range of fonts available, so you can easily create a text or signature style watermark for your images.
Alternatively, you can use the watermark tab to add a predesigned logo or image of a signature to your image. Simply choose the image file you want to use as your logo, and add it to the image.

Once you are done, return to the batch image convert screen, choose the output folder, and press the Convert button at the bottom right.

Here’s my image with both the text (bottom right corner) and image watermark (upper right corner) added.

As the batch process feature suggests, Faststone allows you to apply the same edit to multiple images all at once. So when you have your watermark configured, it’s easy to batch apply it to a number of images in one go.
Add a Watermark using Lightroom
Adobe Lightroom Classic CC is available for Windows and Mac as a paid product. It’s my go-to photo editing and photo management tool. This desktop application allows you to create one or more watermarks, which can be either text or image based. These can then be automatically applied to your images when you export them for sharing.
Here’s how to add a watermark to photos using Lightroom. I’m doing this with Windows 10, but the process is similar for other Windows versions as well as Apple computers.
First, open up the image you want to add a watermark to.
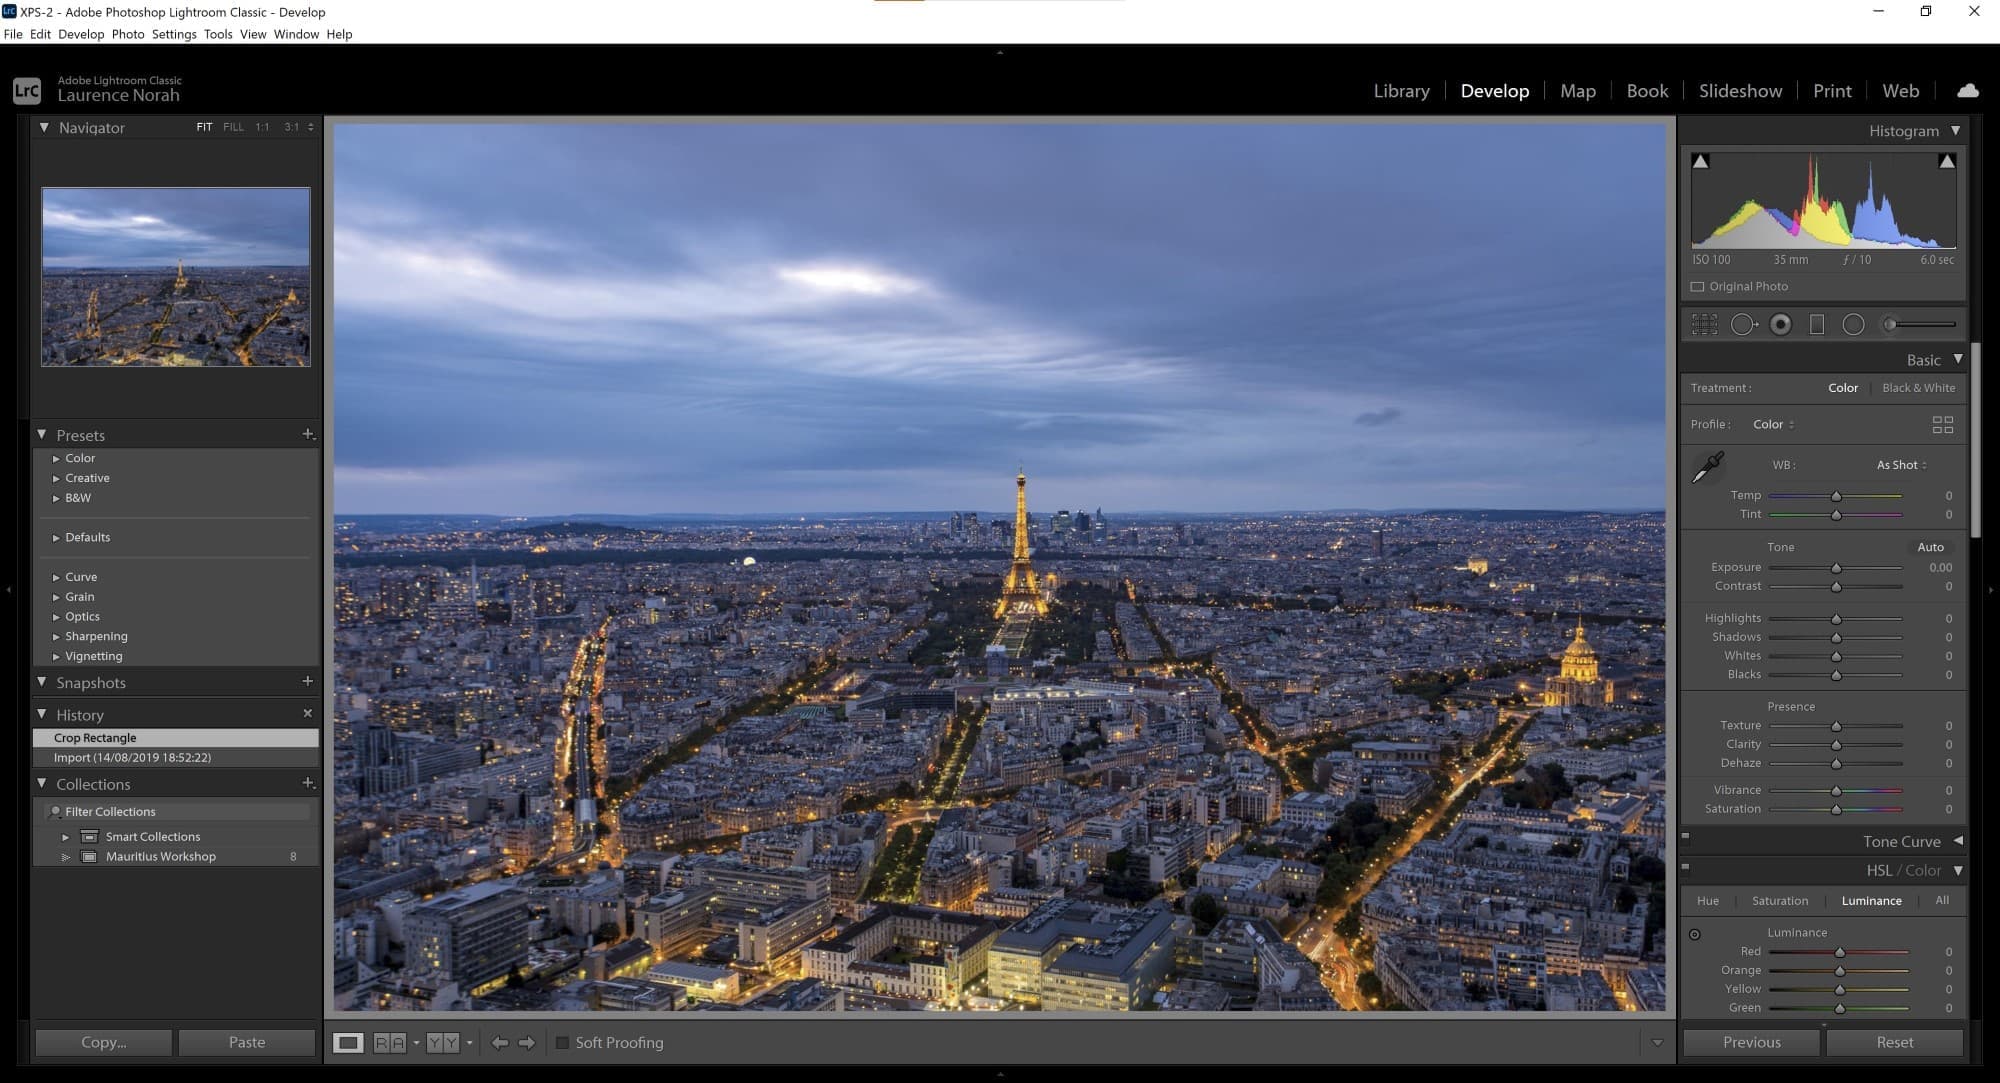
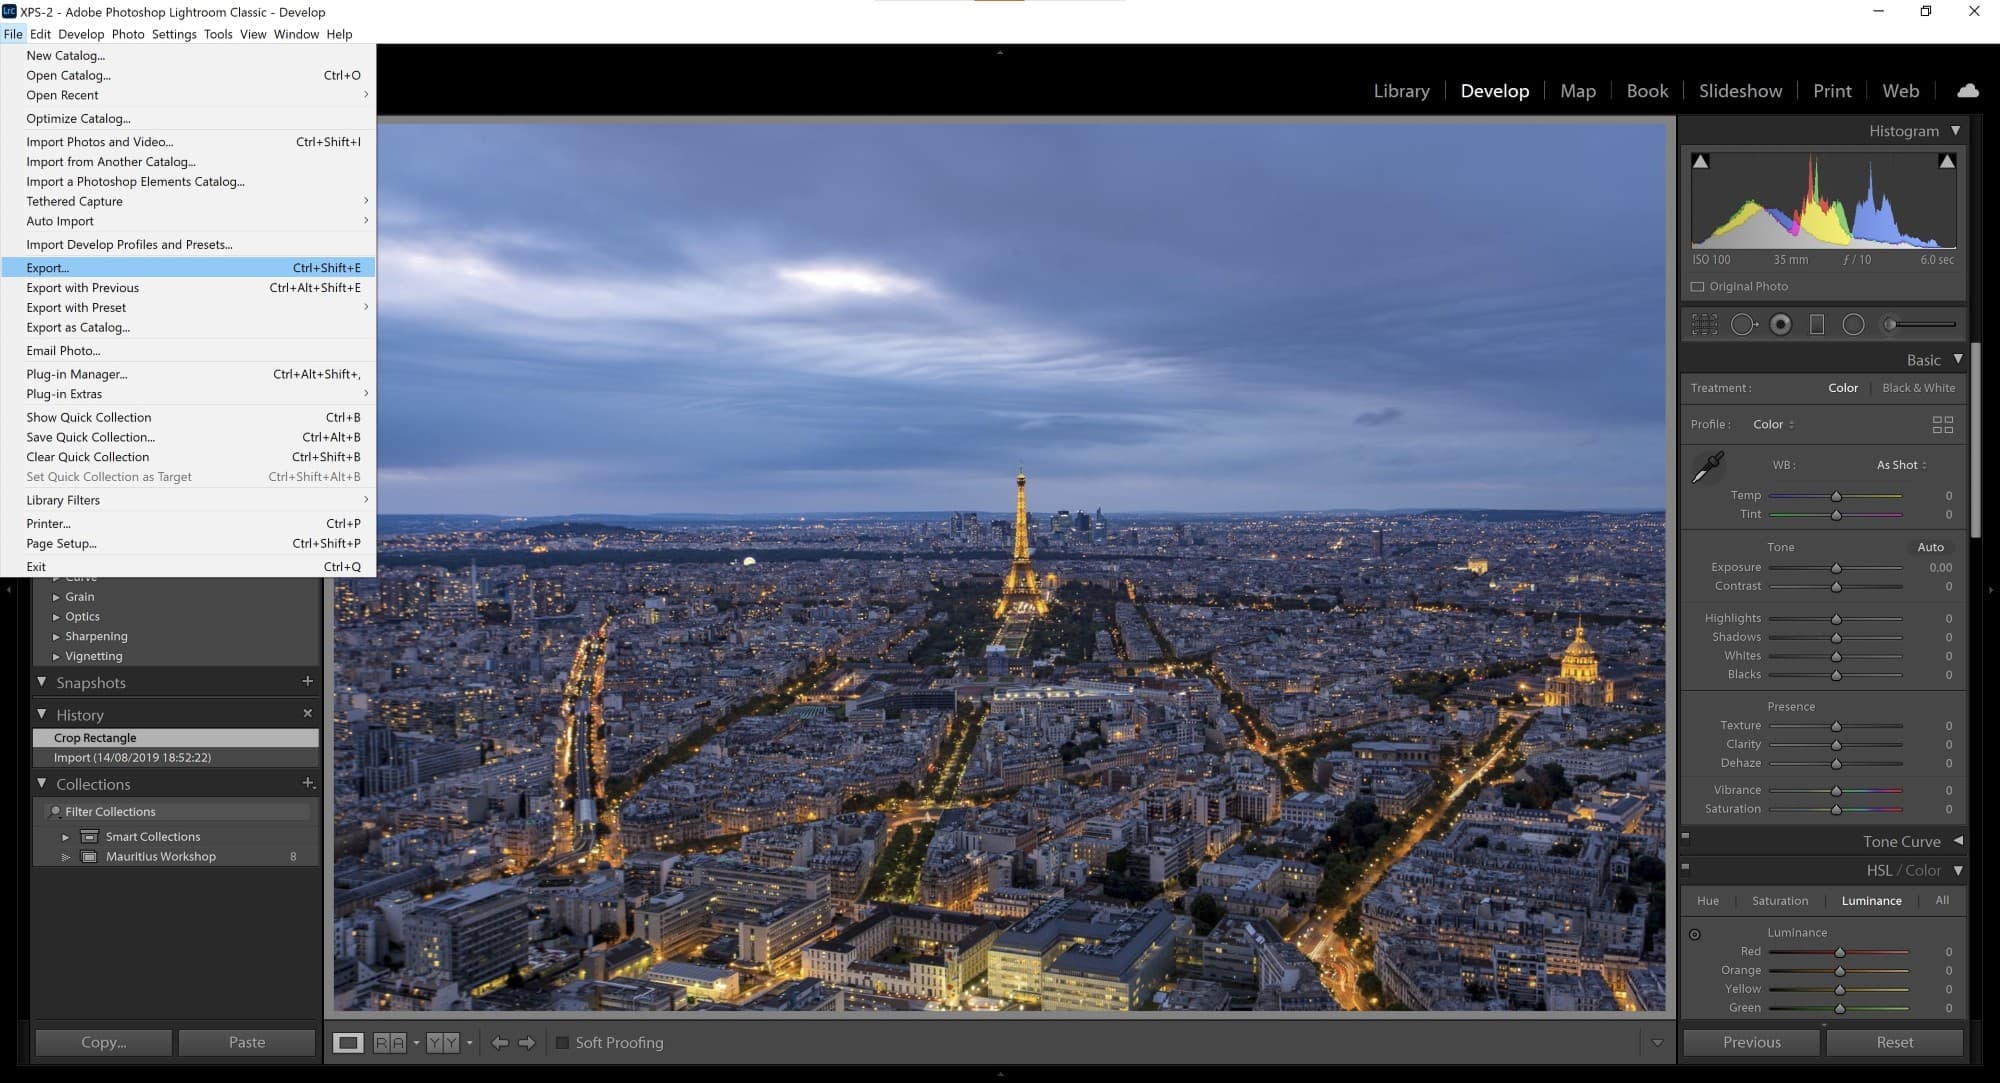
Once you have applied any edits in the develop module, you will want to bring up the export dialog. In Windows, you can do this from the “File” menu, or with the keyboard shortcut “Ctrl+shift+e”. Right clicking the image also brings up a menu with an export option.
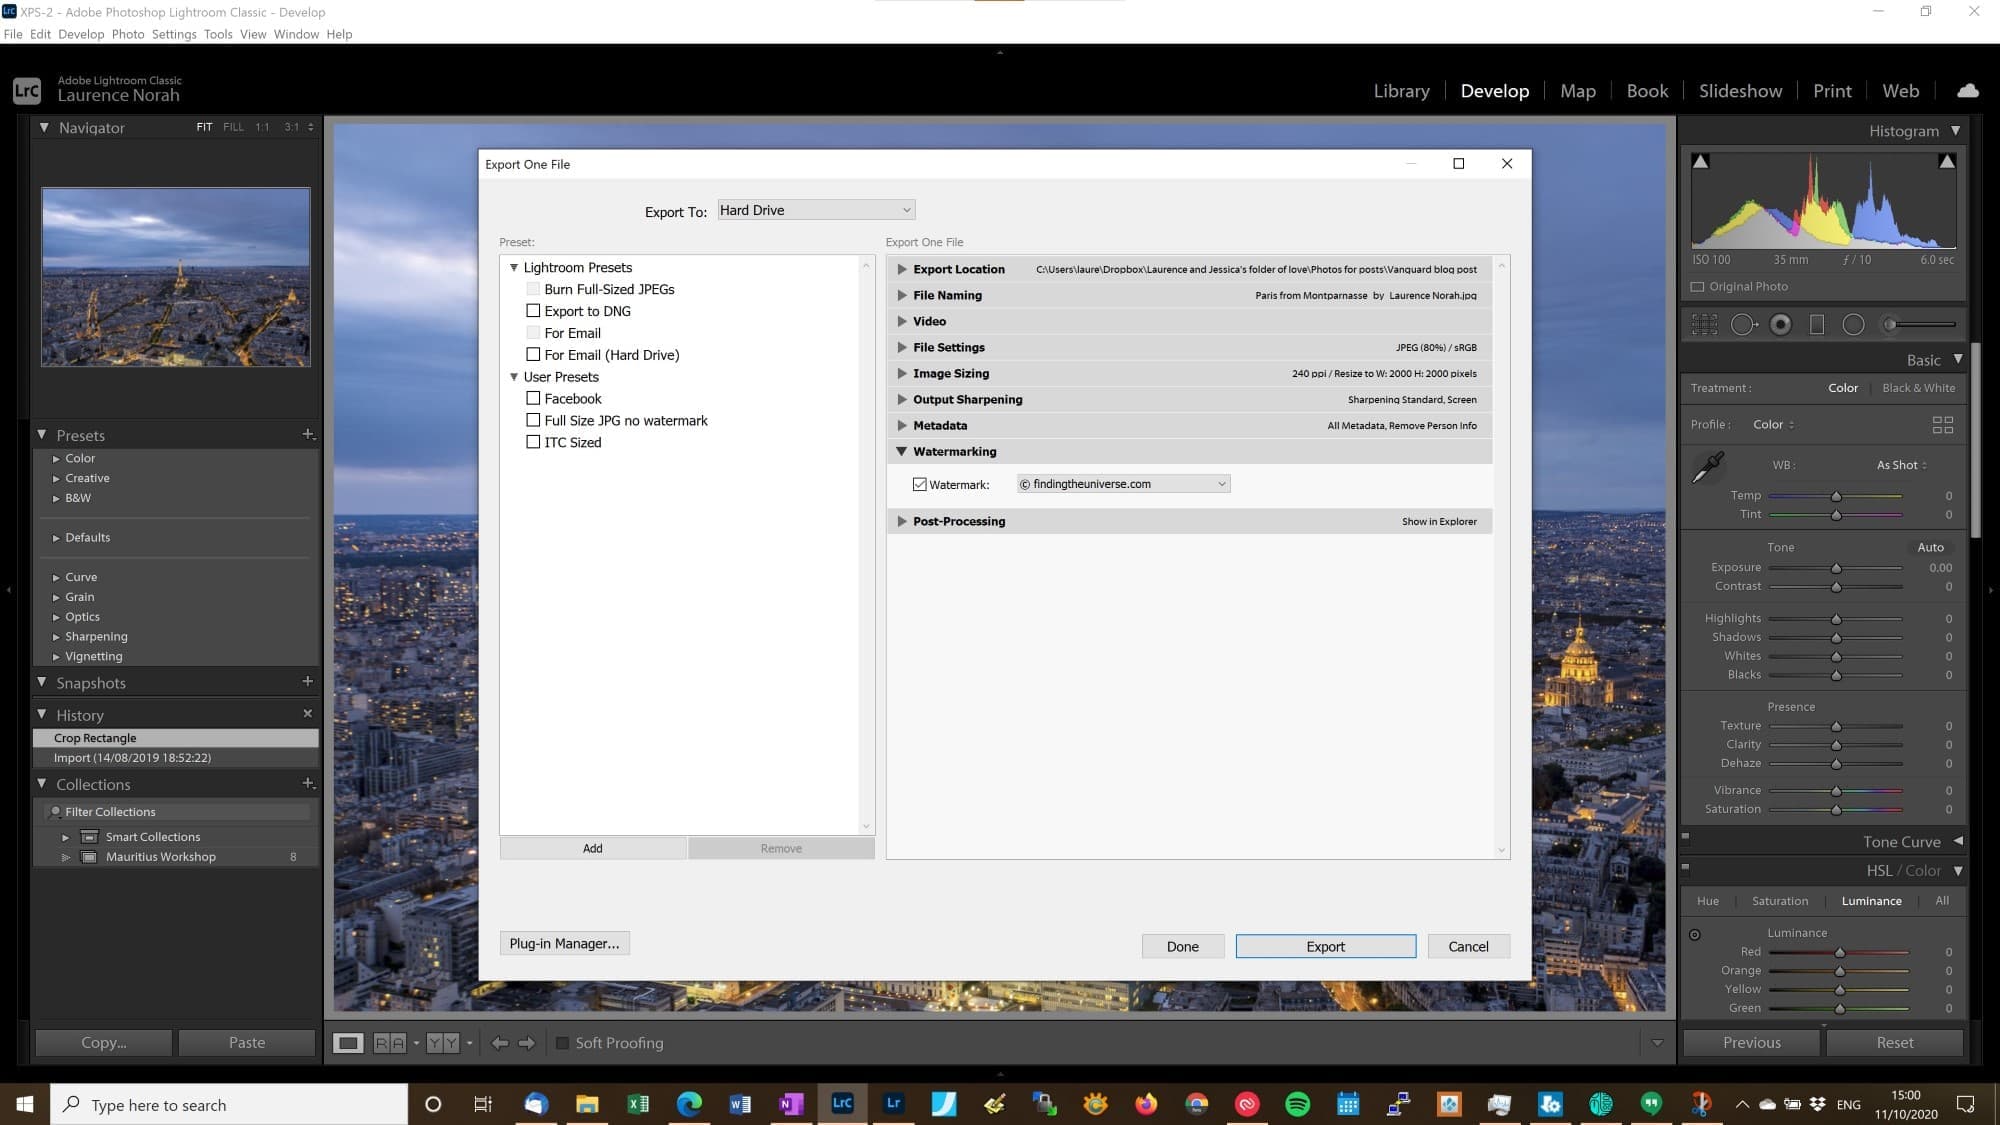
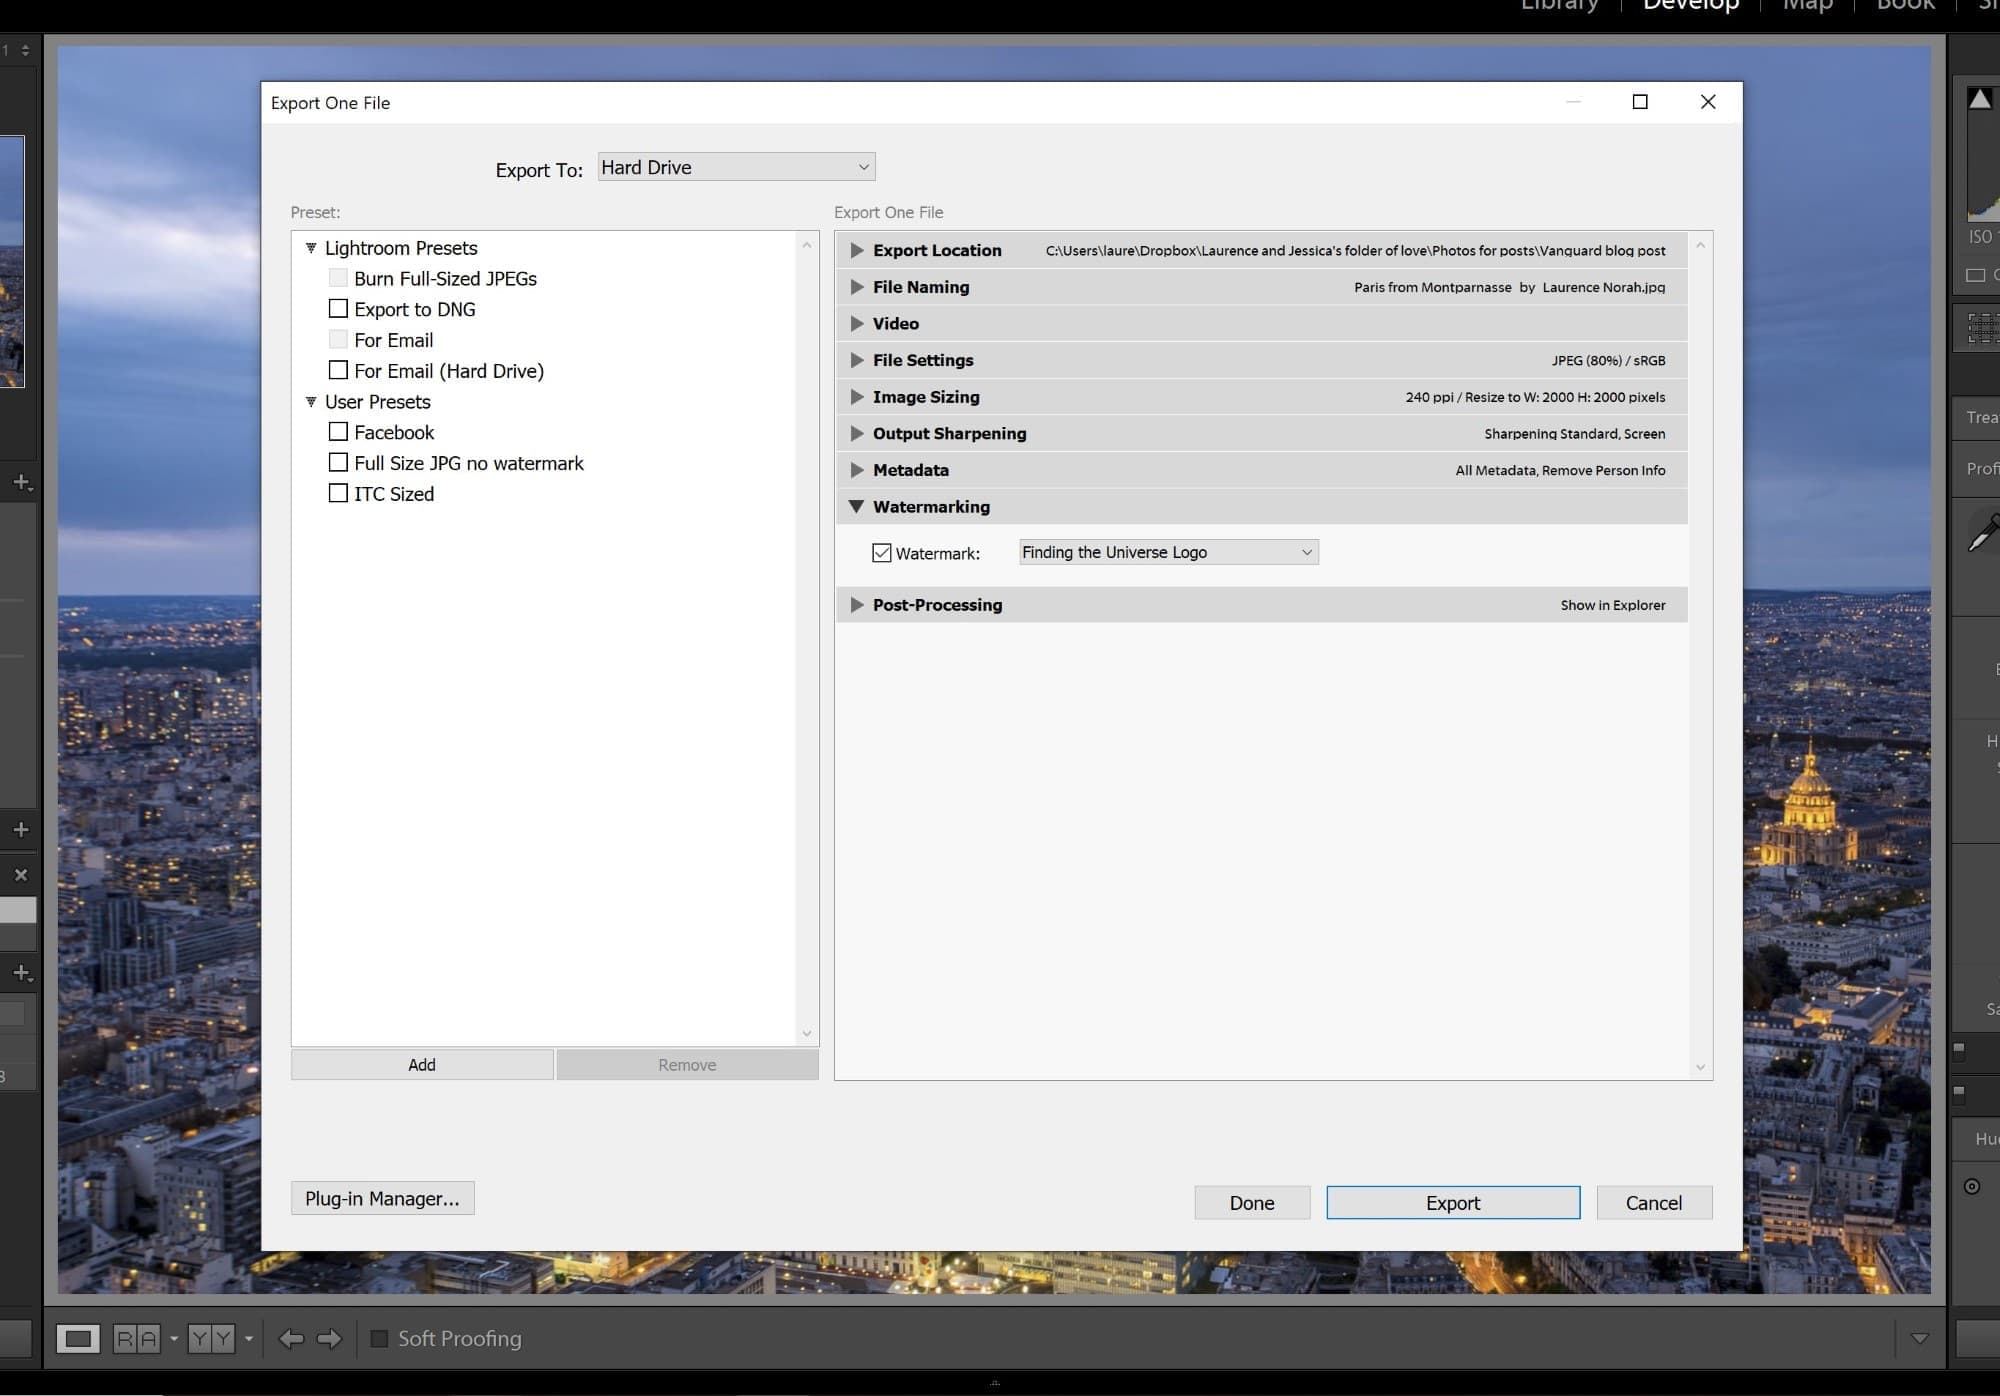
The export window will now appear, with a range of options. One of these is watermarking. You will want to check the “watermark” box, and then select the dropdown, where you will press “edit watermarks”.

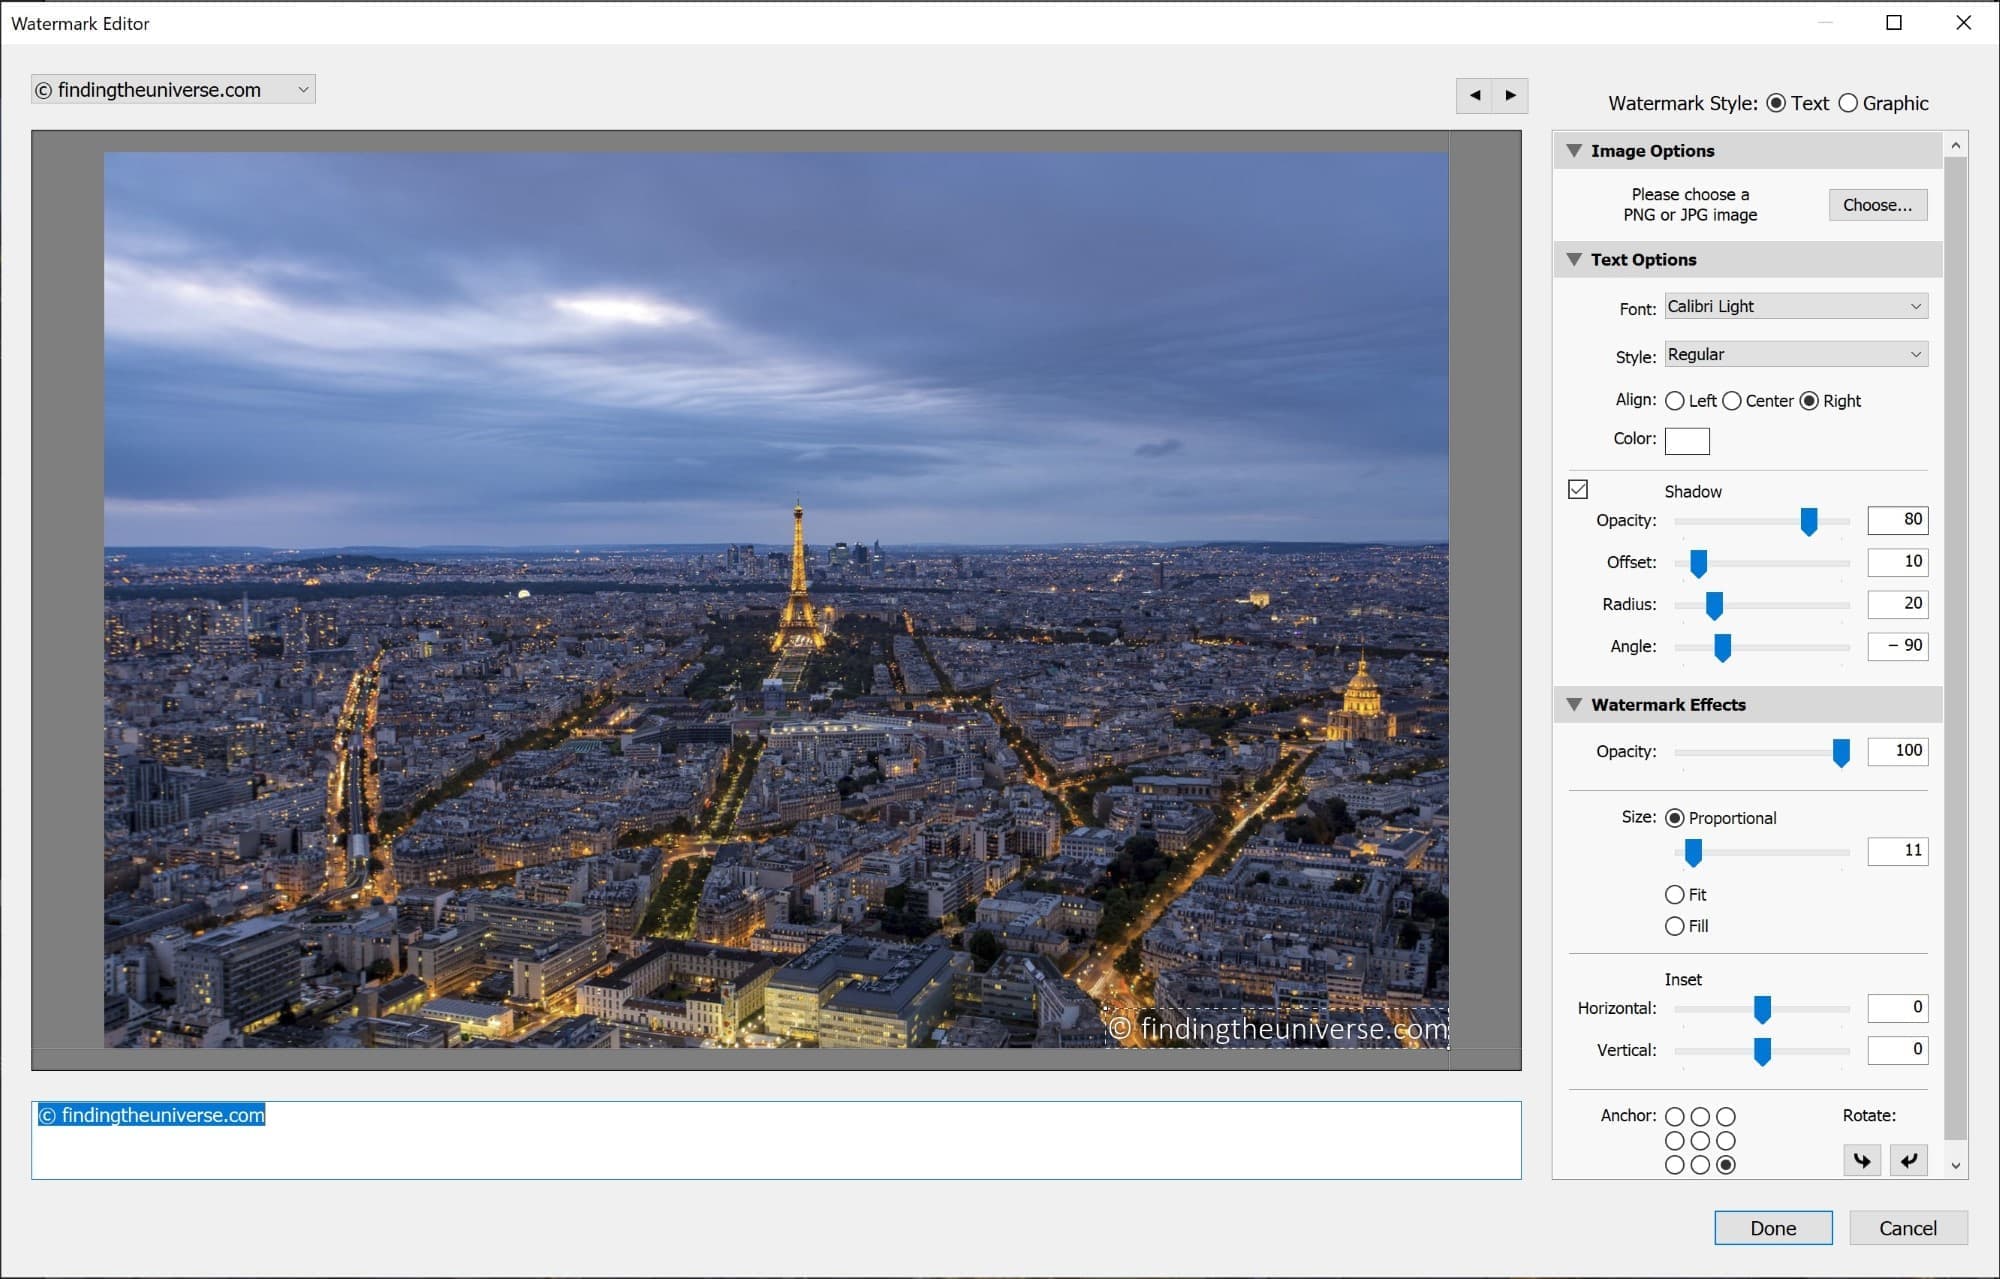
You will now be presented with the watermark editor screen. This allows you to add either a text or an image based watermark to your images, and also to select the position and size of the image.
In the screenshot below, it shows a text based watermark that I had previously configured, with a preview of how it would look on my image.
However, for this demonstration I am going to change to an image based watermark. To do so, press the “graphic” option at the top right, and find the image that you want to use for your watermark on your computer.
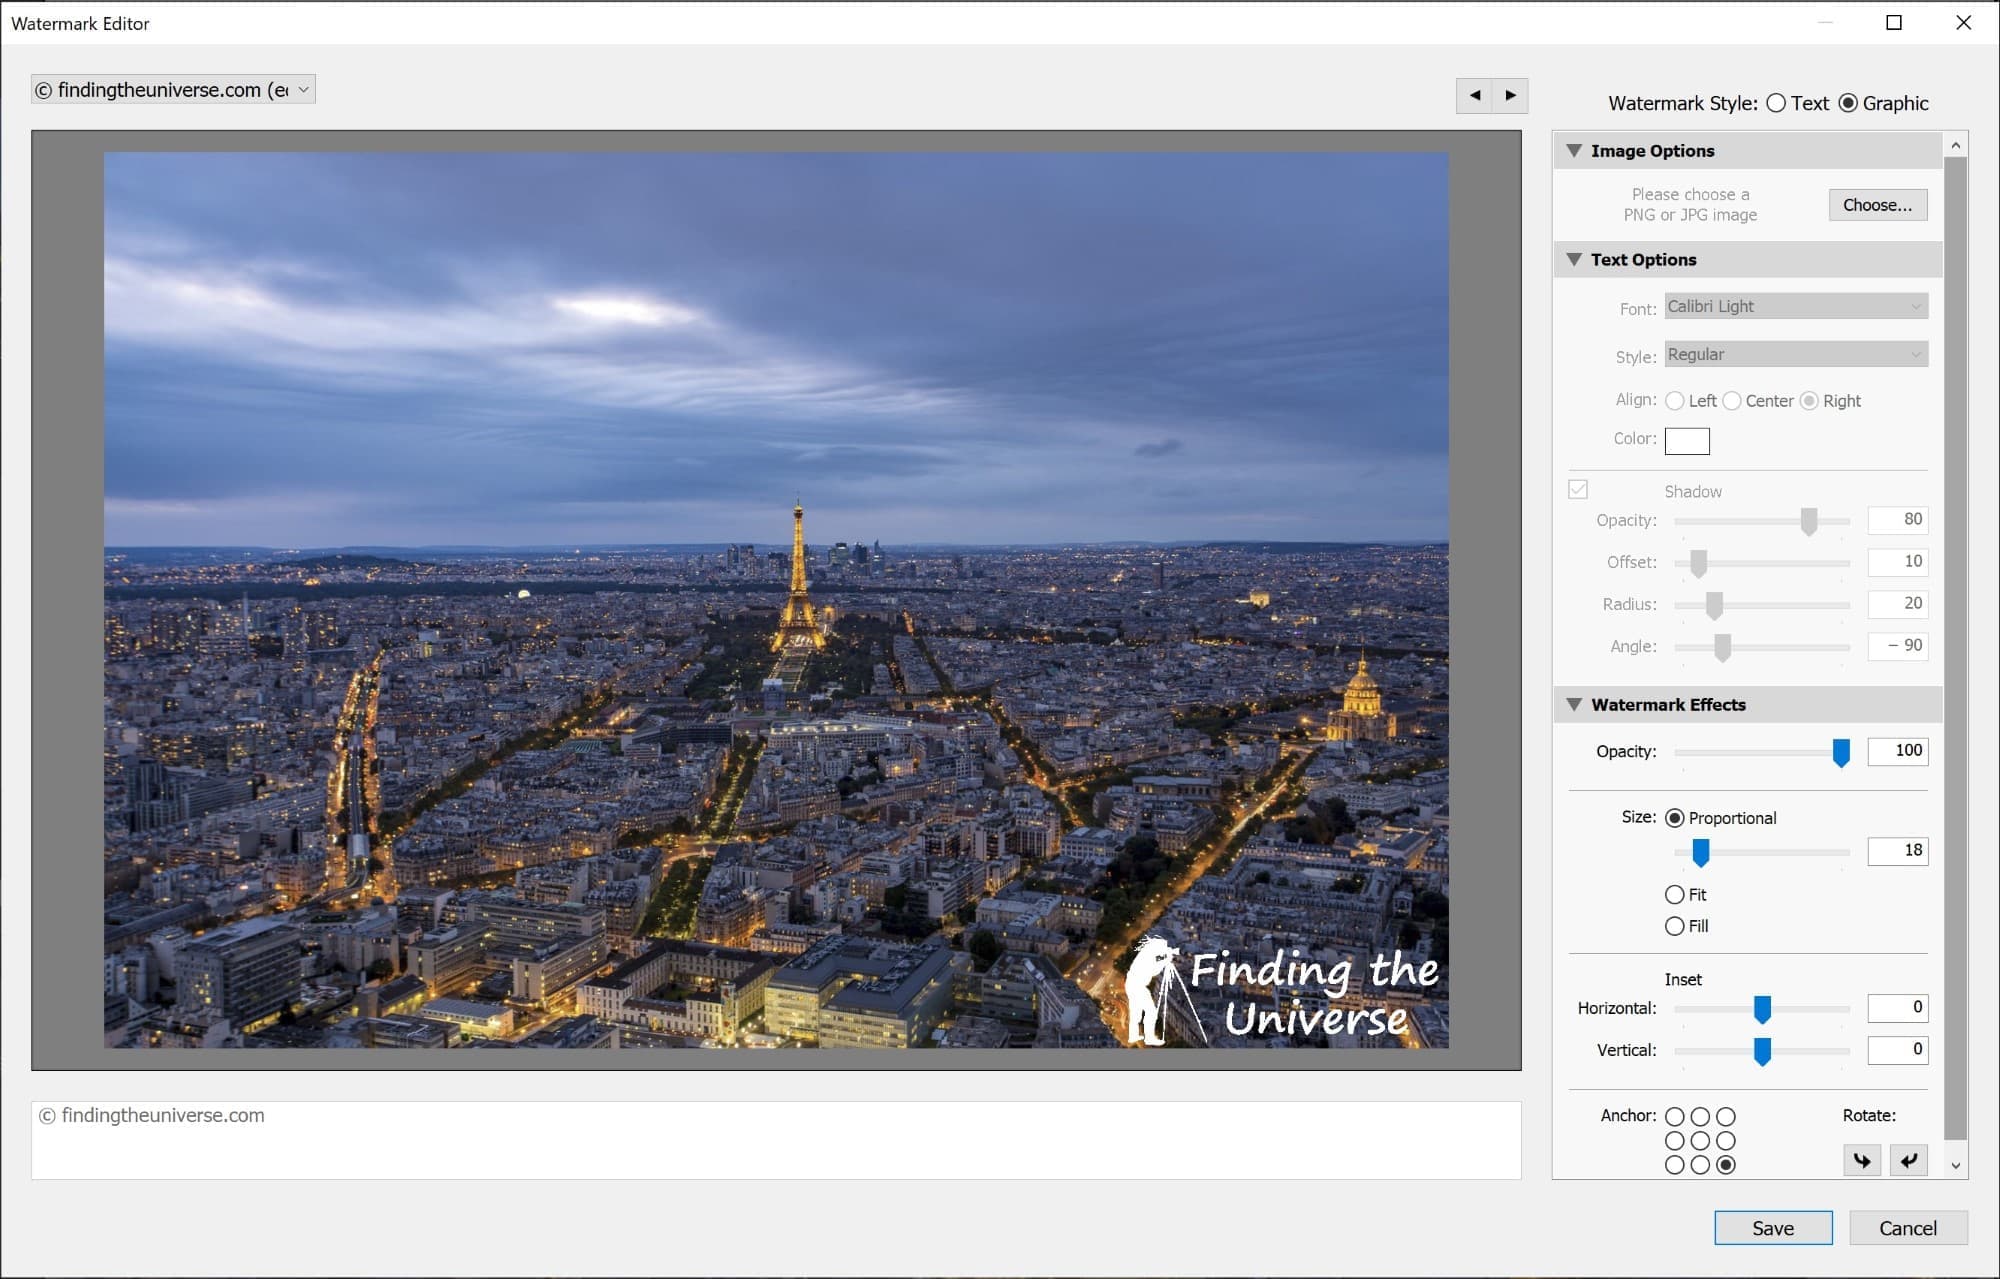
Once selected, the watermark will appear on your image, and you can adjust its position and size to suit. When you are done, use the top left dropdown to save your watermark as a new watermark preset.
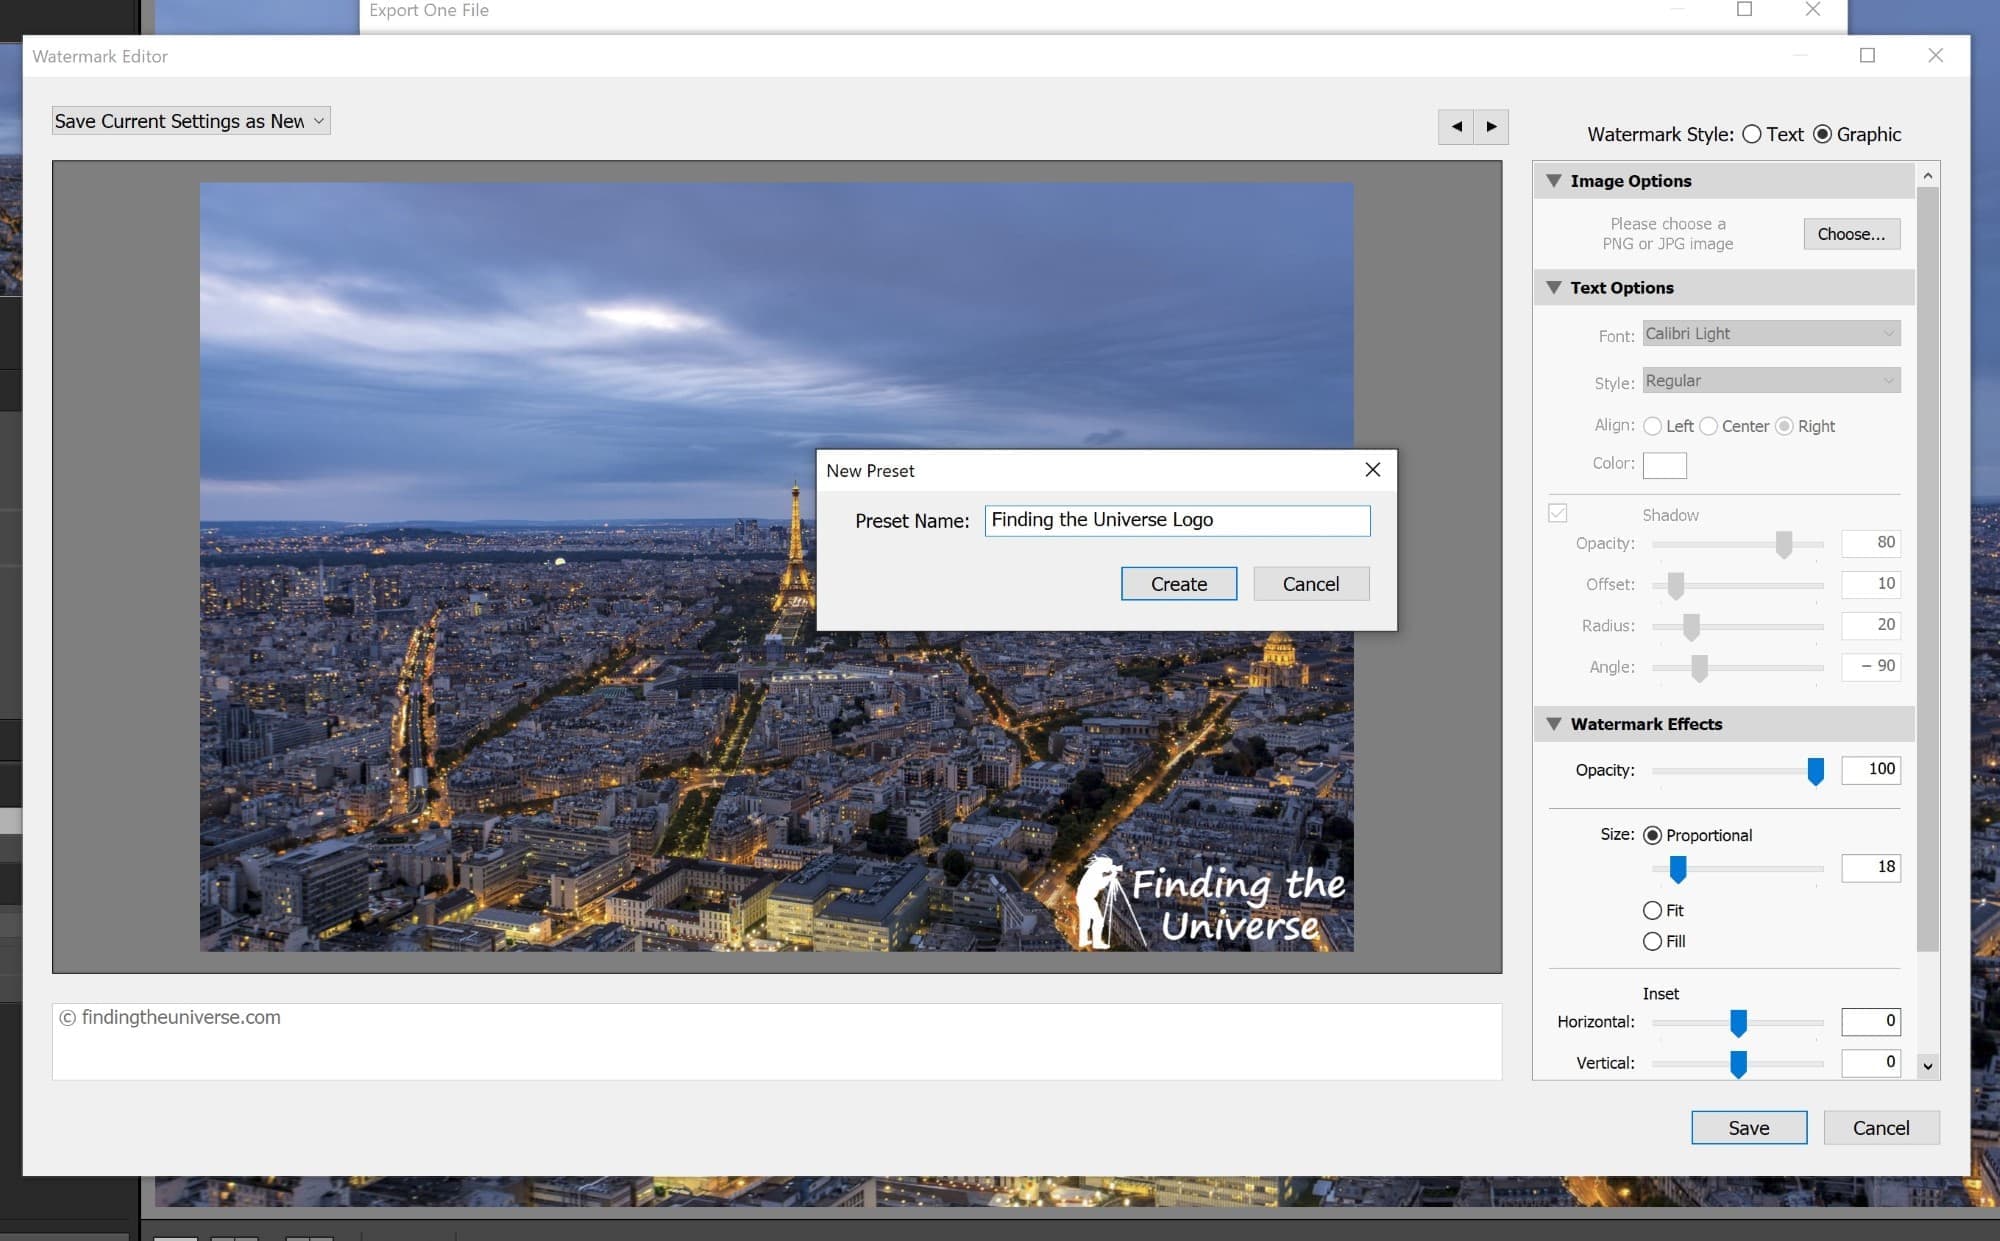
Going forward, if you want to add this watermark to any future images, you can select it from the watermark dropdown on the export screen.
Use Online Tools or Galleries to Watermark your Image
If you plan on selling your photos online, then the tool you choose to use might include built-in watermarking features. This means that when it shows your images to potential buyers, it will automatically add a watermark. This watermark is just for previewing, but is removed on the final copies when sold.
For example, Smugmug, which I currently use for my own online photography sales has a feature where it can add a watermark to any images you display.
There are also a number of online tools which let you easily add text or other elements to your images. For example, we use Canva for some of our design needs, which allows us to add watermarks. These can be good for one-off watermarks, but we would suggest one of the other options in our guide if you intend to add watermarks to your images on a regular basis.
How to Remove a Watermark from Your Photos
All the software solutions I’ve suggested allow you to add a watermark to an image and save it as a separate file. So you shouldn’t ever need to delete the original file, which will exist without the watermark.
However, if you’ve somehow added a watermark to your original photo, and overwritten it, you may want to remove it. This is possible, however, please only do this for your own images that you hold the copyright to edit.
To remove a watermark, you’ll need photo editing software like Lightroom, Photoshop or Luminar, which has a retouching capability. Another option, depending on the location and size of the watermark, is to crop it out, although this will change the size of the image. I’ll demonstrate how to remove a watermark in Lightroom using the logo I added previously.
First, load up the image with the watermark in the develop module.
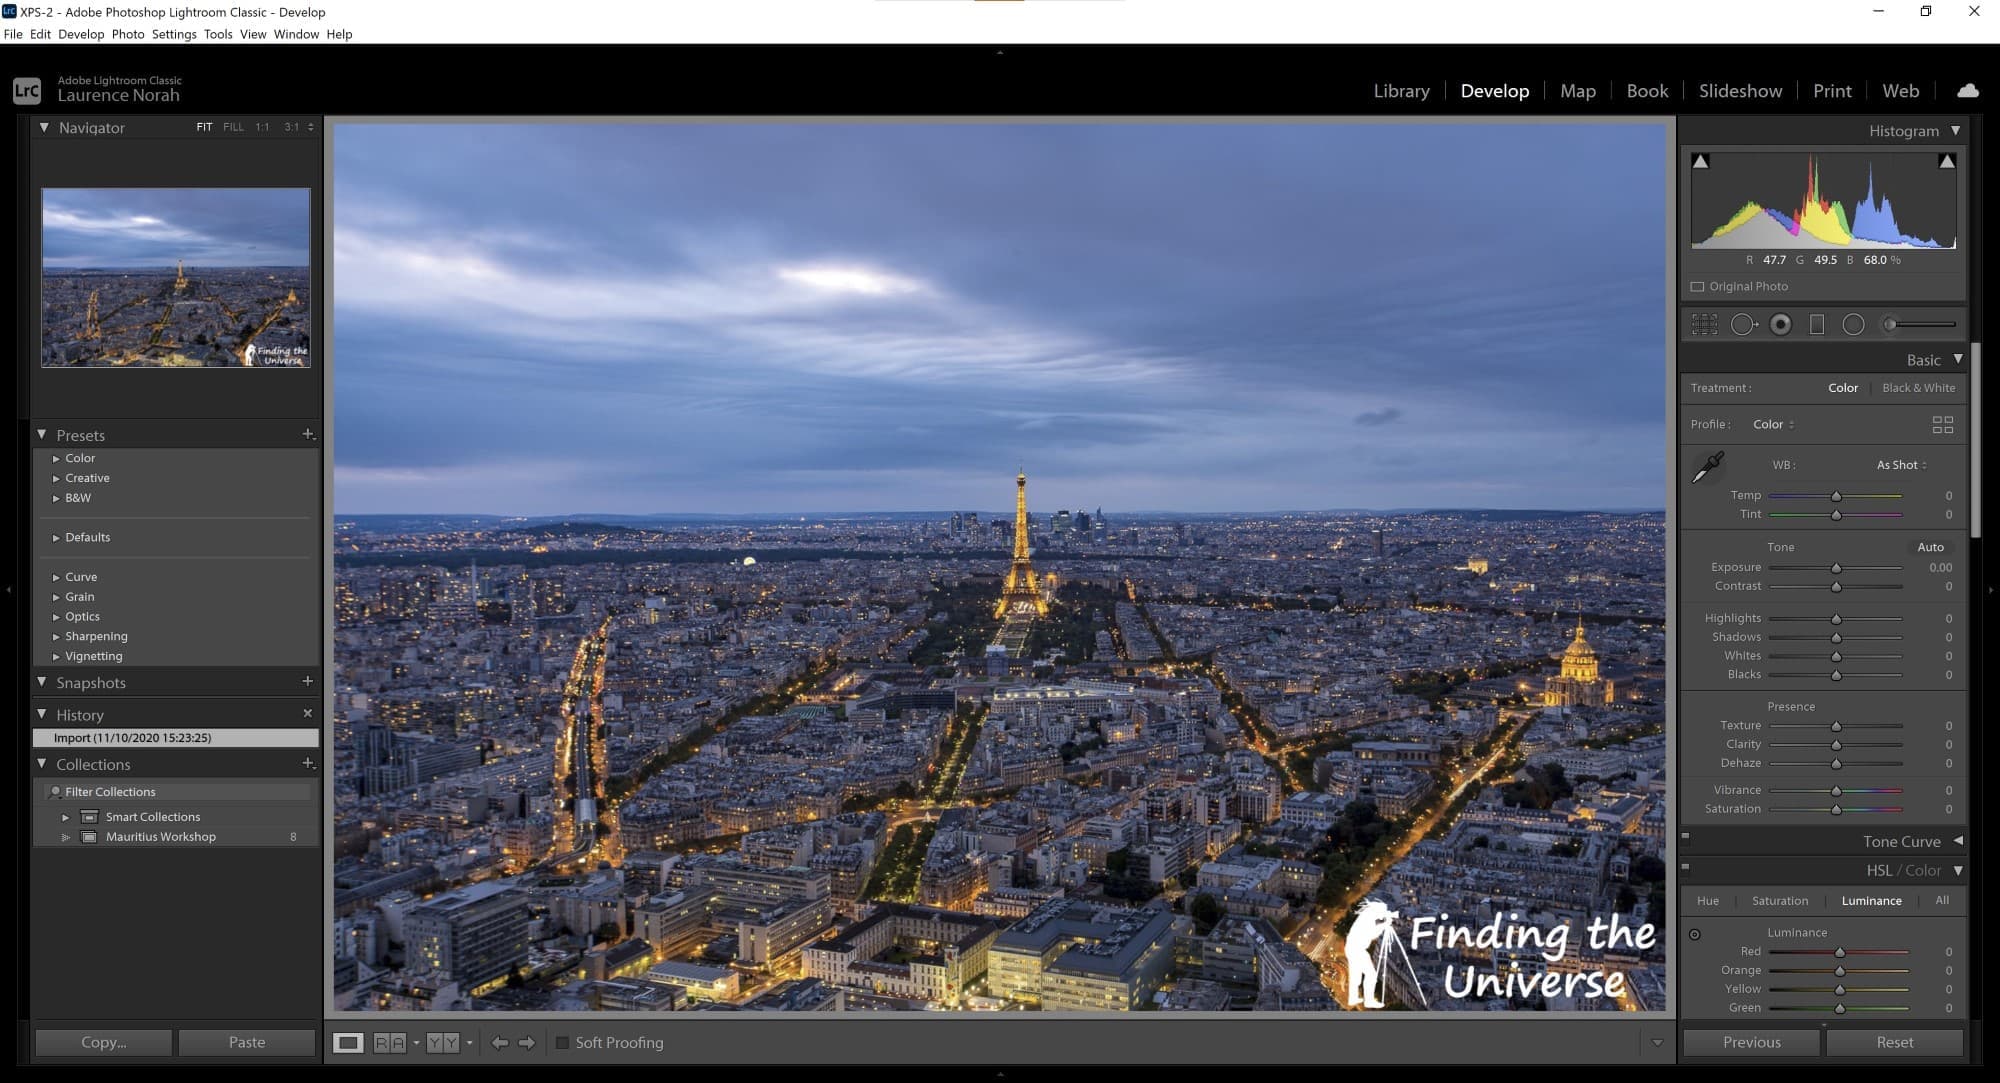
You will want to zoom in on the watermarked area so you have finer control, and then select the retouch option (shortcut key Q).
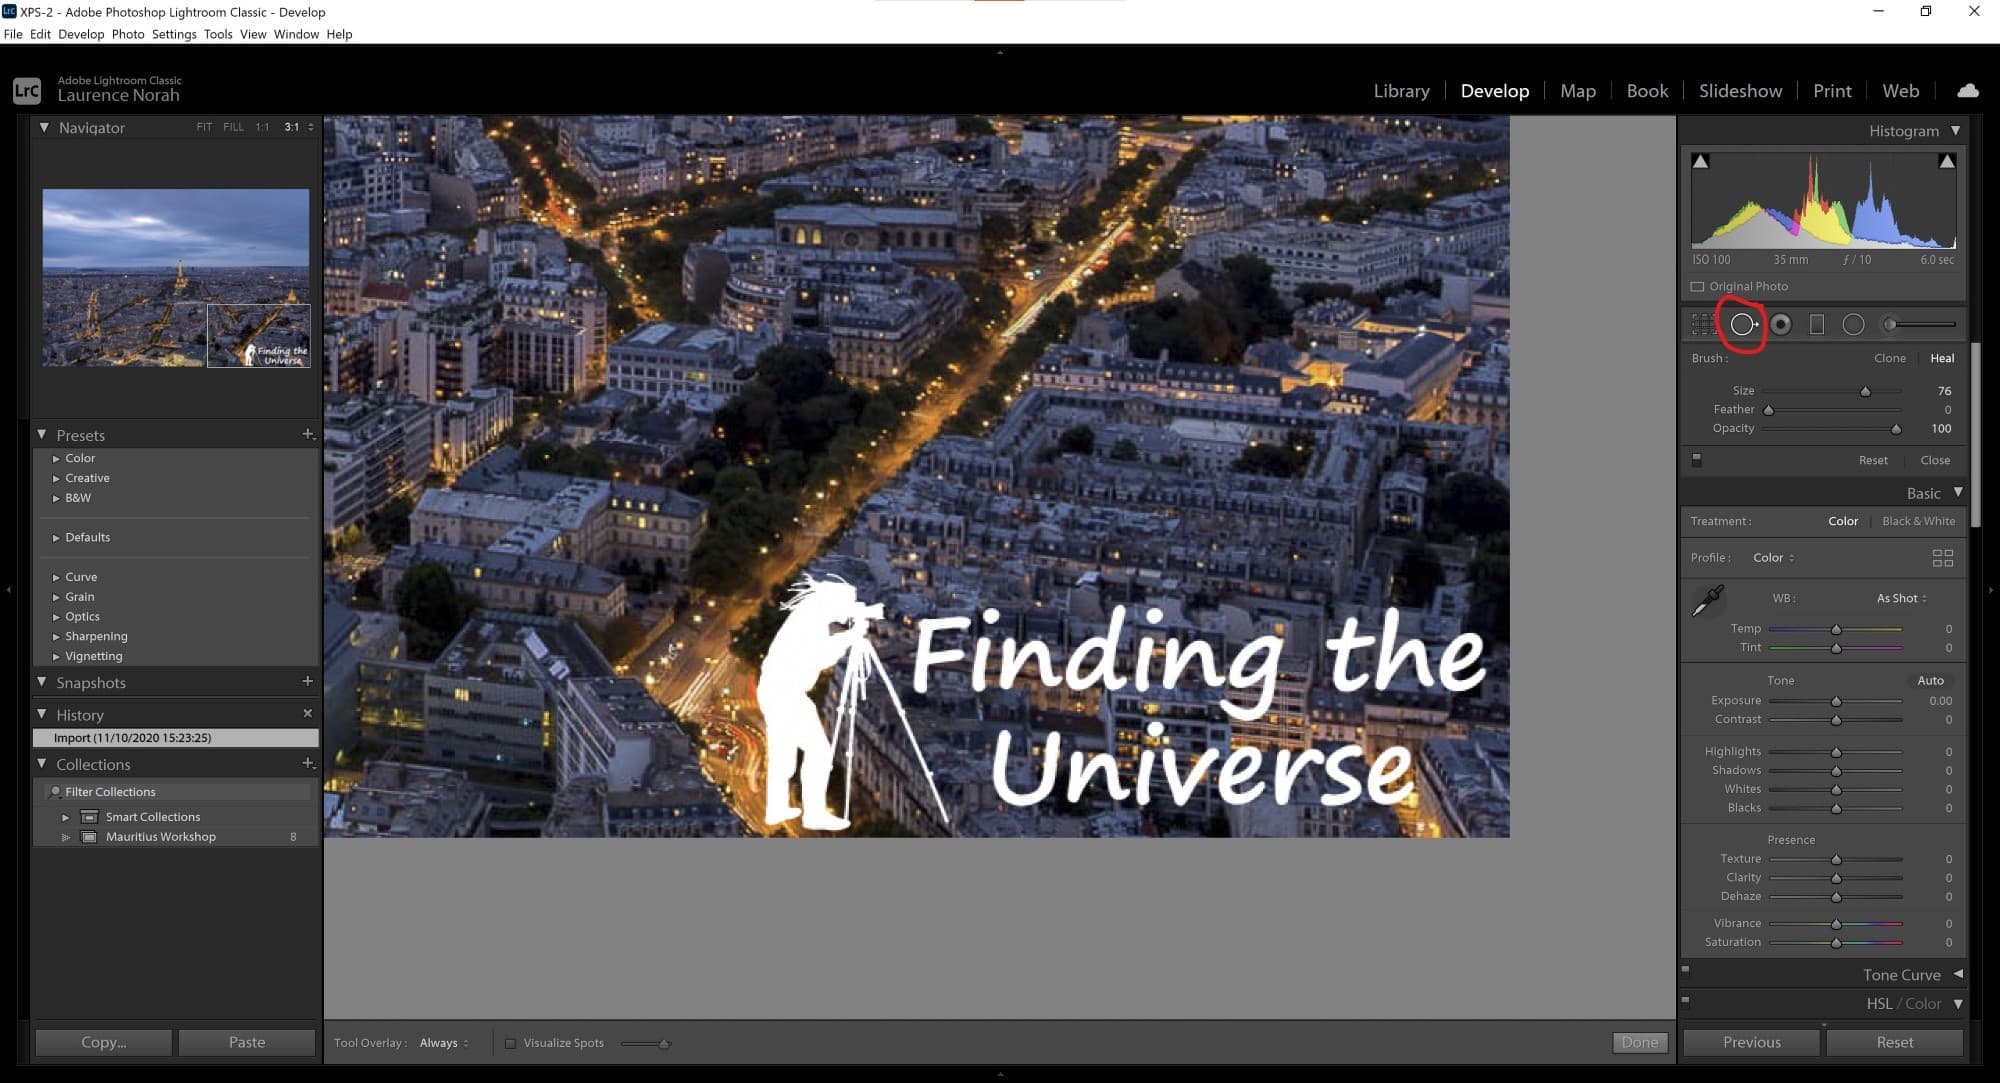
Now you have the fairly laborious task of slowly painting over the white watermark areas with your mouse. The secret is to use small individual retouch areas and make many of them, rather than trying to do one big retouch of the whole area.
You will get the best results if the background is not too complicated, or blends well with other areas of the image.
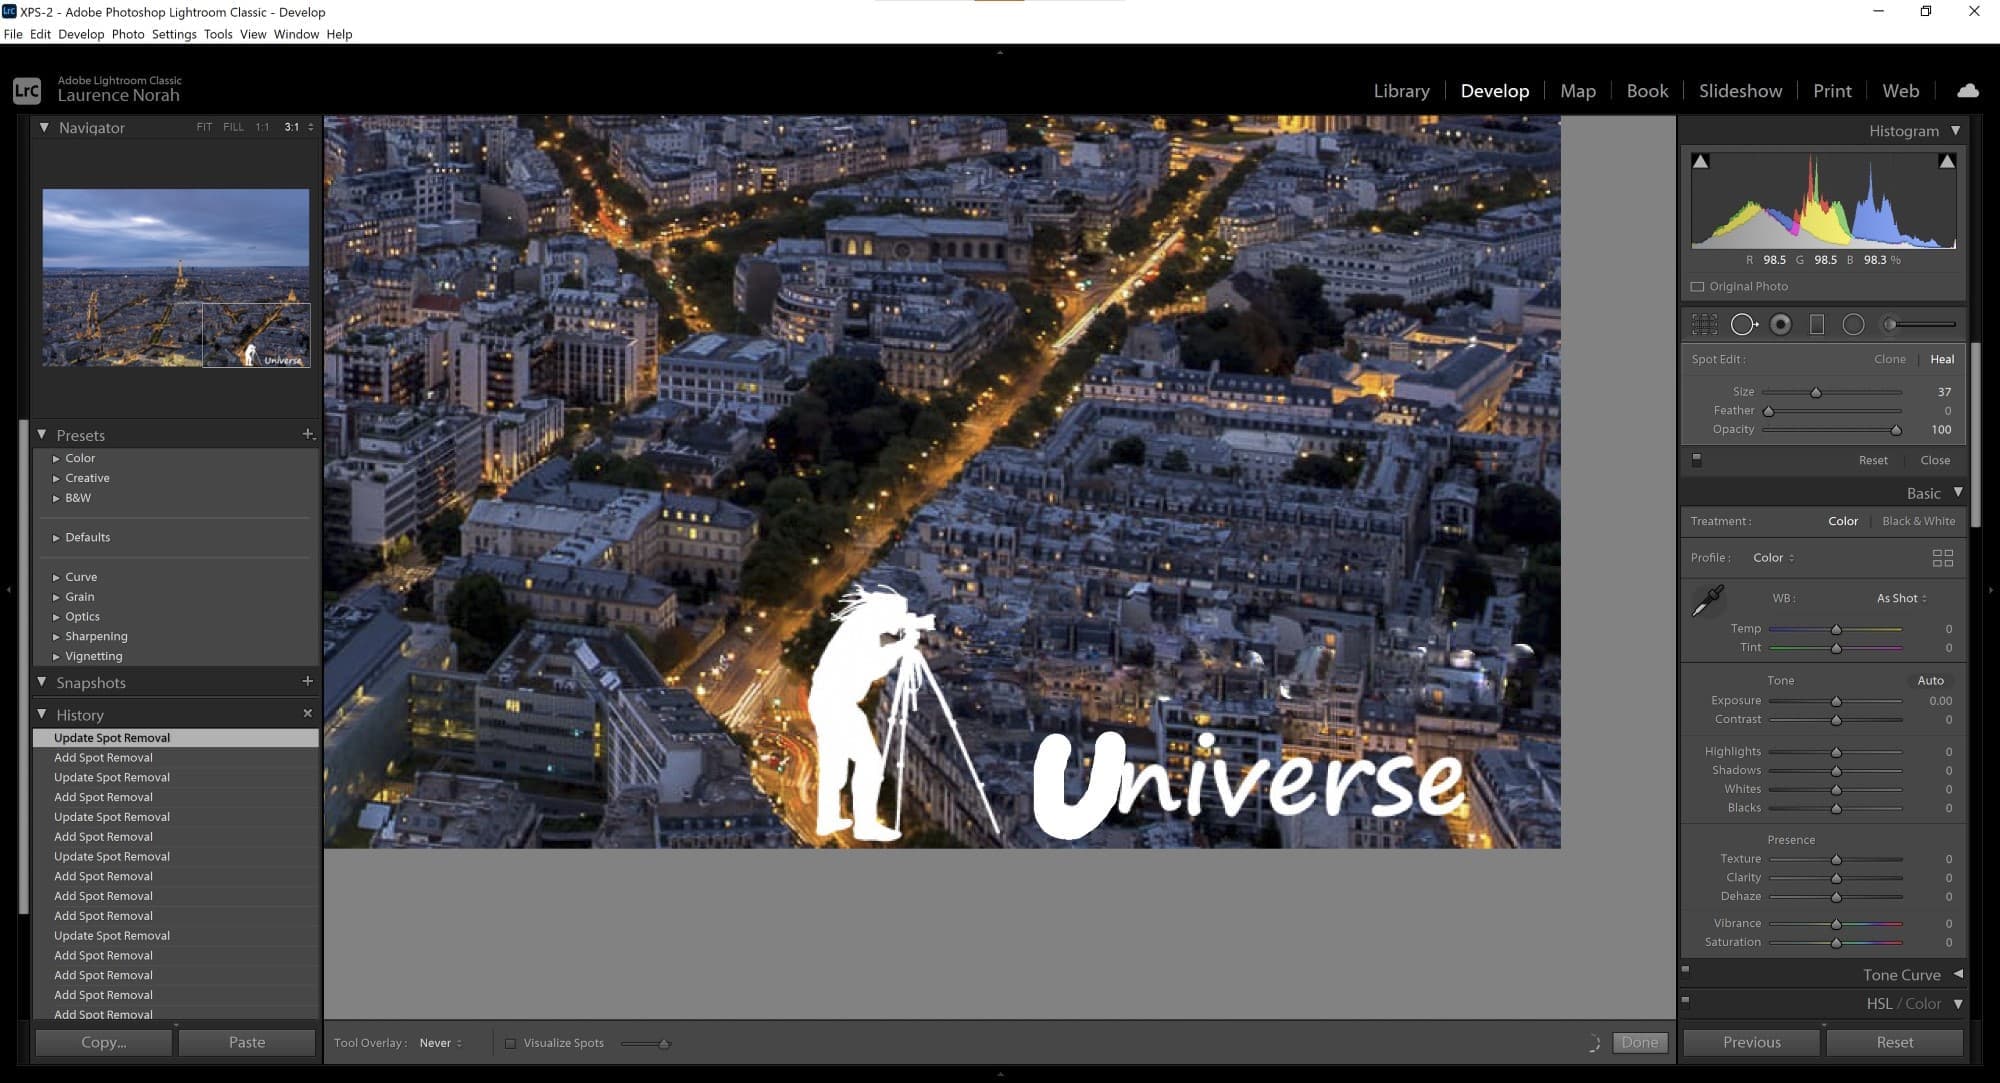
As you can see, my final result isn’t terrible, especially when you zoom out. I could have spent a lot longer refining this of course, adjusting source points for the heal and so on.
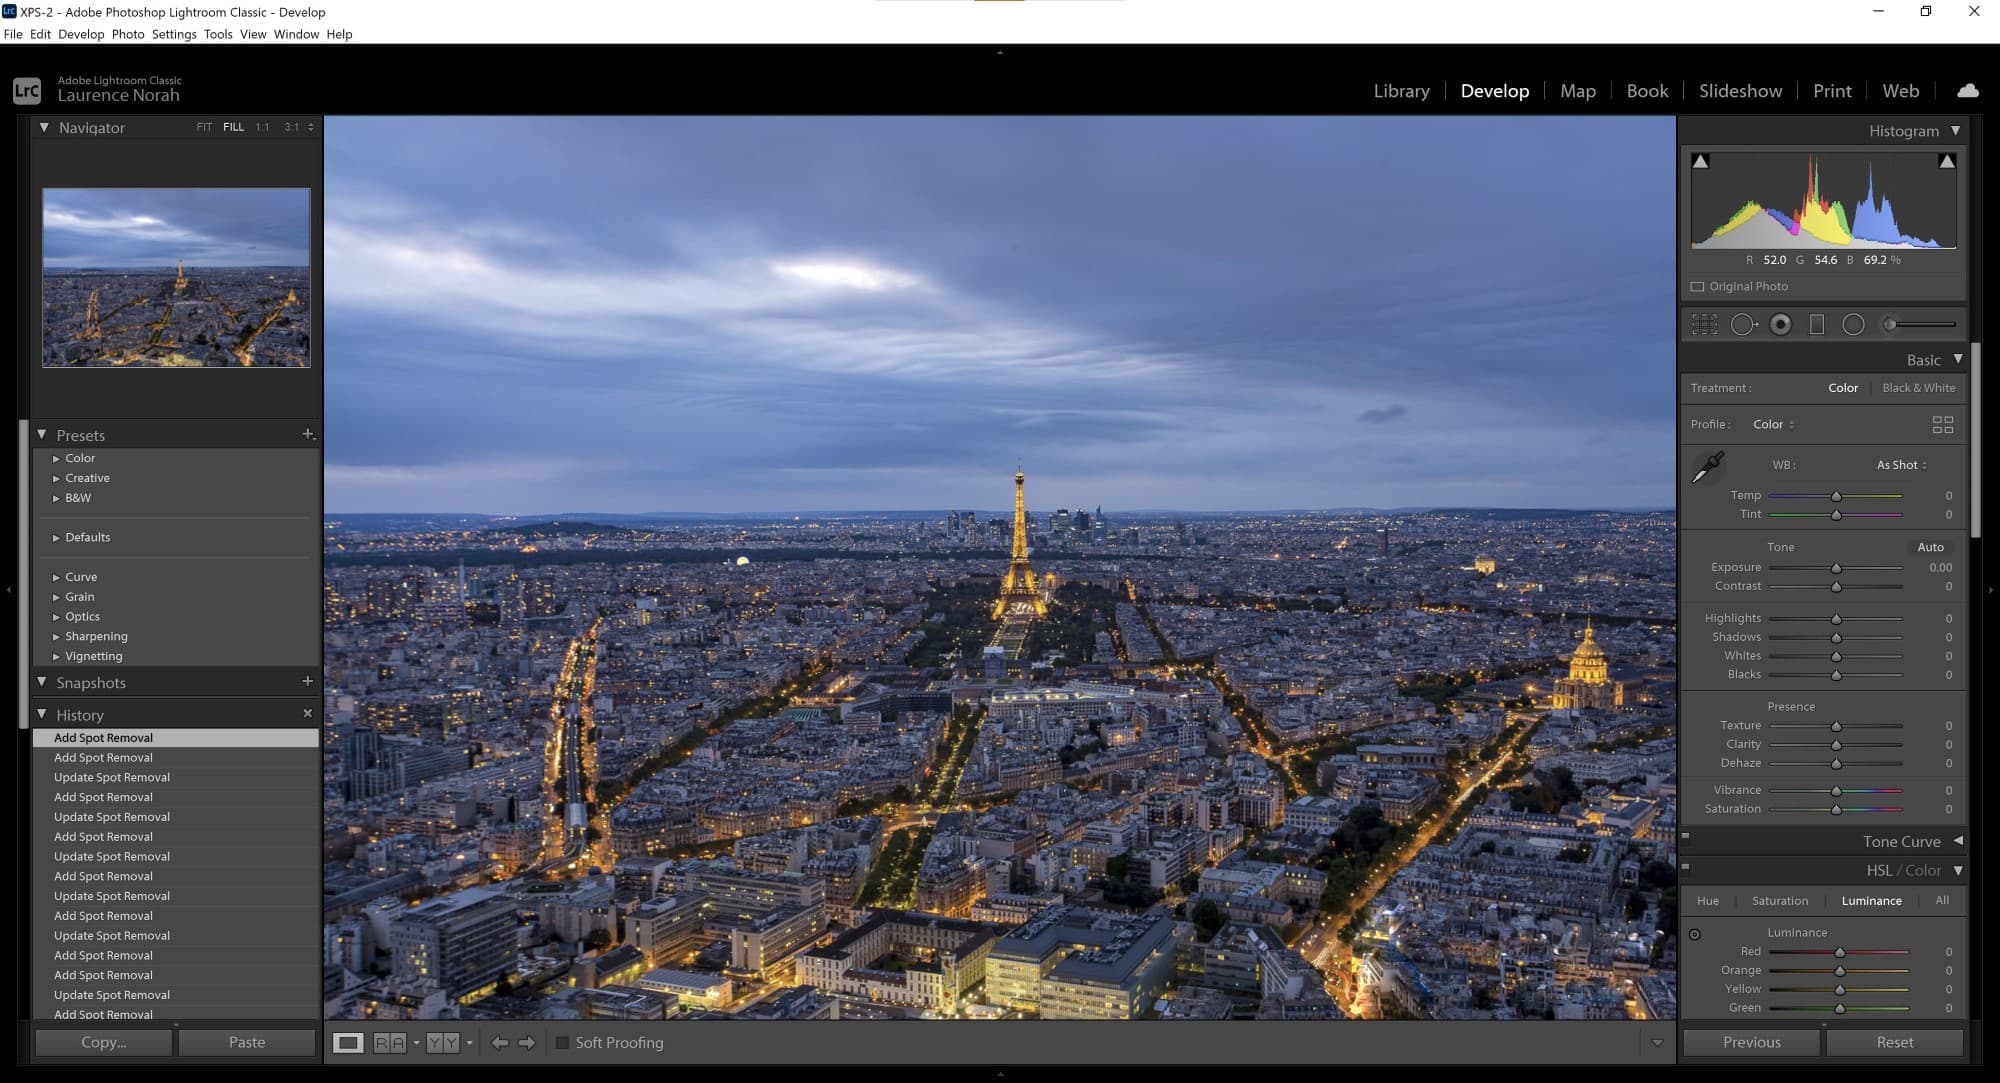
In addition, a tool like Photoshop with its content aware fill would likely have done a better job.
However, for a quick example, this works. Most people will not notice that the bottom right corner of the image looks a bit messy compared to the rest, especially as it’s not the key subject element.
Further Reading
That’s it for our guide to watermarks in photography. Hopefully now you know how to add and remove a watermark from your images.
Before you head on, I wanted to share some more photography content that I think you’ll find useful, that I’ve put together based on my years working as a photographer.
- We have a detailed guide to adding a date stamp to photos, which is similar to watermarking but with some differences.
- We have a guide to how to use a compact camera, how to use a DSLR camera, and how to use a mirrorless camera. We also have a guide to how a DSLR works
- Knowing how to compose a great photo is a key photography skill. See our guide to composition in photography for lots of tips on this subject
- We have a guide to what depth of field is and when you would want to use it.
- We are big fans of getting the most out of your digital photo files, and do to that you will need to shoot in RAW. See our guide to RAW in photography to understand what RAW is, and why you should switch to RAW as soon as you can if your camera supports it.
- Color accuracy is important for photography – see our guide to monitor calibration to ensure your screen is set up correctly.
- We have a guide to the best photo editing software, as well as a guide to the best laptops for photo editing for some tips on what to look for.
- If you’re looking for more advice on specific tips for different scenarios, we also have you covered. See our guide to Northern Lights photography, long exposure photography, fireworks photography, tips for taking photos of stars, and cold weather photography.
- If you’re looking for a great gift for a photography loving friend or family member (or yourself!), take a look at our photography gift guide,
- If you’re in the market for a new camera, we have a detailed guide to the best travel cameras, as well as specific guides for the best cameras for hiking and backpacking, the best compact camera, best mirrorless camera, best bridge camera, and best DSLR camera. We also have a guide to the best camera lenses.
- If you want a camera or lens, but the prices are a bit high, see our guide to where to buy used cameras and camera gear for some budget savings options.
- We have a guide to why you need a tripod, a guide to choosing a travel tripod, and a round-up of the best travel tripods.
Looking to Improve Your Photography?
If you found this post helpful, and you want to improve your photography overall, you might want to check out my online travel photography course.
Since launching the course in 2016, I’ve already helped over 2,000 students learn how to take better photos. In fact, I’ve linked to many of their portfolios in this post.
The course covers pretty much everything you need to know, from the basics of how a camera works, through to composition, light, and photo editing.
It also covers more advanced topics, including astrophotography, long exposure photography, flash photography, and HDR photography.
You get feedback from me as you progress through assignments, access to webinars, interviews and videos, as well as exclusive membership of a Facebook group where you can get feedback on your work and take part in regular fun photo challenges.
It’s available for an amazing one-off price for lifetime access, and I think you should check it out. Which you can do by clicking here.
And that’s it! If you have any questions or feedback, I’m here to listen and do my best to answer. Just pop them in the comments below and I’ll get back to you as soon as I can.


Leave a Reply