As a travel photographer who also runs an online photography course, I’m often asked about the value of Lightroom presets. Most users want to know if Lightroom presets are worth it, if they should use them, and my opinion on them.
In this guide I’m going to share with you everything you need to know about Lightroom presets, both free Lightroom presets and paid Lightroom presets. I’ll tell you exactly what a Lightroom preset is, my opinion on whether you should use presets in Lightroom, whether presets are worth buying, where to download some of the best free Lightroom presets, and how to install presets in Lightroom.
This guide is based on my years of work as a professional photographer. As part of my work, I use Adobe Lightroom daily for the vast majority of my editing and photo management needs.
If you’re not familiar with Lightroom or photo editing, then I recommend reading my guide to the best photo editing software, for more of an overview of Lightroom, and photo editors in general.
Table of Contents:
What are Lightroom Presets?
A Lightroom preset is simply a preconfigured set of Adobe Lightroom settings. These can be created by you or you can install presets created by others.
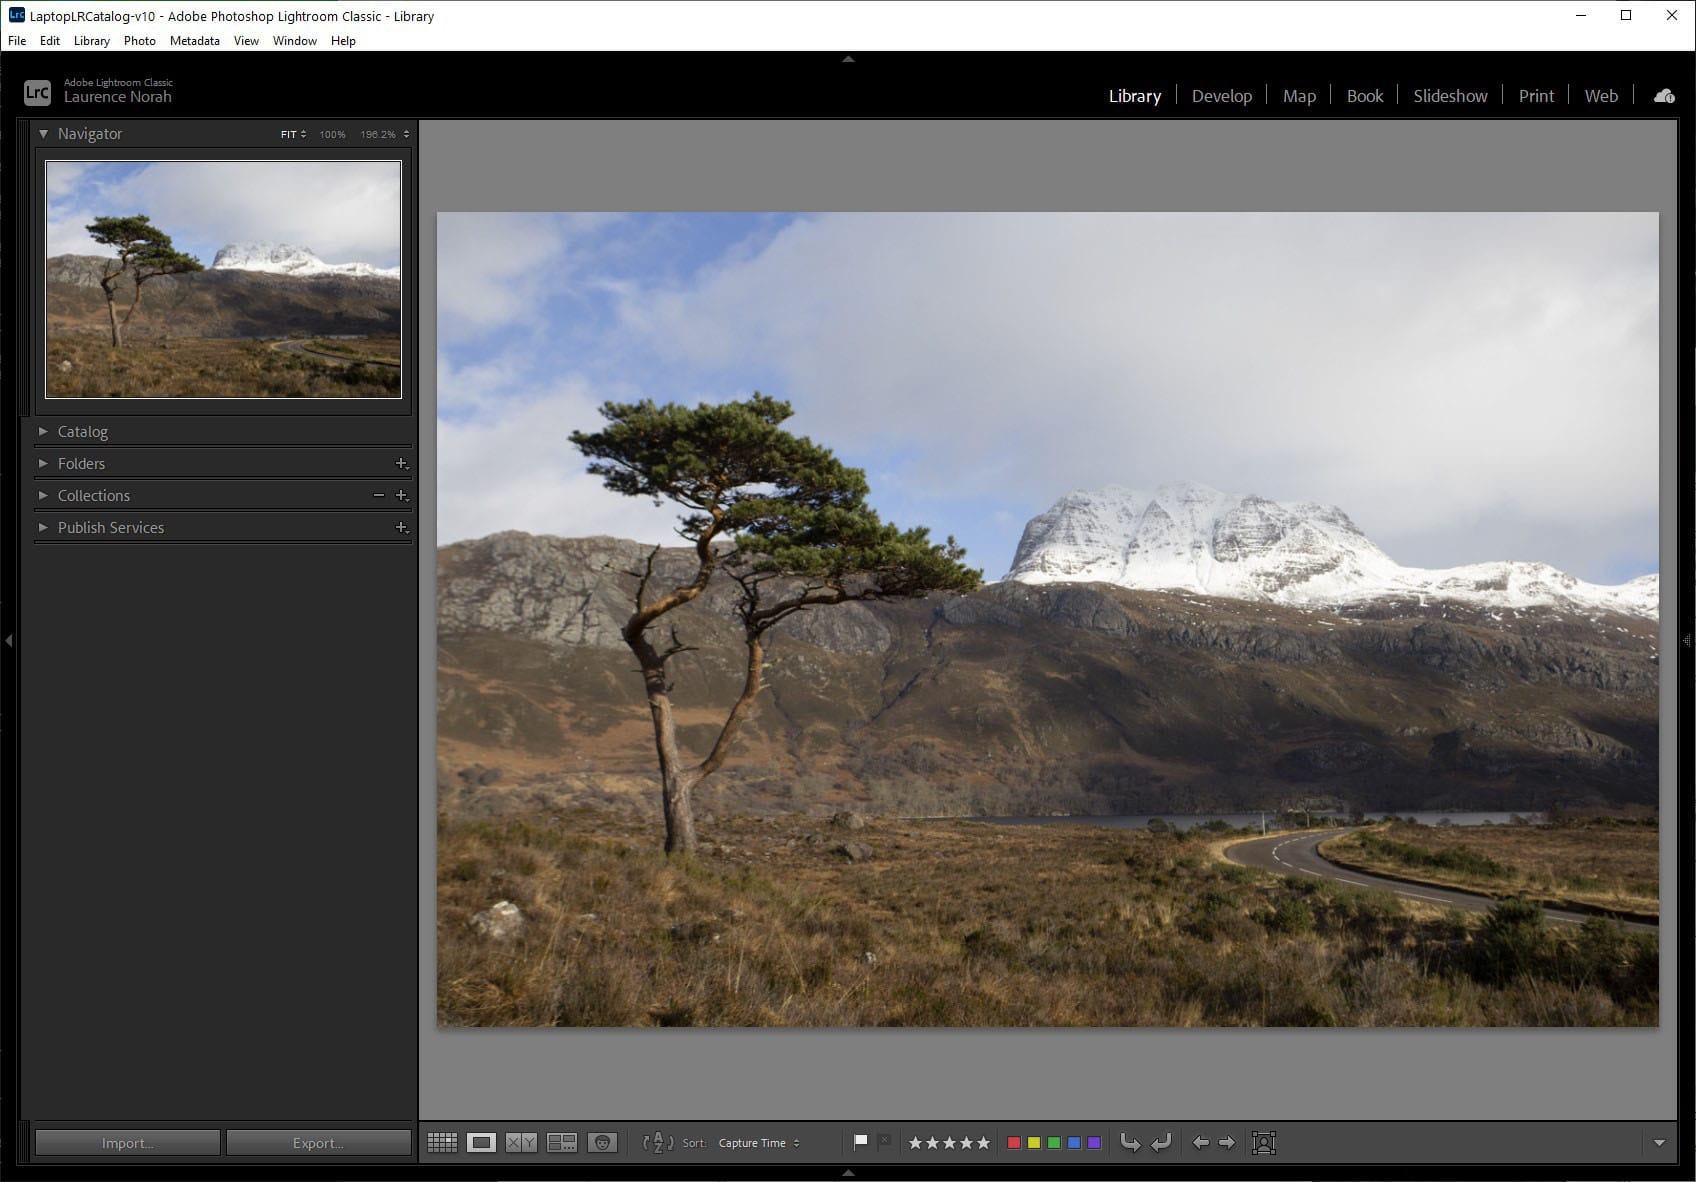
When thinking about Lightroom presets, most users are actually referring to Lightroom “develop” presets. These are presets that you can use when editing a photo in Lightroom to achieve a certain look. They are called “develop” presets, because you use them in Lightroom’s “develop” module, which is where you edit photos.
Lightroom develop presets are similar to the filters that you find on applications like Instagram, in that they instantly change how an image looks. However, they have the advantage that you can see how the preset actually works, and tweak it to suit your image precisely.
As well as develop presets, Lightroom actually allows you to create a wide range of different kinds of presets. So before we focus on Lightroom’s develop presets, let me walk you through Lightroom presets in general. First, lets look at some of the other types of presets in Lightroom.
Other Presets in Lightroom
One good example of a preset in Lightroom is an “export preset”.
When you export an image from Lightroom, you can set things like the file type, file resolution, and filename. To save you from adjusting these settings every time, you can save the export settings as an export preset.
For example, you might choose to export a JPG file with a watermark at 2000px in width for use for social media sharing. You could save this export preset as “social media” in Lightroom.
Then, the next time you want to export an image for social media, you can just use your predefined “social media” preset.
Lightroom lets you save presets for easy access for a number of its features, from importing and exporting images, to watermarks, file naming, local adjustments, and metadata. Creating presets in each of these areas is easy to do, and makes working with Lightroom a lot easier. The majority of these presets will be unique to you as a user.
You can see examples on creating presets like this in my guide to watermarking photos, where I go through the process of creating a watermark and saving it as a preset for future image exports.
Develop Presets in Lightroom
As I mentioned at the start of this section, when you read about downloading Lightroom presets, most people will be referring to develop presets.
A develop preset in Lightroom is one which saves the state of all the adjustments you have made when editing a photo in Lightroom’s Develop module. For example, when editing a photo you might choose to reduce exposure by 2 stops, increase highlights by 1 stop, and apply lens corrections and noise reduction. If you save those develop settings as a develop preset, you can apply them to other images and have the exact same settings apply.
This means you can apply the look you have achieved in one image to other images. To do so, you just save your develop settings as a preset, which you can then apply to your other images.
You can also download develop presets for Lightroom from other photographers, to give results similar to their images. So if there is a photographer you follow whose images you like, if they make their presets available, you can apply the look they use to your image files.
Should You Use Lightroom Presets?
I believe that everyone should learn how to use Lightroom presets for saving regularly used settings. These include export settings, watermark settings, filename settings, and the other things that you do on a regular basis in Lightroom. Doing so will greatly improve your Lightroom workflow and make tasks like file exporting and importing a lot quicker.
Now, when it comes to Lightroom’s develop presets, I think the answer depends on where you are in your photo editing journey and your specific situation.
Personally, I don’t use other’s people’s develop presets. When I started using Lightroom, I did try some free presets, but I learnt that I preferred to edit photos my own way. I have also created my own presets for batch editing a large number of similar photos, although strictly speaking a preset isn’t required for this process as you can copy and paste develop settings between images quite easily too.
There are of course reasons you may want to use develop presets and we’ll go into the pros and cons of using Lightroom presets in the next section.
Pros and Cons of Using Lightroom Develop Presets
When it comes to develop presets in Lightroom, using them comes down to specific situations and individual choice. There’s no right and wrong, just some pros and cons to consider, which I’ll go through now.
Pros of Using Lightroom Presets
First, let’s talk about some of the positive aspects of using Lightroom develop presets.
If you have a style or look that you like to use for an image, then saving that as a preset will give you a great starting point for editing other images that you want to look the same.
If you regularly edit batches of similar photos, perhaps from an event like a wedding, then using develop presets can definitely shorten your workflow if you are applying a similar look to multiple images.
There are also benefits to using develop presets that other photographers have created. In particular, they can be a great way to understand how a look is achieved. This may be particularly useful for those new to Lightroom and its settings.
Lightroom is a complex tool with a lot of different controls, and using a preset can help you to work backwards and learn how to achieve a certain effect. I believe that presets from other photographers should be viewed as a stepping stone to helping you improve your photo editing in Lightroom.
Cons of Using Lightroom Presets
Now let’s go through some of the potential downsides to using Adobe Lightroom develop presets.
Lightroom presets are not “intelligent” in any way. For example, if the preset sets the exposure to +2 stops, and you are working on image that is already over exposed, it’s just going to make it worse. So using a preset in Lightroom might actually make your images look worse.
Next, using presets can lock you in to other photographers styles rather than allowing you to develop your own style. Instead of using presets as a stepping stone to learning how to use Lightroom effectively, it’s all too easy to see Lightroom presets as a shortcut to image editing success.
You can get good results with a preset, but ultimately you should be aiming to master Lightroom so you understand how to achieve the effects you want yourself without relying on presets. Remember that a Lightroom preset is just a saved version of the position of the settings in the develop module, and anyone can learn how to move the sliders!
If the goals is to develop your own style, then you really want to learn to edit your photos on your own. So while presets may be useful to get started, ultimately you want to be able to edit photos in your own personal artistic style.
Finally, adding lots of develop presets to Lightroom can impact Lightroom performance. With this in mind, I’d recommend only keeping those presets that you regularly use, rather than overwhelming Lightroom with hundreds of develop presets. If you find your Lightroom is running a bit sluggishly, check out my guide to improving Lightroom performance for some speed tips.
Free Lightroom Presets
I don’t think that paying for Lightroom presets is a good investment for a photographer. When you see them for sale, they will always be presented on images that work well for the preset, and this can give the impression that simply by using the presets, your photos will similarly look great.
The good news is that you don’t have to pay for presets. If you want to learn how different settings can achieve different looks, there are literally thousands of presets available for free online.
When you are looking for presets, I’d suggest only downloading from sites you trust. I’d also suggest that less is more. For example, a pack of 20 great presets which showcase a range of styles is better than a pack of 1,000 which you’ll spend forever trying to sort through them.
I have chosen the below presets for a number of reasons. First, they are from reputable sources, so you can trust they will be safe to download and of great quality. I’ve included free high-quality presets from the likes of Adobe, Skylym, and On1. These are photography editing software makers, so they should know a thing or two about great presets.
In addition, I’ve decided to stick to my own advice, and not overwhelm you with choice. I honestly believe that having a 10 – 20 great presets to choose from is going to work better for you than overwhelming yourself with choice.
Without further ado, here are some excellent free Lightroom presets that you can download today.
- These free Lightroom presets directly from Adobe. If anyone should know how to get the most out of Lightroom, it’s Adobe. They offer a range of presets tailored to a range of scenes, and they make for an excellent starting point for free Lightroom presets.
- This collection of free Lightroom presets from on1. On1 are the developers behind On1 Photo, one of our favourite Lightroom alternatives. They have hundreds of presets to choose from in various collections, and are an excellent starting point for free Lightroom presets.
- This set of twenty free Lightroom presets from Skylum Luminar, who make another excellent Lightroom alternative. There aren’t so many presets to choose from, but less is sometimes more when it comes to Lightroom presets!
- This collection of Lightroom presets from photographer Mark Galer. These presets are a good starting point for learning about some of the different features available in Lightroom.
Between those options, you should have hundreds of free Lightroom presets to choose from. You can also of course trade presets with photographers you already know.
How to Install and Use Lightroom Presets
Once you have chosen your presets, you will want to install and use them! First step is to download them onto your computer. Once you have downloaded your presets, just remember where they have been downloaded so you can locate them during the install process. Let’s walk through that install process now.
Develop presets are easy to install in Lightroom, however the process varies slightly depending on the filetype. Adobe changed the filetype they used for presets in 2018, and whilst both still work, only the newer presets with filenames ending in “.xmp” can be imported from within Lightroom.
Note that these instructions are for Adobe Lightroom Classic CC. The cloud based Lightroom product also supports presets, and the installation process is similar.
Older Lightroom presets with filenames ending “.lrtemplate” have to be manually copied to the Lightroom develop presets folder.
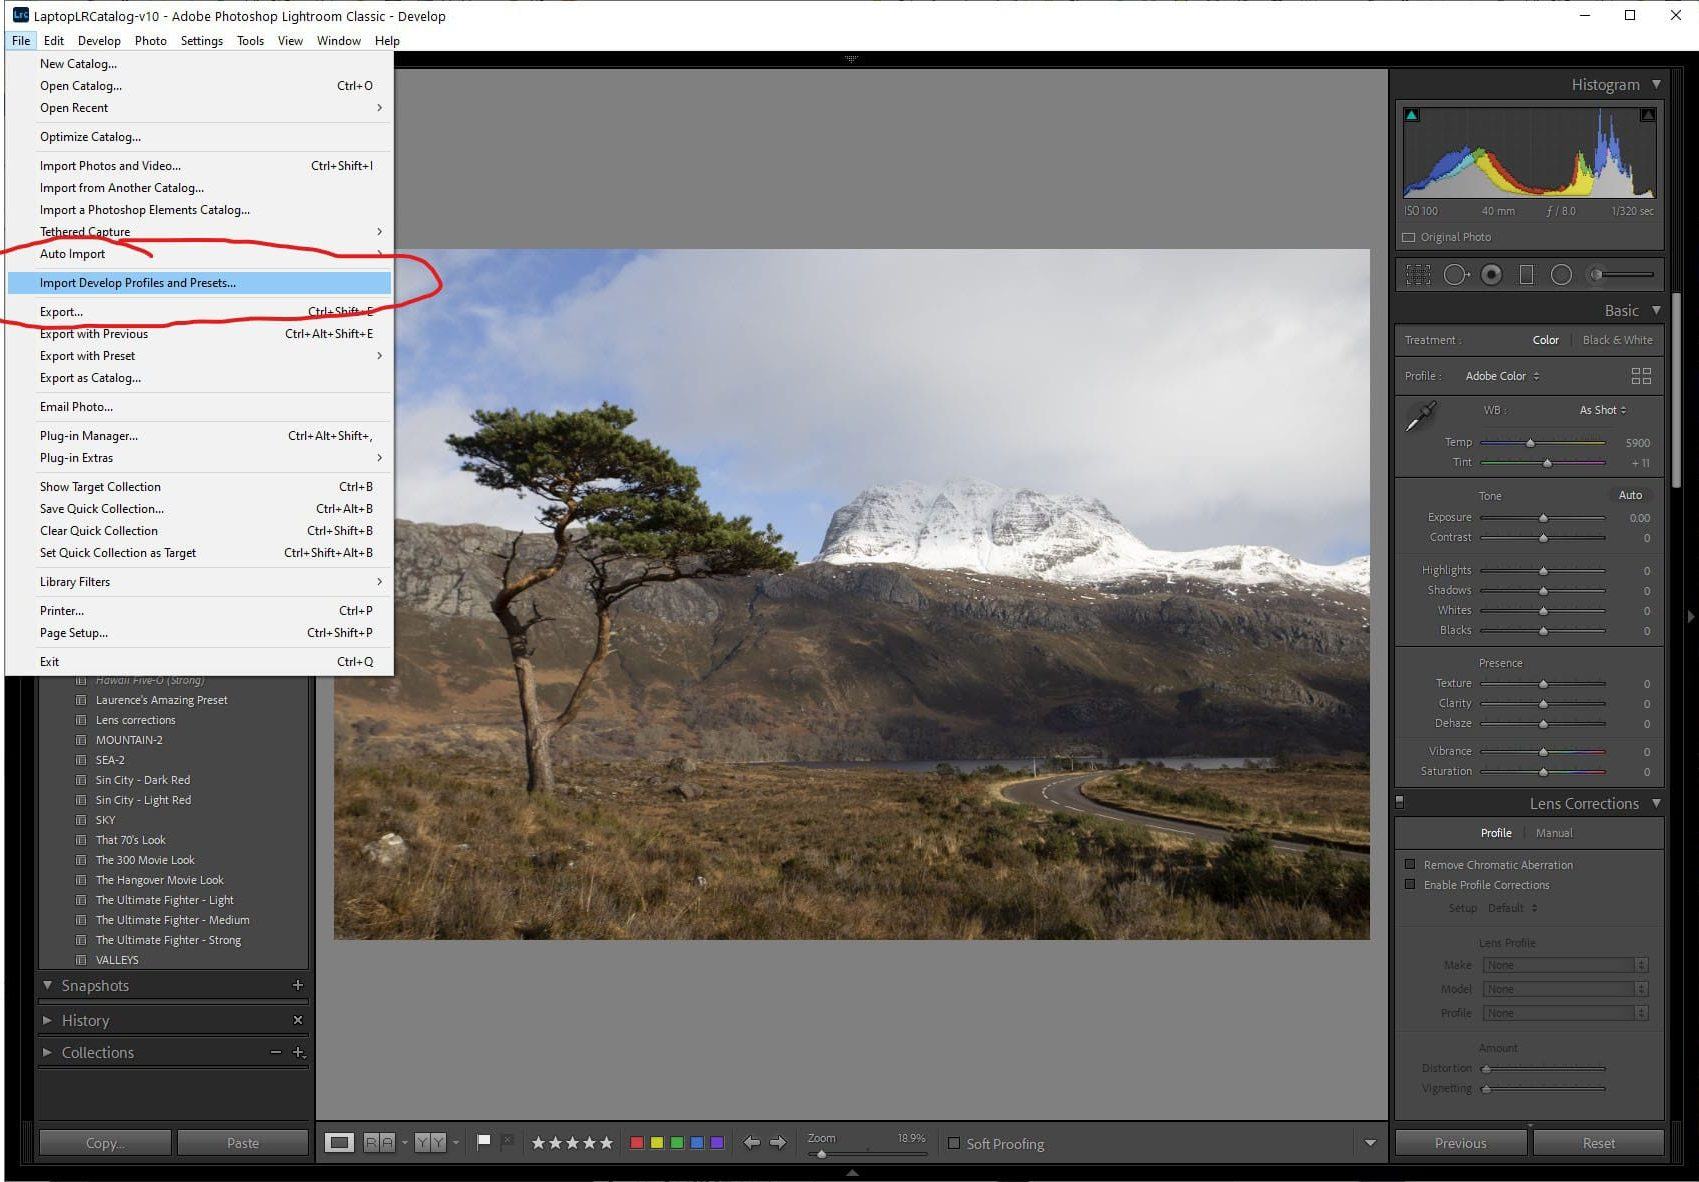
Most preset files will be distributed as a bundle in a zip file. First, you’ll want to check what the template type is by opening the zip file. If you see a list of files ending in “.xmp”, you can import them in Lightroom as follows. For this example, I’ll use the prime presets from Mark Galer, which are available in xmp format.
From the “file” menu, just select the option to “Import Develop Profiles and Presets” as highlighted in the screenshot below. You can do this from any of Lightroom’s modules, including the Library and Develop modules.
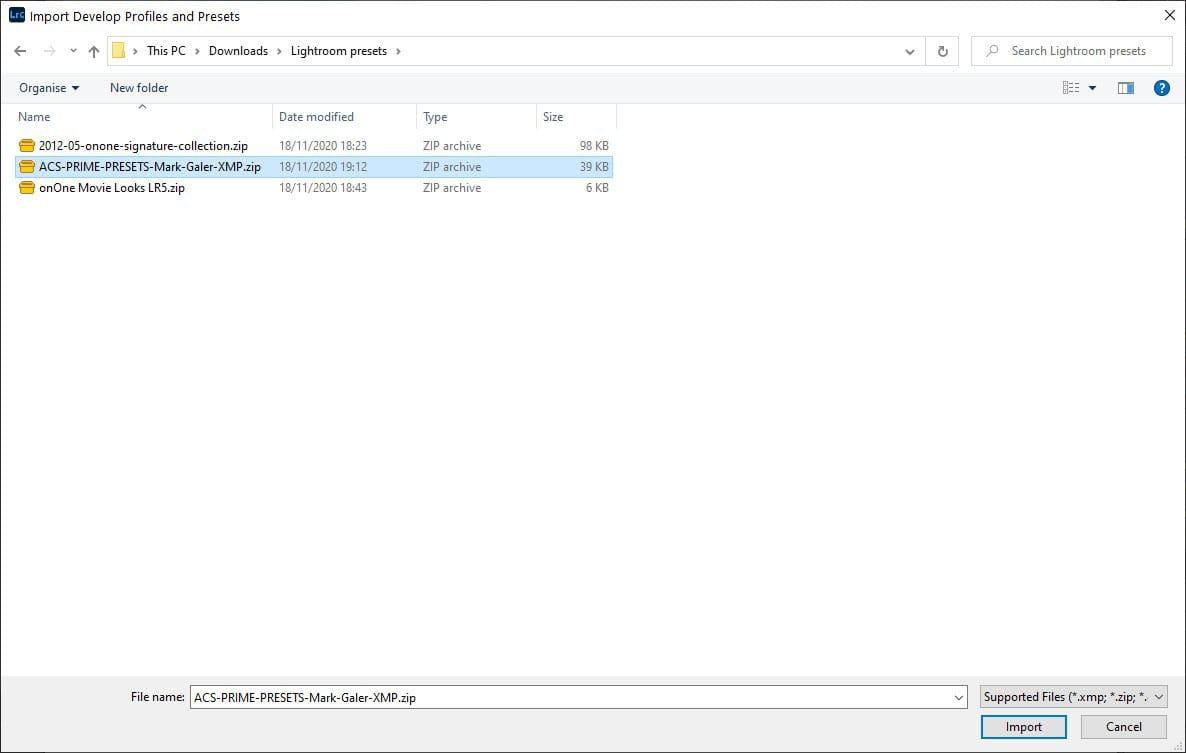
A screen will popup where you’ll be able to select your downloaded presets and add them to Lightroom. Here you can see that Lightroom supports importing presets in zip file format, so for Mark Galer’s presets it’s just a question of selecting the zip file I downloaded and pressing import.
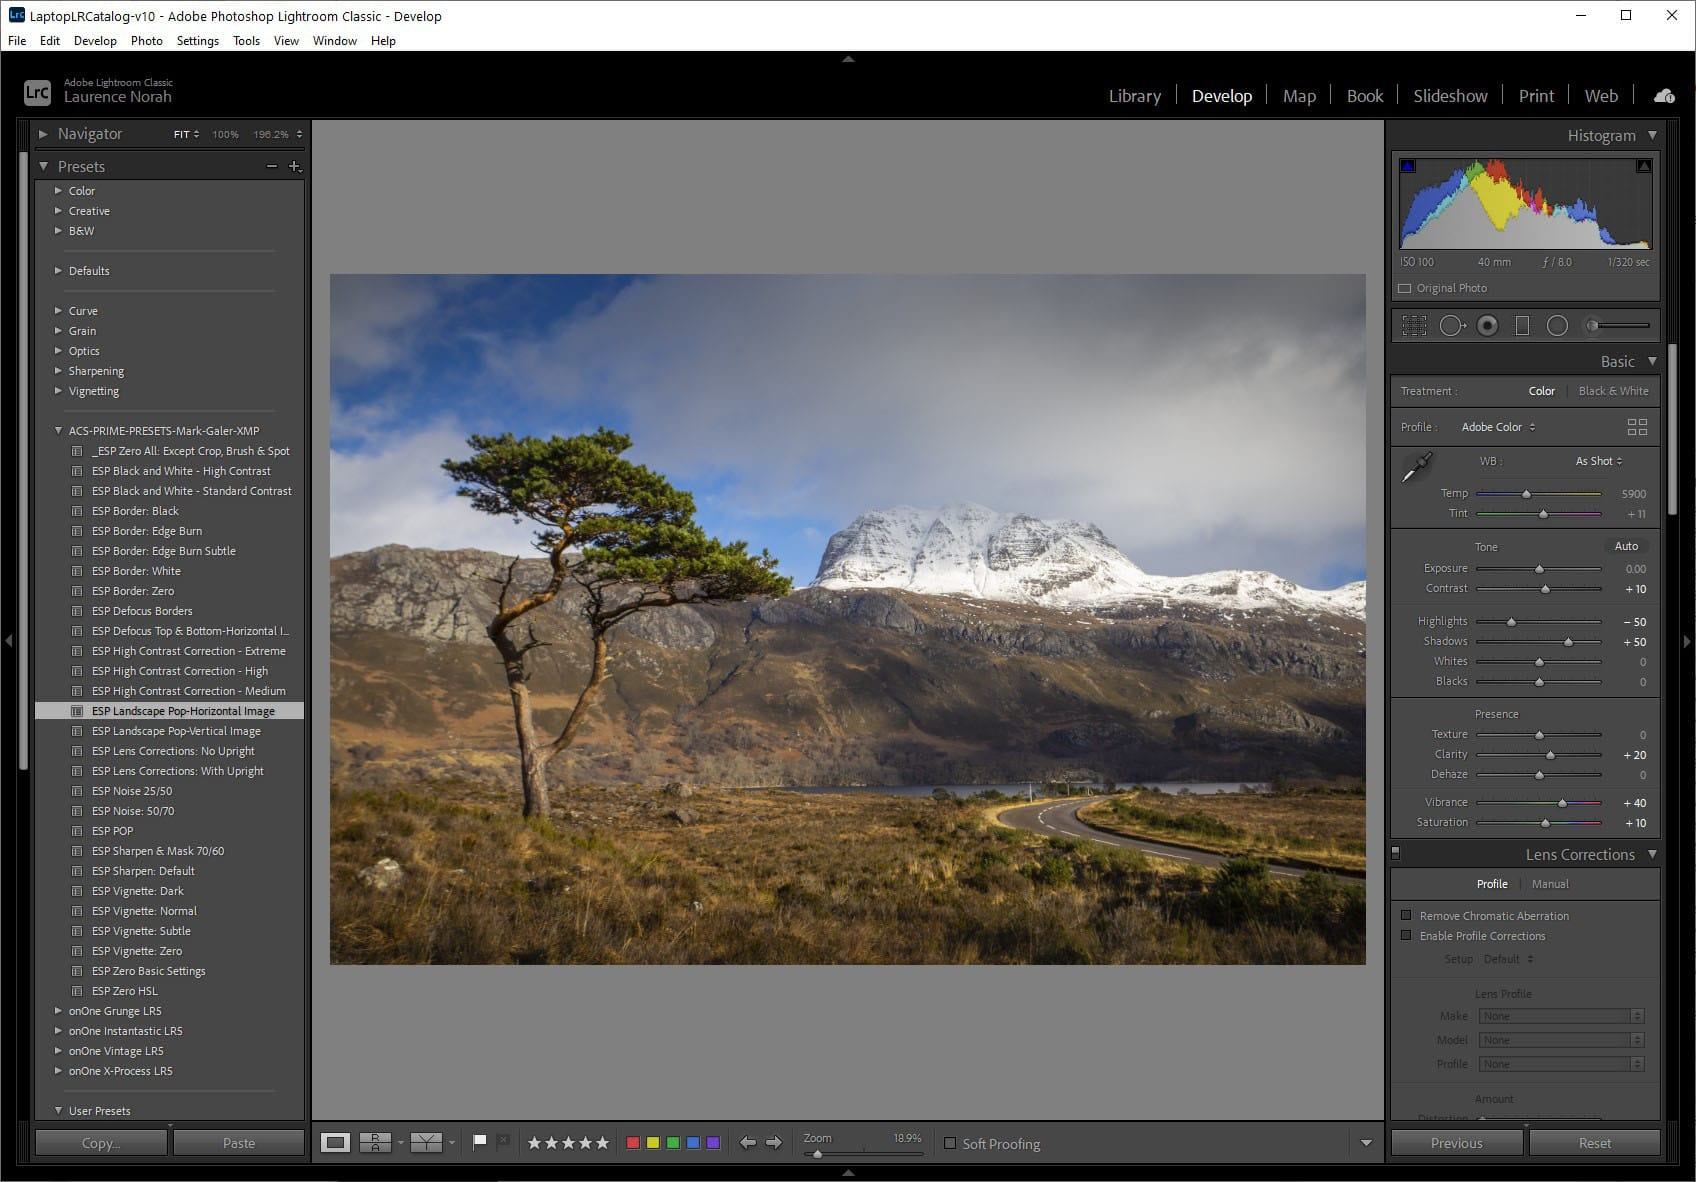
Once the presets are installed and available, to use them you just need to go to the Develop module. In the left hand pane, you’ll see all the available develop presets in the “Presets” box.
Click any of these to apply them to the image you are currently editing. You can also hover over them, which will apply the preset to the image as a preview. Here’s an example using one of Mark Galer’s landscape presets.
If you try and import a zip file of the old “.lrtemplate” develop presets, Lightroom will throw an error about no presets being available to import. Many presets are still in the old format. Here’s what the contents of the zip file of one of the on1 presets looks like for example.
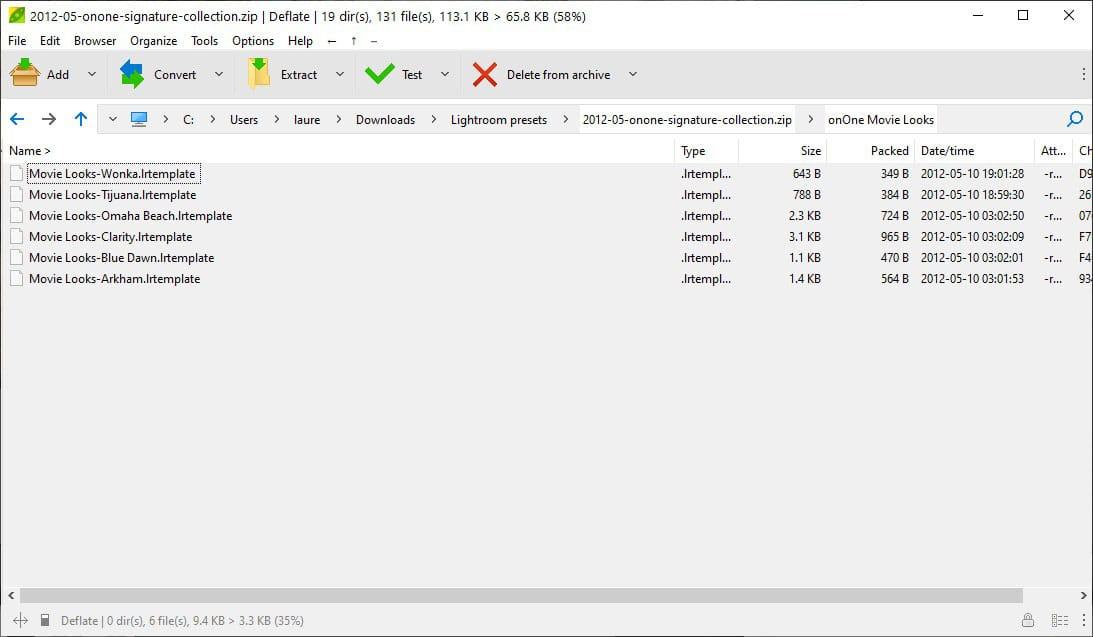
To install the old style templates, first open the preferences window in Lightroom. The easiest way to do this is by pressing “ctrl+,” on Windows, or “cmd+,” on Mac. You can also access it from the menu system.
In the preferences window select the presets tab. Under location, ensure “store presets with this catalog” is not checked. Then press the “Show all other Lightroom presets” button. This will open a view of your filesystem with the Lightroom folder highlighted. Open the highlighted Lightroom folder. Inside there will be a “develop presets” folder.
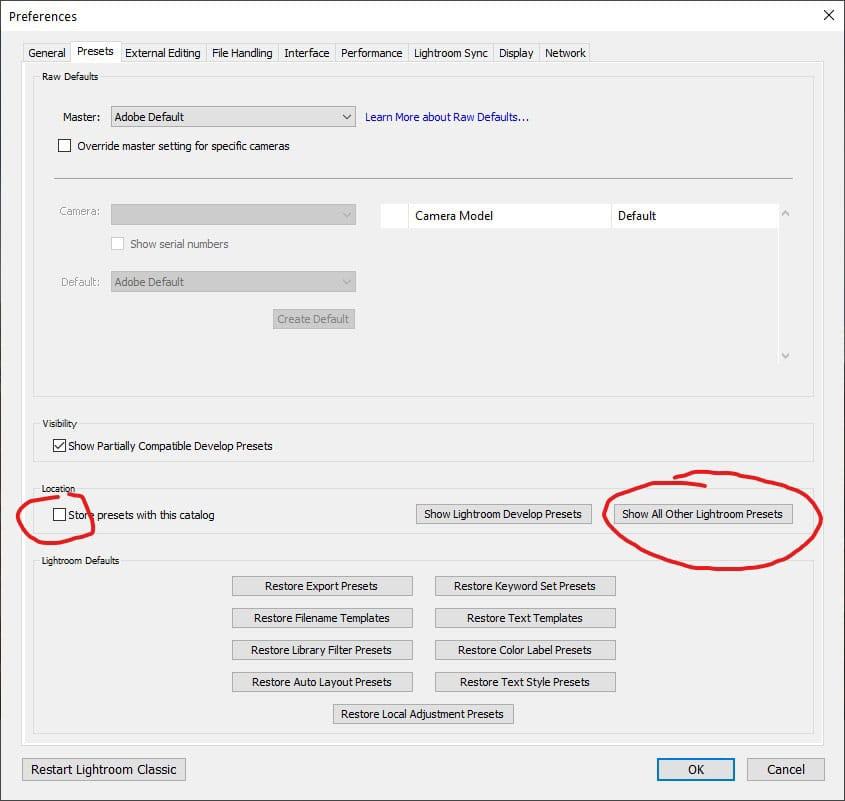
This is where you need to extract your lrtemplate files. Once extracted, restart Lightroom so it picks up the new develop presets.
If you can’t find where to extract your downloaded templates, Adobe has additional help available here.
You can now access these develop presets from the develop presets folder. Here’s the same image as before with one of the on1 presets applied.
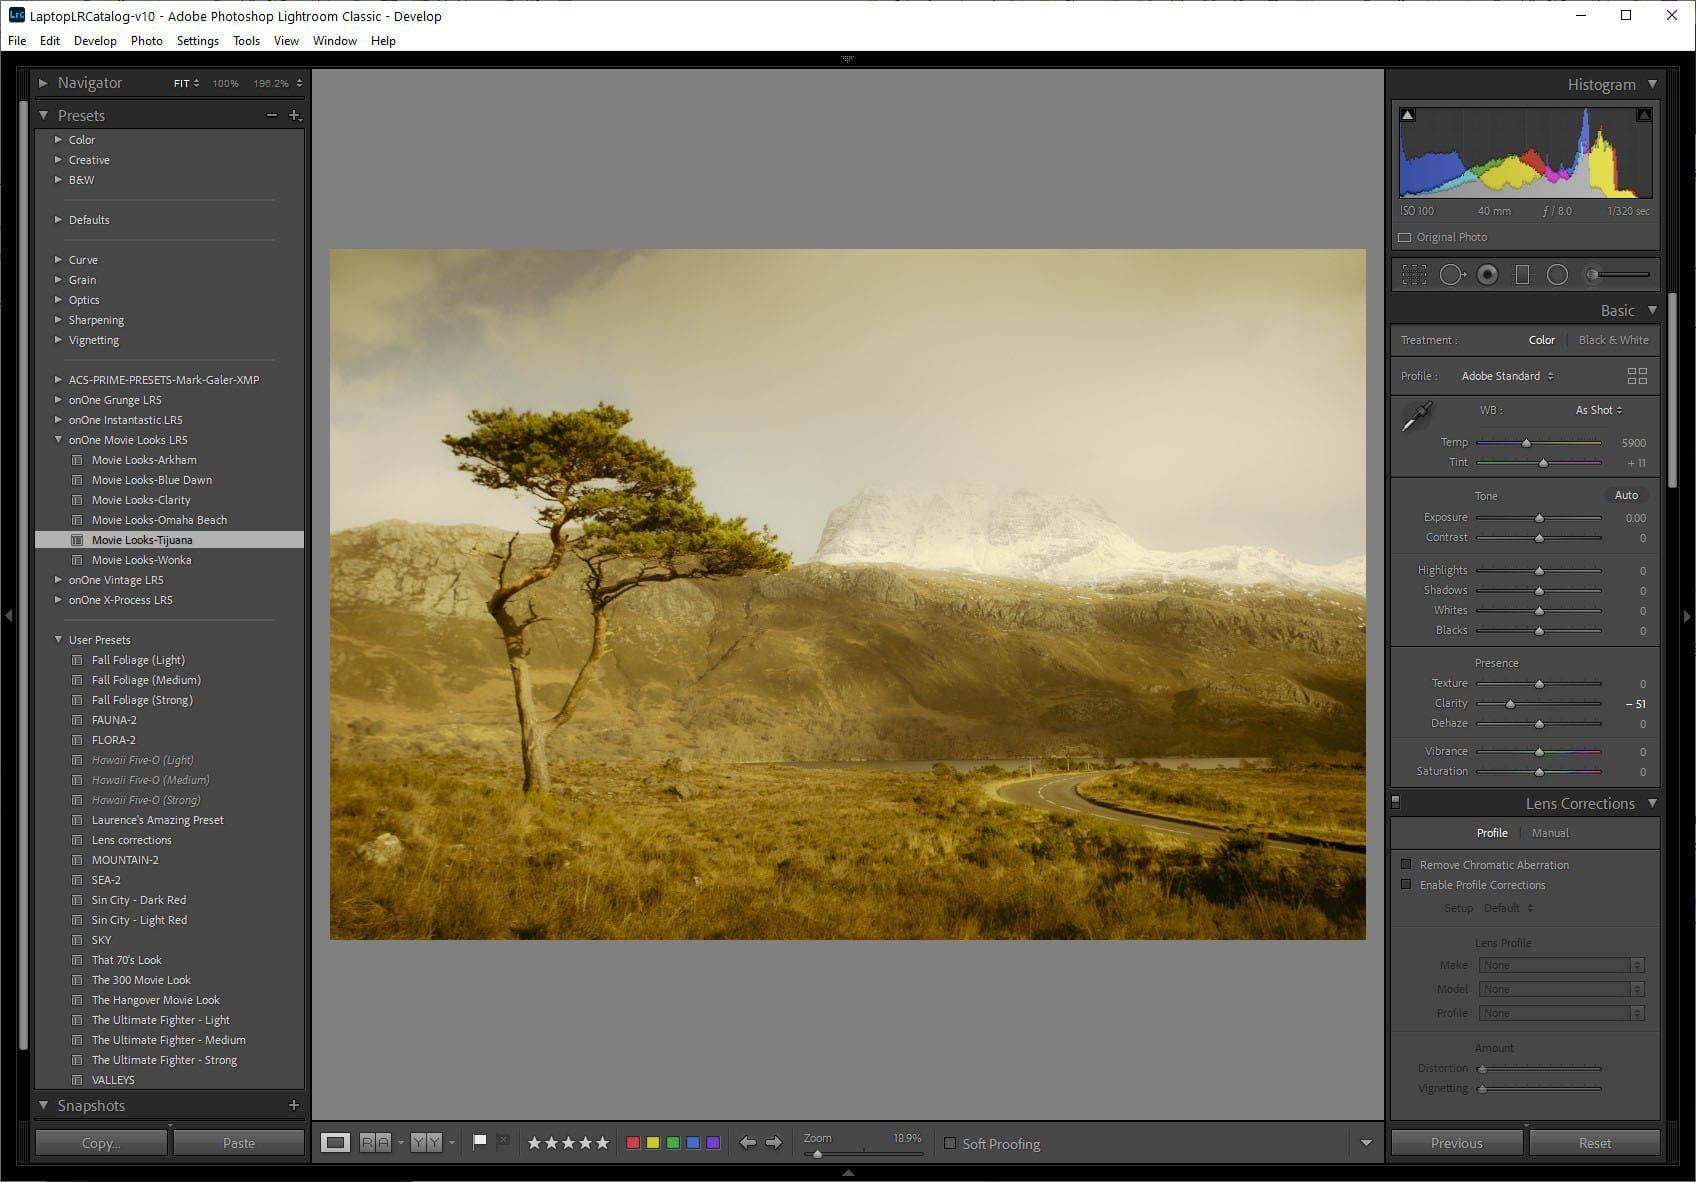
How to Create your Own Lightroom Develop Presets
Creating your own develop preset in Lightroom is very easy. I’ll describe how to create a preset that you can use for editing your photos in Lightroom. In addition, if you are thinking of providing your own presets for other photographers to use, you can use the same process to create a develop preset and then save it for distribution.
To save a preset, load an image in the Develop module. Then, ensure you have all the controls and sliders in the right place. Once you have the image edited to your liking for your preset, from the menu press “develop”, and then “new preset”.
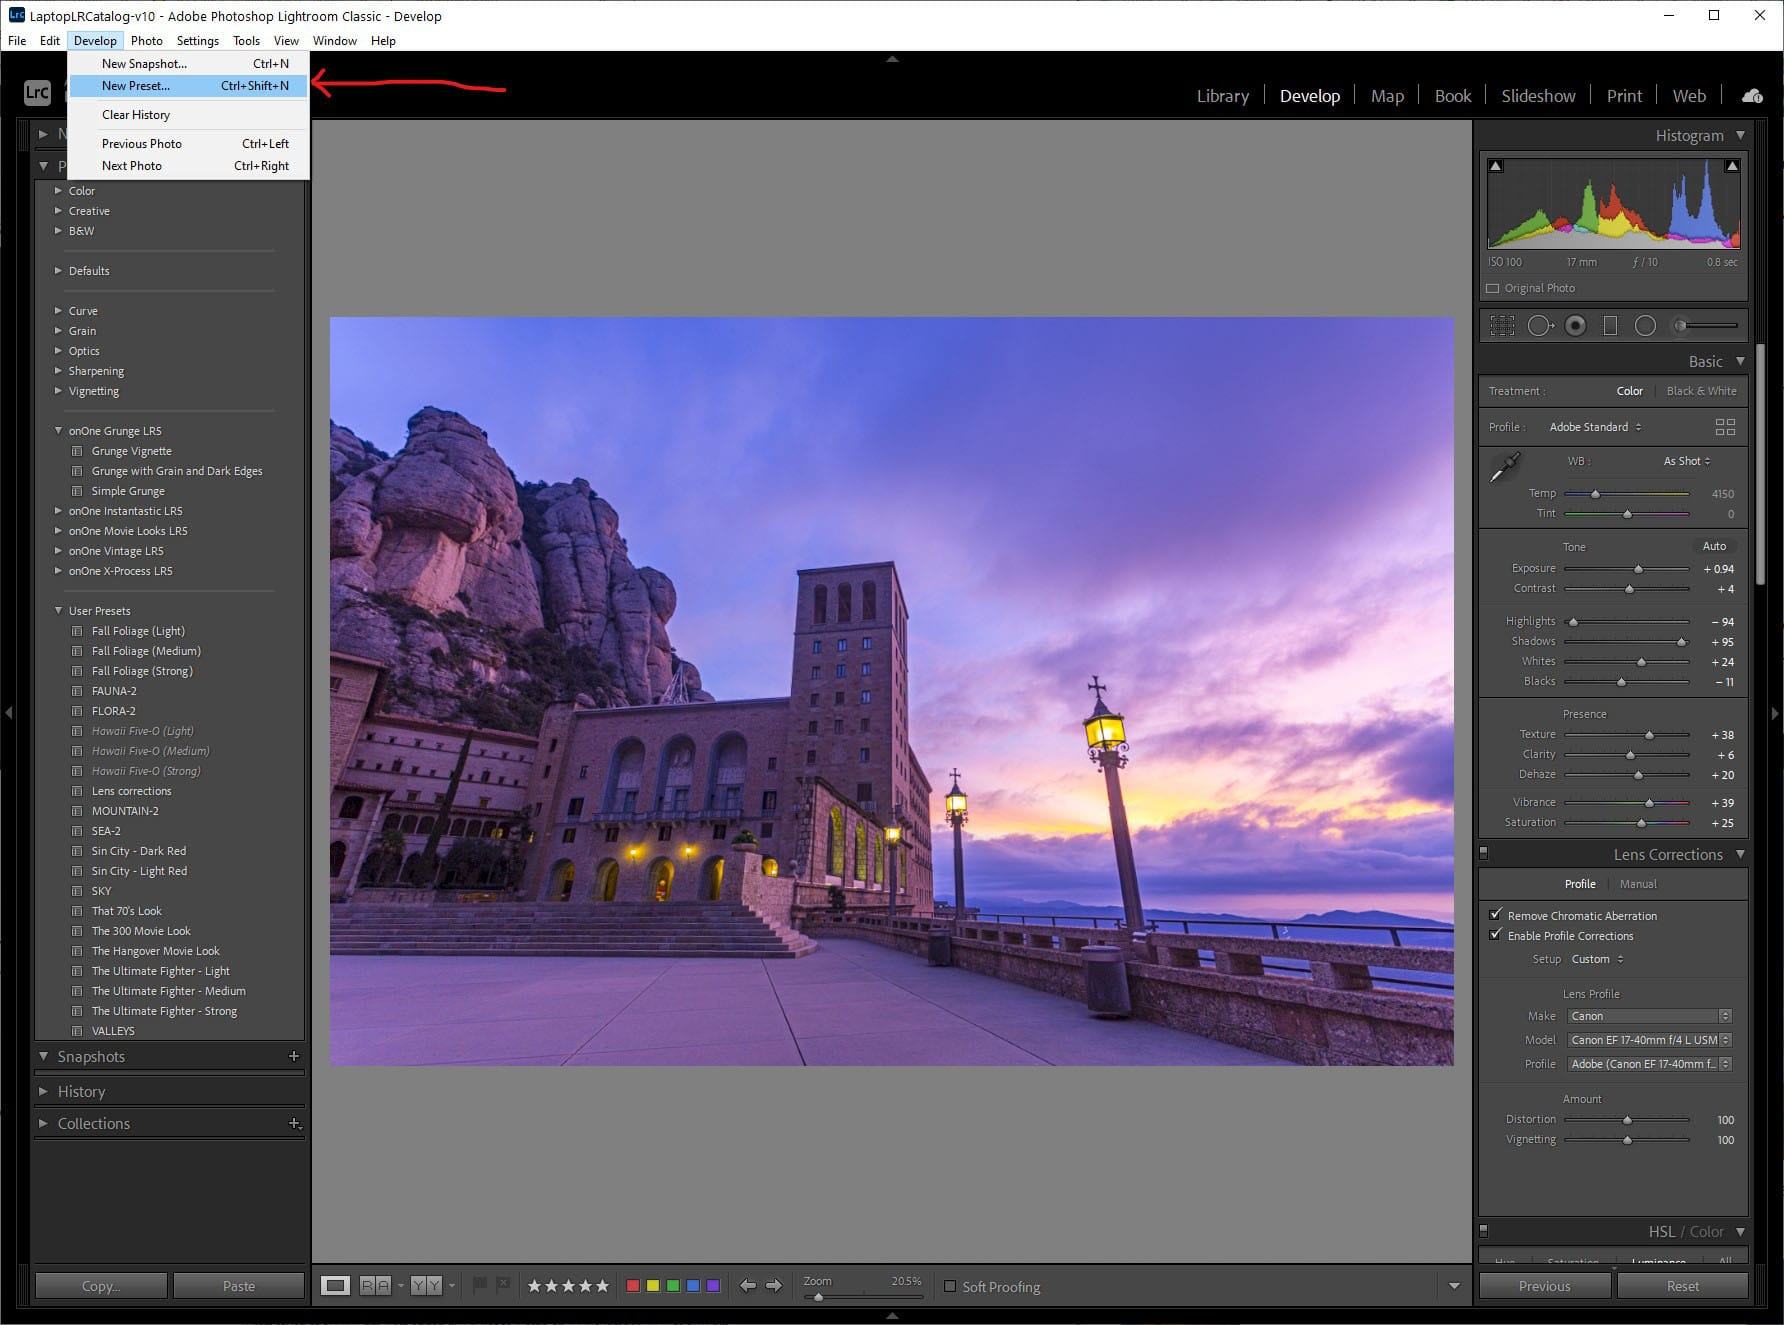
This will popup a window title “New Develop Preset”. Here, you can choose exactly which of the edits you want to save to your preset. By default all the edits will be applied, which is a good starting point. Give your preset a name, and press the “Create” button at the bottom. The preset will now appear in your preset tab down the left hand side of the develop module.
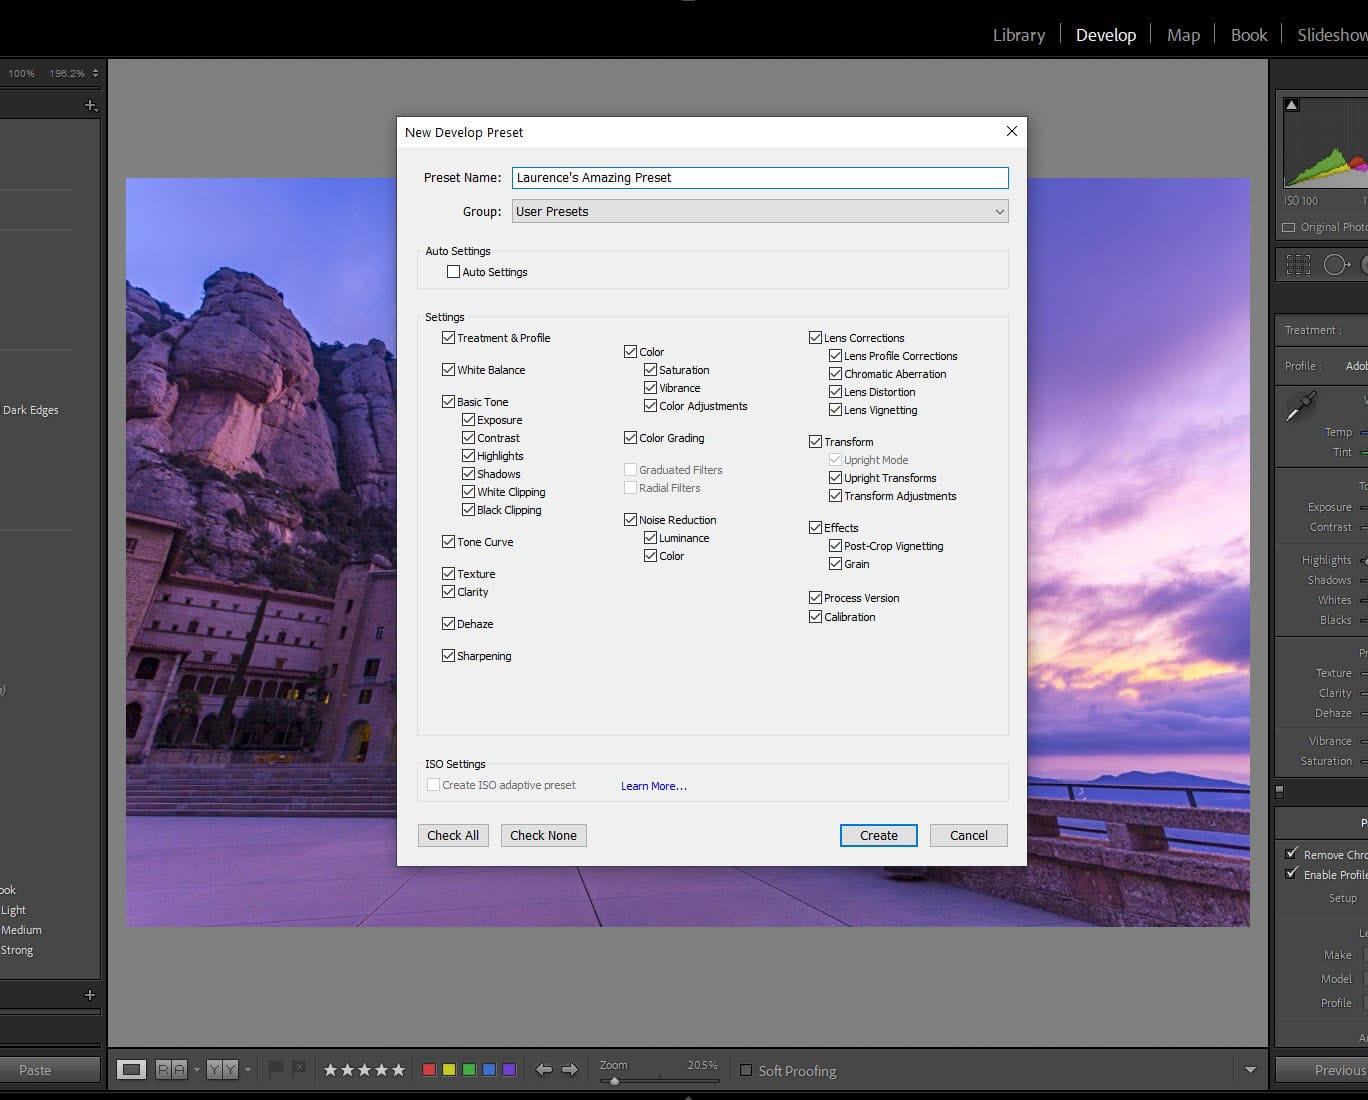
If you are just using the preset for your own use, you are now done! However, if you want to share the preset with other photographers, you have to export it from Lightroom.
To do so, from the develop module, just right click (control-click on Mac) on the preset or group of presets that you want to export. A window will popup where you can choose where to save it. You will now have a preset file that you can share with other photographers.
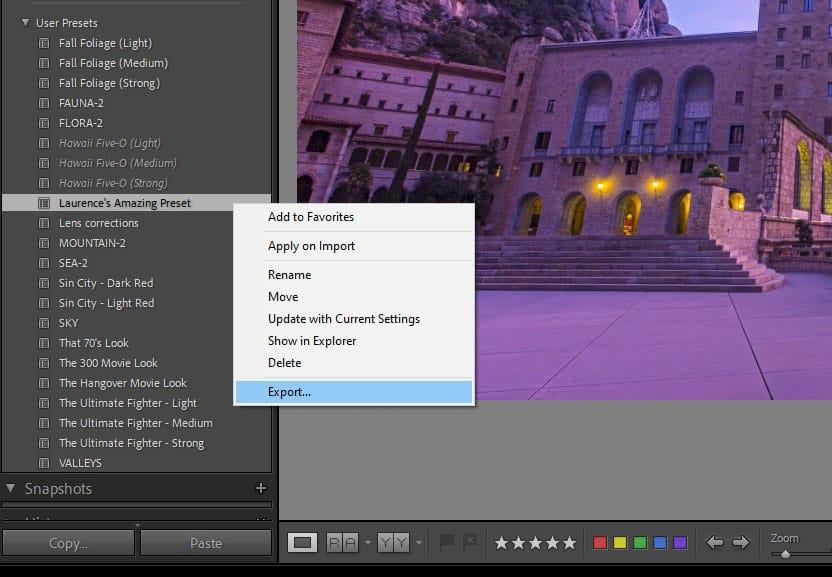
Other photographers can then install your preset using the instructions for installing Lightroom presets outlined above.
Can you use Lightroom Presets on Lightroom for Smartphones?
Lightroom for smartphones comes with a number of presets, however, you can also import your Lightroom Classic presets into Lightroom.
Doing so requires you to first install Lightroom CC (not Lightroom Classic) on your computer. This will import your presets into Lightroom CC, which will then automatically synchronise them with Lightroom mobile. You can see more detailed instructions on the Adobe website here.
You can then access them when editing an image in Lightroom on your mobile phone by pressing the preset button.
Can you use Lightroom Presets in Other Software?
Lightroom is not the only photography editing application, and we have put together a guide to our favourite Lightroom alternatives here.
Like Lightroom, many of these applications support pre-configured develop styles, although they might have different names. For example. Luminar calls them “looks”. On1 also calls them presets.
Unfortunately, presets created for Lightroom are not compatible with other software. The good news is that the majority of photo editing applications on the market have free presets, or equivalent, available. Some of these come with the product, whilst others can be downloaded from the internet.
Further Reading
That’s it for my guide to Lightroom presets. If you found this useful, you might enjoy some of my other photography content. Here are some articles to get you started.
- We have a guide to how to use a compact camera, how to use a DSLR camera, and how to use a mirrorless camera. We also have a guide to how a DSLR works
- Knowing how to compose a great photo is a key photography skill. See our guide to composition in photography for lots of tips on this subject
- We have a guide to what depth of field is and when you would want to use it.
- We are big fans of getting the most out of your digital photo files, and do to that you will need to shoot in RAW. See our guide to RAW in photography to understand what RAW is, and why you should switch to RAW as soon as you can if your camera supports it.
- You’re going to need something to run your photo editing software on. See our guide to the best laptops for photo editing for some tips on what to look for.
- If you’re looking for more advice on specific tips for different scenarios, we also have you covered. See our guide to Northern Lights photography, long exposure photography, fireworks photography, tips for taking photos of stars, and cold weather photography.
- Color accuracy is important for photography – see our guide to monitor calibration to ensure your screen is set up correctly.
- If you’re looking for a great gift for a photography loving friend or family member (or yourself!), take a look at our photography gift guide,
- If you’re in the market for a new camera, we have a detailed guide to the best travel cameras, as well as specific guides for the best cameras for hiking and backpacking, the best compact camera, best bridge camera, best mirrorless camera and best DSLR camera. We also have a guide to the best camera lenses.
- If you want a camera or lens, but the prices are a bit high, see our guide to where to buy used cameras and camera gear for some budget savings options.
- We have a guide to why you need a tripod, a guide to choosing a travel tripod, and a round-up of our favourite travel tripods
Looking to Improve Your Photography?
If you found this post helpful, and you want to improve your photography overall, you might want to check out my online travel photography course.
Since launching the course in 2016, I’ve already helped thousands of students learn how to take better photos. The course covers pretty much everything you need to know, from the basics of how a camera works, through to composition, light, and photo editing.
It also covers more advanced topics, including astrophotography, long exposure photography, flash photography, and HDR photography.
You get feedback from me as you progress, access to webinars, interviews and videos, as well as exclusive membership of a Facebook group where you can get feedback on your work and take part in regular challenges.
It’s available for an amazing one-off price for lifetime access, and can also be bought as a gift if you know someone who would love to learn photography. Find out more by clicking here.
And that’s it! I’d love to hear about your thoughts on Lightroom presets, and am happy to answer any questions you have. Just pop them in the comments below and I’ll get back to you as soon as I can.
Leave a Reply