
I’ve been shooting landscapes professionally for fifteen years, and I’ve learned that the gear matters less than most people think and the planning matters more. Most of the photos in this guide were shot on the same body and two lenses. Some of them were shot ten years ago, some last year, and you’d struggle to spot which is which without checking the EXIF.
This is a working photographer’s guide to landscape photography, not a comprehensive gear list. It runs from camera settings and composition through to the best time of day to shoot, location planning, filters, and editing, with a frequently-asked-questions section at the end. Every example image comes with the camera body, lens, and exact settings I used to take it, because I think that’s more useful than a generic “use f/8” recommendation.
If you’ve come here for a shortcut answer: I shoot most landscapes at f/8 to f/11, ISO 100, on a tripod, in the hour either side of sunrise or sunset. The rest of this article is the why and the how behind that.
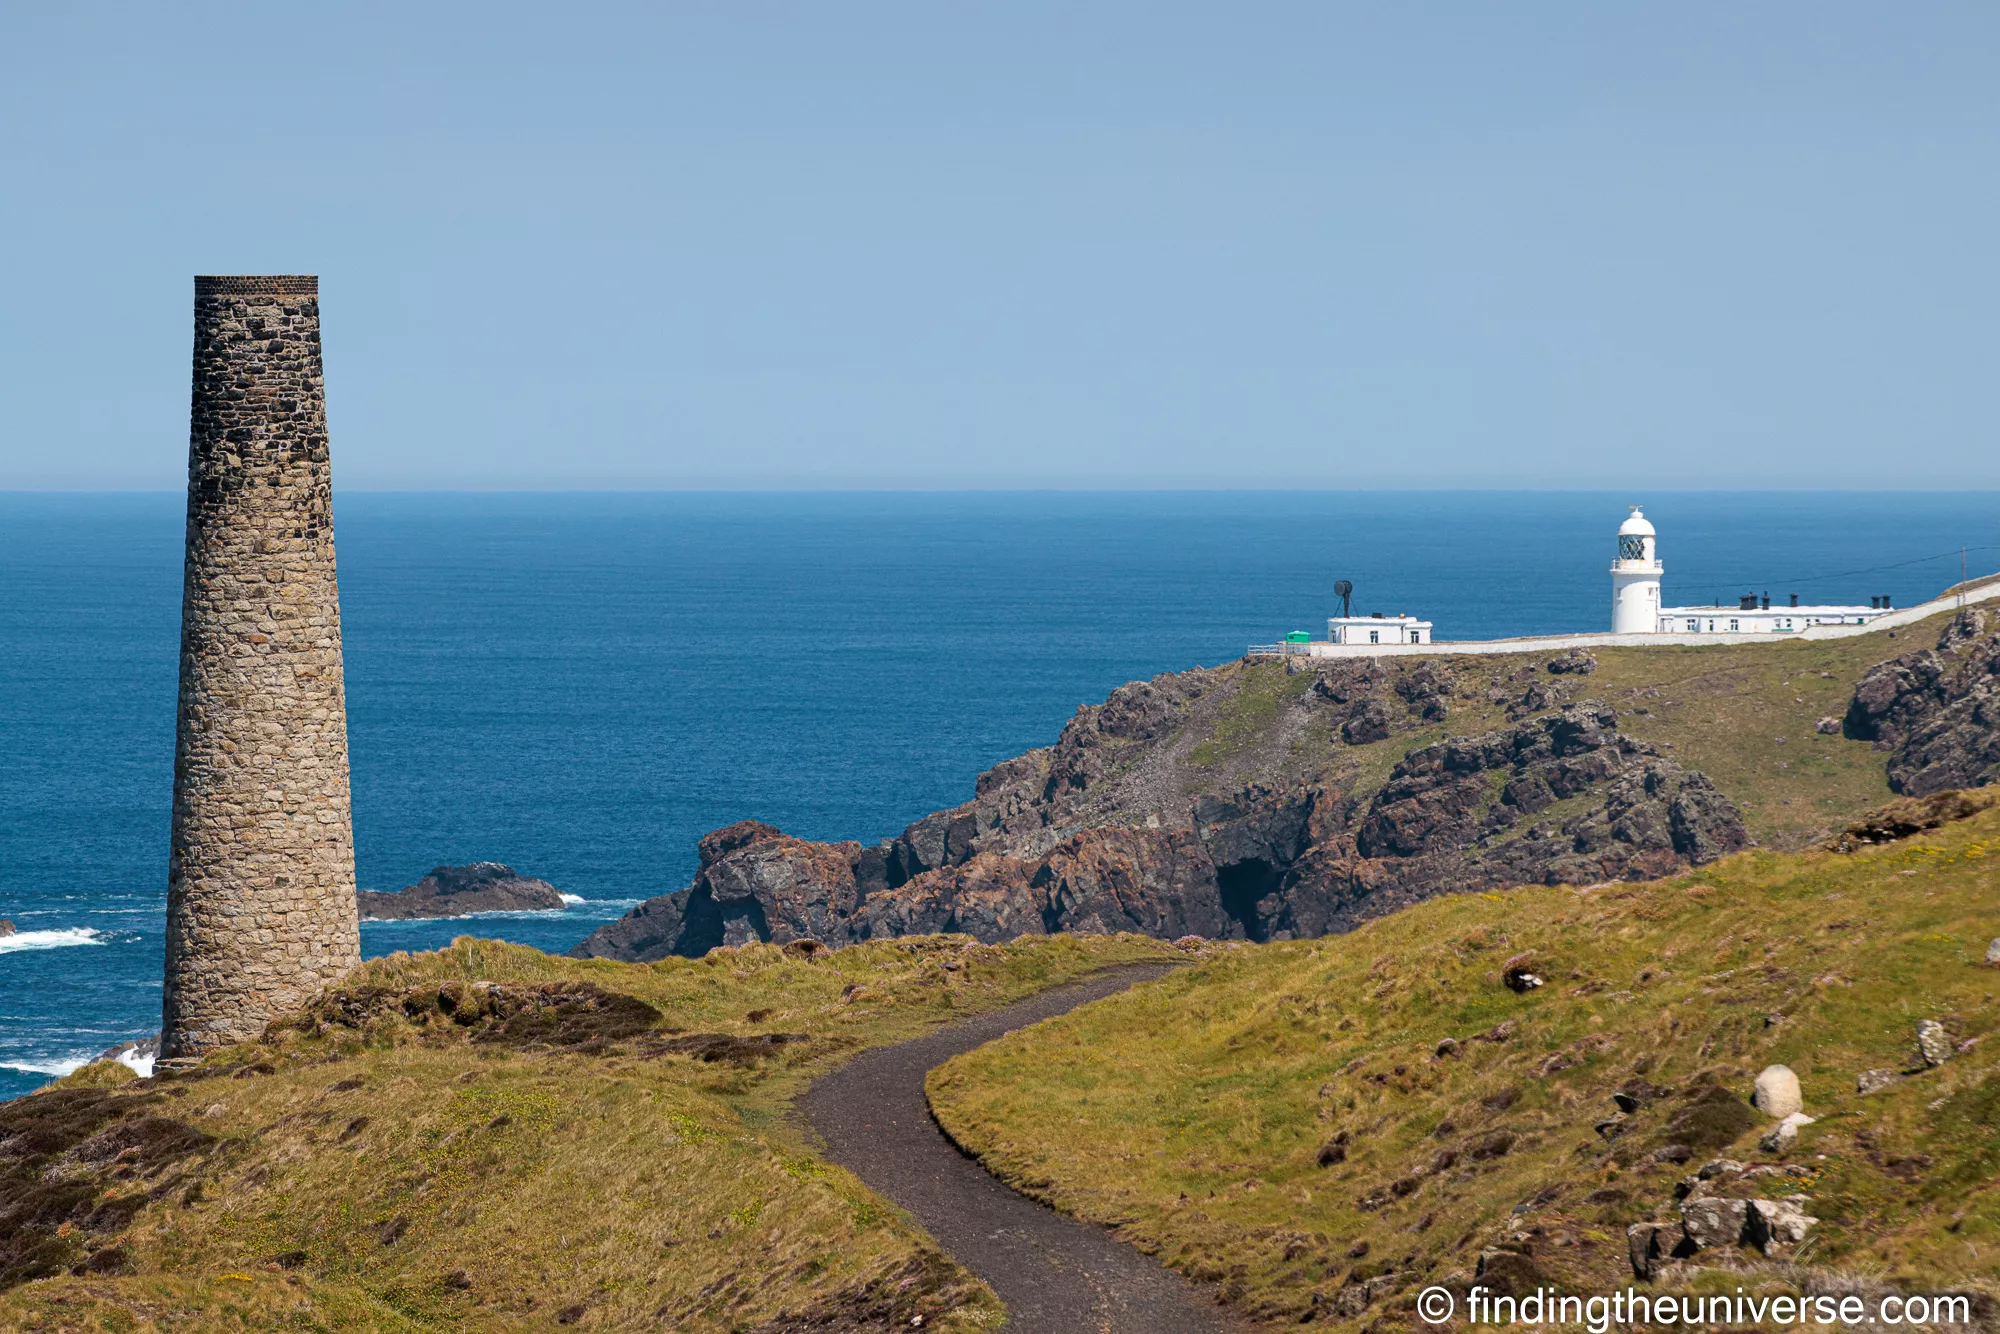
Cornish coastline near Land’s End, England. Canon EOS R5, EF 70-200mm f/2.8L IS II + 2x extender at 260mm, 1/640s, f/10, ISO 320.
Table of Contents:
What I Actually Shoot Landscapes On
Before getting into settings, it’s worth showing you the kit. Most landscape tutorials open with a list of cameras and lenses they think you should buy. I’d rather show you what’s in my bag and let you draw your own conclusions.
Every photo in this article was taken on one of two bodies: a Canon 6D (my workhorse from 2013 to 2020) or a Canon EOS R5 (the one I use now). Same Canon family, ten years apart, same EF mount lenses on both. The R5 takes EF lenses through the EF-RF adapter, which is invisible in use. There’s really no urgent reason to replace working EF glass with RF equivalents. The adapter doesn’t compromise anything, the lenses are still excellent, and second-hand EF prices keep falling.
The two lenses that did the heavy lifting are the Canon EF 16-35mm f/4 IS and the Canon EF 70-200mm f/2.8 IS II L. The 16-35 is my wide-angle, which replaced an older EF 17-40mm f/4L. It’s wide enough for sweeping vistas and waterfalls, and light enough to walk all day with. The 70-200 is my telephoto and my most-used landscape lens by some margin. Pair it with a Canon EF 2x III extender and it reaches 400mm, which is what I use to compress moons against mountains and to pull distant peaks closer.
For safari and wildlife-landscape crossover work I add a Canon EF 100-400mm f/4.5-5.6L IS II USM. That’s optional kit, not a landscape essential.
Body-wise the R5 has been my main camera for landscapes since 2020. The full review is in our Canon EOS R5 review. If you’re shopping today, the Canon EOS R5 Mark II is the natural successor, with the Canon EOS R6 Mark III as the lower-priced alternative. (My original R5 is still going strong, by the way, so there’s no urgency to upgrade if you already have one.)
I carry the kit in a Vanguard Alta Sky 51D backpack (the current model; mine is the discontinued 49). Tripod is a Vanguard VEO travel tripod. Both come up again later.
What if you don’t have any of that?
Use what you’ve got. The best camera for landscape photography is the one you’ll actually carry, and the one you’ve already practised with. If your phone is what comes out of your pocket on a hike, learn to shoot landscapes on the phone. The composition principles in this article apply just the same.
If you’re upgrading and you don’t have a system yet, I’d point you at a full-frame mirrorless body with a wide-angle zoom in the 16-35mm range. The body matters less than people think (sensors have been good enough for landscape work for at least a decade), but a decent wide-angle zoom really does make a difference. For ITC’s full breakdown across systems, see our guides to the best mirrorless cameras for travel photography and the best DSLR cameras for travel photography.
For a deeper dive on what to look for in a lens, see our guide to the best lenses for travel photography, and on bodies more broadly the best travel cameras guide. If budget is tight, our guide to buying used camera gear is the place I’d start.
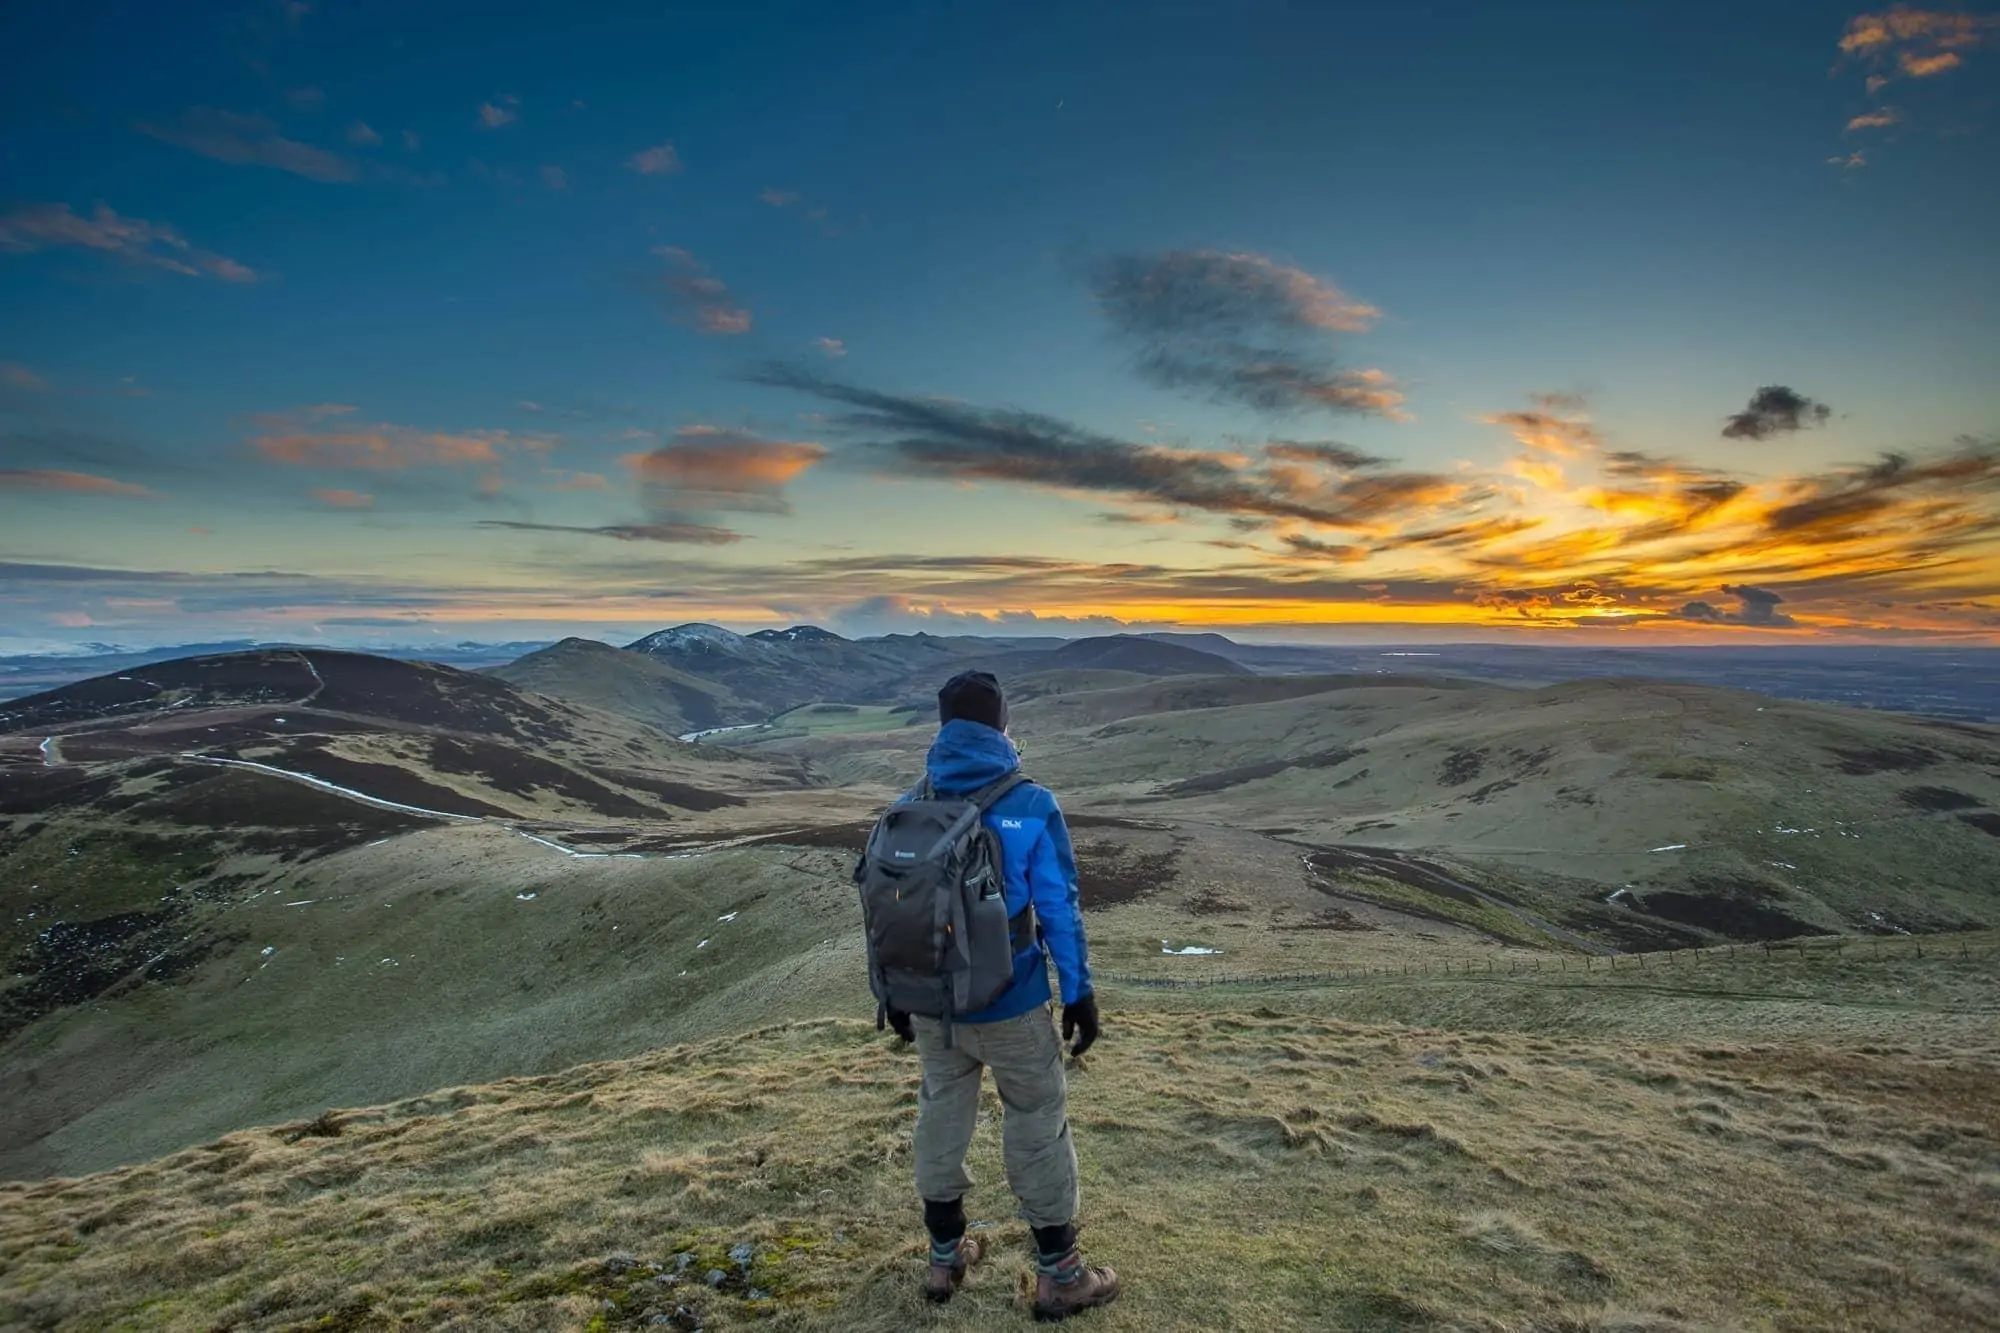
The kit on a hill. Vanguard Alta Sky bag and Vanguard VEO tripod, Allermuir Hill, Pentland Hills, Scotland. Canon EOS 6D, EF 17-40mm f/4L at 17mm, 1/80s, f/8, ISO 100.
Camera Settings for Landscape Photography
If you want one set of starting settings to use as a default and adjust from there, this is mine:
- Aperture: f/8 to f/11
- ISO: 100
- Shutter speed: whatever the meter calls for, on a tripod
- File format: RAW (or RAW + JPEG)
- Focus: single-point autofocus, focused roughly a third of the way into the scene
That’ll get you a sharp, clean, full-depth-of-field landscape in most conditions. The why is below.
Aperture: f/8 to f/11 is the sweet spot
Most landscapes want everything in focus, from foreground to distant mountains. That means a relatively narrow aperture. I default to f/8 to f/11 because that’s where most lenses are at their sharpest and where you have enough depth of field to keep the whole scene crisp.
You can stop down further to f/16 or f/22 if you’ve got significant near-foreground interest, but at very narrow apertures most lenses lose sharpness to diffraction, so I treat f/16 as the practical limit and only go to f/22 when I want to slow the shutter for a long-exposure effect.
For a deeper look at this, see my guide to depth of field.
Hoodoos at Tent Rocks (Kasha-Katuwe), New Mexico. Telephoto compression with deep depth of field. Canon EOS 6D, EF 70-200mm f/2.8L IS II at 70mm, 1/320s, f/13, ISO 200.
ISO: keep it low
Higher ISO means more digital noise. For landscape photography you almost always have a tripod, which means you can use a long shutter speed and keep ISO at base (100 on most cameras). Stay there unless you have a specific reason to go higher (handheld, fading light, astro work).
The exception is night and astrophotography. For my aurora shots in northern Finland I run ISO 3200 on an 8-second exposure at f/5. Modern full-frame sensors handle 3200 cleanly enough that you’d be hard pushed to spot the noise once edited.
Shutter speed: dictated by everything else
With ISO and aperture locked, shutter speed is whatever the meter wants. On a tripod, this can be 1/30s, 1s, 30s, anything. The shutter speed is also a creative choice: a 5-second exposure of a waterfall blurs the water into mist, where 1/500s freezes every droplet.
If you’re handholding rather than on a tripod, the rule of thumb is your shutter speed needs to be at least 1/(focal length) to avoid motion blur. So at 200mm, 1/200s is the minimum. Image stabilisation helps you push that lower, but it’s not magic, and it doesn’t help if your subject is moving.
Why RAW
RAW files preserve all the sensor data your camera captured, where JPEGs throw most of it away. That gives you huge latitude in editing. You can recover blown highlights, lift deep shadows, and fix white balance after the fact. JPEGs let you do almost none of this.
The downside is RAW files are large and need processing software (Lightroom, Capture One, free options like Darktable). For the few seconds of extra work per image, the headroom is worth it. For more, see our guide to RAW in photography.
If the relationship between aperture, ISO, and shutter speed is new to you, our guide to the exposure triangle is the place to start.
How to Compose a Landscape Photo
Settings get you a technically sound image. Composition is what makes it a photo someone wants to look at.
There are no fixed rules in composition, only conventions that tend to produce images that work. The four conventions below cover most of what I think about when I’m framing a landscape. For a fuller treatment, see my photography composition guide.
Rule of thirds
Imagine your frame divided into nine equal rectangles by two horizontal lines and two vertical lines. Place the important elements of your scene on those lines, or at the four points where they cross. For a landscape with a strong horizon, that usually means putting the horizon on the upper third (sky-heavy) or lower third (foreground-heavy), not dead-centre.
Most cameras and phones can overlay this grid in the viewfinder or display. Turn it on. Even after years of shooting, I still find it a pretty useful sanity check.
Leading lines
A road, a river, a fence line, a stone wall: anything that draws the eye through the frame towards your subject. The eye follows lines naturally, so a well-placed leading line gives the viewer a path into the photo.
The road into Glen Etive, off the A82 in Glen Coe, Scotland. The road acts as a leading line into the glen. Canon EOS 6D, EF 17-40mm f/4L at 17mm, 1/50s, f/11, ISO 100.
The Glen Etive shot above is one of my most-used examples for this. The single-track road runs from the foreground deep into the glen, doing all the compositional work for you. I shot it on a January morning, just off the main A82.
Foreground interest
A landscape shot with nothing in the immediate foreground often feels a bit flat. Adding something to anchor the bottom of the frame (rocks, flowers, a boat, a stone wall) gives the eye somewhere to start and creates a sense of depth. With a wide-angle lens at f/11 to f/16, you can get both the foreground anchor and the distant landscape sharp.
Subject placement and spacing
Whatever your subject is (a lone tree, a peak, a person), make sure it has room to breathe. If it’s surrounded by other elements, the eye doesn’t know where to settle.
An easy way to think about this: readingasentencewithoutspacesisachore. Reading a sentence with proper spacing is effortless. The same applies to images. Give your subject room.
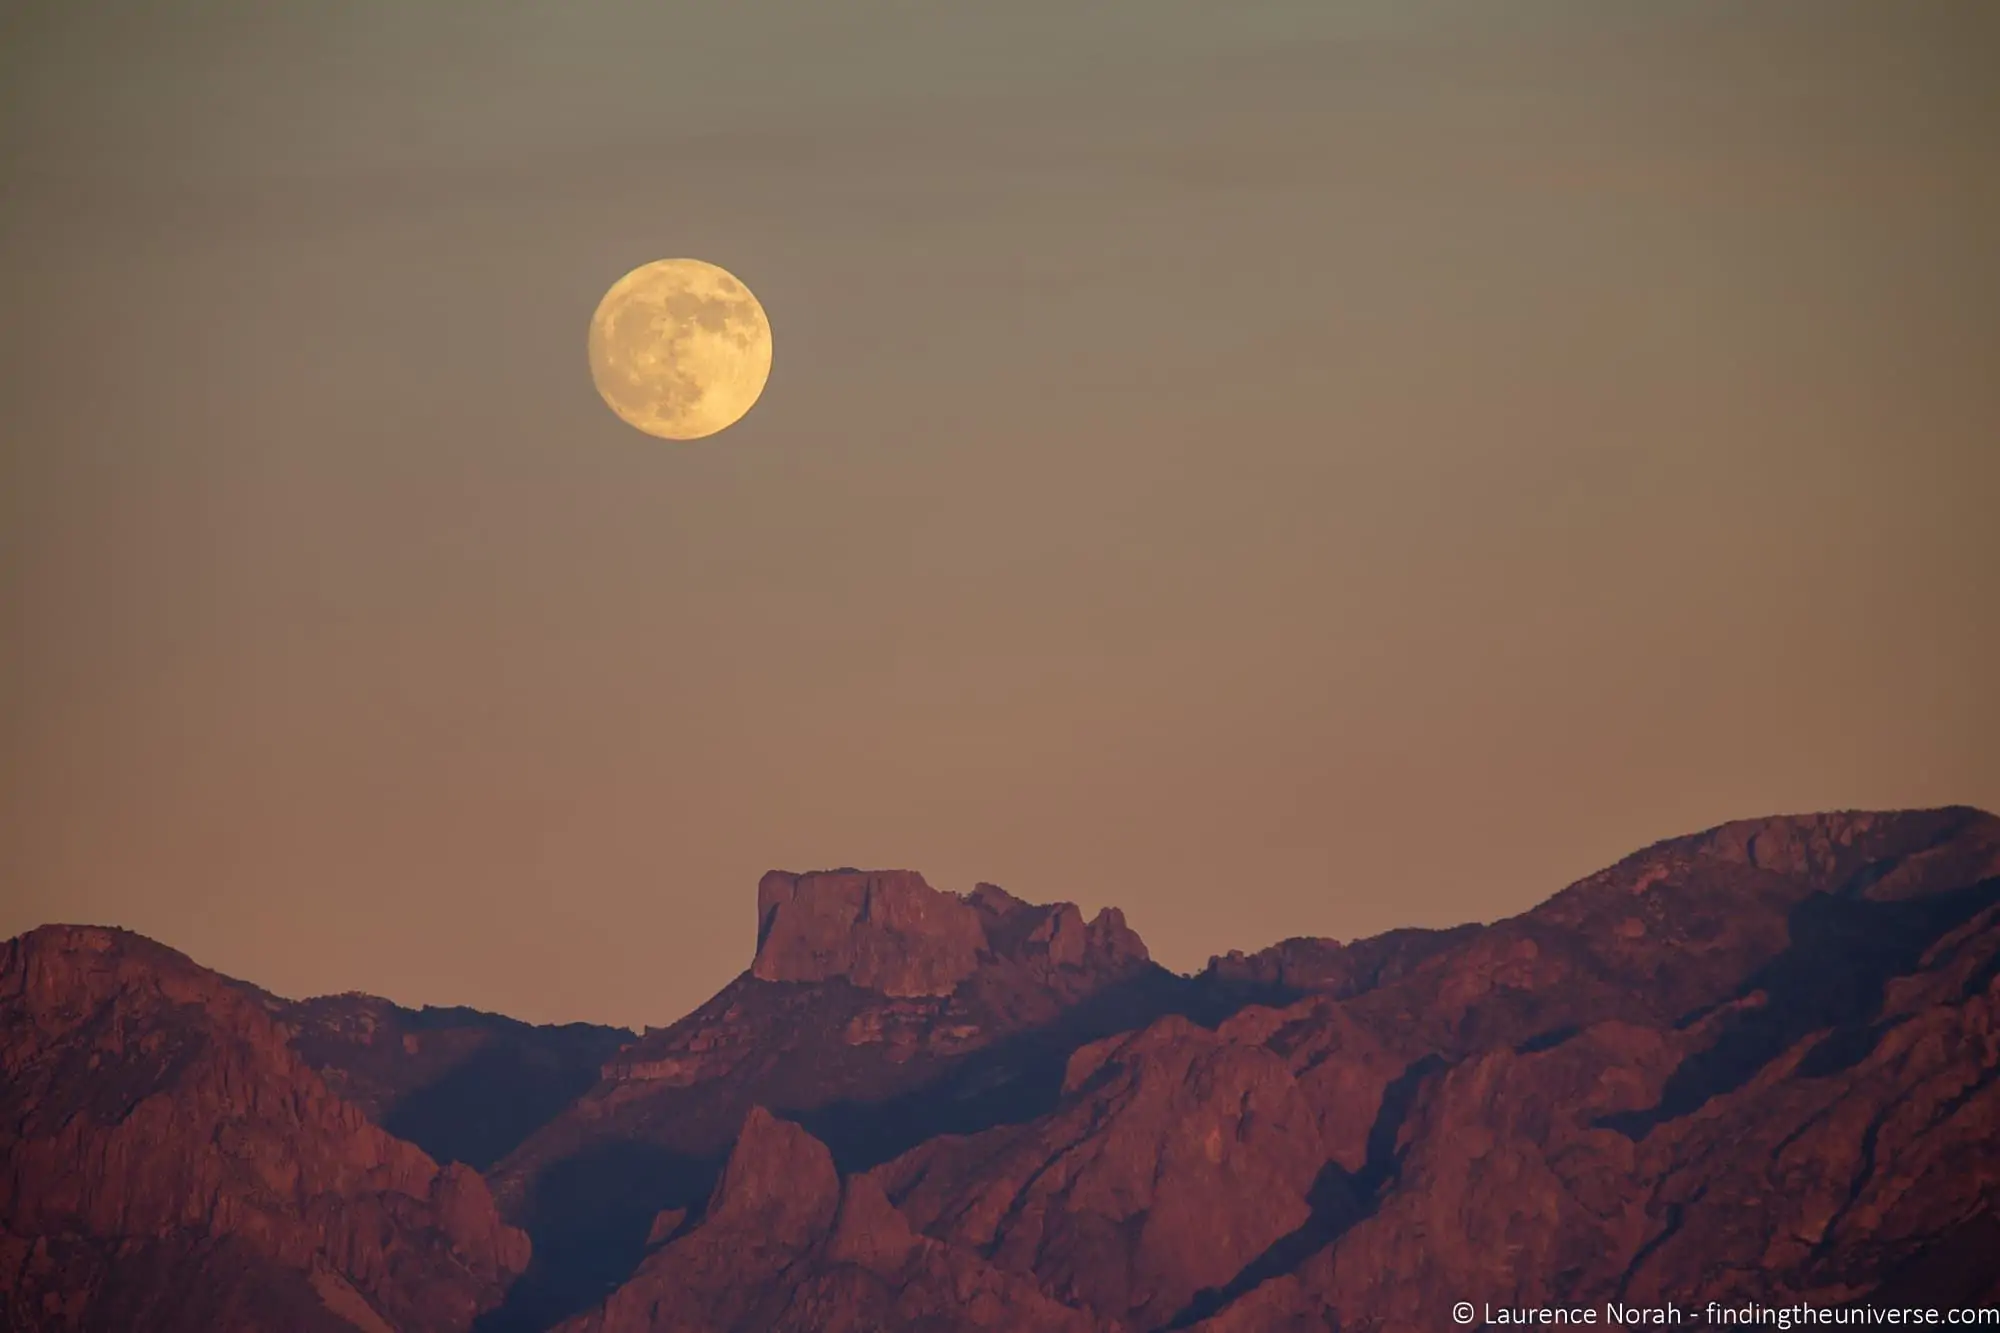
Moonrise over the Chisos mountains, Big Bend National Park, Texas. Telephoto compression makes the moon look enormous against the ridge. Canon EOS 6D, EF 70-200mm f/2.8L IS II + 2x extender at 400mm, 1/250s, f/5.6, ISO 200.
That moonrise shot is a good example of two things: subject placement (the moon sits on the upper-third intersection rather than the centre) and lens compression. At 400mm, distant elements like the moon and the mountain ridge get pulled together into the frame, making the moon look much larger than it does to the naked eye. Wide-angle lenses do the opposite. They push things apart.
The Best Time of Day for Landscape Photography
The hour around sunrise and sunset is called golden hour for a reason. The sun is low, the light is warm, the shadows are long, and there’s structure to the scene that midday flat light just doesn’t have. If you shoot landscapes at any of the obvious dawn-and-dusk windows for a week, your hit rate will go up dramatically without changing anything else about your technique.
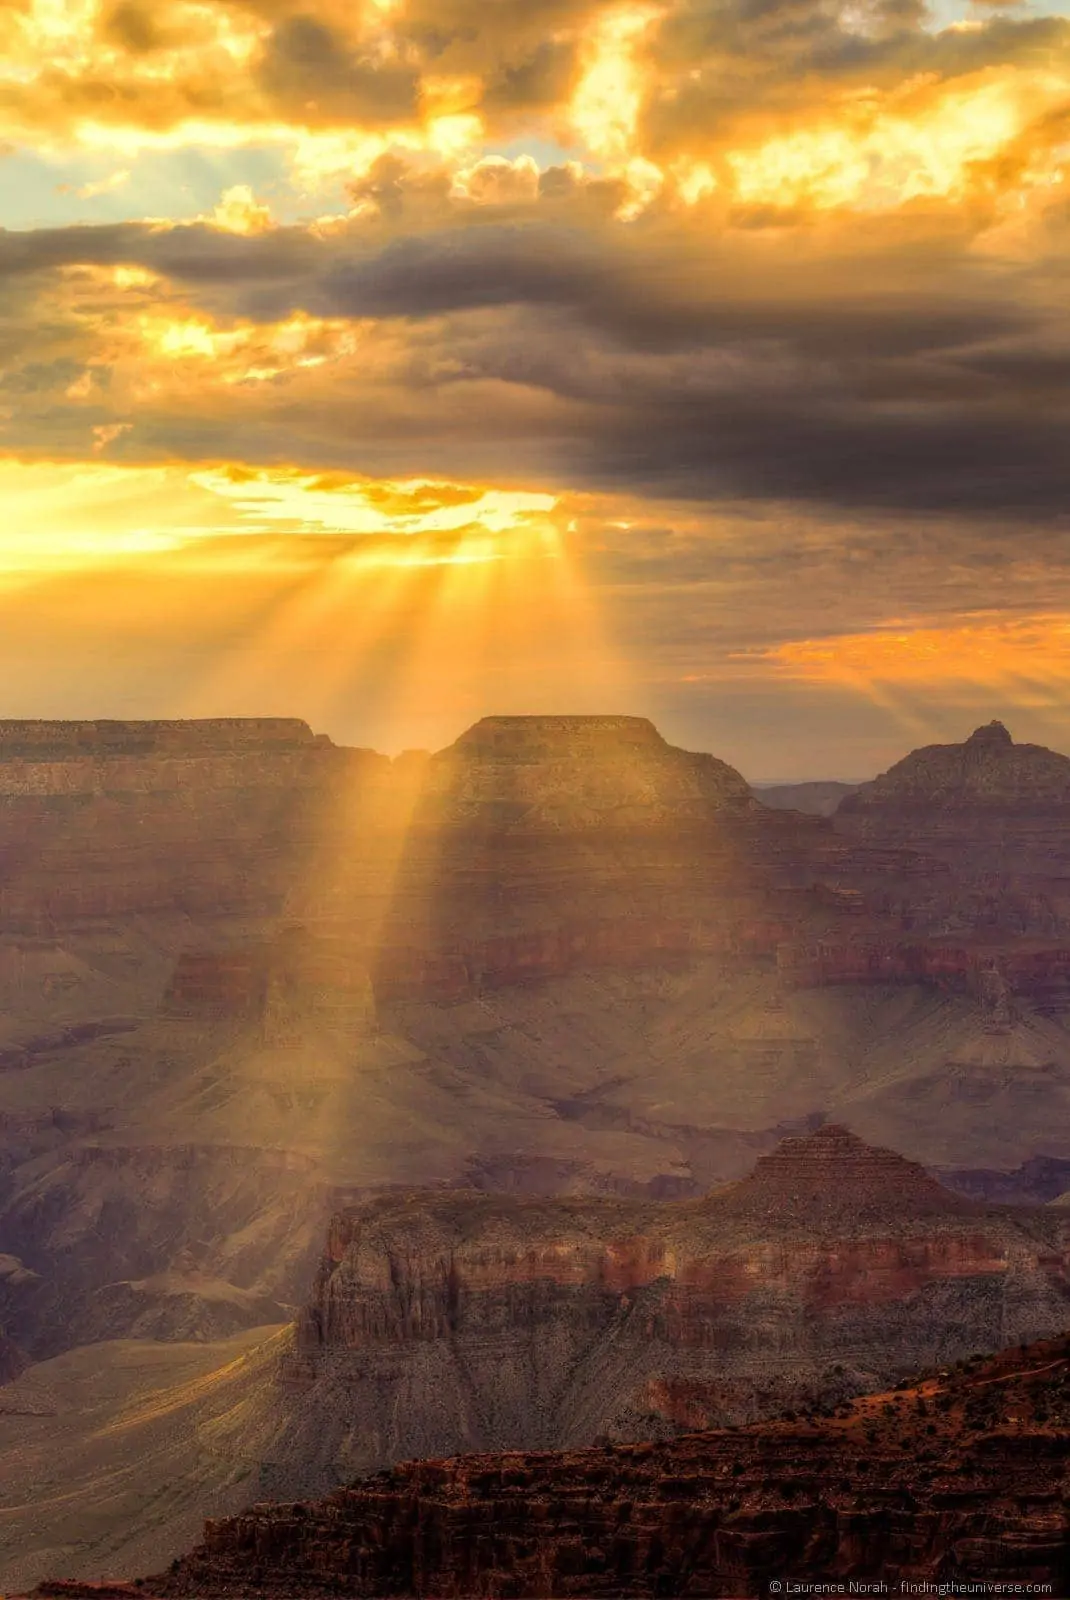
Sunrise at Mather Point, Grand Canyon South Rim, Arizona. Canon EOS 6D, EF 70-200mm f/2.8L IS II at 70mm, 1/160s, f/7.1, ISO 125.
Blue hour
The half-hour before sunrise and after sunset is blue hour, when the sky takes on cool blue and purple tones. It’s particularly useful for cityscapes (the city lights have come on, but there’s still light in the sky for context) and for shooting reflective water.
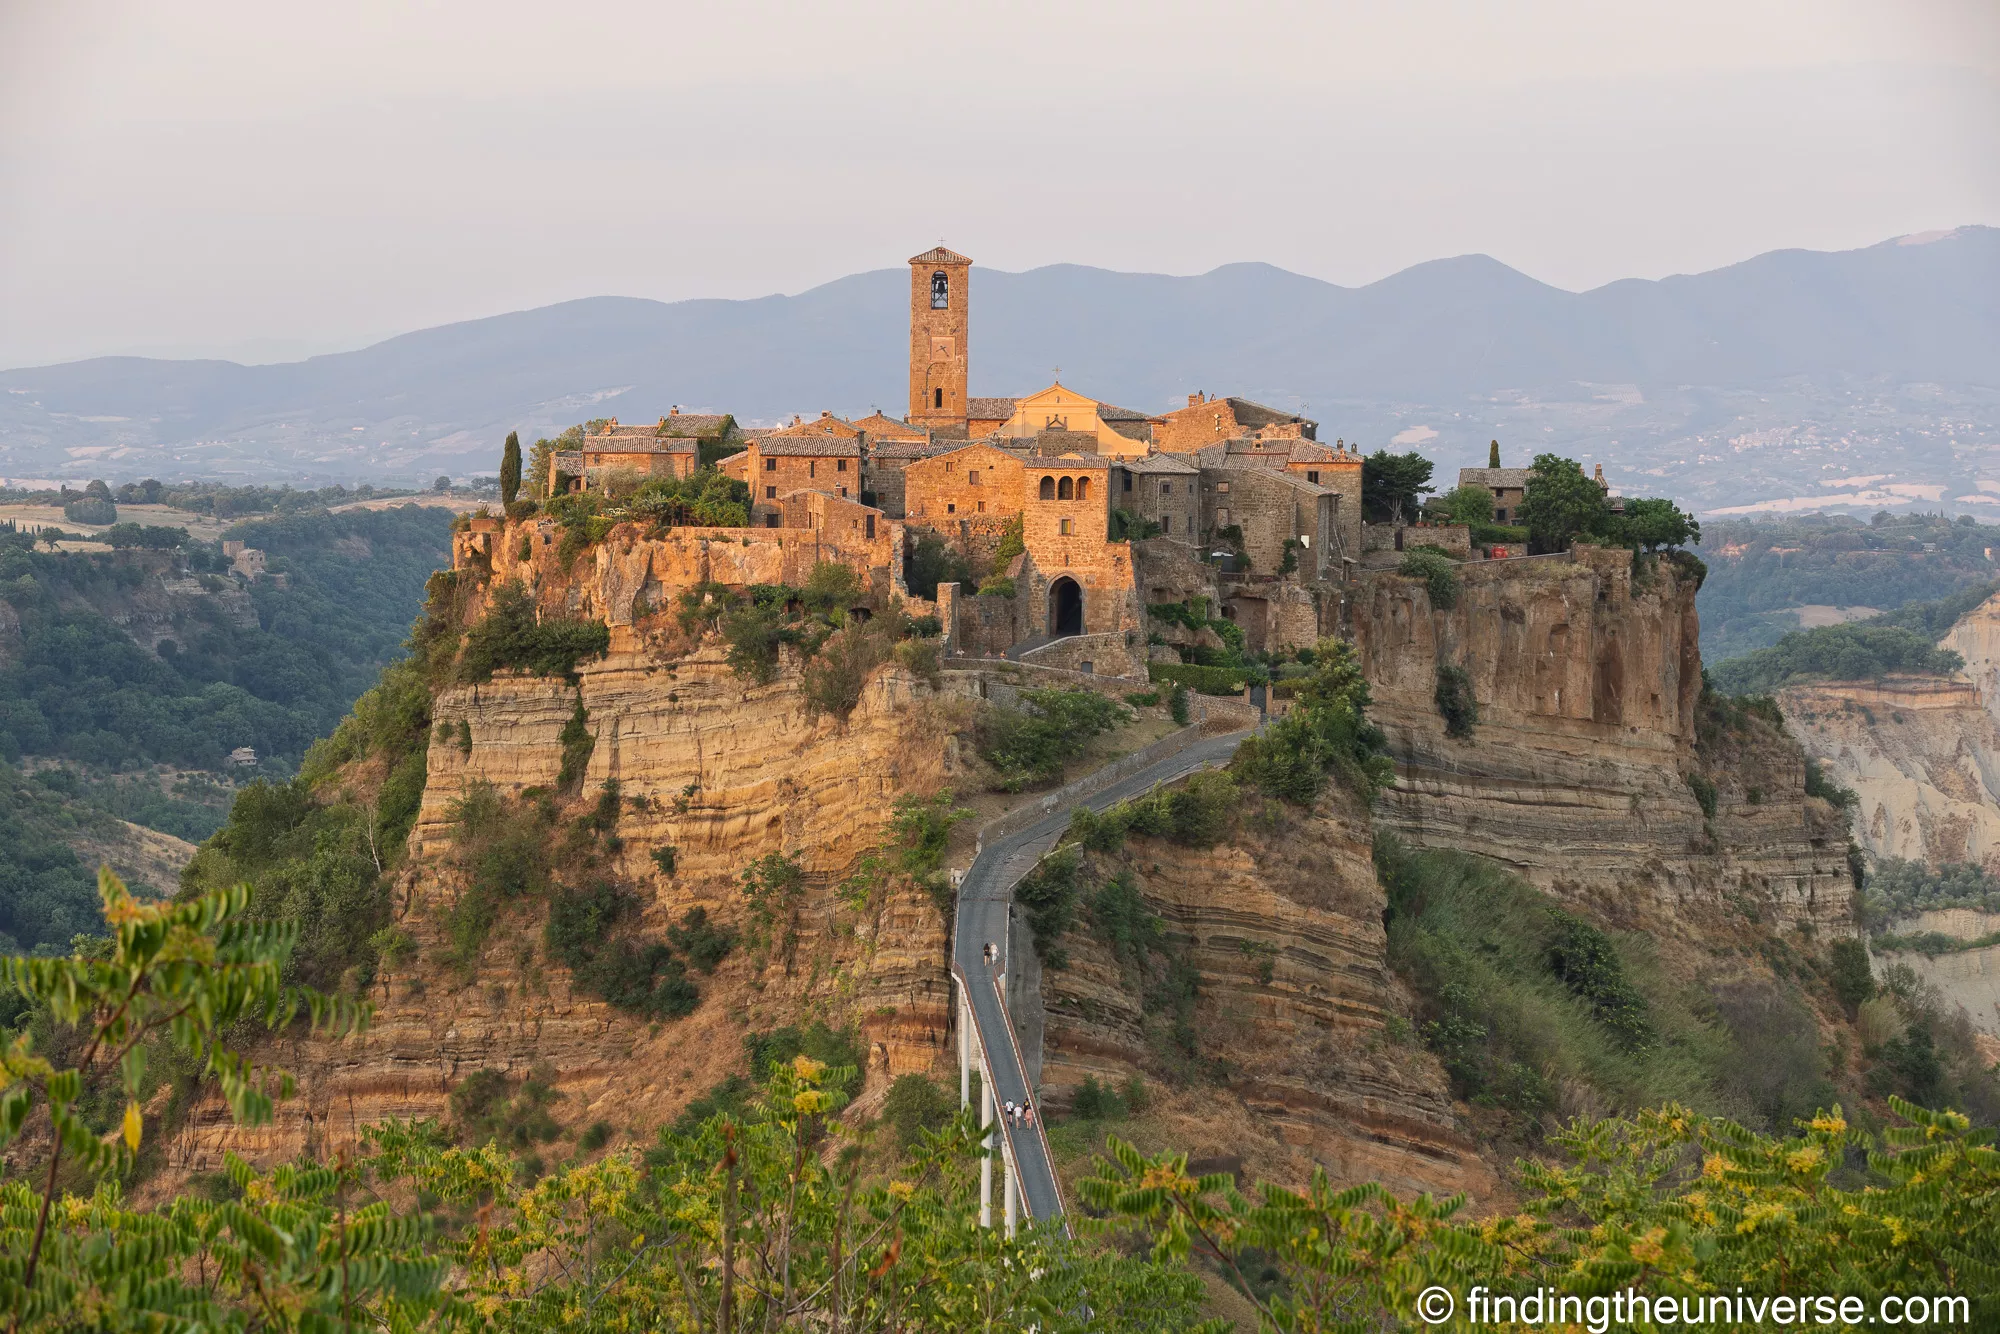
Civita di Bagnoregio, Lazio, Italy. Sunset light on the medieval hilltop town. Canon EOS R5, EF 70-200mm f/2.8L IS II at 105mm, 1/15s, f/8, ISO 100.
Midday isn’t dead
Conventional wisdom says don’t shoot landscapes at midday. That’s mostly right in summer at temperate latitudes, when the sun is high and the light is harsh. But it’s not universal. In Iceland in winter, the sun barely gets above the horizon, so midday is golden hour. On overcast days the cloud cover diffuses the light into a soft, even wash that works really well for forests and waterfalls regardless of time. Don’t put your camera away just because it’s noon.
Plan around the light
If you’re travelling somewhere specifically to shoot, work out the sunrise and sunset times before you go. The Photographer’s Ephemeris shows you sun and moon position for any location and date, including which direction the light will fall. I check it before any landscape-driven trip.
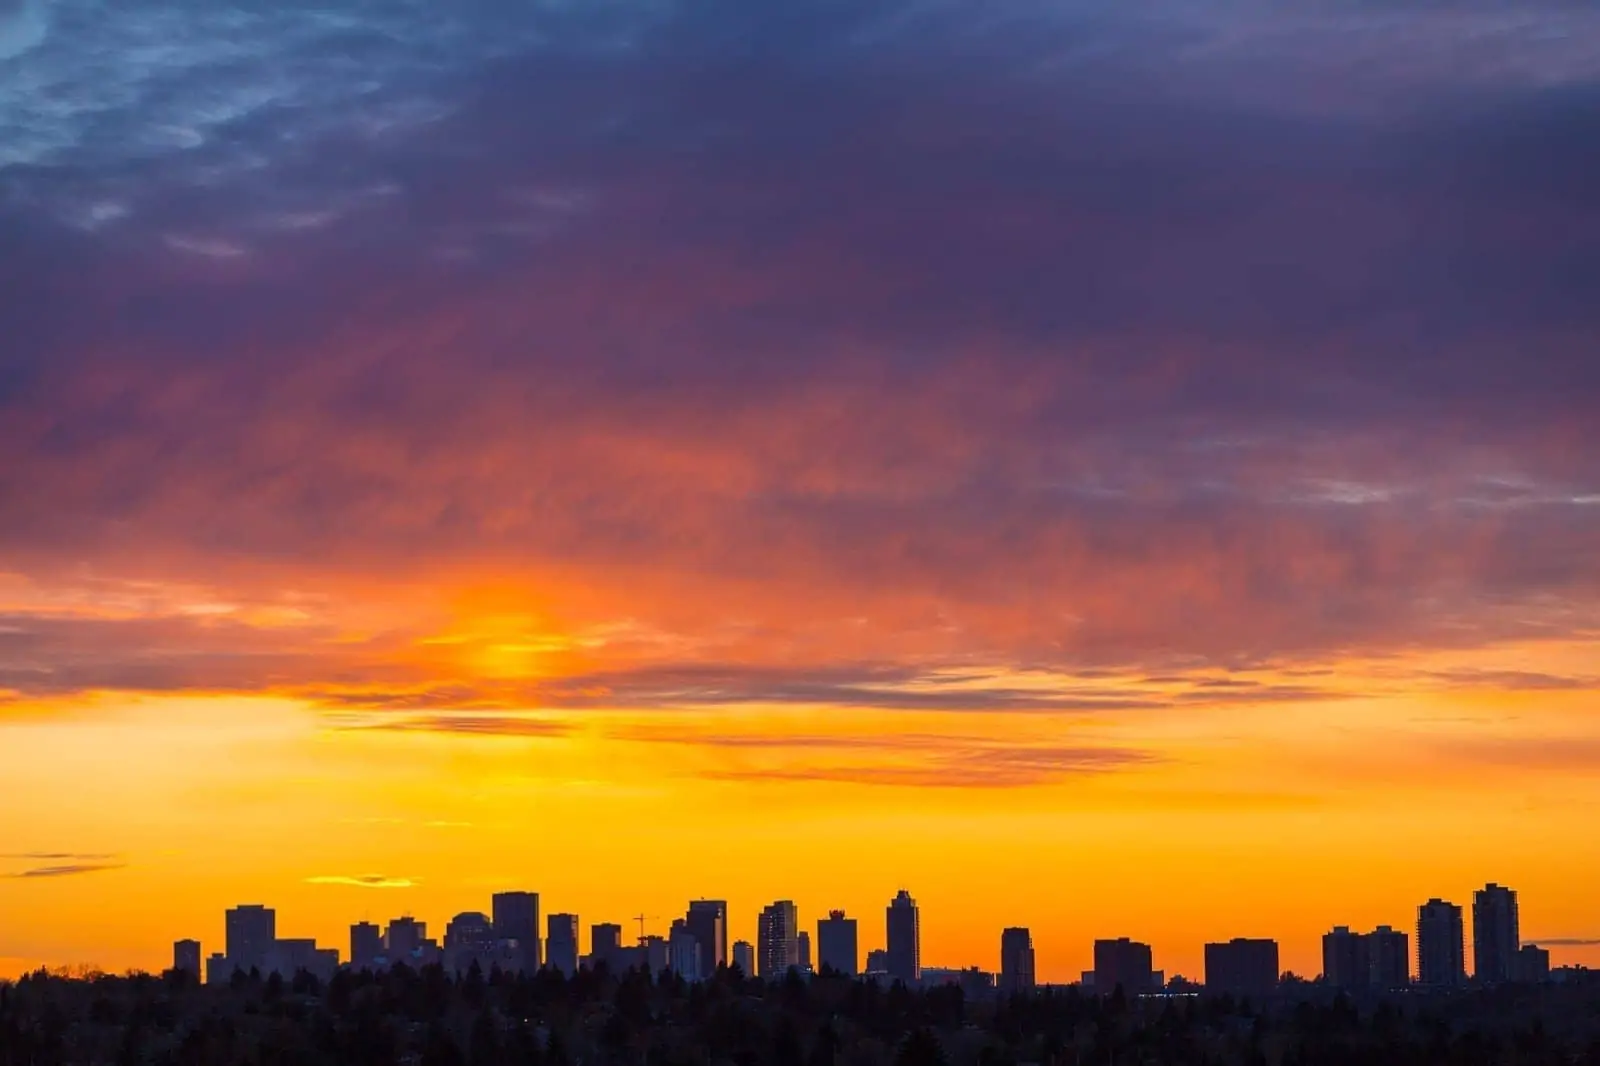
Sunset over the river valley in Edmonton, Alberta, Canada. Canon EOS 6D, EF 70-200mm f/2.8L IS II at 110mm, 1/320s, f/3.5, ISO 125.
Why a Tripod is Worth Carrying
A tripod is the one accessory that makes the most difference to landscape work. Here’s the chain of reasoning:
You want a narrow aperture (f/8 to f/11) for depth of field. You want low ISO (100) for clean files. With those two locked, your shutter speed will often be too slow to handhold without motion blur. A tripod removes that constraint and lets you choose the optimal settings rather than compromising.
Beyond that, a tripod opens up long-exposure photography (anything from a half-second silky-water shot to a multi-minute astro frame) and astrophotography. Once you’ve shot a few long exposures handheld and seen them all blur, the tripod stops feeling optional. The same goes for a set of ND filters, which is what lets you drag those daylight exposures out long enough to blur water and cloud.
I use a Vanguard VEO travel tripod for travel work. It’s light enough to throw in a backpack, and stable enough for an R5 and a 70-200. If you’d rather buy direct, Vanguard’s site has the full range and a discount code (more on that below). For more options, see ITC’s best travel tripods guide, and our piece on why you need a tripod for photography covers the full case.
One note on the bag: I use a Vanguard Alta Sky for landscape work. The 49 (discontinued) is what I use; the Vanguard Alta Sky 51D is the current equivalent. It’s a backpack-style bag with a tripod mount, weather cover, and enough internal volume for the R5, three lenses, filters, batteries, and snacks. I’ve worn mine on full-day hikes and used it as carry-on luggage. Vanguard offer FTU readers 20% off everything on their Vanguard USA, Vanguard UK, Vanguard Spain, and Vanguard Germany stores with code FindingTheUniverse (case sensitive).

Sunset at Baker Beach, San Francisco, with the Golden Gate Bridge to the north. Telephoto compression at the long end. Canon EOS 6D, EF 70-200mm f/2.8L IS II at 105mm, 1/400s, f/2.8, ISO 100.
Lens Filters Worth Carrying
Filters are bits of glass that screw onto the front of your lens or slot into a holder, modifying the light before it hits the sensor. Three are worth carrying for landscape work.
Polariser
A circular polariser cuts reflections (off water, off glass, off wet leaves) and deepens blue skies. It’s the one filter I’d never leave home without. The effect is most pronounced when you’re shooting at right angles to the sun. Pointing directly at or away from the sun, the polariser does very little.
One thing to watch: at very wide focal lengths (under about 18mm) a polariser can produce uneven sky darkening, with one part of the sky much darker than another. Worth checking before you commit to a frame.
Neutral density (ND)
An ND filter cuts the amount of light reaching the sensor, letting you use longer shutter speeds in bright conditions. This is how you get silky waterfalls and blurred-water seascapes in daylight. NDs come in different strengths, measured in stops. A 6-stop ND lets you use a shutter speed 64 times longer than you otherwise could.
For more, see my guide to neutral density filters.
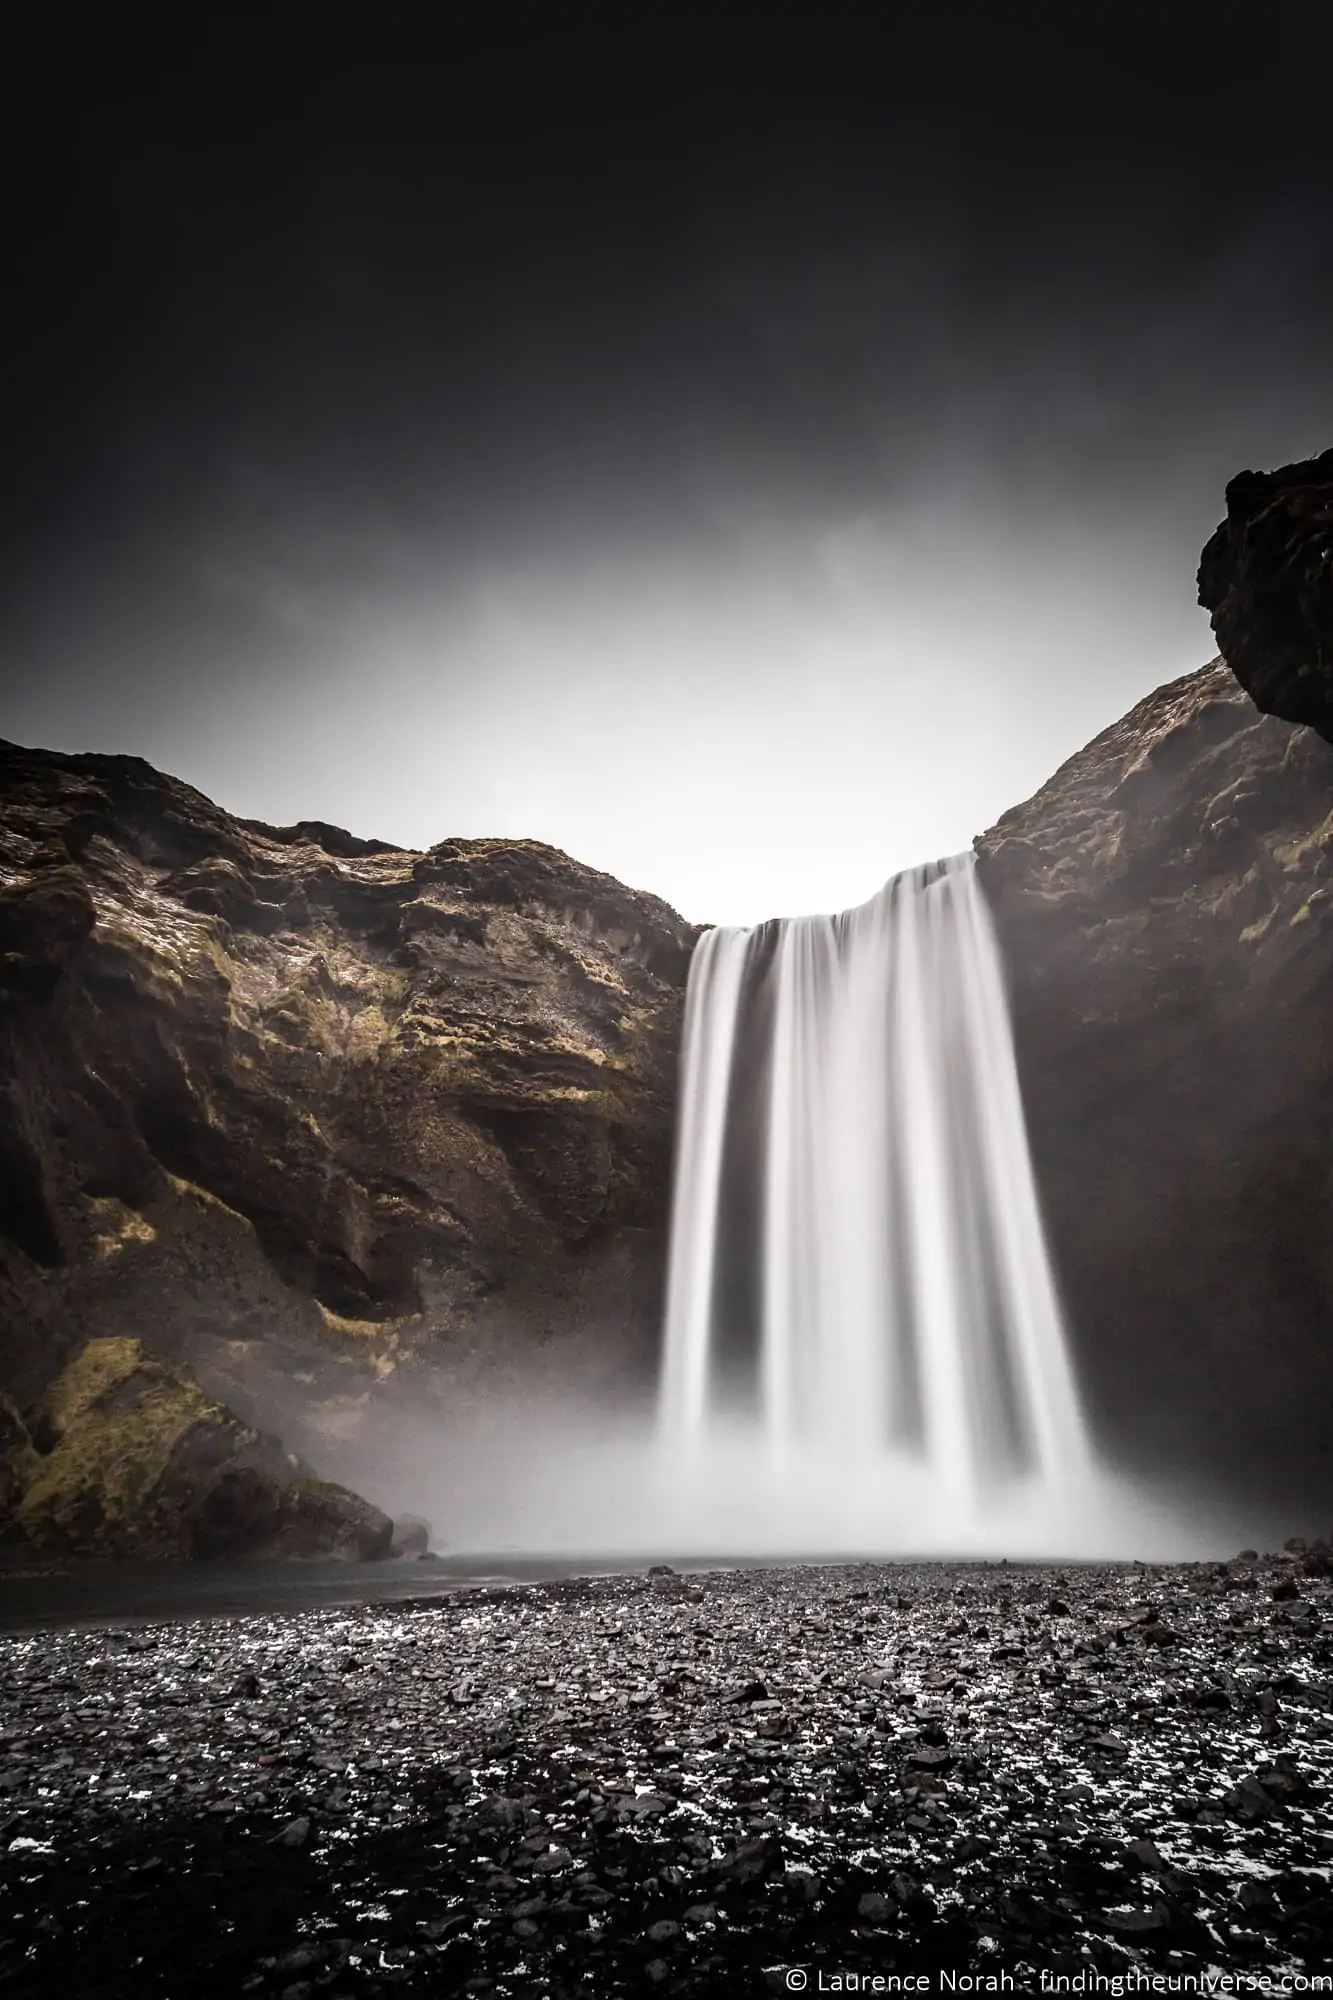
Skógafoss, southern Iceland. A 5-second exposure smooths the water into a sheet. The spray gets everywhere, so a lens cloth is essential kit. Canon EOS 6D, EF 17-40mm f/4L at 17mm, 5s, f/8, ISO 100.
Graduated ND
A graduated ND is half-dark, half-clear, and you slide it in front of the lens to darken just one part of the scene. The classic use is darkening a bright sky against a dark foreground so both sit within the sensor’s dynamic range, and checking the histogram rather than the LCD is how you confirm you’ve actually pulled it off; I walk through that read in my histogram guide. Modern cameras have enough dynamic range that you can recover a lot of this in editing instead, but a grad-ND still gives a cleaner result and saves editing time.
UV / clear protection
A UV or clear filter does almost nothing to your image but protects the front element of your lens. If you’re shooting near salt spray (Skógafoss, the Cornish coast, anywhere coastal in a wind), it’s a cheap insurance policy. I’ve replaced filters that were scratched or salt-pitted; replacing the front element of a 70-200 would have been an order of magnitude more expensive.
How to Find Landscape Photography Locations
Knowing how to set up the camera matters less than knowing where to point it. As a working travel photographer, I spend a lot of my preparation time finding locations rather than worrying about settings. The tools I keep coming back to:
Google Maps is where I do most of my pre-trip work. Satellite view, photos pinned to locations, and the ability to save points of interest mean I can plan a full day of landscape stops before I leave home. The Photographer’s Ephemeris (TPE) is the second tool I check on every trip. It shows sun and moon position for any spot on earth, on any date, and tells you exactly where the light will come from and at what time. Photo Pills is another recommended option if TPE isn’t available on your device.
Once I’m at the destination I look at postcards. When I get to a new place I head to a few postcard racks and any local photography galleries. Local photographers know the spots that work, and you’ll see compositions you’ve been chasing already nailed by someone with thirty years’ familiarity with the area. Searching for “[destination] photography locations” surfaces blogger-written guides too, and I’ve written a few myself in our photography location guides section.
Instagram and Flickr are good for inspiration, but be aware everyone is shooting from the same three spots. The well-known viewpoints exist for good reason, of course. Just don’t stop there if you have time to explore.
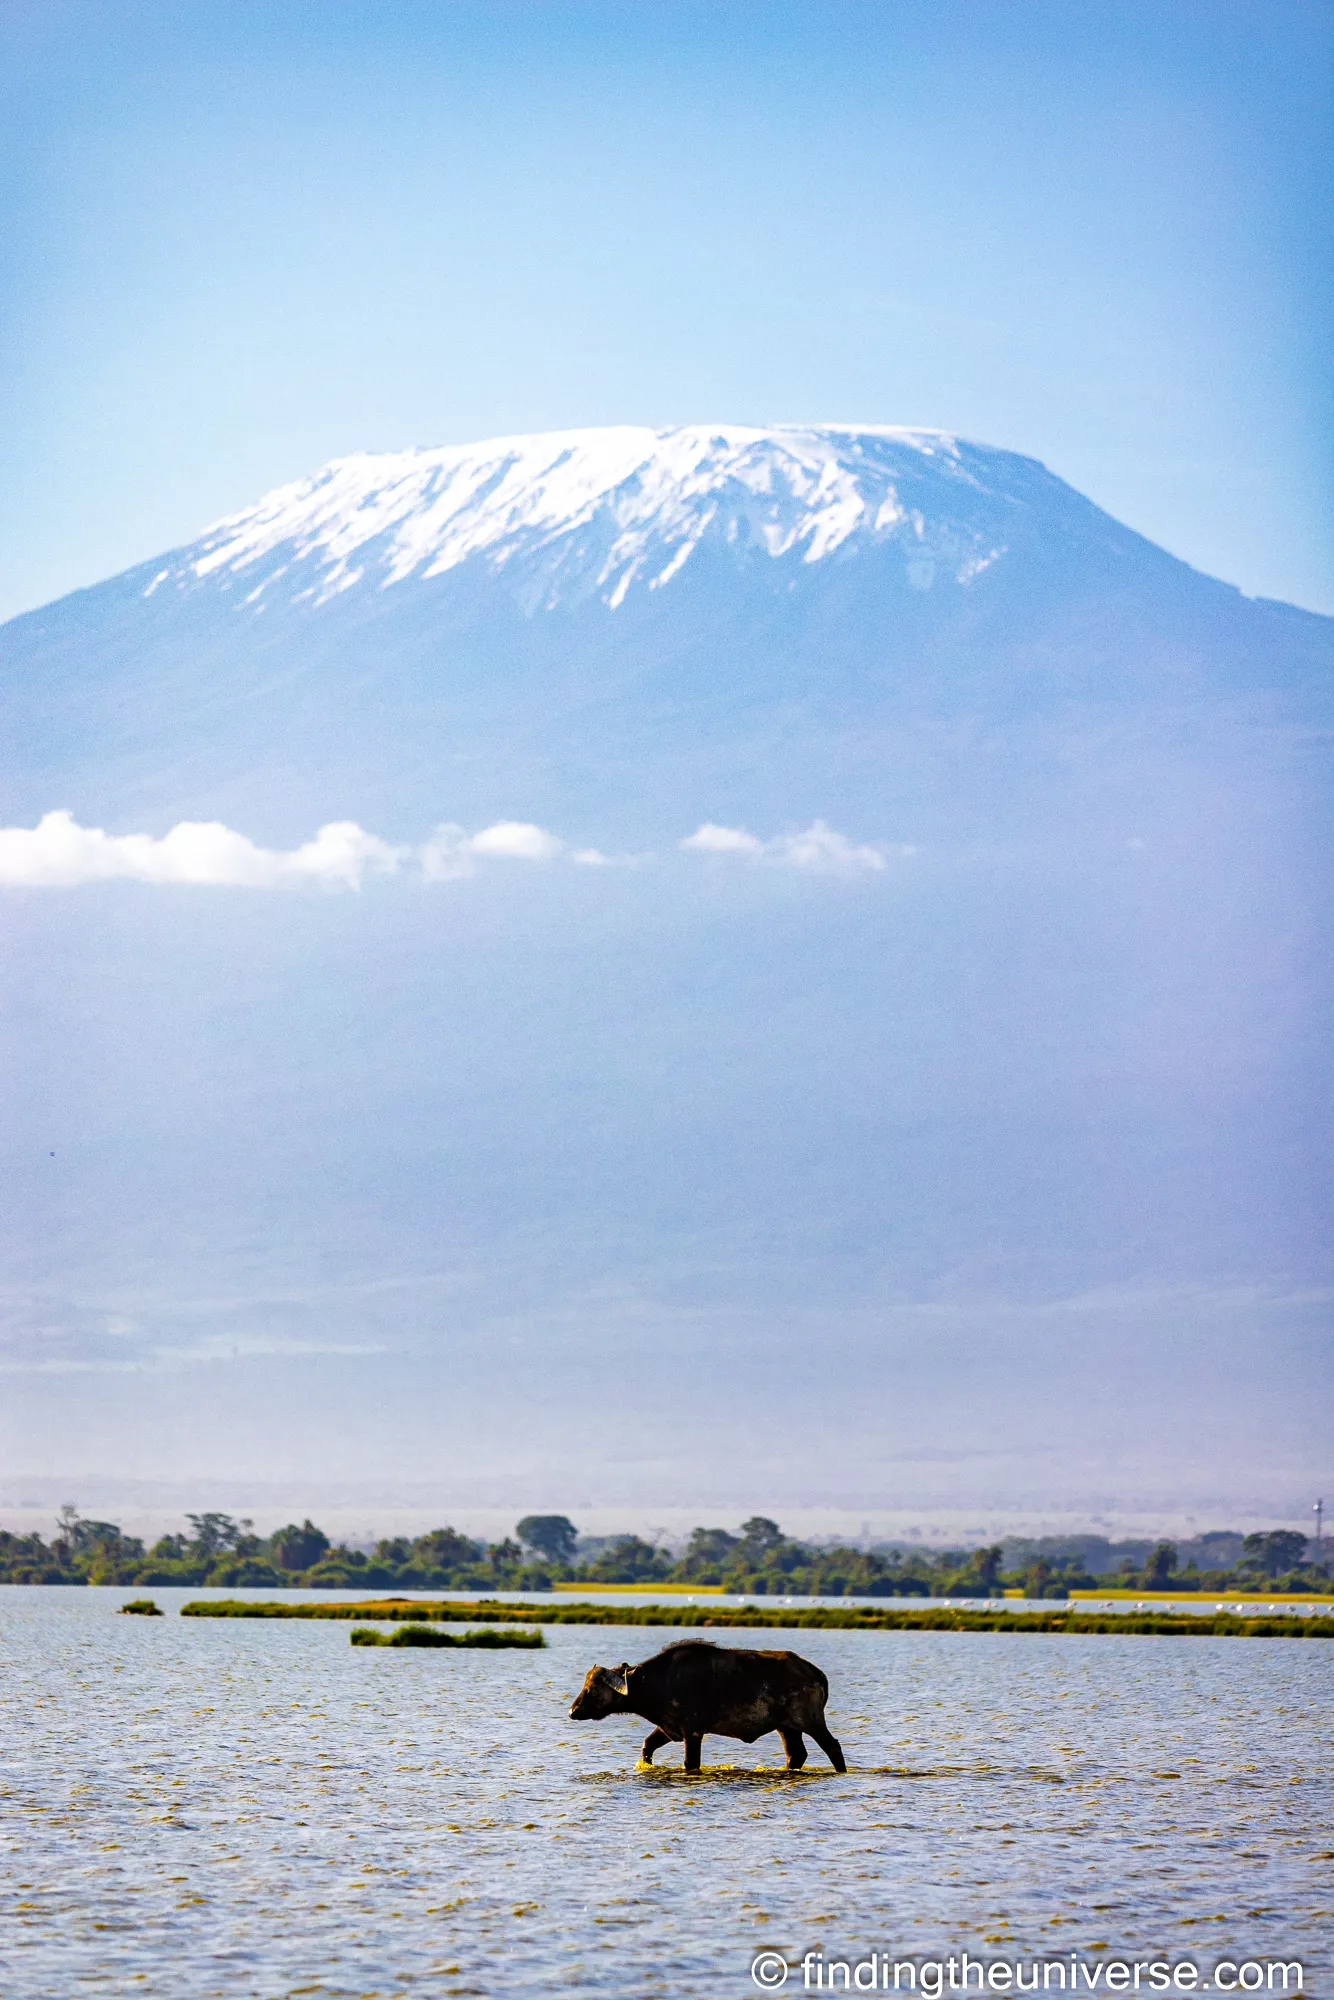
Mount Kilimanjaro from the Kenya-Tanzania border. Telephoto reach (with the 100-400) lets you isolate distant peaks from a great distance. Canon EOS R5, EF 100-400mm f/4.5-5.6L IS II at 214mm, 1/2500s, f/5.6, ISO 250.
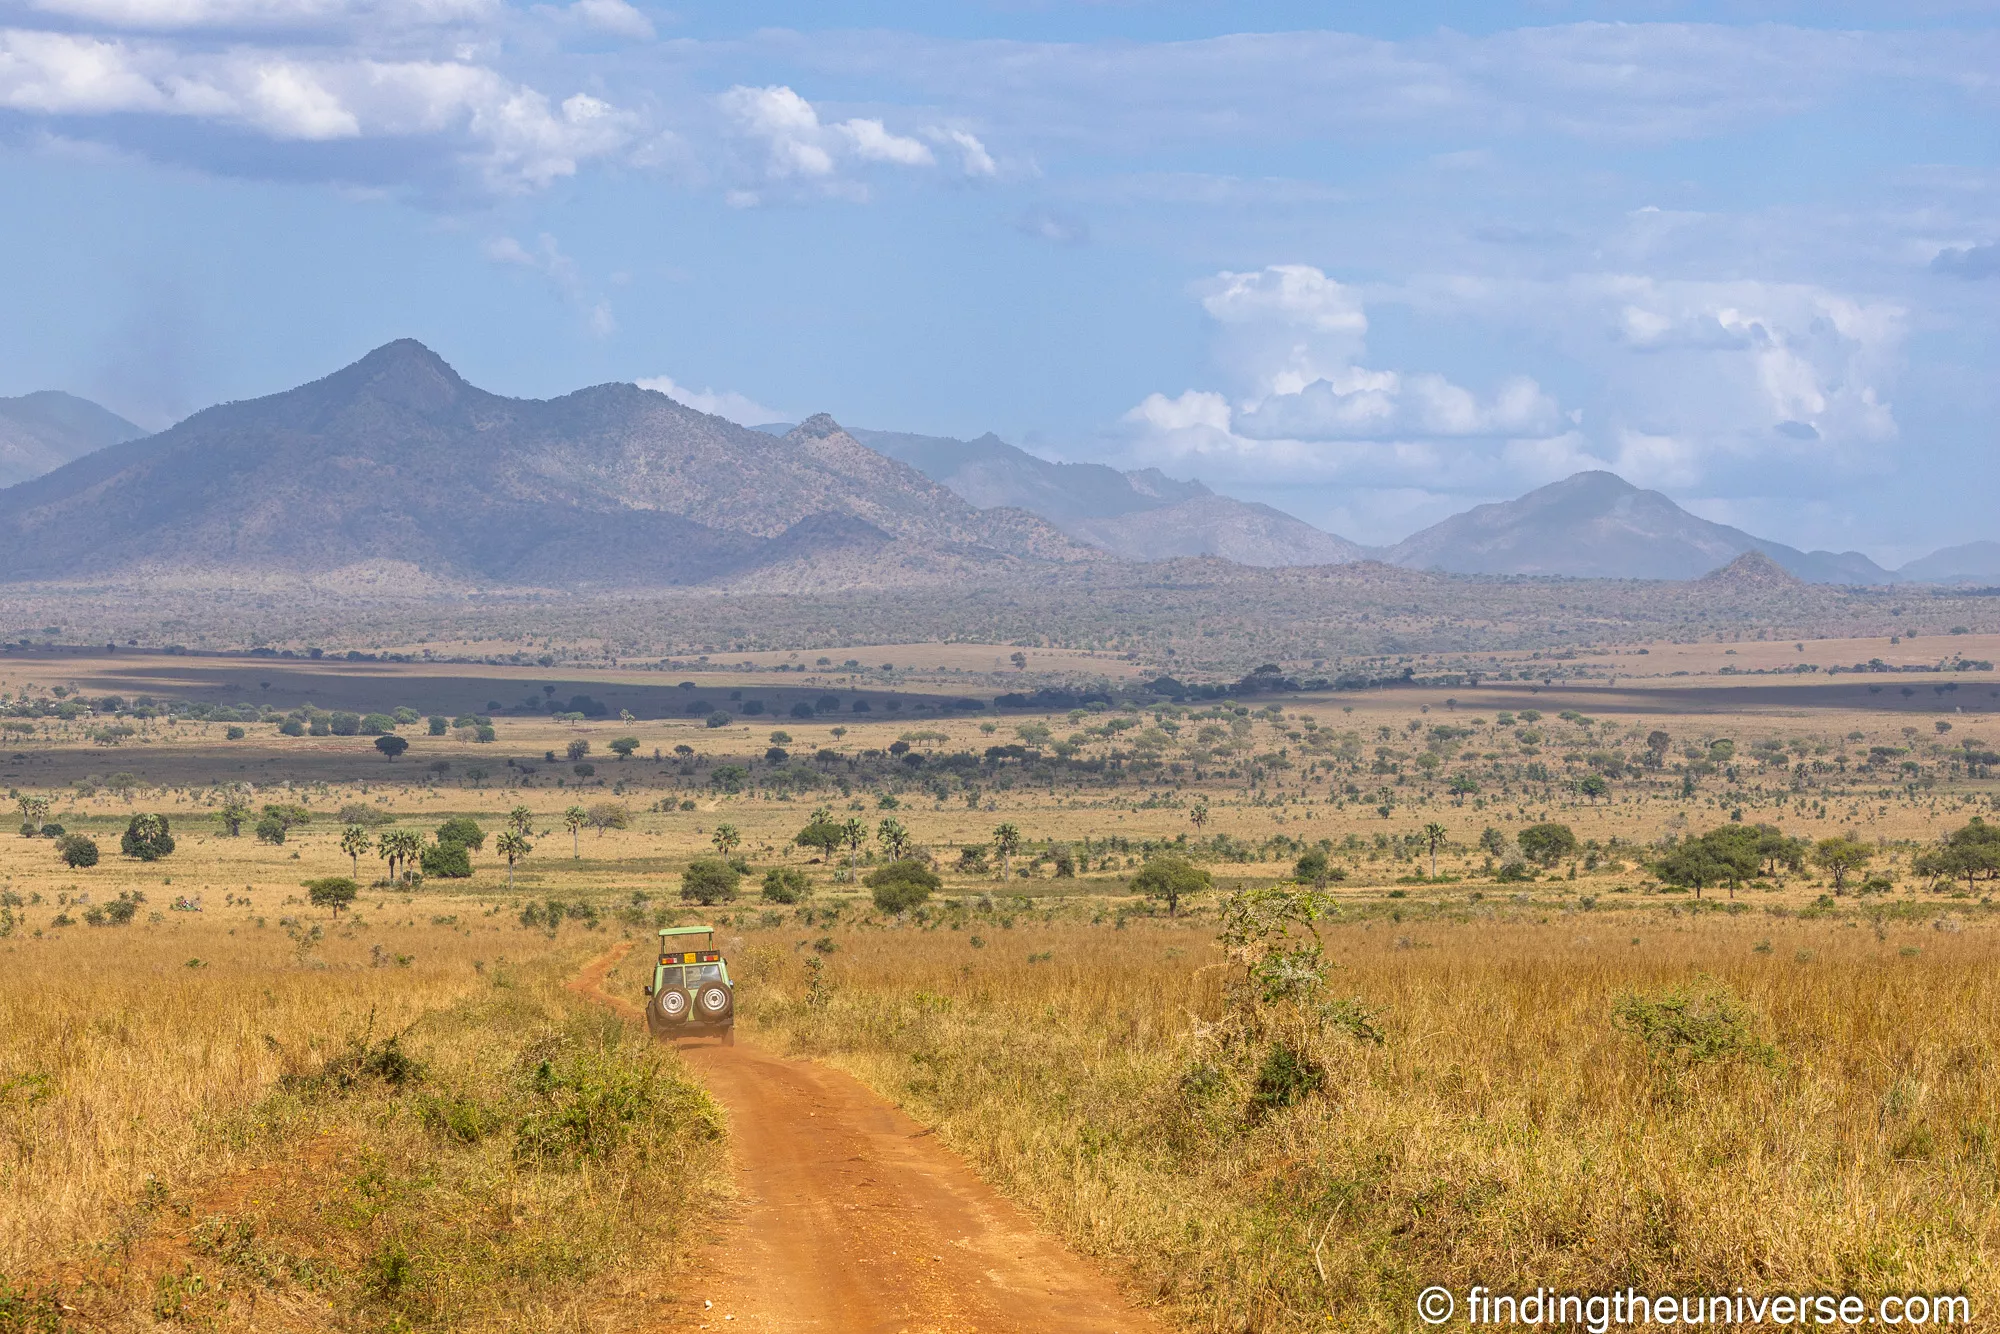
Kidepo Valley National Park, northeastern Uganda. Rolling savannah at golden hour. Canon EOS R5, EF 100-400mm f/4.5-5.6L IS II at 135mm, 1/500s, f/13, ISO 320.
For night-sky and aurora work specifically, dedicated apps like Aurora Forecast (for the Northern Lights) and PhotoPills (for star positions and Milky Way) are worth installing. See our guides to Northern Lights photography and astrophotography for the full kit and technique on each.
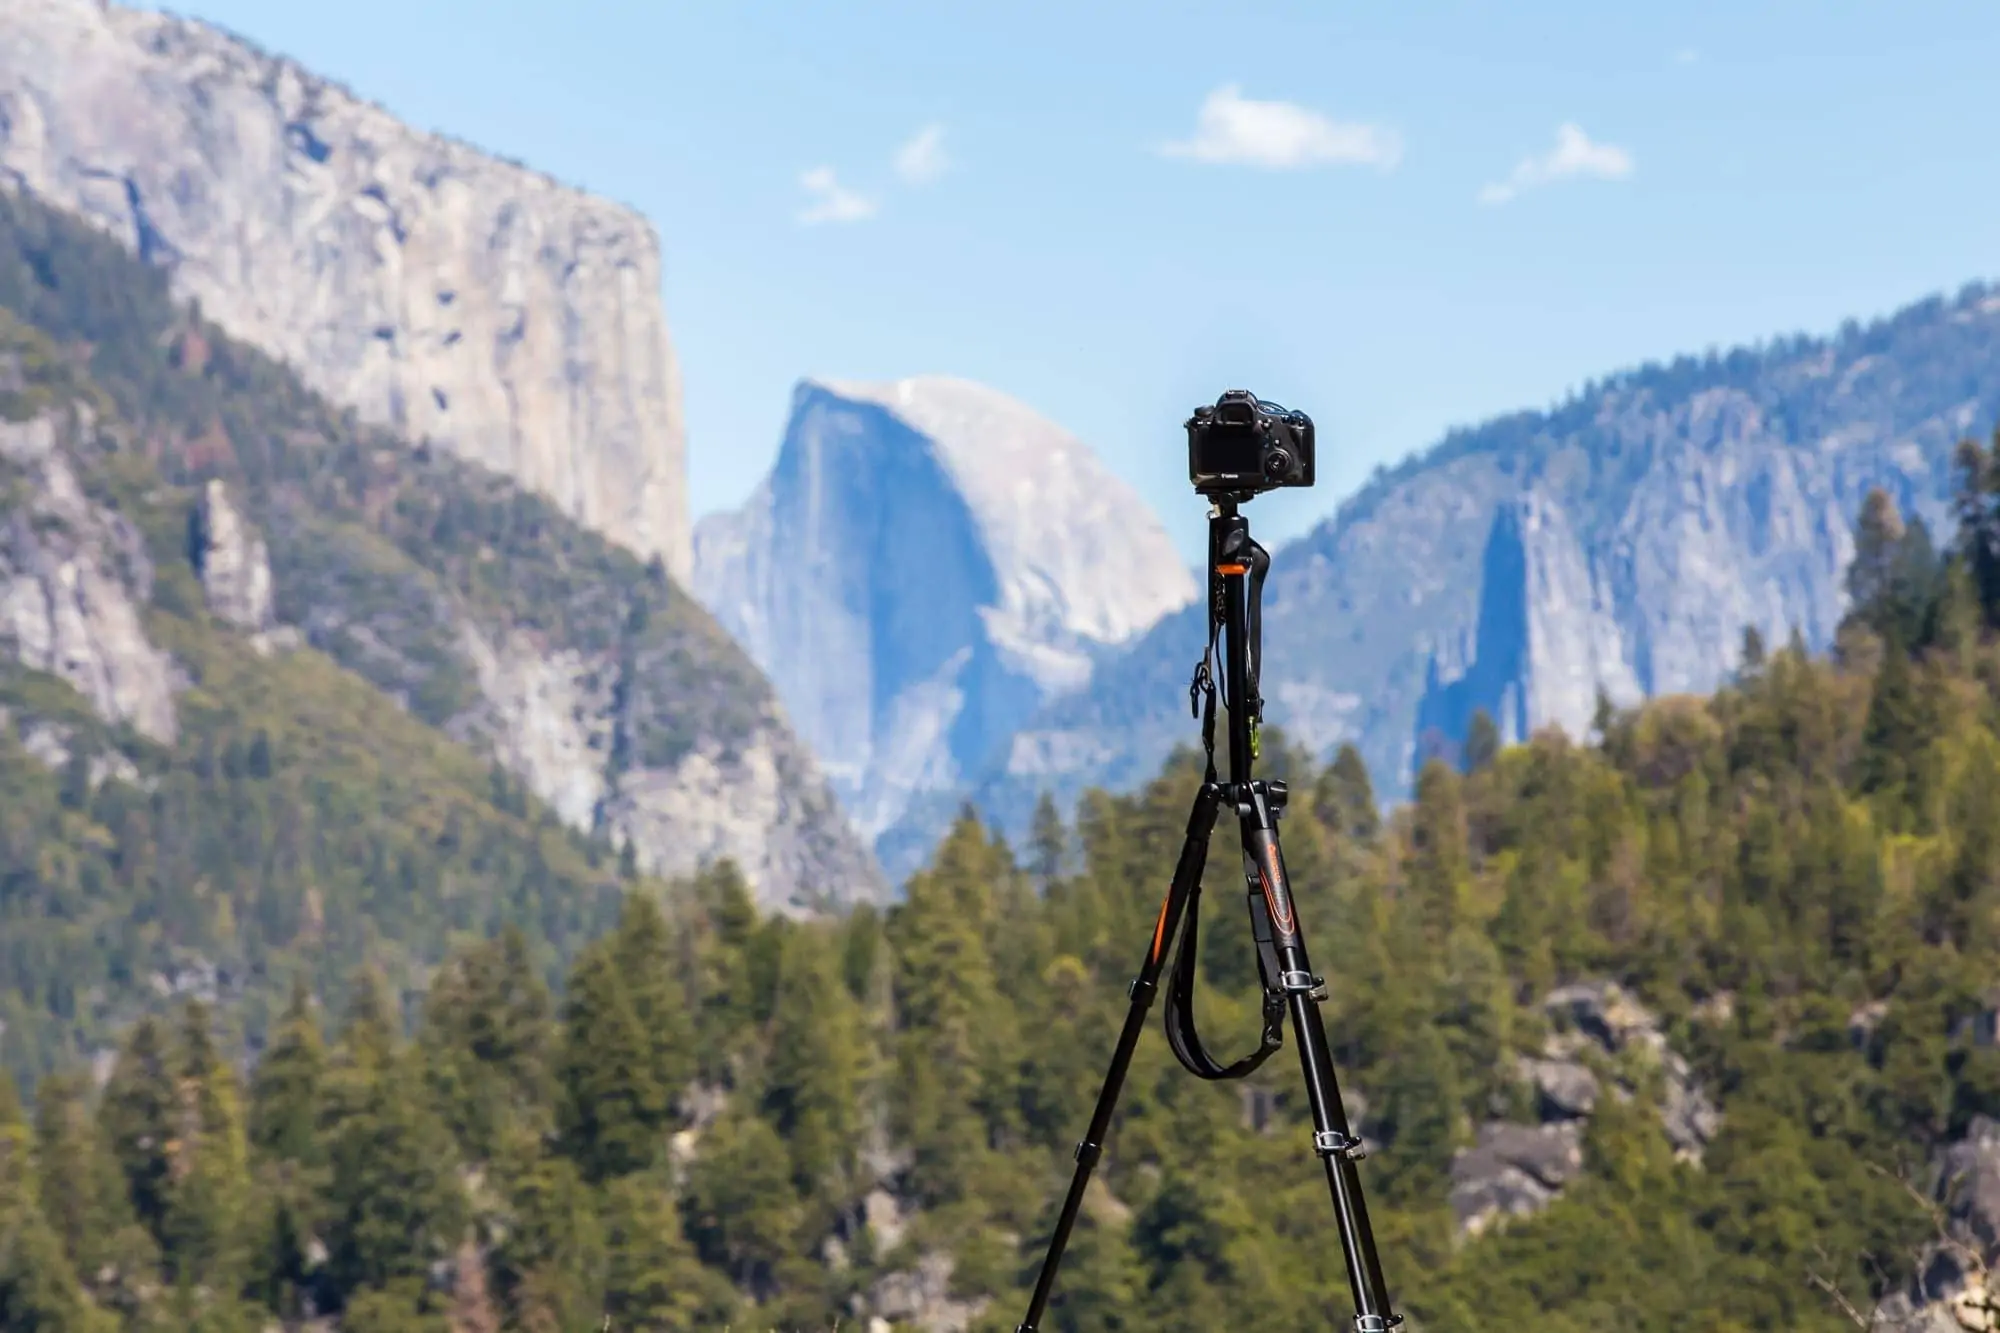
Camera and tripod set up at Tunnel View, Yosemite National Park, California. A reliable, accessible vantage point that delivers regardless of skill level. Sometimes the famous spots are famous for good reason.
Editing Your Landscape Photos
Editing is the final part of the workflow. The first thing to know about editing is that it can’t rescue a badly captured image. The compositional, exposure, and focus decisions made at the moment of capture are the load-bearing ones. Editing builds on top of that. It can take a good frame to great, but it can’t make a bad frame good.
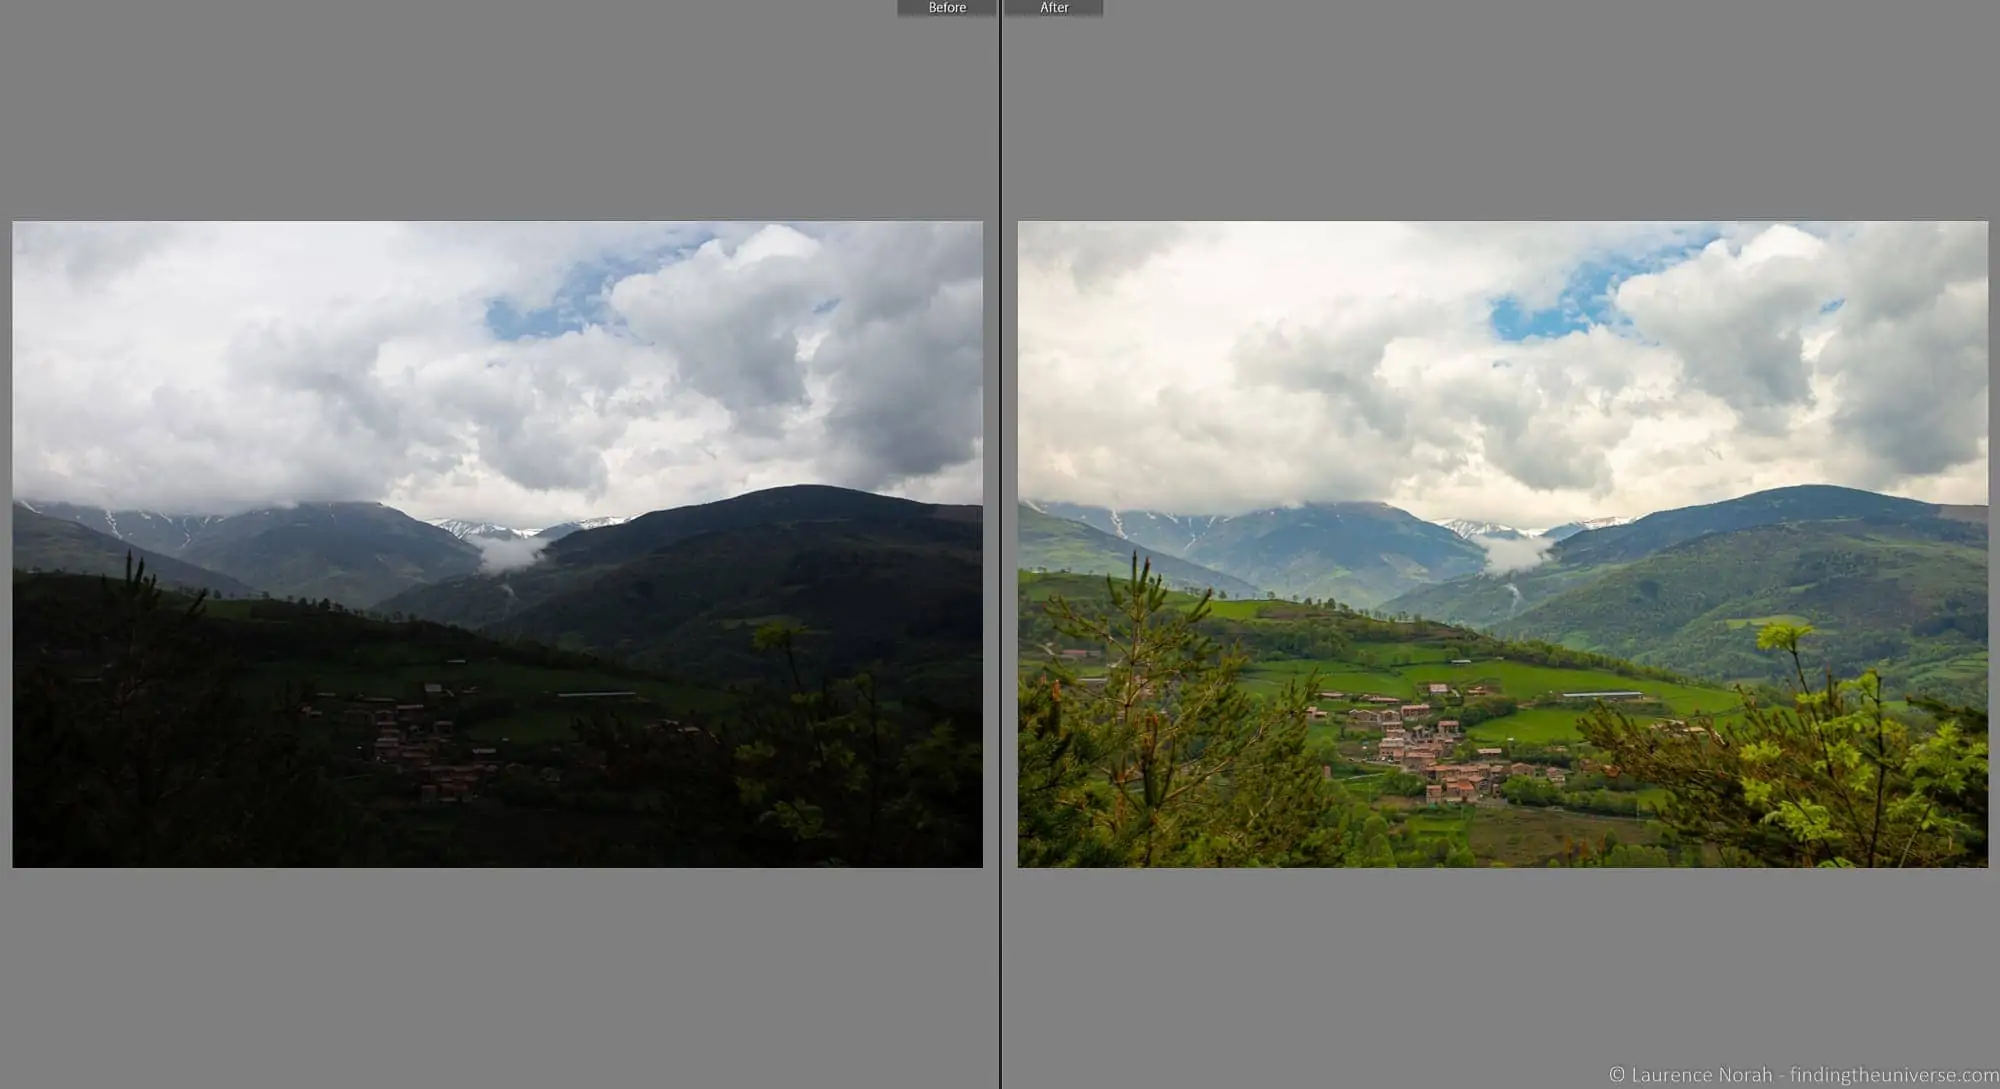
The second thing to know is that for landscape work, RAW files give you enormous editing latitude. The shadows in my Skógafoss shot are well below where the camera’s JPEG processing would have set them, but the RAW file held all the data and let me lift them in Lightroom without falling apart. That’s the kind of edit move that’s only possible from RAW.
The edits I make on most landscape frames
The specific moves vary by image, but most of my landscape edits include some combination of the following.
I start with a small global exposure tweak and a white-balance nudge towards the correct colour temperature for the scene (cooler for high-altitude or shaded scenes, warmer for golden hour). From there I’ll often lift the shadows by 30-50 to recover detail in dark foreground areas, particularly on backlit landscapes where the foreground falls into silhouette, and pull highlights down by 30-50 to recover detail in bright skies or sunlit peaks.
A modest dehaze boost cuts atmospheric fog and adds contrast to distant detail. It’s really easy to overdo, so a small amount goes a long way. I’ll often use Lightroom’s graduated filter (a digital version of the physical grad-ND) to darken bright skies independently of the foreground. Finally, selective clarity boosts on the main subject can pull it forward in the frame. Used sparingly, clarity sharpens texture; used heavily, it looks artificial.
For the software, Adobe Lightroom Classic is what I use, but there are plenty of capable alternatives. Our photo editing software guide covers paid and free options across desktop and mobile. Whatever you use, run it on a calibrated monitor. See our monitor calibration guide for the why and the how. Editing on an uncalibrated screen is editing blind.
Practice
The highest-leverage thing you can do to improve your landscape photography is take more landscape photos. Settings become muscle memory. Composition decisions get faster. You start seeing potential frames in places you’d previously walked past.
Take the camera with you when you walk the dog, when you go for coffee, when you take the kids to the park. The camera that lives on your shoulder gets used. The camera that lives in a cupboard between trips doesn’t.
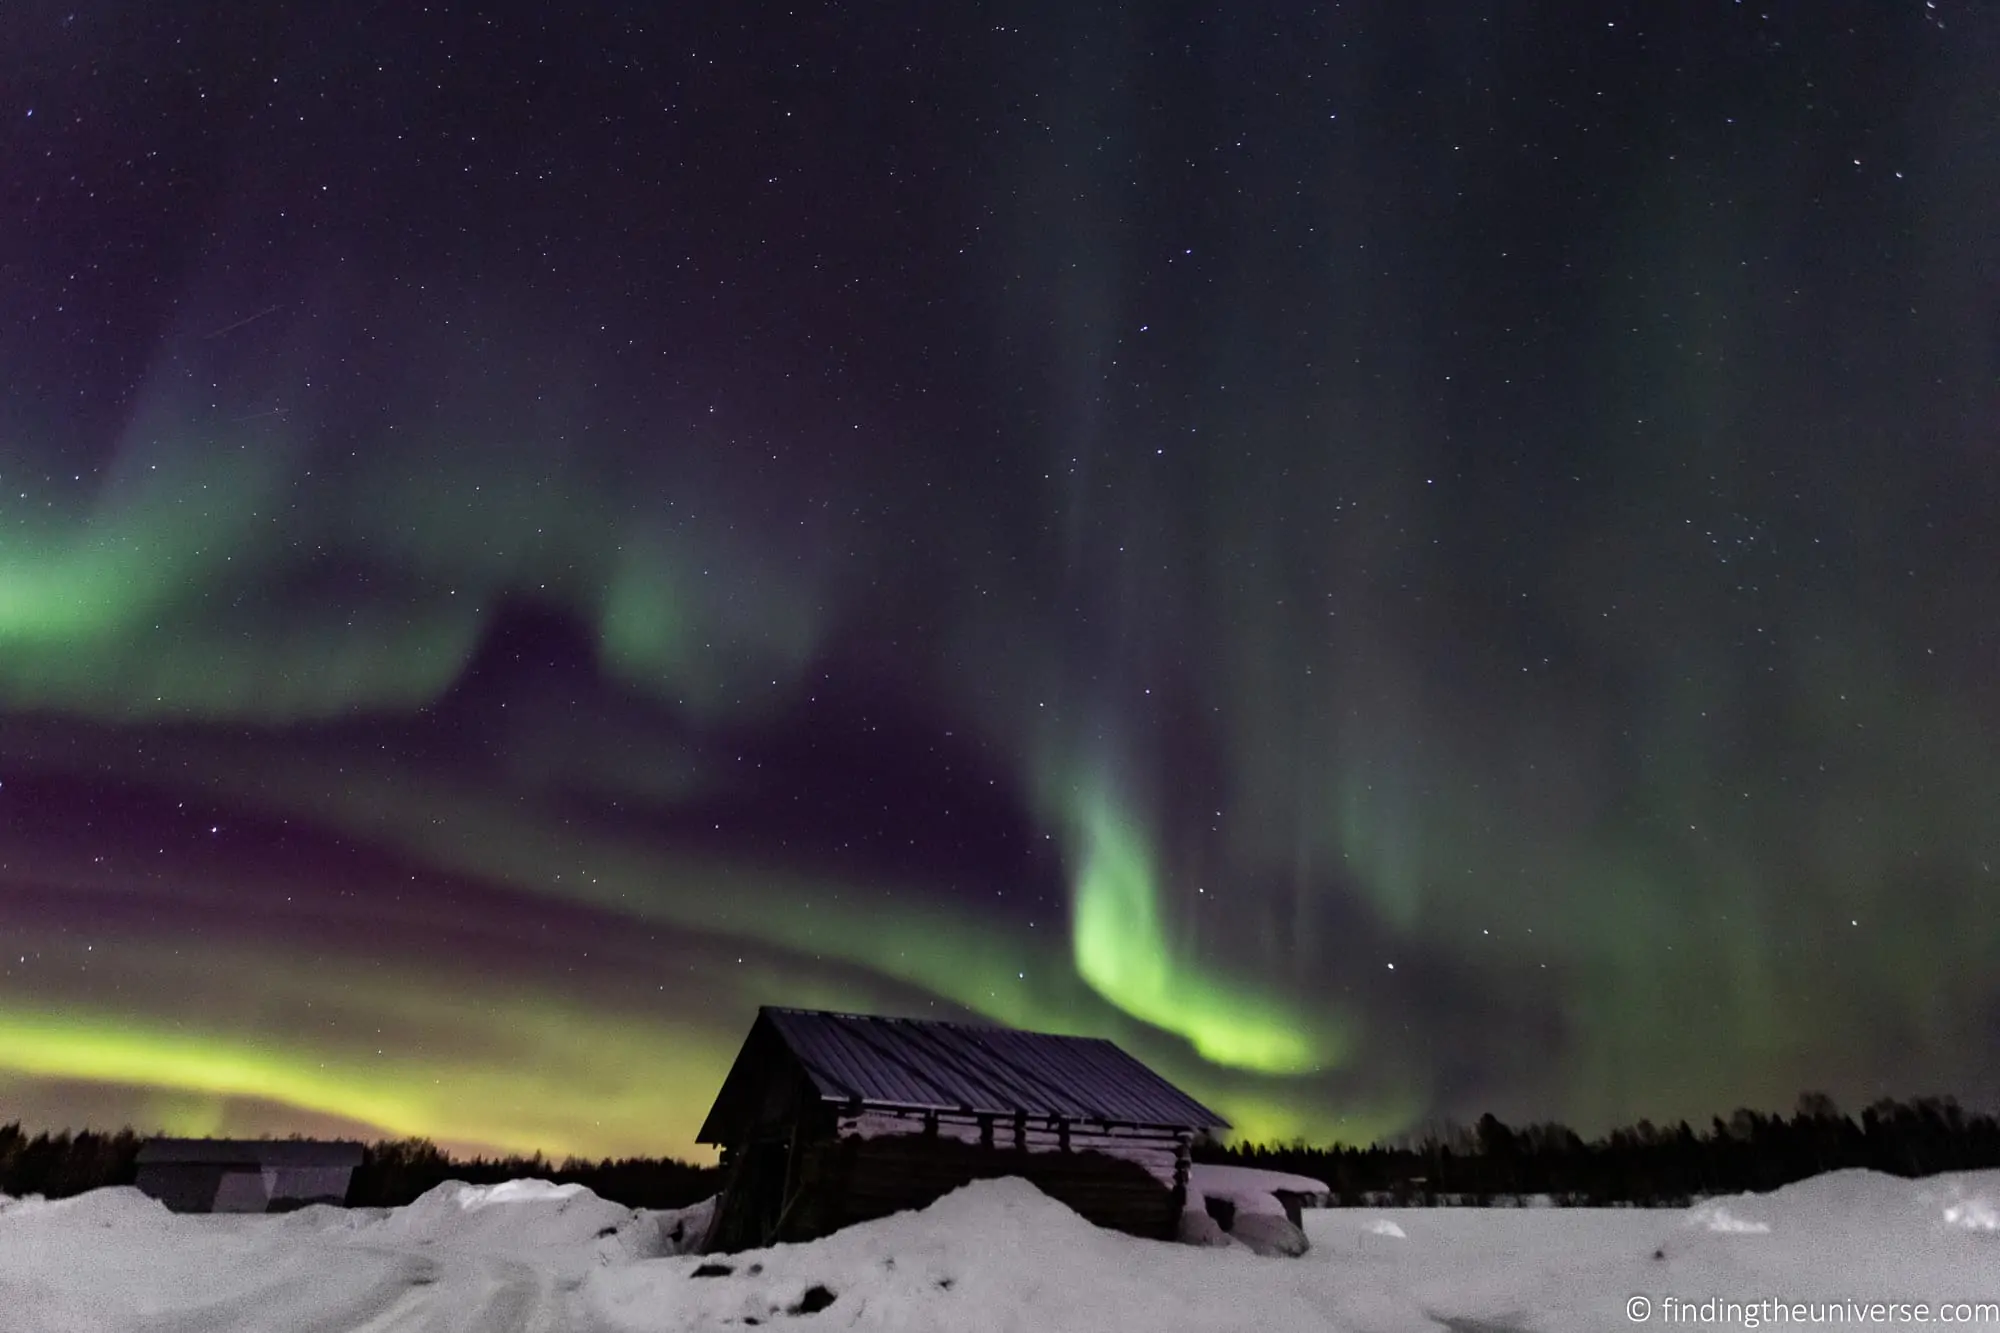
Northern Lights over Tornio, northern Finland, near the Swedish border. Cold fingers, frozen tripod legs, and one of the longer exposures you can comfortably handhold the focus ring through. Canon EOS 6D, EF 17-40mm f/4L at 19mm, 8s, f/5, ISO 3200.
If you’d like a structured way to practise with feedback, my online travel photography course includes assignments and reviews. But the most important thing is just to keep shooting.
Frequently Asked Questions
What aperture should I use for landscape photography?
f/8 to f/11 covers most landscape work. It gives you enough depth of field to keep the whole scene in focus, and it’s where most lenses are at their sharpest. Stop down to f/16 if you have significant near-foreground interest you need to keep sharp; avoid f/22 unless you specifically want a longer exposure, because diffraction softens the image at very narrow apertures.
What ISO should I use for landscape photography?
ISO 100 (or your camera’s lowest native ISO) is the answer most of the time. Landscapes are usually shot on a tripod, so you can compensate for the low ISO with a longer shutter speed without introducing motion blur.
The exception is night photography. For aurora and astrophotography I run ISO 3200 or higher. Modern full-frame sensors handle this cleanly enough that the noise penalty is worth the shutter-speed savings.
Do I need a tripod for landscape photography?
If you want to shoot at low ISO and narrow aperture (which is the recipe for clean, deep-focus landscapes), then yes. The tripod removes the shutter-speed constraint and lets you choose your settings freely.
You can produce decent landscapes handheld in good light, particularly with a wider aperture or higher ISO, but you’ll be fighting the camera. Long-exposure work (silky waterfalls, star trails) is pretty much impossible without one.
What’s the best lens for landscape photography?
If you can only have one, a wide-angle zoom in the 16-35mm full-frame range. That covers everything from sweeping vistas to tighter compositions. My personal pick is the Canon EF 16-35mm f/4L IS. It’s light, sharp, and weather-sealed.
If you can have two, add a 70-200mm f/2.8 or f/4. Telephoto landscapes (compressing distant elements together, isolating peaks, tight detail shots) are a different visual language to wide-angle and worth having access to.
What’s the best time of day to shoot landscape photos?
Sunrise and sunset are the high-percentage windows. The light is warm, the angle is low, and shadows give the scene structure and depth. The hour before sunrise (blue hour) and the hour after sunset are also useful, particularly for cityscapes and reflective water.
Midday flat light is harder to make interesting, but not impossible. Overcast days are good for forests and waterfalls. In winter at high latitudes, the sun stays low all day, so the rule about midday doesn’t apply.
Do I need a full-frame camera for landscape photography?
No. APS-C and Micro Four Thirds cameras can produce excellent landscape images. Full-frame sensors have a slight edge in dynamic range and high-ISO performance, but for daylight landscape work shot at base ISO on a tripod, the difference is marginal.
What matters more is having a wide-angle lens you actually carry, a tripod you actually use, and the discipline to be out at the right time of day.
How do I stop my landscape photos looking flat?
Three usual culprits. First, time of day. Midday flat light produces flat images, so shoot at golden hour. Second, lack of foreground interest. A landscape with nothing in the immediate foreground often feels two-dimensional, so add a rock, a tree, a path. Third, post-processing. Most camera JPEGs come out muted, so a small contrast and clarity boost in editing, plus targeted shadow and highlight adjustments, gives the image more dimensionality without looking processed.
Further Reading
- The full exposure triangle guide for the relationship between aperture, ISO, and shutter speed.
- Our composition guide for a deeper look at framing, balance, and visual flow.
- How to shoot long exposures, with technique and gear.
- Our guides to using a DSLR, a mirrorless camera, and a compact camera.
- The best photo editing software for working through your RAW files.
- The best laptops for photo editing if you’re shopping for the hardware to run that software on.
- Our best travel cameras guide, plus specific guides for the best cameras for hiking and backpacking, the best compact cameras, the best bridge cameras, the best mirrorless cameras, and the best DSLR cameras.
- If budget is tight, see our guide to buying used cameras and gear.
- Specific scenarios: Northern Lights photography, astrophotography, fireworks photography, snow photography, and cold-weather photography.
- For a structured course, see my online travel photography course.
If you have any questions, drop them in the comments and I’ll get back to you.

Leave a Reply